
- Wet Filament: Prevention, Symptoms & Drying - July 18, 2024
- Sovol SV08 – Best PrusaSlicer Settings & Profile - June 26, 2024
- Sovol SV08 – Best Orca Slicer Settings & Profile - June 26, 2024
Disclosure: Links marked with * are Affiliate Links. I earn from qualifying purchases if you decide to make a purchase through these links – at no additional cost for you!
With the right PrusaSlicer settings, the Qidi Tech Q1 Pro can deliver perfect printing results.
In this article, I’ll share my optimized PrusaSlicer settings that will give you a solid foundation for excellent print quality with the Qidi Tech Q1 Pro. I’ll also explain how to create a new 3D printer profile for this specific printer.
But it would be much easier to insert a pre-made config file in PrusaSlicer that contains all the necessary settings, including the correct acceleration values. You can download this config file via the link below to start immediately with the optimal settings for your Qidi Tech Q1 Pro.

Calibrated PrusaSlicer Profile
For optimal print quality with minimal effort, you can download my calibrated PrusaSlicer profile for this 3D printer and import it directly into PrusaSlicer. In it, all settings are perfectly adapted to this printer, like for the accelerations, jerk, supports and the first layer.
Table of Contents:
Correct Printer Settings for the Qidi Tech Q1 Pro in PrusaSlicer
A PrusaSlicer profile consists of print settings, filament settings and printer settings.
First, the printer settings must be defined. An empty profile serves as a template for this.
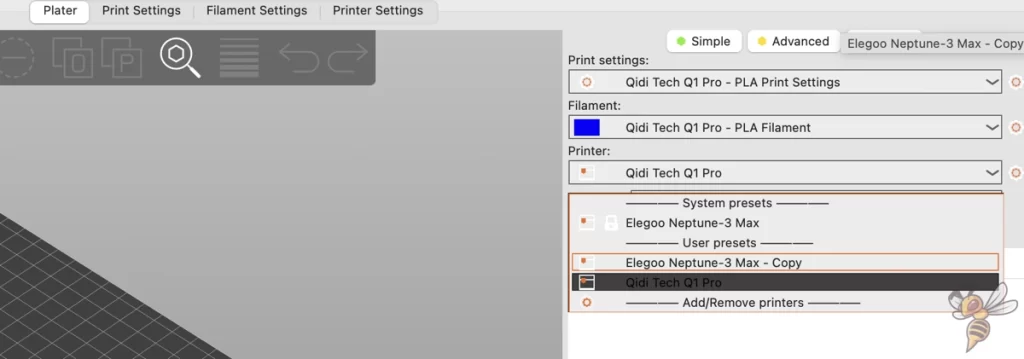
To add a 3D printer in PrusaSlicer, first click on the current printer to select a new one. Then click on “Add/Remove printers”.
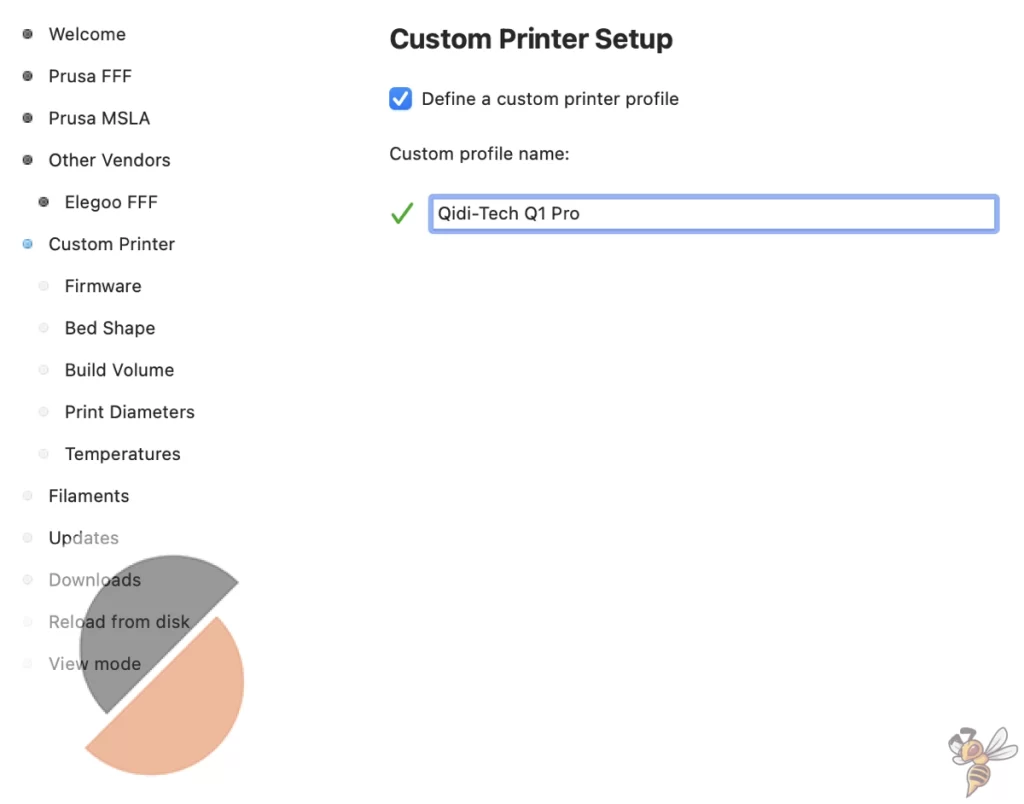
From the large selection of printers, select “Custom Printer” in the menu on the left. Check the box “Define a custom printer profile” and name it.
Next, you need to define the following values:
- Firmware: Klipper
- Bed Shape & Size: 240 × 240 mm
- Max print height: 240 mm
- Nozzle diameter: 0.4 mm
- Filament diameter: 1.75 mm
- Extrusion temperature: 210 °C
- Bed temperature: 60 °C
Then select the filaments for which standard values are to be generated.
A profile has now been created for the Qidi Tech Q1 Pro, with default settings that for the most part do not fit well. The first thing we will do is adjust the printer settings.
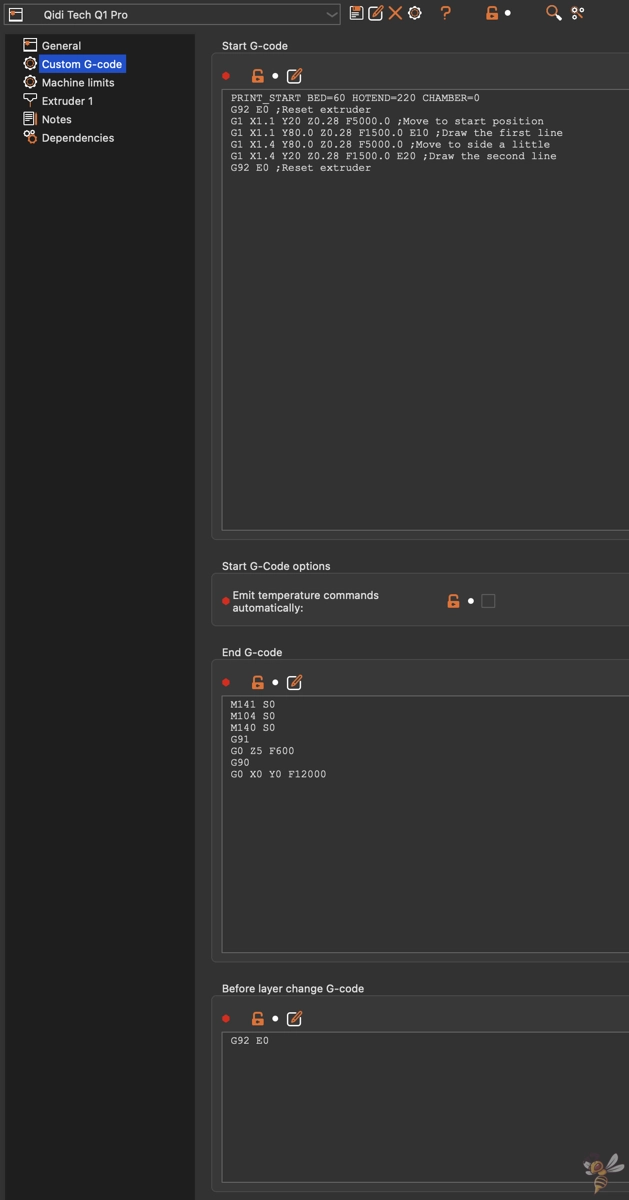
A Start and End G-code on a 3D printer are special sets of commands that are executed at the beginning and end of each print.
The Start G-code is executed automatically before the actual start of printing and is used to prepare the printer and the print bed. This includes tasks such as heating the extruder and the print bed to the desired temperatures, aligning the print axis, resetting the position to the starting point and possibly automatic bed leveling.
The End G-code is executed after completion of the printing process and takes care of the post-processing. This includes lowering the temperatures of the extruder and print bed, retracting the extruder to prevent further filament from escaping, and moving the print bed or extruder to a park position. This ensures that the printer is shut down properly and the finished print can be easily removed.
The correct filament settings for the Qidi Tech Q1 Pro in PrusaSlicer

The red expert mode should be activated for the visibility of the settings in order to be able to see all settings.
PLA Settings
These are the correct PrusaSlicer settings for printing PLA filament with the Qidi Tech Q1 Pro:
- Print temperature: 210 °C
- Print bed temperature: 60 °C
- Print speed: 300 mm/s
- Retraction: 0.8 mm with 30 mm/s
- Cooling: 100 %
The Qidi Tech Q1 Pro can print PLA filament perfectly without much calibration effort.
With the above settings, you should achieve good results with most PLA filaments. If you detect stringing, you should calibrate the temperature and retraction to your filament. I will show you how to do this in this detailed guide.
ABS Settings
These are the correct PrusaSlicer settings for printing ABS filament with the Qidi Tech Q1 Pro:
- Print temperature: 250 °C
- Print bed temperature: 100 °C
- Print volume temperature: 45 °C
- Print speed: 300 mm/s
- Retraction: 0.8 mm at 30 mm/s
- Cooling: 30 %
ABS filament, known for its strength and heat resistance, often poses a challenge in 3D printing, especially due to its tendency to warp.
However, the Qidi Tech Q1 Pro, equipped with a closed and even heatable enclosure, offers ideal conditions for printing with ABS. The heatable enclosure helps to maintain a constant temperature during the printing process, which minimizes warping of the material and improves adhesion between the layers.
Unfortunately, it is not easily possible to set the temperature of the printing chamber directly in the PrusaSlicer. However, the desired temperature of the printing chamber can be set via the Start G-Code to create optimal conditions for ABS printing.
Thanks to these features, even large objects made of ABS are no problem for the Qidi Tech Q1 Pro. The combination of the right settings and the heatable enclosure makes it possible to achieve high-quality and dimensionally accurate prints with ABS without having to worry about common problems such as warping or poor layer adhesion.
TPU Settings
These are the correct PrusaSlicer settings for printing TPU filament with the Qidi Tech Q1 Pro:
- Print temperature: 230 °C
- Print bed temperature: 60 °C
- Print speed: 150 mm/s
- Retraction: 1.0 mm with 30 mm/s
- Cooling: 100 %
The Qidi Tech Q1 Pro is equipped with a direct drive extruder, which makes it particularly suitable for printing with flexible filaments such as TPU. The short distance between the extruder gearbox and the nozzle minimizes the risk of the flexible material getting stuck, which can occur more frequently with Bowden extruders.
Flexible filaments require special handling, and the Qidi Tech Q1 Pro masters this challenge with flying colors. When processing TPU, some settings in the PrusaSlicer are particularly important to ensure high print quality. These include:
- Selecting a slower print speed to increase the precision of the print and minimize the risk of tangles and misprints.
- Carefully calibrating the retraction settings to prevent stringing, which can occur more easily with flexible materials.
- Use high cooling to ensure that each layer cools and stabilizes quickly enough before the next layer is applied.
PETG Settings
These are the correct PrusaSlicer settings for printing PETG filament with the Qidi Tech Q1 Pro:
- Print temperature: 240 °C
- Print bed temperature: 80 °C
- Print speed: 200 mm/s
- Retraction: 1.0 mm at 30 mm/s
- Cooling: 60 %
PETG is a popular filament because of its robustness and chemical resistance, but has a strong tendency to string. This means that fine threads of the material can form between the parts of the print if the retraction settings are not optimal.
Therefore, retraction and print temperature must be carefully calibrated to minimize this effect and achieve clean, sharp prints.
Another important aspect of printing with PETG is the storage of the filament. PETG easily absorbs moisture from the air, which can lead to stringing, bubbling, poor layer adhesion and a generally reduced print quality. Dry storage is therefore a must to ensure that the filament remains in the best condition and delivers optimal printing results.
Correct Print Settings for the Qidi Tech Q1 Pro in PrusaSlicer
Layers and Perimeter
- Layer height: 0.1-0.3 mm
- Perimeters: 2-5
- Solid layers top/bottom: 4
These settings play a crucial role in the strength and appearance of your 3D prints.
The layer height influences the print quality and speed: lower values result in finer details, while higher values print faster.
Perimeters give the object structure and stability; more perimeters mean a more robust wall.
The number of solid layers at the top and bottom determines how well the top and bottom of your prints are covered. A higher number of solid layers provides a smoother surface and better support structures, especially for overhanging parts.
Infill
- Infill density: 10%
- Infill pattern: Honeycomb
These specifications are standard values that work well for most projects. They offer a balanced compromise between material consumption, printing time and strength of the object.
For decorative objects where strength does not play a major role, you can reduce the infill density further to save material and printing time.
For objects that can withstand mechanical stress, on the other hand, you should increase the infill density to ensure the necessary stability and durability. An infill density of 20% to 50% is often used for parts that need to withstand a certain amount of stress. The adjustment of the settings ultimately depends on the specific application and the requirements of the finished object.
Skirt and Brim
- Loops: 1
- Distance from brim/object: 6 mm
- Skirt height: 1 layer
- Draft shield: Deactivated
- Brim type: No brim
A skirt is a line that is printed around the object without touching it. It is used to stabilize the flow of filament at the beginning of the printing process and to ensure that the nozzle is properly filled before the actual printing begins. The skirt also helps to detect potential problems with the first layer at an early stage without affecting the object itself.
A brim, on the other hand, is an extension of the first layers of the object, which are directly connected to the object and are intended to improve its adhesion to the print bed.
However, for most projects using the Qidi Tech Q1 Pro, a brim is not necessary as the print bed adhesion to the PEI print bed is excellent.
Support Material
- Generate support material: Depending on the project
- Auto generated supports: Yes
- Style: Organic
- Top contact Z distance: 0.2 mm
- Support on build plate only: Yes
Supports are essential for printing models with overhangs or complex geometries that would not be realizable without additional support during the printing process.
The “auto generated supports” option makes this process easier by allowing PrusaSlicer to automatically decide where support material is required based on the object’s design and overhangs.
The style: Organic is particularly effective as it creates an easily removable support material that still provides sufficient support for the model.
The top contact Z distance of 0.2 mm provides a small gap between the support material and the actual print object, making it easier to remove the support material after printing without damaging the surface of the object.
With the setting “Support on build plate only“, the support material is only created on the base of the print bed and not on the model itself. This is helpful to save material and minimize post-processing.
Speed
- Perimeters: 300 mm/s
- External perimeters: 200 mm/s
- Support material: 150 mm/s
- First layer speed: 20 mm/s
Although the Qidi Tech Q1 Pro can theoretically reach speeds of up to 500 mm/s, the best results are achieved with the values given above.
The reduced print speed of the first layer of a maximum of 20 mm/s is particularly important. This lower speed significantly increases adhesion to the print bed as it gives the filament more time to heat up and bond firmly to the bed, which is essential for avoiding warping and achieving a successful print start.
Advanced
- Default extrusion width: 0.42 mm
- Infill/perimeters overlap: 15%
The default extrusion width of 0.42 mm optimizes the accuracy of the printed walls and ensures a solid structure of your objects by providing a good balance between detail and mechanical strength.
The infill/perimeters overlap of 15% improves the bond between the infill and the outer walls of your print. This increases the structural integrity of the printed object by ensuring that the inner structures are firmly bonded to the outer walls without causing over-extrusion at the interfaces. Reduce this value if the infill shows through from the outside.
Summary
I hope that with these settings, you get a good start with your Qidi Tech Q1 Pro in PrusaSlicer. This article has covered the most important PrusaSlicer settings for the Qidi Tech Q1 Pro to help you get the most out of your 3D printer.
For easy access and integration of these settings into your projects, you can find the full profile with all the necessary customizations in the link below.
Calibrated PrusaSlicer Profile
For optimal print quality with minimal effort, you can download my calibrated PrusaSlicer profile for this 3D printer and import it directly into PrusaSlicer. In it, all settings are perfectly adapted to this printer, like for the accelerations, jerk, supports and the first layer.
Disclosure: This website is the property of Martin Lütkemeyer and is operated by Martin Lütkemeyer. Martin Lütkemeyer is a member of the Amazon Services LLC and other Affiliate Programs. These are affiliate advertising programs designed to enable websites to earn advertising revenue through advertising and linking to Amazon.com and others. Links marked with * are affiliate links.
