- Wet Filament: Prevention, Symptoms & Drying - July 18, 2024
- Sovol SV08 – Best PrusaSlicer Settings & Profile - June 26, 2024
- Sovol SV08 – Best Orca Slicer Settings & Profile - June 26, 2024
Disclosure: Links marked with * are Affiliate Links. I earn from qualifying purchases if you decide to make a purchase through these links – at no additional cost for you!
Finding the right Cura profile is important for accurate and successful 3D printing. The Mingda Magician X is mainly used with Cura and the manufacturer recommends this slicer.
To create a good Cura profile for the Magician X, the machine parameters and the individual print settings must be defined. These differ depending on which filament is used. A calibration of the most important settings perfects the profile.
There are many pre-made default profiles in Cura, but sometimes not for the exact printer you are using. Especially in the first few weeks or months after the release of a new 3D printer, there are no default profiles – sometimes never. I’ve done extensive hands-on testing of the Magician X and have perfected the Cura profile for PLA, ABS and TPU. In this article, you will learn the values for the most important settings for the Magician X and how you can calibrate them.
Table of Contents:
Creating a Profile for the Mingda Magician X in Cura
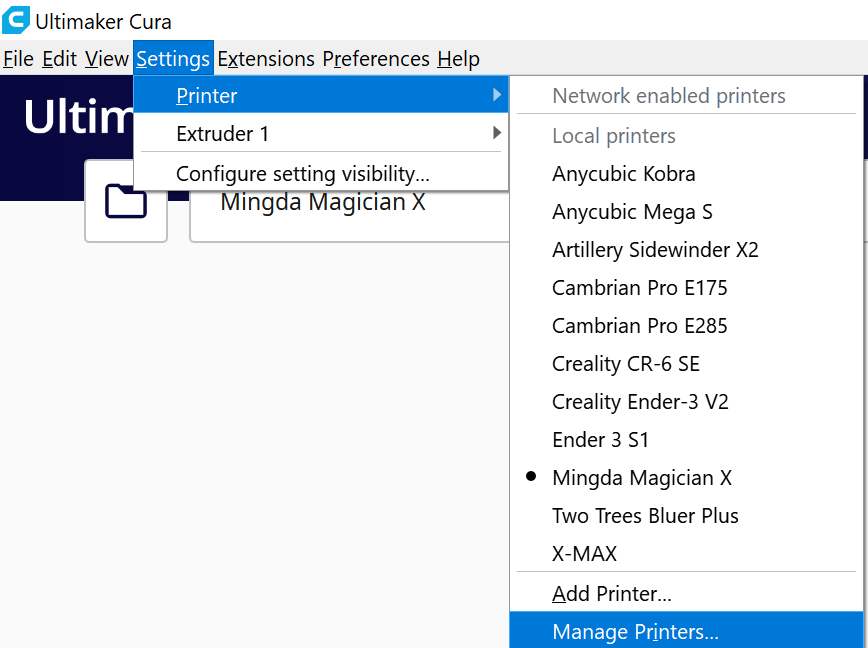
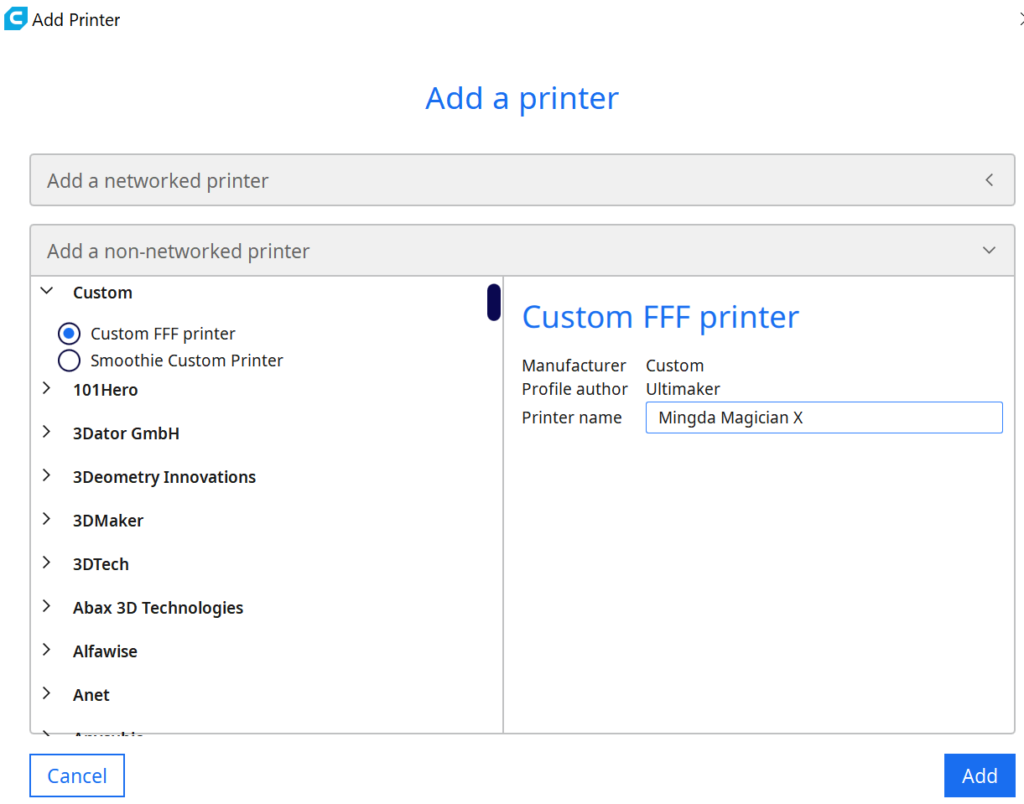
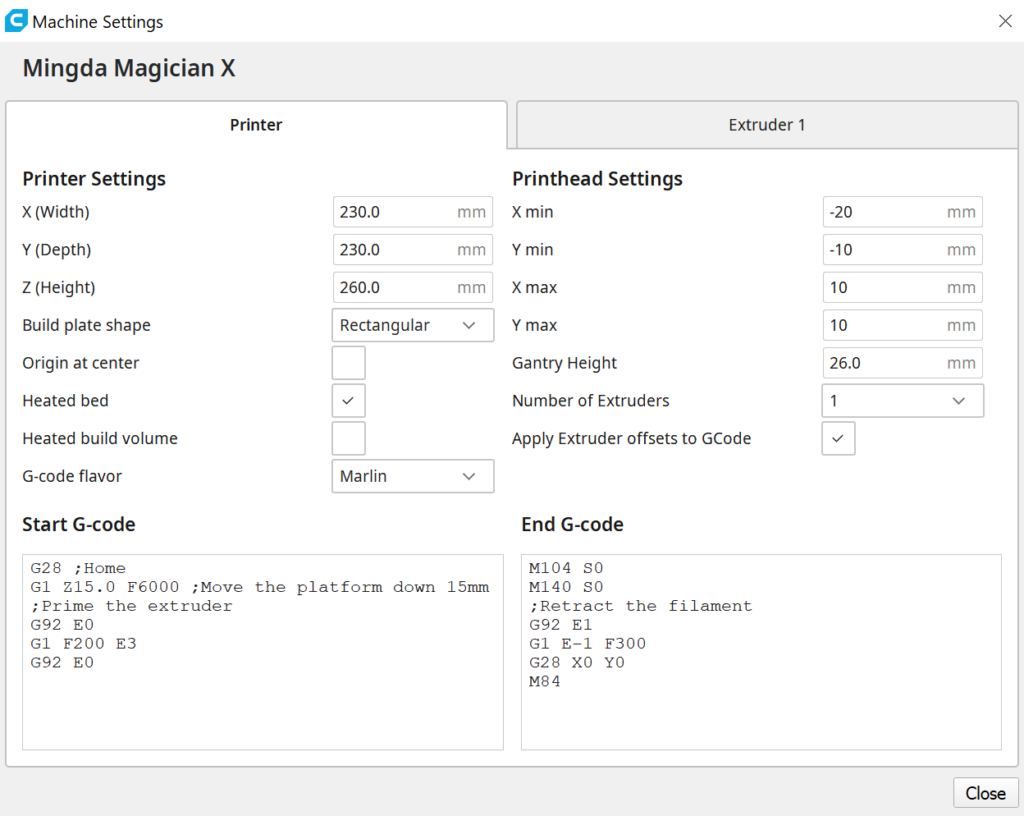
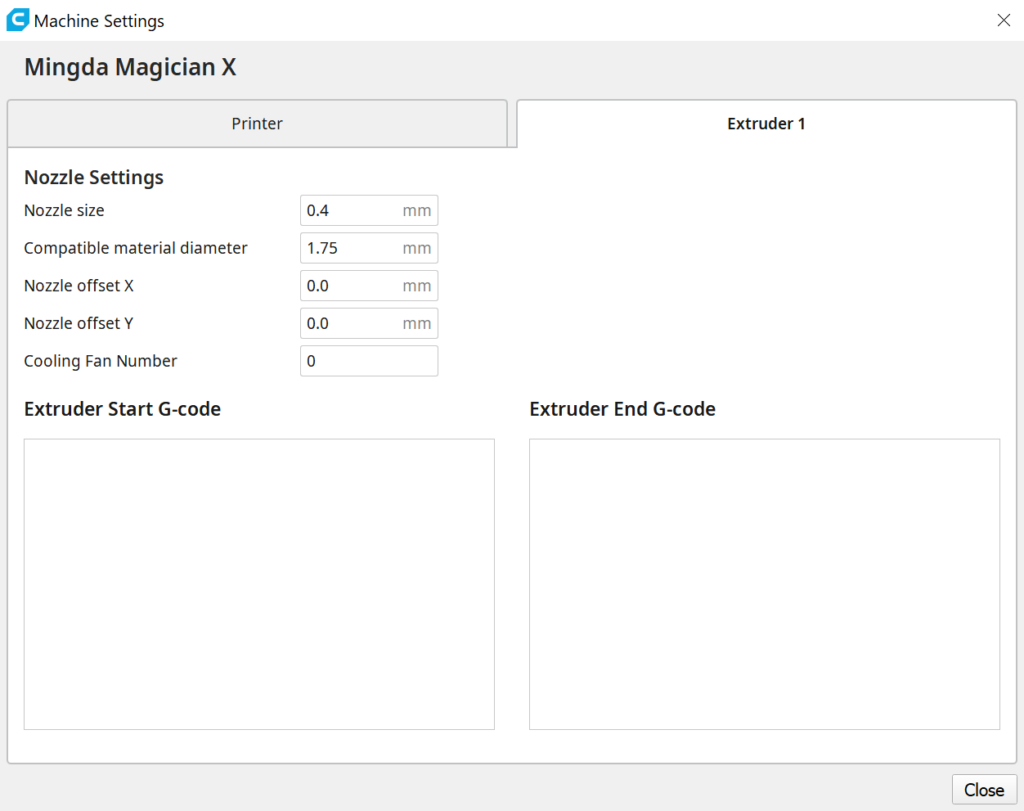
In Cura, the settings are divided into the machine settings and the print settings. The former describe the printer itself (i.e. how large the print volume is, the number of extruders, etc.), the print settings describe how the filament should be printed (i.e. temperature, speed, etc.). First, you need to create the machine settings for the printer.
To create a new profile for your 3D printer in Cura, follow these steps:
- Click on “Settings” at the top of the Cura interface.
- Then click on “Printers” and “Manage printers”.
- To add a new printer, click the Add Printer button. A drop-down menu will appear where you can create new printers. Select “Add a non-networked printer”.
- Select the “Custom” menu and then the “Custom FFF printer” option from the drop-down menu.
- Name the new 3D printer “Mingda Magician X”.
- The control panel will then display the newly created machine settings of the 3D printer. Enter the following values to teach Cura what kind of printer it is:
- Printer Settings:
- X (Width) = 230 mm
- Y (Depth) = 230 mm
- Z (Height) = 260 mm
- Build plate shape = Rectangular
- Origin at center = No
- Heated bed = Yes
- Heated build volume = No
- G-code flavor = Marlin
- Printhead Settings:
- X min = -20 mm
- Y min = -10 mm
- X max = 10 mm
- Y max = 10 mm
- Number of extruders = 1
- Gantry Height = 26 mm
- Apply Extruder offsets to GCode = Yes
- Start G-Code = Leave at default values
- End G-Code = Leave at default values
- Nozzle Settings:
- Nozzle size = 0.4 mm
- Compatible material diameter = 1.75 mm
- Nozzle offset X = 0.0 mm
- Nozzle offset Y = 0.0 mm
- Cooling Fan Number = 0
- Extruder Start G-Code = Leave at default values
- Extruder End G-Code = Leave at default values
- After that you can close all menus.
Cura then creates numerous print setting profiles (i.e. how the filament should be printed) for a wide range of accuracies. The accuracy varies from 0.06 mm to 0.6 mm.
However, these profiles are not yet adjusted to the printer and the filament and lead to poorer quality results. To achieve satisfactory results, you must change and calibrate the print settings.
The perfect starting point to do this are the verified default values for different filaments you will find in the next lines. From these starting values, you can further perfect your settings. You will learn how to do this later in the article.
You can find more information on how to create a 3D printer profile in Cura and what you need to pay attention to in this article: How to Create a Custom 3D Printer Profile in Cura
PLA Settings at a Glance
PLA is a biodegradable and compostable thermoplastic made from renewable resources such as corn starch or sugar cane. It is the most common 3D printing filament and the easiest to print.
When 3D printing with filament, there are a few critical print settings to consider. The most important are the print temperature, the temperature of the print bed, the print speed and the retraction.
Also, the first layer in 3D printing is essential for a successful print. The first layer is often the most difficult because it must adhere well to the build plate and not be squeezed too much so that the layers above have something to adhere to.
The following settings lead to optimal results for PLA with the Mingda Magician X:
- Print temperature: 180-190 °C
- Print bed temperature: 60 °C
- Printing speed: 50 mm/s
- Retraction: 3 mm at 60 mm/s
- Cooling: 100%
- First layer: 0% cooling, 100% extrusion width, 100% layer height
ABS Settings at a Glance
ABS is more difficult to print than PLA. ABS is a petroleum-based thermoplastic. It is strong and durable but can be difficult to print because it warps and shrinks when cooled (warping).
If you are using ABS filament, it is important to set the print bed temperature to a higher value than PLA. A 3D printer enclosure is a good way to avoid warping of ABS during 3D printing. By enclosing the printer, you create a controlled environment that helps regulate the temperature of the print. The result is less warping and better prints. There will also be no cracking if you allow the warm ambient air to cool slowly.
The following settings are ideal for ABS on the Mingda Magician X:
- Print temperature = 220-230 °C
- Print bed temperature = 80 °C
- Printing speed: 50 mm/s
- Retraction: 3 mm at 50 mm/s
- Cooling: 0%
- First layer: 0% cooling, 140% extrusion width, 100% layer height
TPU Settings at a Glance
Thermoplastic polyurethane (TPU) is a soft and flexible thermoplastic that is commonly used in 3D printing for prosthetic parts, cell phone cases, and other items that need to be elastic. TPU filament is more difficult to print than PLA or ABS because it has a very low glass transition temperature.
It is important that the flexible filament cannot get tangled. Therefore, lower print speeds make sense. Thanks to the Magician X’s Direct Drive extruder, this risk is very small, so you only need to reduce the speed slightly compared to other filaments.
And to increase the print bed adhesion of the first layer on the print bed, you should slightly increase the extrusion width of the first layer with TPU.
The following settings are a perfect start for optimizations for TPU on the Mingda Magician X:
- Print temperature = 220-230 °C
- Print bed temperature = 60 °C
- Printing speed: 40 mm/s
- Retraction: 5 mm at 60 mm/s
- Cooling: 100%
- First layer: 0% cooling, 140% extrusion width, 100% layer height
Best Cura Settings for the Mingda Magician X
Now we will go into the most important print settings in Cura for the Magician X. I’ll show you which settings work best on my Magician X and at the end of the article, you’ll learn how to optimize and calibrate these settings on your 3D printer.
Print Temperature

The print temperature of an FDM 3D printer is the temperature at which the filament is melted and extruded from the nozzle. The optimal printing temperature for PLA filament is 180-190 °C, while the optimal printing temperature for ABS filament is 220-230 °C.
Incorrect print temperature can cause a number of errors in 3D printing, including:
- Stringing
- Cracks on the surface due to under-extrusion
- Blobs or zits
The hotends of two 3D printers can be very different, which can significantly affect the print temperature. For example, the ideal print temperature for the same PLA filament on two different 3D printer models may differ. This is due to the construction of the hotend. The actual temperature at the nozzle can therefore be several degrees different than the display suggests.
In my experience, the Magician X’s hotend is hotter rather than cooler. Therefore, the perfect printing temperatures of each filament type tend to be at the lower end of their recommended temperature range.
The best printing temperatures for the Mingda Magician X in Cura:
- PLA: 180-190 °C
- ABS: 220-230 °C
- TPU: 220-230 °C
Print Bed Temperature

The surface of the print bed of the Mingda Magician X 3D printer is made of textured glass, which results in a very even surface and provides good print bed adhesion. The printer’s heated bed can be set to a temperature of up to 110°C, allowing printing with a wide range of filament types.
A print bed temperature that is set too high can cause the filament to warp. A print bed temperature that is too low can cause the first layer to not adhere properly to the print bed, which can result in poor print quality or a failed print.
The optimal print bed temperature for PLA filament is 50-70 °C. With the Magician X I have had very good experiences with 60 °C. Since the print bed has a very good adhesion, you have some leeway here and do not need to optimize too much.
For ABS 80 °C and for TPU 60 °C have been proven to work well. With these values you should have a good starting point for a good print bed adhesion on the Magician X. If you still have problems, Magigoo, a special adhesive developed for 3D printers, might help. Especially on glass this glue works wonders!
The best print bed temperatures for the Mingda Magician X in Cura:
- PLA: 60 °C
- ABS: 80 °C
- TPU: 60 °C
Print Speed
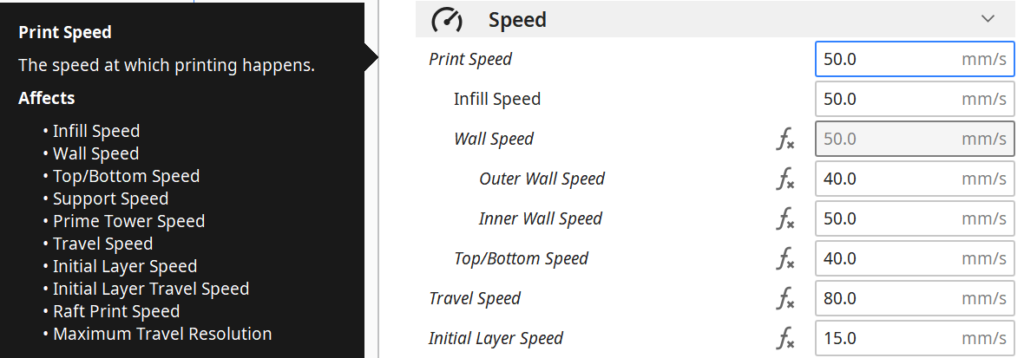
The print speed indicates how fast the filament is extruded from the nozzle. The higher the print speed, the shorter the time it takes for the filament to cool and cure, which can lead to problems such as cracking or deformation.
A slower print speed gives the filament more time to cool and cure. The correct printing speed is therefore not only dependent on the 3D printer, but also on the filament used.
Even though the Magician X has a very high print speed on paper, you should stick to the values given below for the different filaments. The higher the print speed, the worse the quality of the print. But you also don’t want to set the speed too slow, otherwise the print will take forever.
Finding the sweet spot is sometimes not that easy. Nevertheless, similar starting values have proven themselves for PLA, ABS and TPU. If you have problems with the print bed adhesion, you should reduce the print speed for the first layers. This will allow the filament to take longer to cool down and create a better bond to the print bed surface.
The correct printing speed for the Mingda Magician X in Cura:
- PLA: 50 mm/s
- ABS: 50 mm/s
- TPU: 40 mm/s
Layer Height
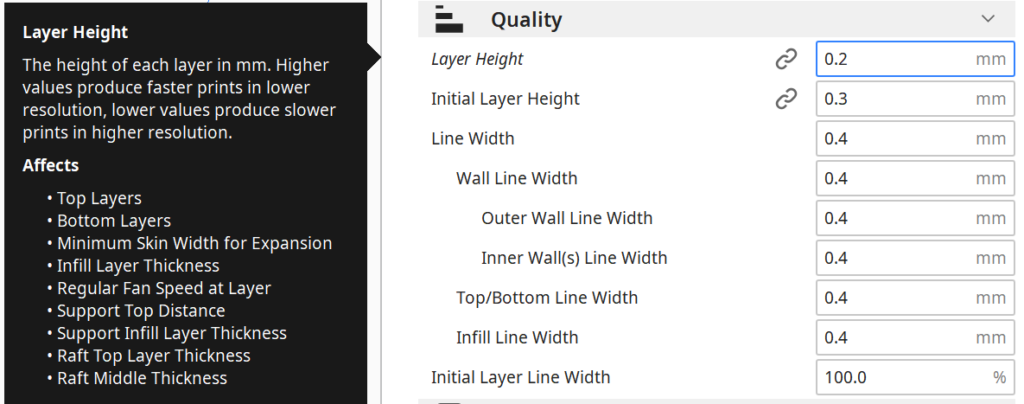
Layer height is the height of a single filament layer in a 3D print. Most 3D printers have a standard layer height of 0.1 mm, but this can be changed depending on the requirements of the print. A higher layer height will result in a faster print, but will also result in a rougher surface. A thinner layer height will result in slower printing, but the surface will be more detailed and smoother.
Once you have created the profile for the Magician X, Cura will automatically create 7 accuracy profiles:
- Extra Fine 0,06 mm
- Fine 0,1 mm
- Normal 0.15 mm
- Draft 0,2 mm
- Extra Fast 0.3 mm
- Coarse 0,4 mm
- Extra Coarse 0,6 mm
Cura creates these profiles from the settings you have made in the machine parameters – the nozzle diameter of 0.4 mm. Since the extruder of the Magician X is very precise, it is actually possible to print the Extra Fine accuracy with 0.06 mm layer height.
Depending on the purpose you have in mind for the model to be printed, different layer heights are possible.
The correct layer height for the Mingda Magician X in Cura:
- Decorative objects: 0.06 and 0.1 mm
- Standard: 0.15 and 0.20 mm
- Coarse, fast prints: 0.3 and 0.4 mm
Flow Rate

The flow rate indicates how much material is extruded from the 3D printer nozzle per second. This setting affects the width of the lines.
If the flow rate is set too high, over-extrusion will occur, which can lead to various print errors. There is simply too much filament being extruded per second that has to go somewhere. Excessive stringing or the formation of blobs can be the result.
On the other hand, if the flow rate is set too low, under-extrusion will occur. If too little filament is extruded per second, cracks can occur. Either way, over- or under-extrusion will result in incorrect dimensions of the finished product. This is especially problematic for parts that need to perform a mechanical function.
The default value is always 100%. If you have problems with the extrusion, you should calibrate this value. I recommend you do this anyway if you change the filament every time. How to do this you will learn later in this article.
The best flow rate for the Magician X in Cura:
- Default value: 100%
- For over-extrusion: 90% to 99
- For under-extrusion: 101% to 110%.
Retraction

Retraction is the process by which a 3D printer pulls the filament back into the nozzle when it is not being extruded. This prevents the filament from hanging down due to gravity and keeps it close to the hot end of the extruder. This helps prevent problems like stringing.
Stringing is a common 3D printing problem when the filament is not pulled back properly. When the printer is not actively extruding filament, the molten plastic at the tip of the nozzle cools and solidifies. When this solid plastic is then pulled down by gravity, a plastic filament forms between the nozzle and the printed object.
The correct retraction setting is extremely important for high-quality prints. The direct drive Extruder of the Magician X needs different values compared to Bowden extruders.
The best retraction settings for the Magician X in Cura:
- PLA: 3 mm at 60 mm/s
- ABS: 3 mm at 50 mm/s
- TPU: 5 mm at 60 mm/s
Infill

In 3D printing, infill is the area inside a printed object that is filled with material. This is usually done to save filament and reduce print time, as less material is needed for the inside of an object than for its outside.
The infill settings are independent of the 3D printer used and depend only on the purpose of your object.
There are a number of different infill patterns that can be used in 3D printing, each has a different stability and therefore different applications:
High stability (for stable objects):
- Cube
- Cube subsection
- Octet
- Gyroid
Medium stability (for standard objects):
- Grid
- Triangles
- Tri-Hexagonal
Low stability (for decorative objects):
- Lines
- Zigzag
- Lightning
But not only the pattern but also the infill density is crucial. Infill density in 3D printing is the percentage of the object’s volume that is filled with material. This setting determines how solid or hollow the object becomes. A higher infill density results in more stable objects.
The best infill densities for the Magician X in Cura:
- Decorative objects: 0-15%
- Standard objects: 15-50%
- Stable objects: 50-100%
First Layer
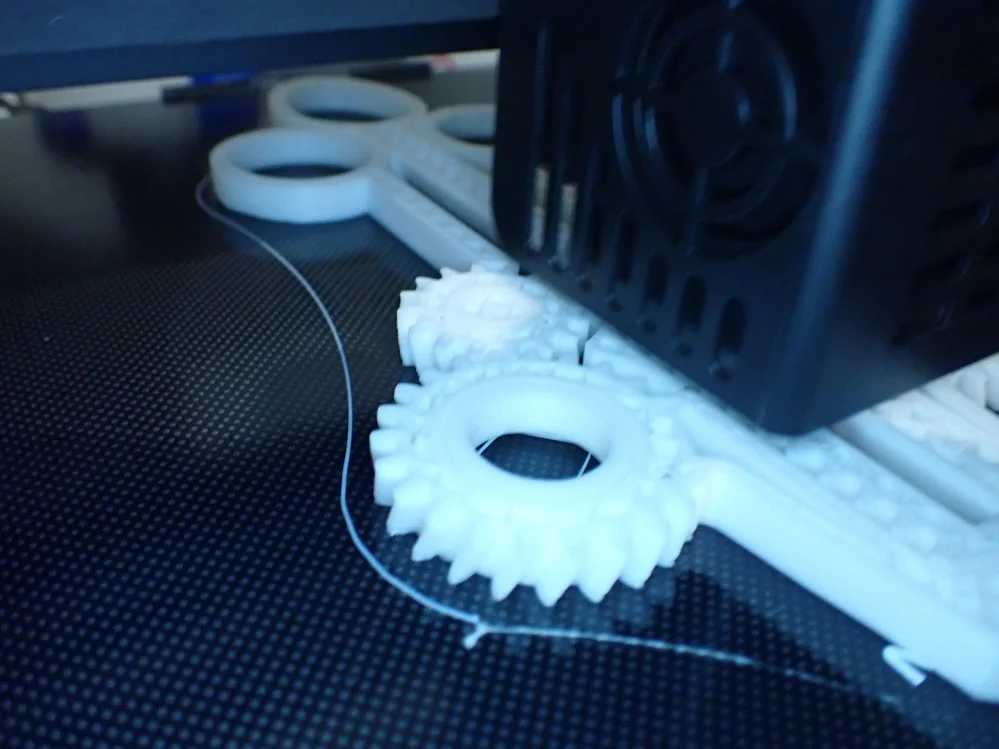
The first layer is extremely important in 3D printing because it is the foundation for the rest of the print. It is very important that the first layer is printed correctly because problems with it will be magnified later in the print.
There are a few things to consider when printing the first layer: The first layer should be printed at a slower speed than the rest of the print. This gives the plastic more time to adhere to the build plate and prevents it from coming off as easily during printing.
The first layer should also be printed at a higher temperature than the rest of the print if you have problems with print bed adhesion. This allows the plastic to flow better and form a better bond with the print bed surface.
But also the layer thickness and the line width are important and can influence the print bed adhesion. The thicker the layer, the longer it takes to cool down and can adhere better to the print bed. Therefore, the first layer should be thicker than the rest of the print. Also, the line width should be increased for the first layer so that it can flow better.
These are the best Cura settings for the first layer on the Magician X:
- Layer thickness: 100-200% of the normal layer thickness
- Line width: 100-200% of the normal line width
- Print temperature: Same as the rest of the object or 5-10 °C higher for better print bed adhesion.
- Print speed: 50% of the normal print speed (i.e. 25 mm/s with a normal print speed of 50 mm/s)
- Flow rate: 100-110% (higher values for poor print bed adhesion)
How to Calibrate the Mingda Magician X Cura Settings
The Cura settings you read for the Magician X in this article are very good starting values for further optimizations. The values I have given fit perfectly for my Magician X. However, since not every 3D printer is identical, you will probably find slightly different values to be better.
To find these values there are various calibration objects. Especially the print temperature, the flow rate and the retraction are important here and should be calibrated with every new printer or a new filament to achieve ideal results.
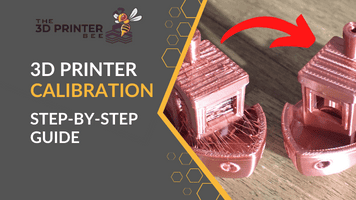
Read the full calibration guide:
3D Printer Calibration: Step-by-Step to Perfect Results
How to Calibrate the Print Temperature
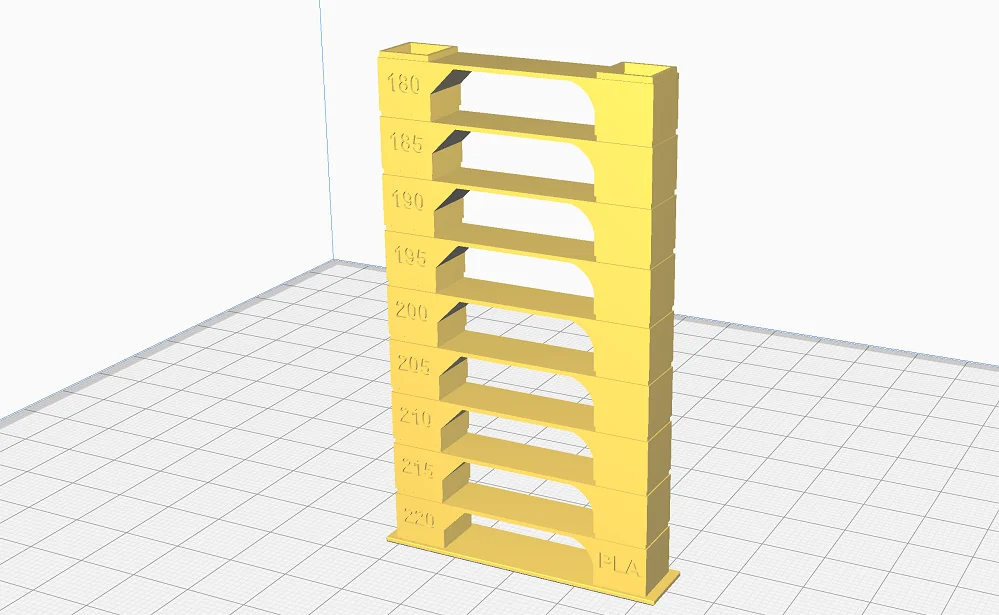
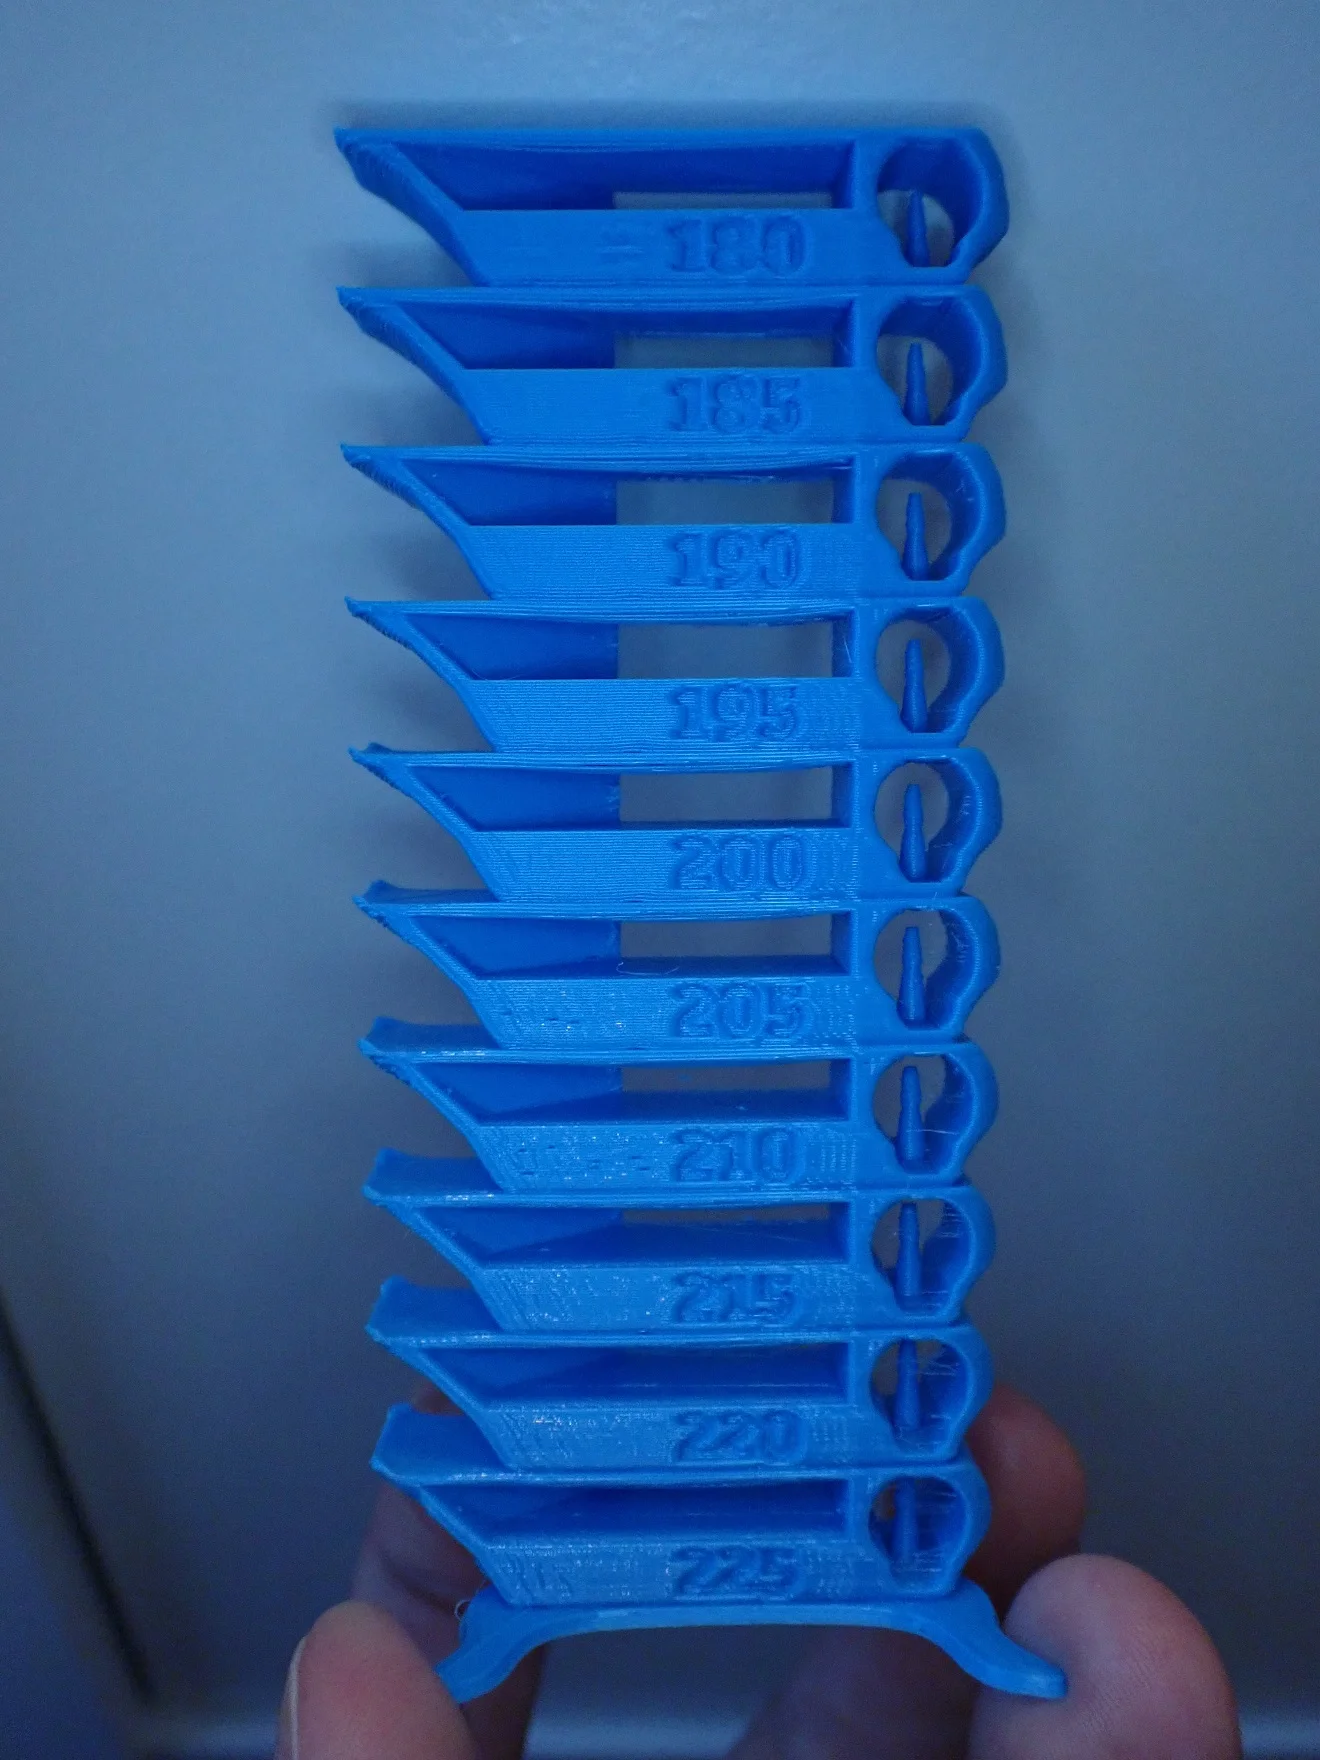
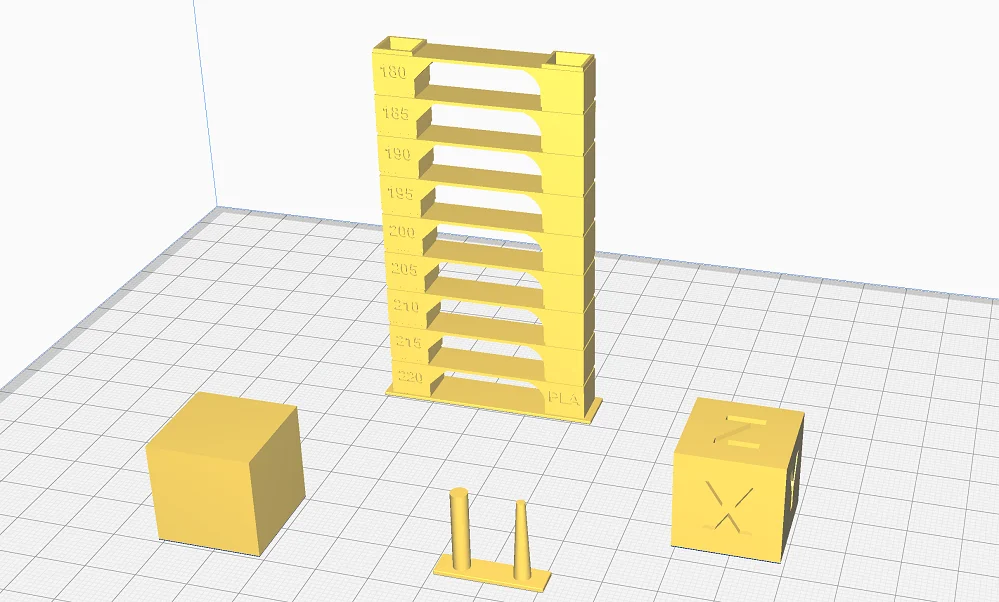
To find the perfect print temperature, you can print a calibration object. There are a number of different objects, but I recommend the temperature tower from the “Calibration Shapes” plugin from Cura, as it is very easy to print and quickly shows you the correct temperature.
The Calibration Shapes plugin in Cura is a great tool for calibrating your 3D printer. It contains a variety of different objects that you can use to calibrate different settings of your printer, such as print temperature, flow rate, and retraction.
The temperature tower from this plugin is particularly easy to print and is printed at different temperatures. When you look at the results, you can see which temperature gives the best result. The best temperature is the one where the surface is the smoothest and no stringing appears.
How to Calibrate the Flow Rate
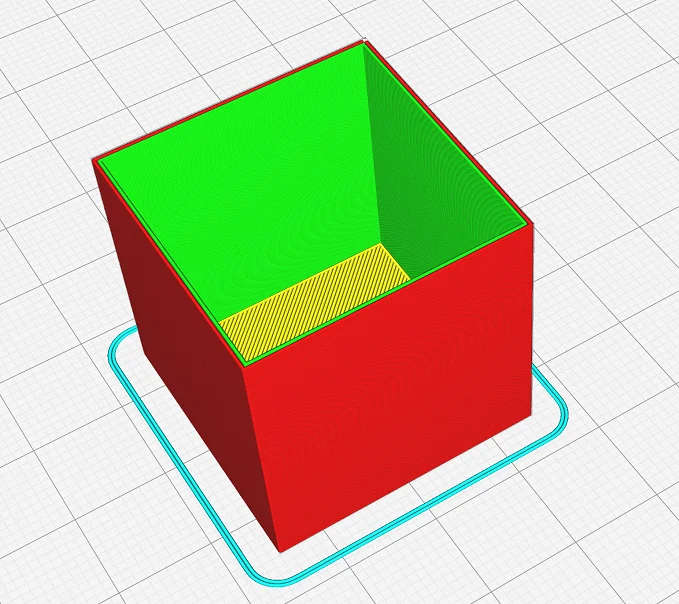
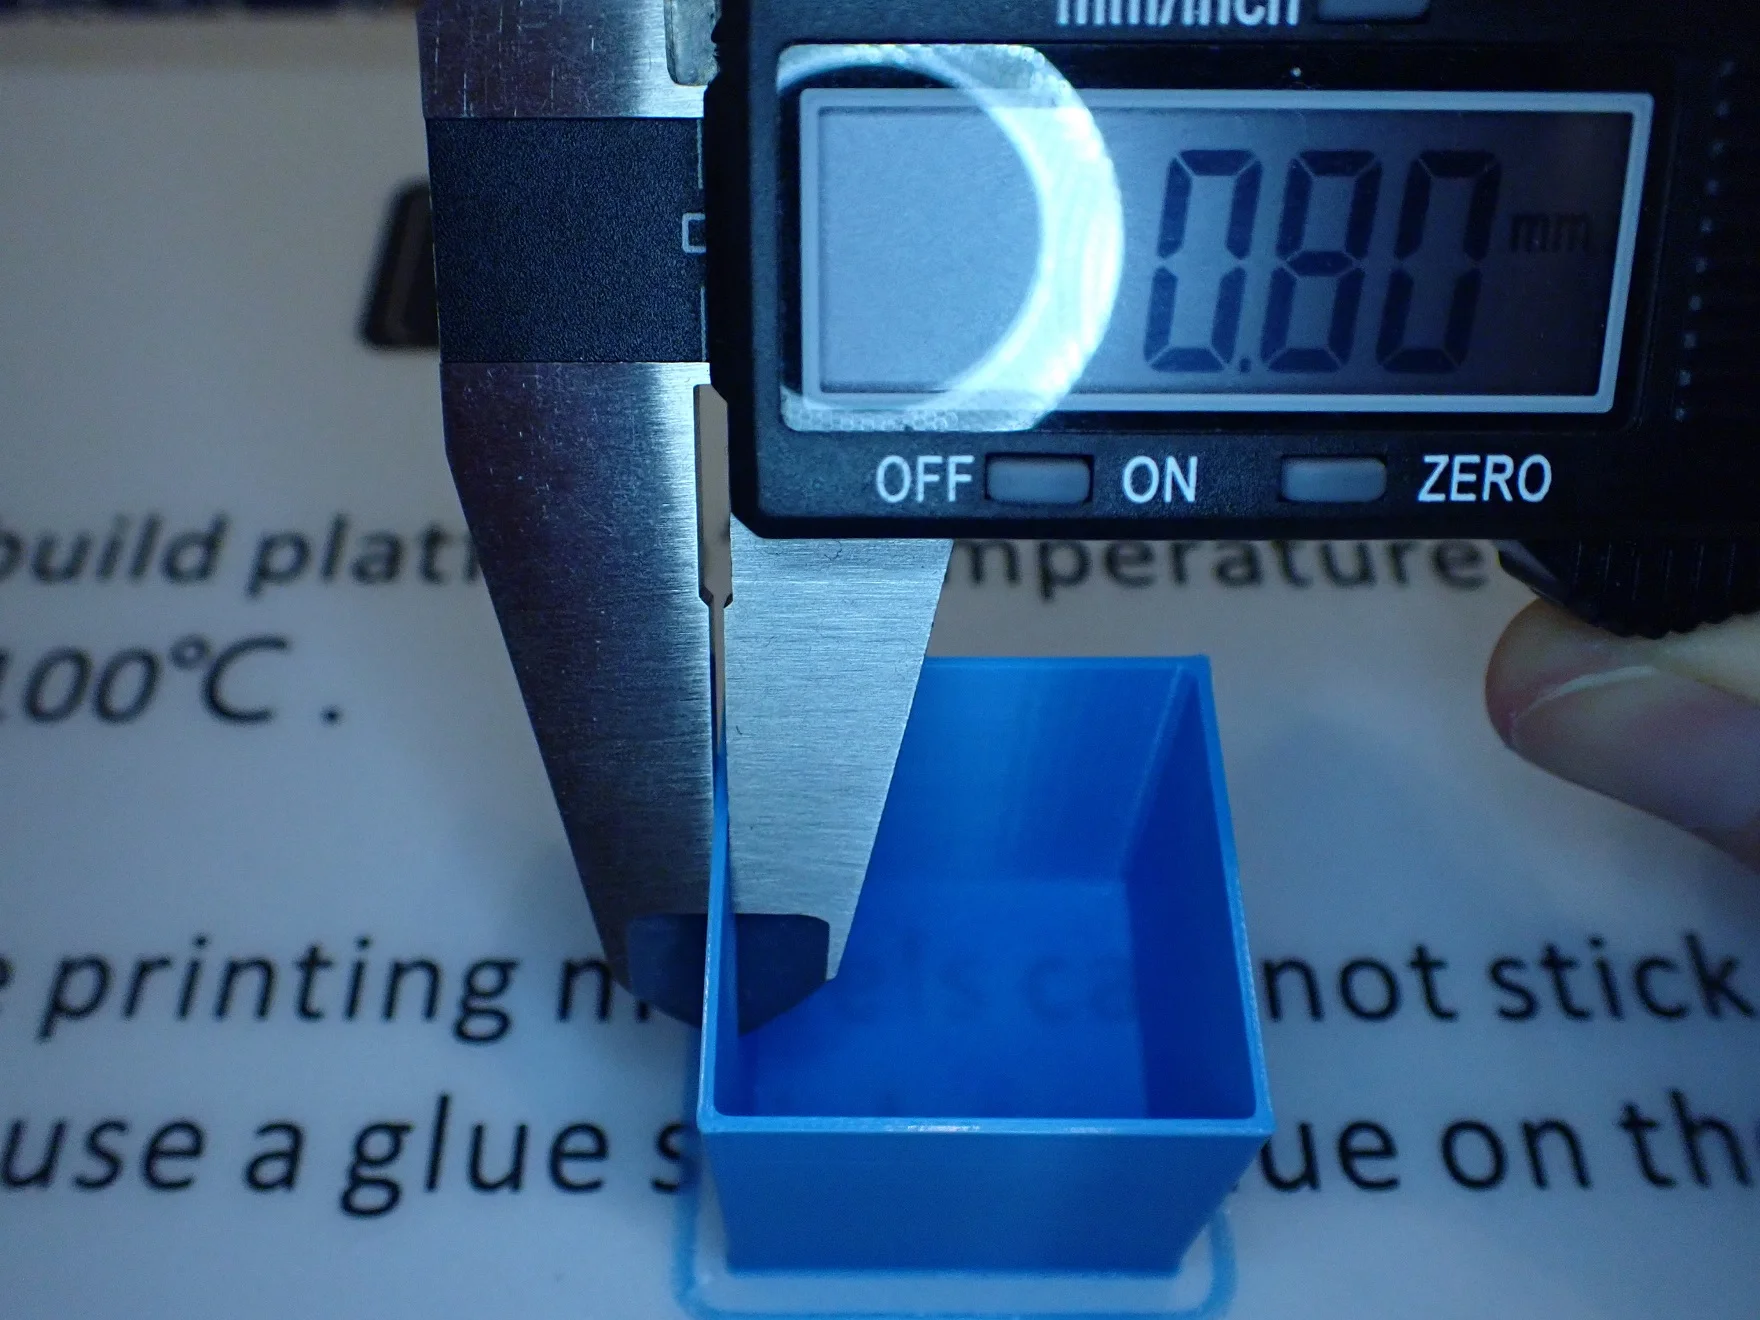
Flow rate calibration is important to get the best results from your 3D printer. To calibrate the flow rate, you can print a calibration object. There are a number of different objects, but I recommend the calibration cube from Cura’s Calibration Shapes plugin. It’s a very easy object to print that will help you find the perfect flow rate.
Print the cube without infill and without top layers so you can measure the wall thickness afterward. Make sure you remember the number of wall lines and how wide the line width is set. If the measured value on the printed object is the product of the number of wall lines and the extrusion width, the flow rate is set correctly. If it differs, you can adjust it via the percentage value until you get the right result.
How to Calibrate the Retraction
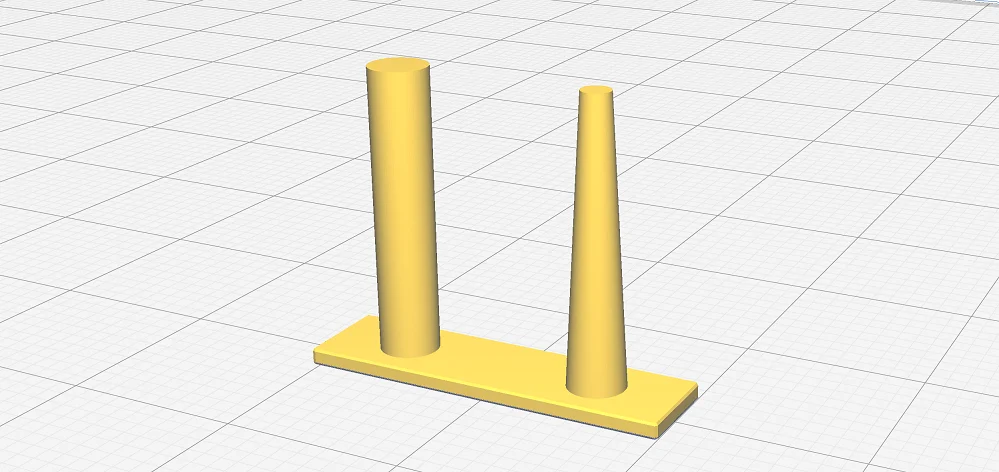
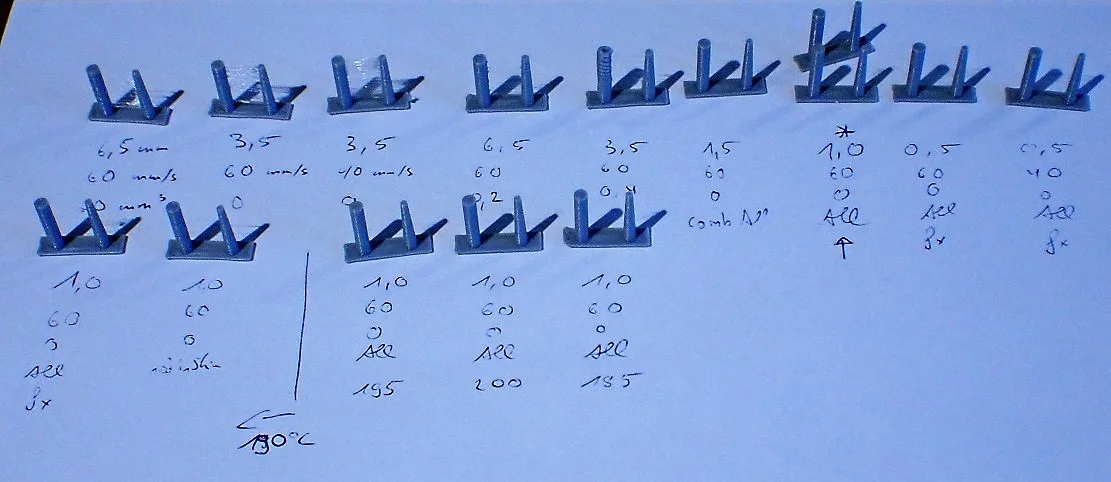
Calibrating the retraction is important to get the best results from your Magician X. To calibrate the retraction, you can print a calibration object. There is also a simple retraction test in the Calibration Shapes plugin.
The object consists of two columns and a base. So it is printed within a few minutes and you can quickly perfect the retraction settings.
It’s best to start with the values I’ve given in this article and work your way up to the perfect value in small steps. For the retraction speed, you should take 5 mm/s steps and for the retraction distance 0.1 mm steps.
Conclusion
In this article, you learned all about the Cura print settings for the Mingda Magician X 3D printer to get perfect results, as well as some tips on how to tweak them for the best results.
The recommended Cura settings are a good starting point but may need to be adjusted depending on the printer and filament. Important calibration tasks include setting the print temperature, flow rate and retraction. Once you have successfully calibrated these values, you will print perfect surfaces!
Disclosure: This website is the property of Martin Lütkemeyer and is operated by Martin Lütkemeyer. Martin Lütkemeyer is a member of the Amazon Services LLC and other Affiliate Programs. These are affiliate advertising programs designed to enable websites to earn advertising revenue through advertising and linking to Amazon.com and others. Links marked with * are affiliate links.

