
- Wet Filament: Prevention, Symptoms & Drying - July 18, 2024
- Sovol SV08 – Best PrusaSlicer Settings & Profile - June 26, 2024
- Sovol SV08 – Best Orca Slicer Settings & Profile - June 26, 2024
Disclosure: Links marked with * are Affiliate Links. I earn from qualifying purchases if you decide to make a purchase through these links – at no additional cost for you!
The Elegoo Neptune 4 is my favorite entry-level 3D printer of 2023. Its performance, balanced with affordability, sets it apart. But here’s the catch – achieving that perfect print quality hinges on the correct Cura settings.
It’s not just about the printer, it’s about tuning it right. Let’s dive into how you can make the most out of your Neptune 4 with the right Cura settings.
I’ve put the Neptune 4 through its paces, testing extensively and fine-tuning each setting for optimum print quality. Every dial tweaked, every adjustment made, all for the perfect print. I’m going to share those calibrated settings with you in this article.
And if you should still feel a bit lost – don’t worry, I’ve got you covered. Take a look at this comprehensive post for more detailed instructions on calibrating these settings. Or better yet, take a deep dive into my 3D printing course, where I break everything down step-by-step. You’ll be a 3D printing pro in no time.
| PLA | ABS | TPU | PETG | |
|---|---|---|---|---|
| Print Temperature | 225 °C | 245 °C | 220 °C | 250-270 °C |
| Print Bed Temperature | 60 °C | 90 °C | 70 °C | 70-75 °C |
| Speed | 250 mm/s | 250 mm/s | 40-80 mm/s | 200 mm/s |
| Retraction | 0.5 mm at 45 mm/s | 0.5 mm at 45 mm/s | 0.5-1.0 mm at 35-45 mm/s | 0.5 mm at 40 mm/s |
| Cooling | 100 % | 0-20% | 100 % | 50-100 % |

Calibrated Cura Profile
For optimal print quality with minimal effort, you can download my calibrated Cura profile for this 3D printer and import it directly into Cura. All settings are perfectly adapted to this printer, e.g. the accelerations, jerk, supports and the first layer.
Table of Contents:
How to Create a Profile for the Elegoo Neptune 4 in Cura
Creating a profile for the Elegoo Neptune 4 in Cura starts with defining the machine settings. The machine settings include printer details like the build volume, the start and end G-code, and whether the printer has a heated bed.
Next, set the print settings. These determine the print quality. The print settings include layer height, print speed, temperature, retraction settings, and cooling settings. These settings can vary based on the filament used. For example, PLA, ABS, PETG, and TPU all require different print temperatures and speeds.
Let’s take a look at the machine settings first.
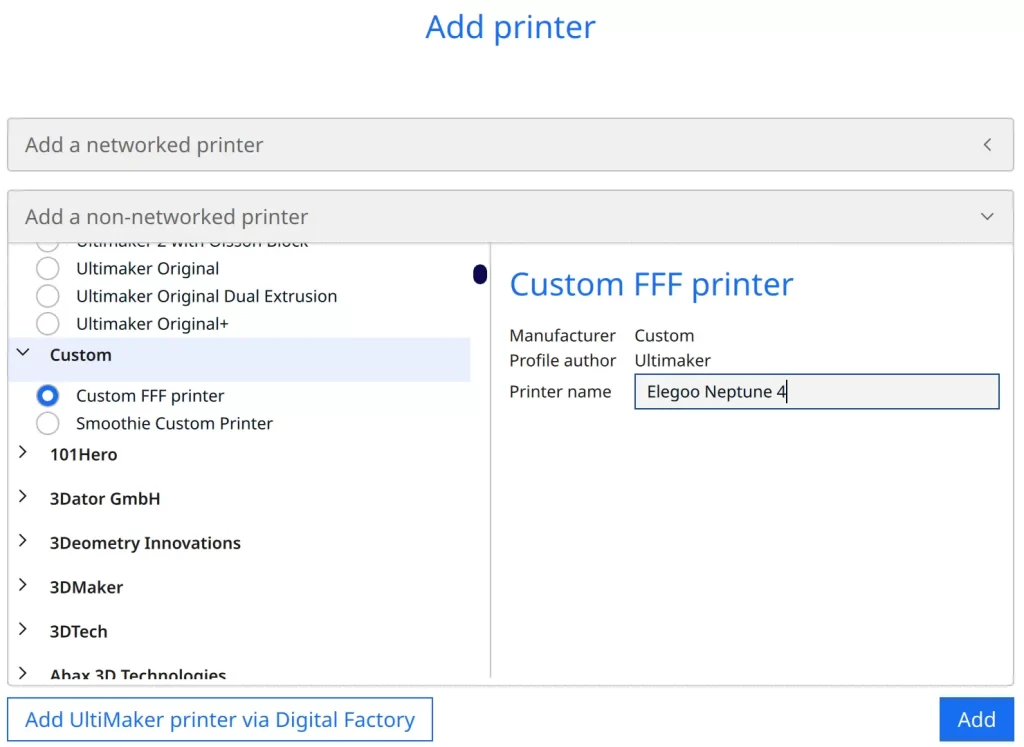
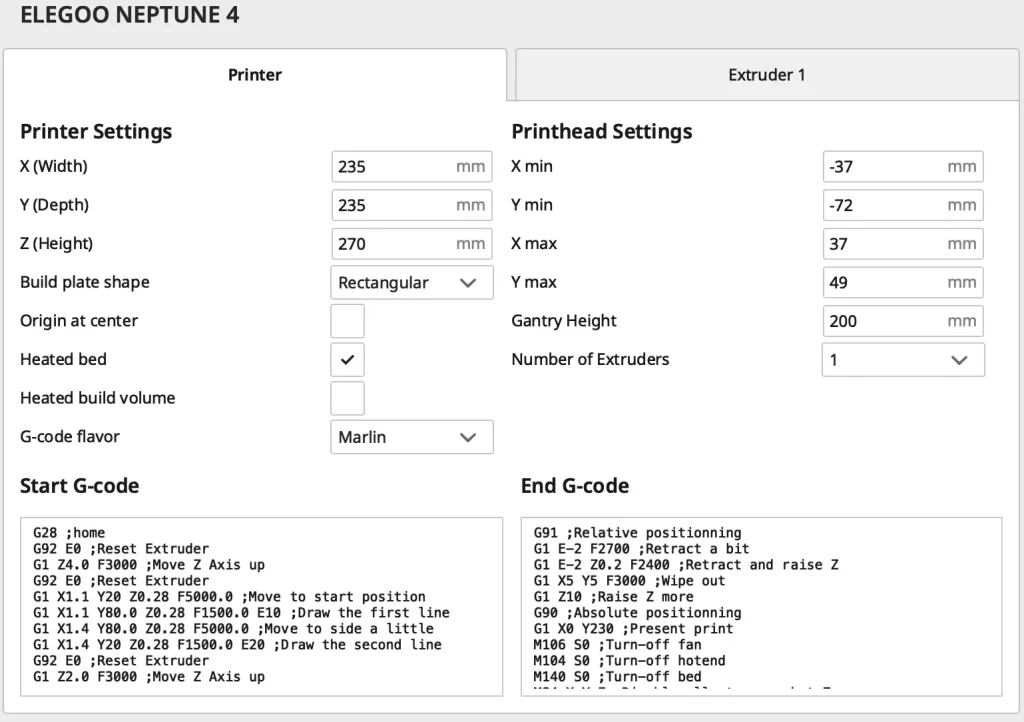
Adding a 3D printer in Cura is a straightforward process. Start by clicking on ‘Settings’ in the main menu, then select ‘Printer’, and click ‘Add Printer’. In the pop-up window, choose the ‘Non-Networked Printer’ option. Finally, scroll down to select ‘Custom’, and then click on ‘Custom FFF Printer’. This will let you add any printer parameters that are not pre-configured in Cura. Follow the prompts to complete the printer setup process and copy the values from the screenshot.
Start G-Code:
- G28 ;home
- G92 E0 ;Reset Extruder
- G1 Z4.0 F3000 ;Move Z Axis up
- G92 E0 ;Reset Extruder
- G1 X1.1 Y20 Z0.28 F5000.0 ;Move to start position
- G1 X1.1 Y80.0 Z0.28 F1500.0 E10 ;Draw the first line
- G1 X1.4 Y80.0 Z0.28 F5000.0 ;Move to side a little
- G1 X1.4 Y20 Z0.28 F1500.0 E20 ;Draw the second line
- G92 E0 ;Reset Extruder
- G1 Z2.0 F3000 ;Move Z Axis up
End G-Code:
- G91 ;Relative positioning
- G1 E-2 F2700 ;Retract a bit
- G1 E-2 Z0.2 F2400 ;Retract and raise Z
- G1 X5 Y5 F3000 ;Wipe out
- G1 Z10 ;Raise Z more
- G90 ;Absolute positioning
- G1 X0 Y230 ;Present print
- M106 S0 ;Turn-off fan
- M104 S0 ;Turn-off hotend
- M140 S0 ;Turn-off bed
- M84 X Y E ;Disable all steppers but Z
Once you’ve created your printer profile in Cura, the next step is to define your print settings. This involves setting your print quality parameters such as layer height, print speed, temperature, retraction settings, and cooling settings.
The appropriate settings can vary depending on the type of filament you’re using. Make sure to adjust each parameter according to the specific requirements of your filament, be it PLA, ABS, PETG, or TPU.
And now, I show you my calibrated settings!
You can find more information on how to create a 3D printer profile in Cura and what you need to pay attention to in this article: How to Create a Custom 3D Printer Profile in Cura
PLA Settings
These are the correct Cura settings for the Elegoo Neptune 4 for PLA:
- Print temperature: 225 °C
- Print bed temperature: 60 °C
- Print speed: 250 mm/s
- Retraction: 0.5 mm at 45 mm/s
- Cooling: 100%
- First layer: 5-10 mm/s, 0% cooling, 100% extrusion width, 100% layer height
Retraction is a crucial factor in achieving high-quality 3D prints. It controls how much the extruder pulls back the filament during the printing process to prevent oozing or stringing between different parts of your print.
In the example above, a retraction distance of 0.5 mm at a speed of 45 mm/s is used. This offers a good start point, but you might need to fine-tune these settings based on the specific filament you’re using.
The provided settings, including print temperature, bed temperature, print speed, cooling, and first-layer parameters, have been calibrated for PLA with the Elegoo Neptune 4. They serve as a solid base for achieving optimal print outcomes. However, bear in mind that each 3D printer and filament can have its specifics, requiring some adjustments. Further in this article, the process of calibrating these settings will be explained in greater detail.
Apart from that, it is easy for the Elegoo Neptune 4 to print PLA filament flawlessly.
ABS Settings
These are the correct Cura settings for the Neptune 4 for ABS:
- Print temperature: 245 °C
- Print bed temperature: 90 °C
- Print speed: 250 mm/s
- Retraction: 0.5 mm at 45 mm/s
- Cooling: 0% + enclosure
- First layer: 5-10 mm/s, 0% cooling, 100% extrusion width, 100% layer height
ABS is a popular choice among 3D printing enthusiasts. It’s known for its strength and durability.
However, printing with ABS can be tricky. It requires precise temperature control and (ideally) an enclosure to prevent warping.
The Neptune 4 does not come with an enclosure. However, it is capable of producing quality prints without one.
With the right settings, it can print small to medium-sized objects from ABS without warping. Precision and attention to detail can make the difference.
Increasing print bed adhesion can help avoid warping when printing with ABS without an enclosure. One effective method is to slow down the first layer print speed to 5-10 mm/s. This allows for better adhesion as the filament has more time to bond with the print bed before the next layer is added. This method may lengthen the print time, but the result will be a print with less warping and better overall quality.
TPU Settings
These are the correct Cura settings for the Neptune 4 for TPU:
- Print temperature: 220 °C
- Print bed temperature: 70 °C
- Print speed: 40-80 mm/s
- Retraction: 0.5-1.0 mm at 35-45 mm/s
- Cooling: 100%
- First layer: 5-10 mm/s, 0% cooling, 100% extrusion width, 100% layer height
TPU is a flexible filament known for its elasticity and strength. It’s a go-to for printing items that need to bend or flex without breaking. However, printing TPU can be a challenge due to its flexibility.
A direct drive extruder can significantly boost the ease and quality of TPU printing. The filament path in a direct drive extruder is short and straight, reducing the chances of the filament bending and causing a jam. Plus, a direct drive extruder can handle the flexible nature of TPU better, enabling smoother and more accurate prints.
TPU filament requires a slower print speed compared to rigid filaments. This adjustment is crucial for handling the flexible nature of TPU, helping to prevent issues such as jamming. The settings listed above, tested personally, are an effective starting point for TPU.
However, it’s essential to remember that optimal settings can vary depending on the specific printer model and the TPU brand. Experimentation and fine-tuning are necessary to achieve the best results. Don’t hesitate to adjust the values above to find what works best for your setup.
PETG Settings
These are the correct Cura settings for the Elegoo Neptune 4 for PETG:
- Print temperature: 250-270 °C
- Print bed temperature: 70-75 °C
- Print speed: 200 mm/s
- Retraction: 0.5 mm at 40 mm/s
- Cooling: 50-100%
- First layer: 5-10 mm/s, 0% cooling, 100% extrusion width, 100% layer height
PETG filament is quite user-friendly, known for its stability and weather resistance. Despite its relative ease of use, it has one notorious downside – stringing. However, with the right measures in place, this can be managed efficiently.
Dry storage for your PETG filament is crucial as it helps prevent moisture absorption, a common cause of print quality issues. Ensuring the correct print temperature is equally important, as this can significantly reduce the risk of stringing. Lastly, don’t overlook retraction settings, which when finely tuned, can further eliminate stringing and boost the quality of your prints.
The settings provided above should yield a good print quality when using PETG filament. I tested them on different PETG brands, and they consistently produced satisfactory results. Nevertheless, feel free to experiment with these settings and adjust them accordingly for your specific setup and filament brand.
Different PETG brands can hugely impact the optimal cooling setting. Some brands may require a higher cooling percentage to achieve the best print quality, while others might need less. It’s essential to experiment with this variable to find the right balance for your specific filament brand.
Best Cura settings for the Elegoo Neptune 4
After walking you through my individual filament settings, it’s time to dive into the specific settings and calibration process for the Elegoo Neptune 4. This will involve precise fine-tuning to ensure optimal print quality.
Print Temperature
The best printing temperatures for the Neptune 4 in Cura:
- PLA: 225 °C
- ABS: 245 °C
- TPU: 220 °C
- PETG: 250-270 °C
If the print temperature is not set correctly, it can lead to a myriad of problems. Prints can fail, or the quality may be incredibly poor. This can be a frustrating waste of time and resources.
One major consequence of incorrect temperature setting is stringing. If the temperature is too high, the filament may leak from the nozzle during movements, causing thin strands or “strings” between parts of your print. It can ruin the aesthetic of your 3D model and requires post-processing to remove.
Lastly, an incorrectly set temperature can cause over-extrusion or under-extrusion. This means that the printer is either pushing too much or too little filament through the nozzle. Over-extrusion leads to blobs and zits on your print, while under-extrusion can create gaps in the layers of your print.
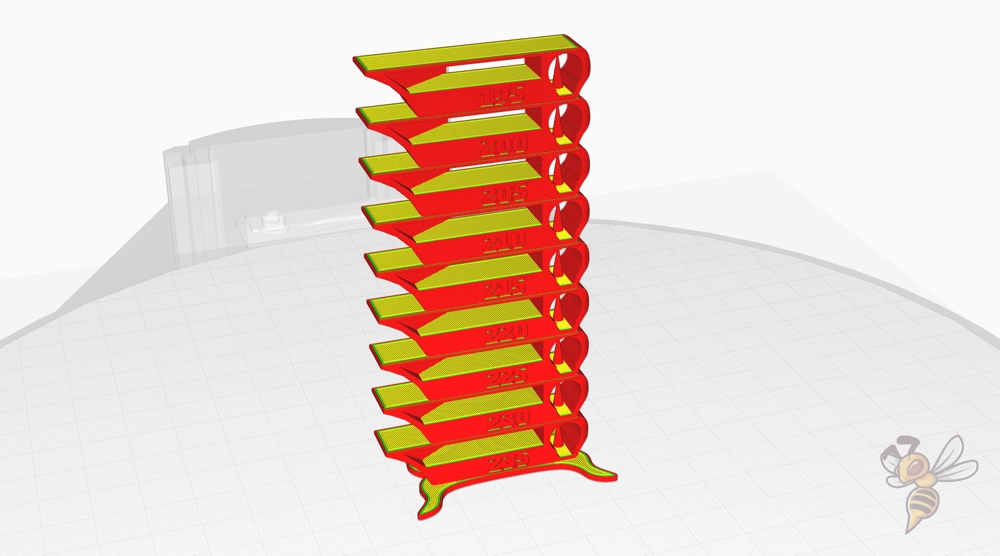
To calibrate the print temperature, start by printing a temperature tower. This is a 3D model specifically designed to test different temperatures on different layers of the print. You can find many free temperature tower models online.
Load the temperature tower model into your slicing software. Assign different temperatures to different sections of the tower in ascending or descending order. This allows you to see how your filament reacts at various temperatures.
After the print completes, examine the temperature tower closely. Look for each section’s quality, smoothness, and detail. The section that has the best quality indicates the optimal temperature for your filament.
Print Bed Temperature
The best print bed temperatures for the Neptune 4 in Cura:
- PLA: 60 °C
- ABS: 90 °C
- TPU: 70 °C
- PETG: 70-75 °C
Achieving the highest possible print bed temperature is beneficial for print adherence. However, it’s essential not to push it too far. Overheating can lead to a common issue known as “elephant foot“.
Elephant foot happens when the base layers of your print expand outward, distorting the shape. Avoiding this issue requires a delicate balance. While high temperatures increase adherence, it’s crucial not to surpass the recommended maximums above.
Finding the accurate bed temperature for the Neptune 4 printer is straightforward thanks to its PEI coating. The PEI coating enhances adhesion, making it easier to achieve fine print quality without adjusting the temperatures excessively. The recommended temperatures provided above should work.
Print Speed
The best print speed for the Neptune 4 in Cura:
- PLA: 250 mm/s
- ABS: 250 mm/s
- TPU: 40-80 mm/s
- PETG: 200 mm/s
Printing at high speeds often leads to a common issue known as ringing or ghosting. This problem manifests as echoes or ripples around the sharp corners of your 3D model. It’s an artifact that degrades the print quality, making the output less appealing and precise.
Ringing or ghosting occurs when the printer’s movement causes vibrations. The faster the printer moves, the more intense these vibrations become. Being mindful of this, it’s essential to keep print speeds within recommended limits to prevent such issues and ensure optimal print quality.
The Neptune 4 printer, equipped with Klipper, can print at impressive speeds. Klipper’s efficiency and precision allow for rapid printing without compromising the quality of the output. However, in my experience, adhering to the above-listed values yielded the best results.
When printing with TPU on the Neptune 4, lower speeds are key. This requirement stems from TPU’s unique properties as a flexible, soft material. Attempting to print TPU at high speeds may lead to filament jamming or poor layer adhesion, affecting the quality of the final product.
Layer Height
The best layer heights for the Neptune 4 in Cura:
- Decorative objects: 0.1 mm
- Standard: 0.2 mm
- Coarse, fast prints: 0.3 mm and higher
The Neptune 4 printer comes with a 0.4 mm nozzle, which dictates the optimal layer height. When you wish to create decorative objects with intricate details, a layer height of 0.1 mm is recommended. This will ensure a highly detailed and smooth finish, crucial for aesthetic appeal.
For standard prints, which balance speed with quality, a layer height of 0.2 mm is appropriate. This setting is common for general use cases, delivering good detail while keeping print times reasonable.
When speed is the primary concern, consider going for a layer height of 0.3 mm or higher. This is particularly applicable for rough drafts or prototype parts where the finer details are not as important. The thicker layers speed up the printing process, though it does sacrifice some level of detail.
Remember, though, that these values are guidelines. Depending on the specific application of your print, you might need to adjust the layer height. Experiment with different settings to find what works best for your needs, while keeping in mind the capabilities of the 0.4 mm nozzle.
Flow Rate
The optimal flow rate in Cura for the Neptune 4 is:
- Default value: 100%
- For over-extrusion: 90% to 99%
- For under-extrusion: 101% to 110%
The flow rate is a key variable in 3D printing that impacts the quality of prints. It’s the speed at which filament is pushed through the nozzle. In Cura, the Neptune 4’s ideal flow rate is set at 100% as a default.
However, printing isn’t always perfect. Sometimes, too much filament (over-extrusion) or too little filament (under-extrusion) is pushed through the nozzle. To correct these issues, adjust the flow rate. For over-extrusion, reduce the value to between 90% and 99%. For under-extrusion, increase it between 101% and 110%.
Before adjusting the flow rate, first ensure that the printing temperature and retraction are correctly calibrated. These two factors have a significant impact on the quality of your 3D prints. Once these factors are optimized, you can then proceed to fine-tune the flow rate for achieving the best print results.
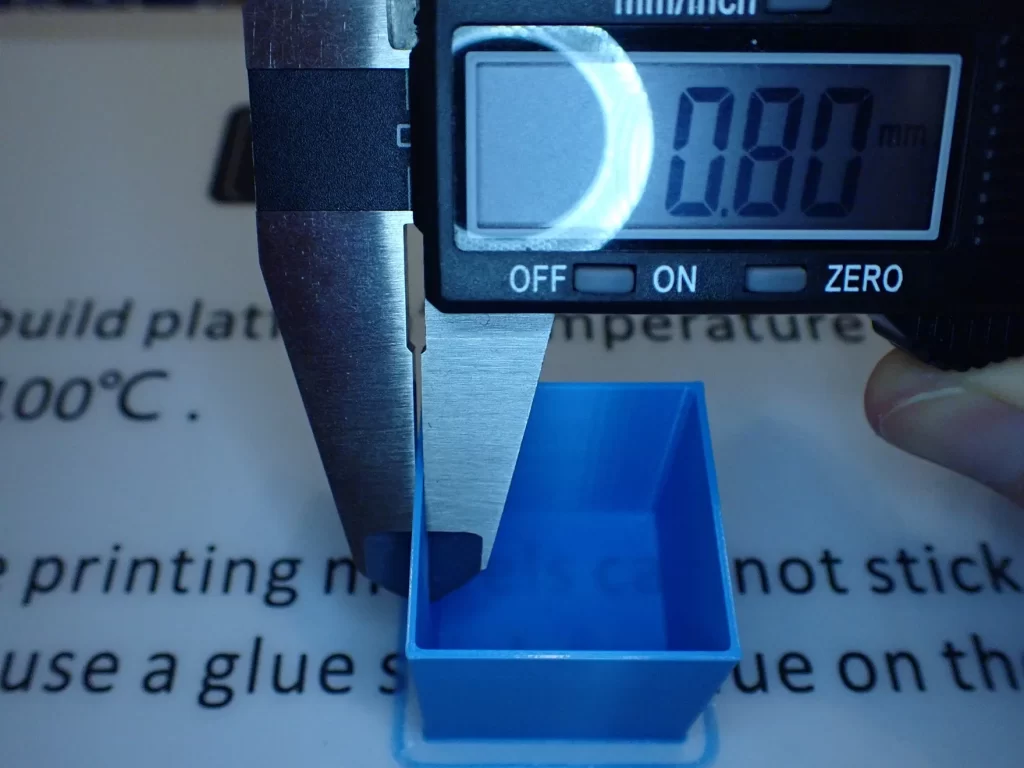
First, to calibrate your flow rate, start by 3D printing a hollow cube with two walls. It’s essential to use a model without any infill or top layers to ensure the measurement accuracy. Make sure the cube is adequately sized, around 20mm for each side, to provide enough surface for accurate measurements.
Next, measure the wall thickness of your printed cube using a digital caliper. This tool provides precise measurements, which are crucial for calibrations. Take several measurements at different points along the cube’s sides to account for any potential inconsistencies in the print.
Finally, divide the average measured wall thickness by two and compare it to the slicer wall thickness. If the values match, your flow rate is well calibrated. If your measured value is higher, you need to decrease your flow rate. Conversely, if it’s lower, increase the flow rate. Iterate this process until the measured thickness closely matches the slicer thickness value.
Retraction
Optimal retraction settings for the Elegoo Neptune 4 in Cura:
- PLA: 0.5 mm at 45 mm/s
- ABS: 0.5 mm at 45 mm/s
- TPU: 0.5-1.0 mm at 35-45 mm/s
- PETG: 0.5 mm at 40 mm/s
Incorrect retraction settings can lead to stringing, a common issue in 3D printing where thin strands of plastic connect separate parts of the print. This happens when molten plastic drips from the print nozzle while it’s moving to a new location.
The listed retraction settings for different materials are a good starting point for initial setup of the Neptune 4. However, perfect print results require calibration tailored to your specific setup and the characteristics of the material you’re using.
Regular calibration of your retraction settings ensures that your 3D prints have a clean look without any unwanted strings or blobs. Not taking the time for calibration can lead to reduced print quality.
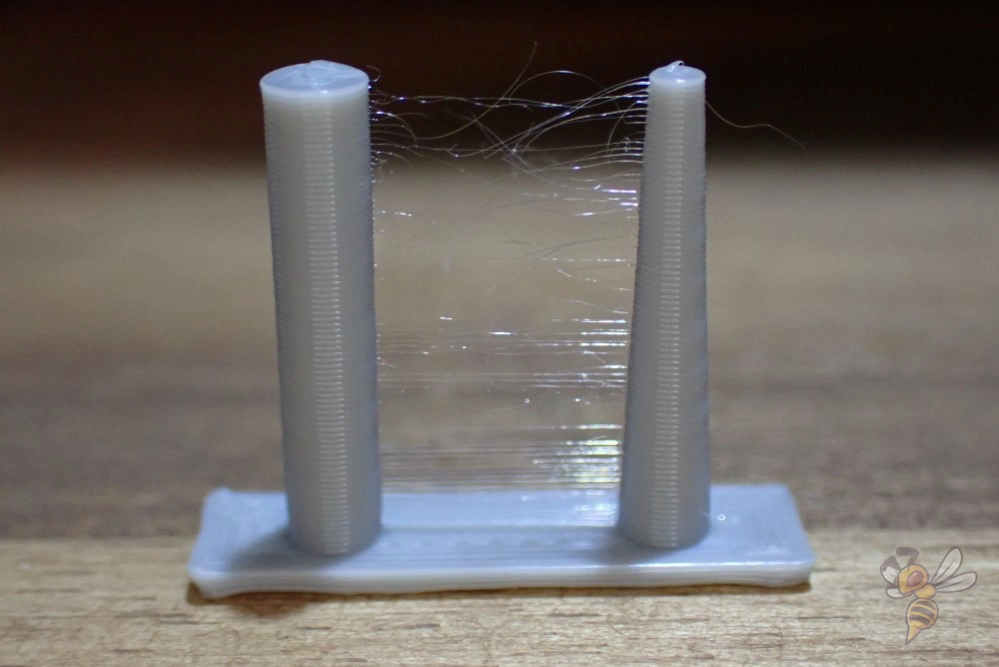

Start retraction calibration with a simple object. Choose a 3D object with two columns. This will provide enough travel for the extruder to retract filament.
To begin, adjust the retraction distance. Start at a lower value, like 0.5 mm. Print the object and observe the results.
Next, if the print shows stringing, increase the retraction distance in small increments. Repeat the print after each adjustment. Keep adjusting until no strings form between the columns.
Finally, once you find the ideal distance setting, stick with it. Calibration is an iterative process. It takes time and patience, but the result is worth it: precise, high-quality 3D prints.
Infill
The optimal infill density setting for the Neptune 4 in Cura is as follows:
- Decorative objects: 0-15%
- Standard objects: 15-50%
- Stable objects: 50-100%
Decorative objects require less infill density, usually between 0-15%, as their primary purpose is for aesthetics rather than functionality. With a lower infill, these models are quicker to print and use less filament, reducing both time and material costs.
Standard objects balance the need for strength with material efficiency, making 15-50% infill a suitable choice. These items may need to bear some load or endure regular use, necessitating a denser structure than purely decorative pieces while still keeping material usage reasonable.
Stable objects demand a higher infill, typically ranging from 50-100%. These 3D prints are designed for heavy-duty use or structural applications, where rigidity and durability matter more than the amount of filament used or the speed of printing.
First Layer
Here are the recommended Cura settings for the first layer with the Neptune 4:
- Layer height: Adjust to 100-200% of the normal layer height to enhance print bed adhesion.
- Line width: Increase to 100-200% of the normal line width for better print bed adhesion.
- Print temperature: Keep the same as the rest of the object or raise it by 5-10 °C for improved print bed adhesion.
- Print speed: Set it to 50% of the normal print speed (e.g., 25 mm/s for a 50 mm/s print speed) or 5-10 mm/s for higher print bed adhesion.
- Flow rate: Adjust to 100-110% or increase it further if print bed adhesion is poor.
- Raft/Brim/Skirt: Not necessary since the Neptune 4 has a PEI print bed.
Warmer filament is more effective in bonding with the print bed. The increased temperature gives the material more time to establish a solid connection with the surface.
This process is essential for improving the overall stability of the printed object. A well-bonded first layer ensures a strong foundation, minimizing the risk of print failure.
The settings recommended for the first layer are designed to prolong the filament’s viscous state. This extended viscosity promotes a stronger bond with the print bed. Maintaining the filament at a higher temperature for a longer duration facilitates this process. The aim is to achieve a solid connection, optimizing the overall stability of the printed object.
Conclusion
The Neptune 4 is an impressive 3D printer that offers remarkable printing capabilities and currently my favorite entry level FDM 3D printer. Its full potential, however, can only be unlocked with the appropriate Cura settings.
The right settings make a massive difference in the quality of the prints. To ensure the best results, it’s crucial to fine-tune the settings for each layer, particularly the first one.
I hope the values provided in this article have proven beneficial in enhancing your 3D printing experience with the Neptune 4. If you’re still seeking further guidance, do consider enrolling in the comprehensive course that was mentioned at the start of this post.
Disclosure: This website is the property of Martin Lütkemeyer and is operated by Martin Lütkemeyer. Martin Lütkemeyer is a member of the Amazon Services LLC and other Affiliate Programs. These are affiliate advertising programs designed to enable websites to earn advertising revenue through advertising and linking to Amazon.com and others. Links marked with * are affiliate links.
