
- Wet Filament: Prevention, Symptoms & Drying - July 18, 2024
- Sovol SV08 – Best PrusaSlicer Settings & Profile - June 26, 2024
- Sovol SV08 – Best Orca Slicer Settings & Profile - June 26, 2024
Disclosure: Links marked with * are Affiliate Links. I earn from qualifying purchases if you decide to make a purchase through these links – at no additional cost for you!
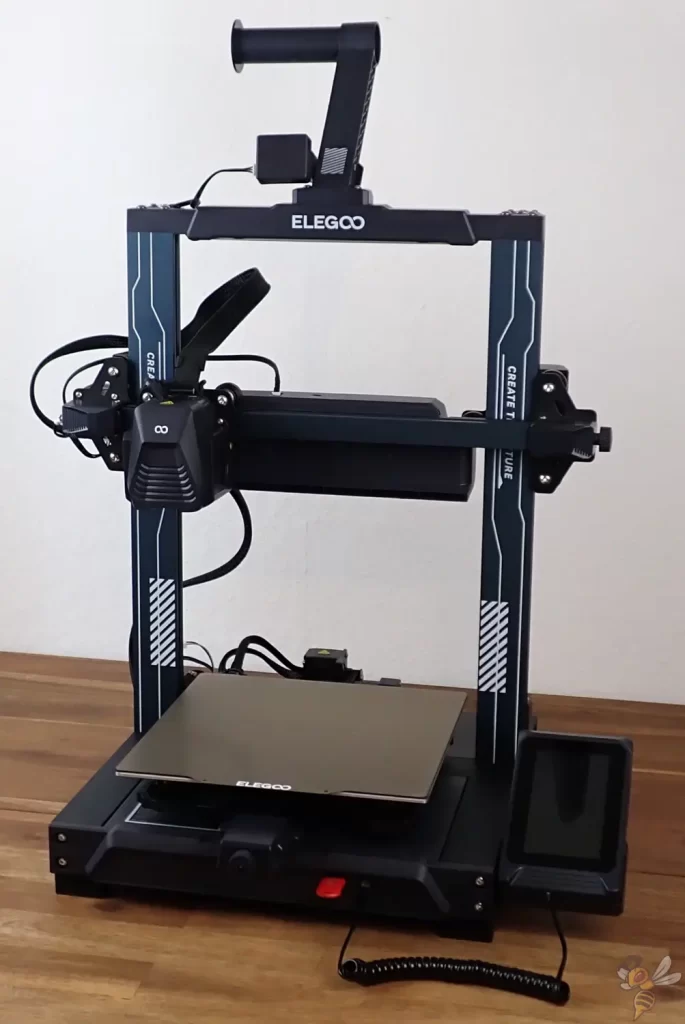
The Elegoo Neptune 4* has a perhaps revolutionary ventilation system. Together with Klipper as firmware, it achieves very high printing speeds.
I took a detailed look at the Neptune 4 and tested it from a newbie’s perspective. In this review, you will find all the details about the Neptune 4, what print speeds you can achieve with it and what print results it produces.
Who should buy the Elegoo Neptune 4?
The Neptune 4 from Elegoo is the ideal FDM 3D printer for beginners. It is very easy to use and offers good print quality without much experimentation. However, it is also interesting for advanced users as it is very reliable.

The Neptune 4 from Elegoo uses Klipper as firmware and can compensate for the vibrations of the print head. Together with the new X-axis fan system, it achieves high printing speeds.
Build Volume: 225 × 225 × 265 mm³
Speed: max. 500, normal 250 mm/s
Extruder: Direct Drive
Print Bed: Flexible PEI
Leveling: Automatic
Firmware: Klipper
Nozzle Temp.: max. 300 °C
Bed Temp.: max. 110 °C
Connectivity: USB, MicroSD, LAN
Pros:
✓ Klipper
✓ High print speed
✓ Touchscreen
✓ Good print bed adhesion
✓ Easy to use
✓ LED’s
Cons:
× Loud with layer fans on
Review Copy Disclosure
Elegoo provided me with the printer for testing. I did not promise Elegoo anything more than that. Money did not flow and my opinion of the printer was not influenced. Elegoo did not read this article until after it was published.
Table of Contents:
- 1 A brief overview of the Neptune 4
- 2 Packaging and scope of delivery of the Neptune 4
- 3 How to assemble the Neptune 4
- 4 Print bed of the Neptune 4 and leveling
- 5 Print volume of the Neptune 4
- 6 Klipper – the firmware of the Neptune 4
- 7 Layer cooling of the Neptune 4
- 8 Touchscreen of the Neptune 4 and menu
- 9 Filament sensor of the Neptune 4
- 10 Stability of the z-axis of the Neptune 4
- 11 LEDs illuminate the Neptune 4
- 12 Dual-Gear Direct Extruder of the Neptune 4
- 13 Slicers compatible with the Neptune 4
- 14 Test prints and calibration of the Neptune 4
- 15 Volume of the Neptune 4 during printing
- 16 Print speed of the Elegoo Neptune 4
- 17 Print quality of the Elegoo Neptune 4 (pictures of 3D prints)
- 18 Operating the Elegoo Neptune 4 & Ease of Use Features
- 19 Is the Elegoo Neptune 4 the right 3D printer for you?
- 20 Elegoo Neptune 4 vs. Neptune 4 Pro
- 21 Important accessories for an FDM 3D printer
A brief overview of the Neptune 4
The Neptune 4* is basically a Neptune 3 Pro with Klipper and a layer fan system for faster print speeds. Price-wise, they are actually very similar, which means it always makes more sense to buy the newer Neptune 4 at the moment.
Klipper is a firmware that can access the measurement data from an acceleration sensor in the print head. This data is evaluated and used to compensate for the vibrations of the print head during printing. This means that higher print speeds are possible without generating print errors such as ringing or ghosting.
The problem with such high print speeds, however, is that the filament needs time to cool down. Otherwise, the nozzle would extrude hot filament onto filament that has not yet fully cured. This would result in various printing errors. So to enable the high speed, Elegoo attached a large fan system to the x-axis to quickly cool down the entire layer that was just printed.
This sophisticated system of print head acceleration compensation and layer cooling allows the Neptune 4 to reach 250 mm/s with normal filament. With special filament with a high flow rate, it even reaches 500 mm /s.
It can also achieve these speeds on its entire print volume. The Neptune 4 is a mid-sized FDM 3D printer with a print volume of 225 × 225 × 265 mm³. With it, you can print most projects in one piece and only need to split larger objects into multiple parts.
Thanks to the direct drive extruder, it can also handle most filaments. This includes flexible filaments, which can only be reliably printed with a direct drive extruder. The print head and extruder system have barely changed from the previous version, but that’s not a bad thing. The only thing that has changed noticeably is the small LED in the print head.
In contrast to the Neptune 3 Pro, the print bed of the Neptune 4 again has rotating screws underneath the print bed. In addition to the rough manual leveling you can do with it, it also has a sensor for automatic print bed leveling.
As is now standard with modern FDM 3D printers, the Neptune 4 has a flexible and magnetic PEI print bed. Most filaments adhere perfectly to this.
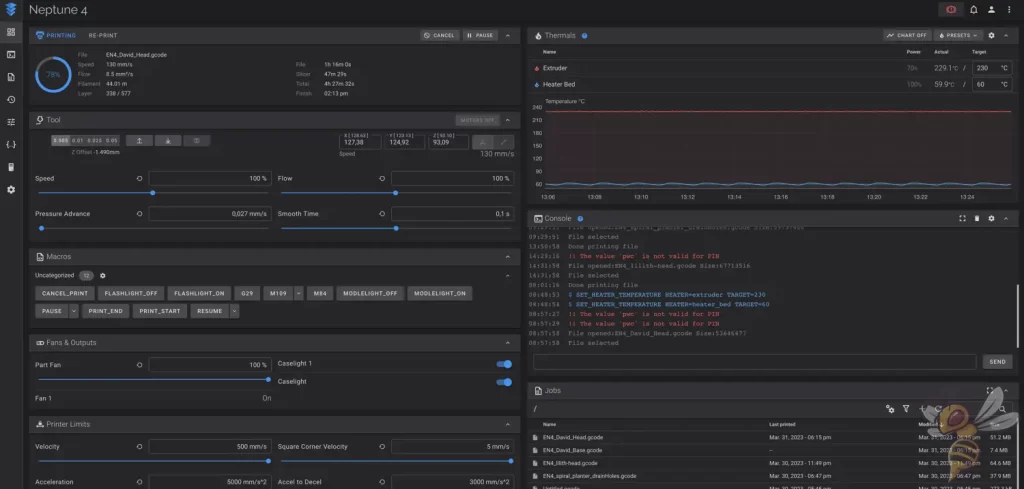
Because the Neptune 4 has Klipper as firmware, you can also conveniently operate it via a browser interface and LAN connection. In fact, this is how I have been operating my Neptune 4 exclusively. This saves you carrying the USB stick back and forth and gives you remote control and monitoring functions over the 3D printer.
My brief assessment of the Neptune 4 is as follows:
There are very few FDM 3D printers out there right now that can get to similar print speeds at this price point. The main one that comes to my mind is the Kobra 2 from Anycubic*, but it can only print at a maximum of 250 mm/s. The last FDM 3D printer with comparable speeds that I tested is the K1 from Creality. It even gets to 600 mm/s, but also costs two to three times as much…
The Neptune 3 series and especially the direct predecessor of the Neptune 4, the Neptune 3 Pro, have been my favorite FDM 3D printers for a long time. I was very impressed with the new fan system and Klipper in my review and along with the usual high quality of the Neptune series, the Neptune 4 is likely to be extremely popular.
In my estimation, the Neptune 4 will definitely be one of the best, if I may even say the best, entry level FDM 3D printer for some time.
And now let’s take a look at the Neptune 4 in detail!
Packaging and scope of delivery of the Neptune 4


The Neptune 4 comes almost completely pre-assembled. All the individual parts and modules are securely stored in the package with matching foam. Even if the shipping service handles the package a bit rougher, nothing will happen to the 3D printer.

Everything is included to get started with the first test prints. However, the included PLA filament is only a small sample and might just be enough for a small test object. So you should order some more filament when buying the Neptune 4. For starters, PLA filament* is highly recommended because it’s easy to print, environmentally friendly, and versatile.
Apart from the 3D printer modules, the following things are still included in the scope of delivery:
- Tools and screws for assembly
- PLA filament sample
- LAN cable
- USB cable
- Cable tie
- Needle for nozzle cleaning
- Side cutter for the filament
- Plastic spatula for the print bed (which you will probably never need, as the finished objects are easy to remove from the print bed once it has cooled down)
- USB stick with instruction manual, test objects and the slicer software
- Spare nozzle (2 × 0.4 mm) and PTFE tube for the hot end
If you live in a humid climate or want to print with filaments that tend to be moisture from the ambient air as well, you will also need a way to store the filament dry and actively dry it. Vacuum bags* with desiccant* and special filament dryers* are suitable for this.
How to assemble the Neptune 4
The assembly of the Neptune 4 is done within a few minutes. The pre-assembled modules of the 3D printer just need to be connected with the included screws and tooling. It took me 10 minutes to complete the assembly.

After assembly, it is definitely recommended to tighten the belts of the x- and y-axis via the respective belt tensioners. They may have become loose during transport.
If the tension is not strong enough, this can lead to layer shifting. However, the tension should not be too strong either, otherwise the belts can tear or wear out too quickly. As a rough rule, the belt should make a relatively high-pitched sound when you flick it like a guitar string.
Except for the print bed leveling, the Neptune 4 is ready to go with this.
Print bed of the Neptune 4 and leveling

On top of the heated print plate of the Neptune 4 lies the magnetic and PEI coated spring steel print bed.
The PEI coating creates a very high adhesion for most filaments. The surface is very rough, which allows the liquid filament to flow into the small depressions and stick there. On the other side of the print bed, there is still a smooth surface, which is sometimes more suitable for certain filaments.
Because the print bed can be easily flexed after printing, it is easy to remove the finished objects from it. Usually, this is not actually necessary, as the objects will come off almost by themselves once the print bed has cooled completely. Sometimes a slight lifting of one corner of the print bed is necessary.
Flexible and magnetic print bed surfaces with a PEI coating are very popular and widely used at the moment. The Neptune 4 also benefits from the advantages of this surface.

The Neptune 4 has both manual and automatic print bed leveling. Underneath the print bed, there are rotary screws at all four corners, with which you can roughly adjust the inclination of the print bed.

However, you only need to level the print bed manually after assembly and at longer intervals. To do this, use the paper method. The leveling is accompanied and explained in detail via the menu. Basically, you adjust the distance between the print bed and the nozzle in such a way that a piece of paper between them can still be moved easily with a little friction.
After the rough manual leveling, you can still level the print bed automatically via the menu. The sensor installed in the print head measures the distance to the print bed at many points. From this, the 3D printer calculates the remaining inclination, which is then automatically compensated for during printing.
After that, you only have to set the global distance to the print bed, which is called z-offset. Here, the same principle applies as with manual leveling. A piece of paper is used to set the distance correctly. If you are unsure if the distance is correct, you can also adjust it while printing the first layer.
Print volume of the Neptune 4
The print volume of the Neptune 4 is 225 × 225 × 265 mm³, which is about 13.4 liters. This is a medium volume, which allows you to print most objects in one piece.
If you plan to print large objects in one piece, as in cosplay, it may be worth waiting for the likely upcoming Plus or Max versions of the Neptune 4 series.
Klipper – the firmware of the Neptune 4
Most FDM 3D printers run the Marlin firmware. Klipper is a firmware that is becoming increasingly popular as it supports certain features that drastically improve print quality. These mainly include Input Shaping and Pressure Advance.
Input Shaping prevents the most common print errors at high print speeds. There is an acceleration sensor in the print head that registers vibrations during movements. Software is used to control the accelerations of the print head so that no strong vibrations occur.
The mechanical components of the 3D printer have long been capable of achieving such high speeds. However, until now, the strong accelerations always led to the fact that the printing results were unusable. Common speeds for FDM 3D printers are therefore between 40 and 60 mm/s.
It is precisely this feature that allows the Neptune 4 and comparable FDM 3D printers to achieve such high printing speeds of 250 or even 500 mm/s.
Pressure Advance optimizes filament flow and prevents some of the most common printing errors, such as stringing or under-extrusion. This feature is especially valuable at high print speeds.


Of course, the Neptune 4 can also be supplied with files conventionally. There is room for a MicroSD card, a USB-C cable and a USB stick on the front. However, the connection to your network via LAN cable is much more interesting. Unfortunately, there is no option to connect the Neptune 4 via Wi-Fi, but via a cable is almost as good.
If the Neptune 4 is connected to the network via a LAN cable, you can enter its IP address in the Internet browser and land directly in the browser window of Klipper. You can control and monitor it from there.
Using Klipper as firmware is not the only feature the Neptune 4 needs for its high printing speeds. The hot filament also needs to be cooled fast enough!
Layer cooling of the Neptune 4
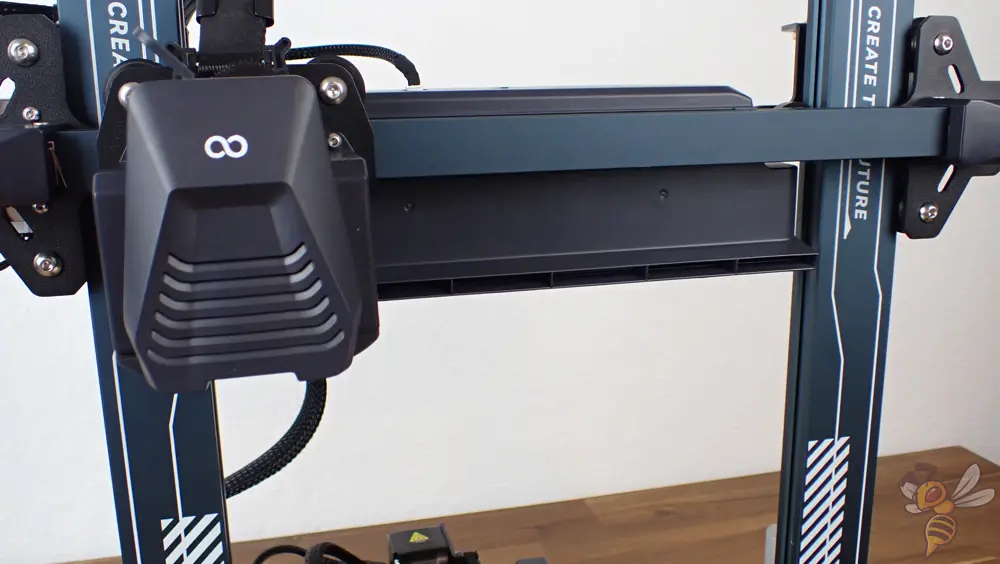
Installed on the x-axis of the Neptune 4 is a fan system consisting of four individual fans. The air duct sends the cooling air directly to the last layer printed. This cools it down quickly so that the next layer can be printed on it immediately.
Until the last printed layer has hardened, the next layer cannot be printed on it without errors. So, a very high printing speed is not much use if the printing speed has to be turned down to give the filament enough time to cure.
The strong cooling also prevents the nozzle from dragging the still hot filament behind it. Particularly at corners, if the speed is too high and the cooling is too weak, the filament can be dragged along and not adhere where it should.
The advantage of the Neptune 4’s layered cooling system is that it cools the hot filament as quickly as possible, making it possible to print at high speeds without errors with most filaments.
The downside of this fan system, however, is that it is very loud. But more about that later…
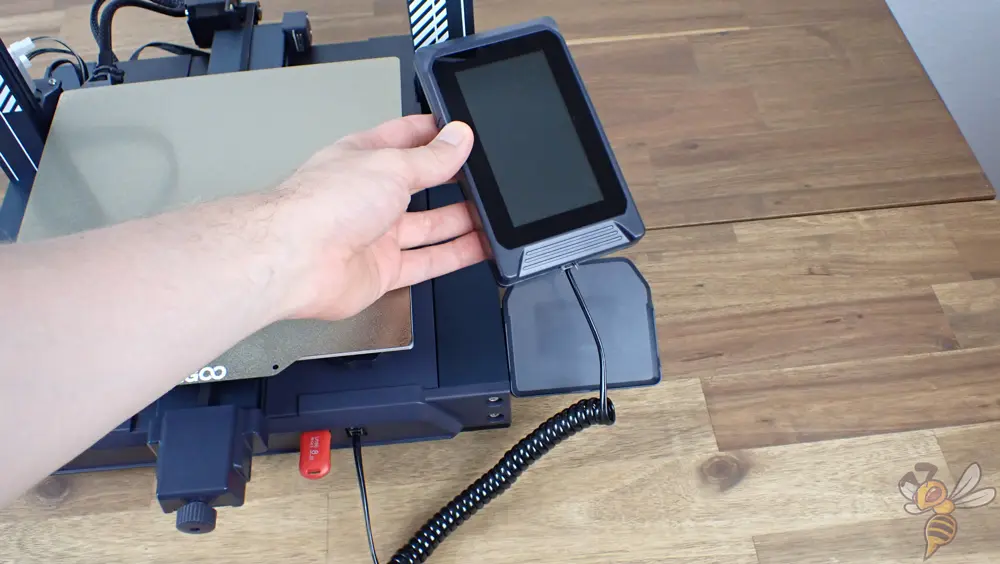
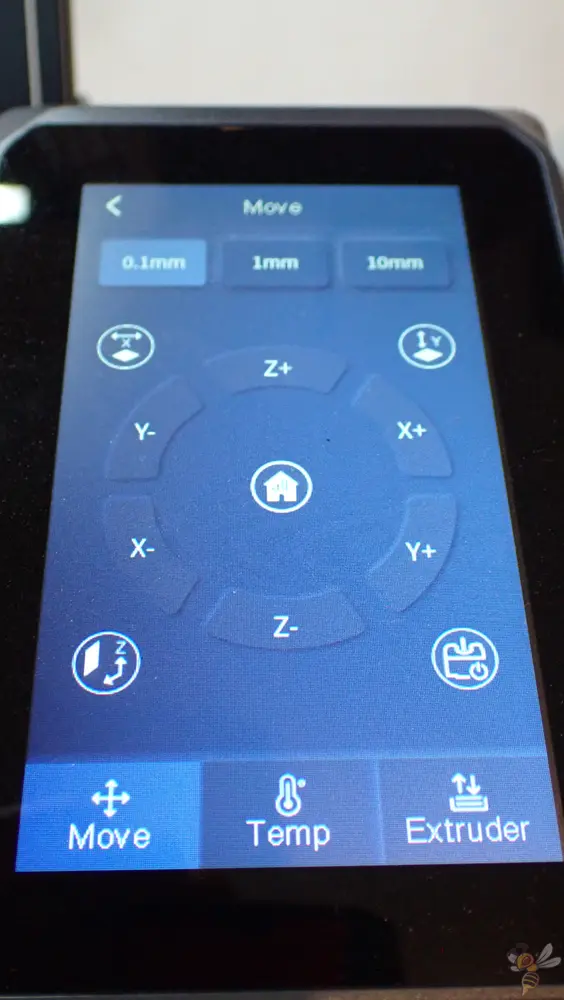
The Neptune 4’s touchscreen and menu are identical to the Neptune 3 series. The touchscreen is connected to the 3D printer base via a long cable. So you can detach the touchscreen and operate it like a smartphone. Depending on how much space there is on the work surface and how high the printer sits, this feature is either really handy or superfluous.


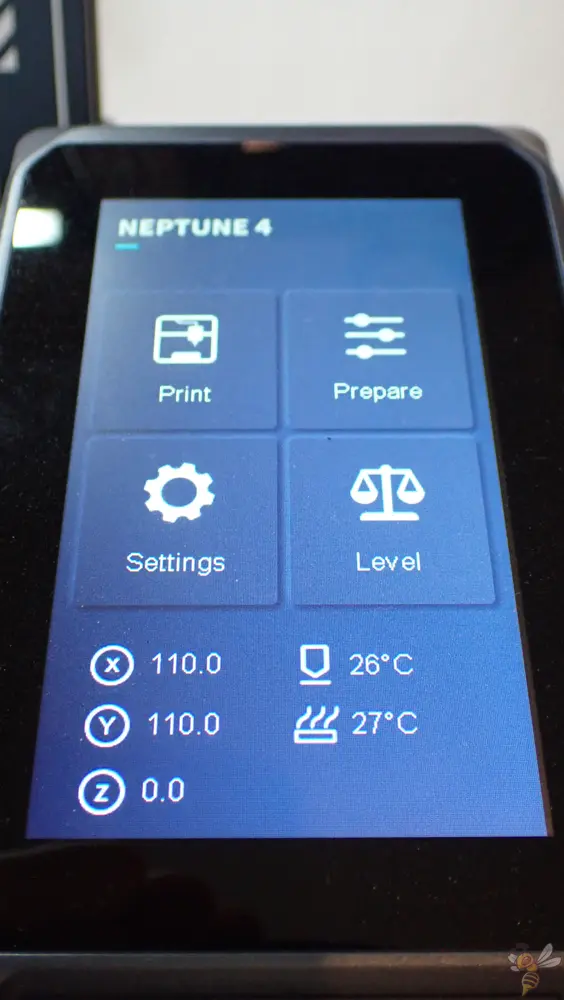
The menu is very intuitively designed. You can find all the important functions with just a few clicks. When the print files are saved as TFT files, the files are displayed with preview images of the objects in the print menu.
During printing, you can see the current progress and the most important settings on the display. You can also adjust certain settings like the temperatures, the speeds and the z-offset during printing. You can also control the LED lights during printing.
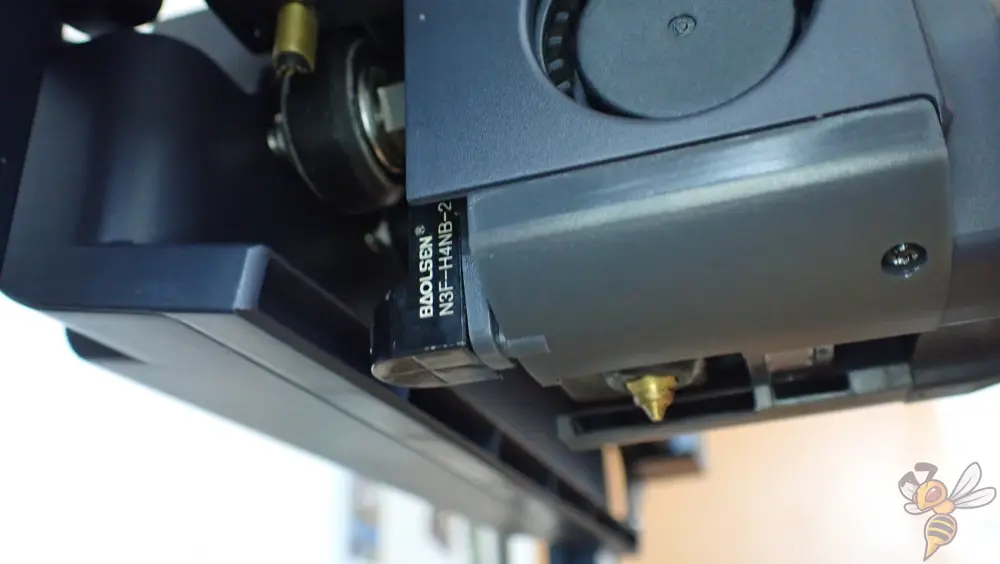
Filament sensor of the Neptune 4
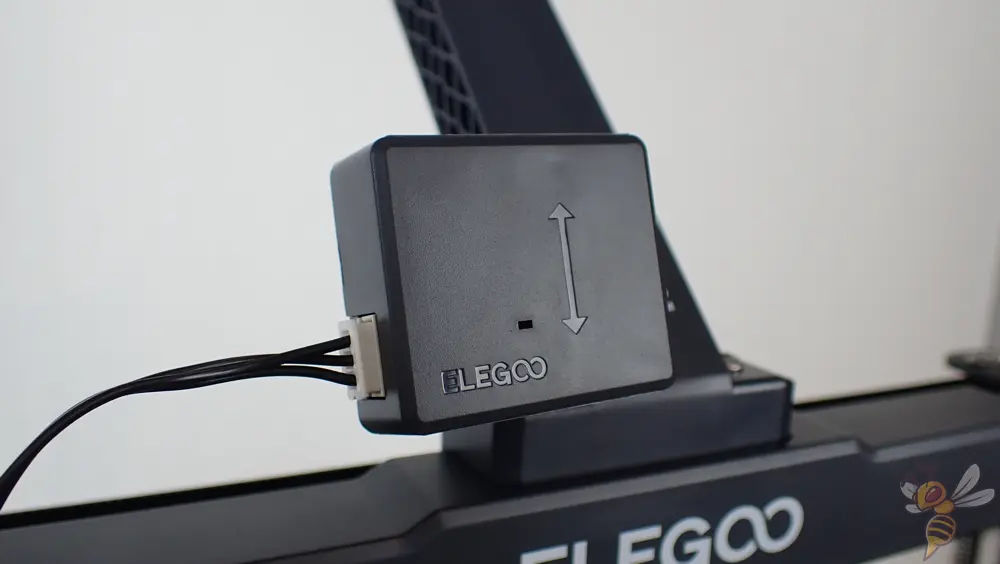
Located on the filament holder is the filament sensor. The filament is fed from the filament holder through the sensor to the extruder.
The sensor detects whether the filament is still present. If the filament on the spool is empty or broken, the Neptune 4 automatically pauses printing. This allows new filament to be added and printing to continue. Without this sensor, the 3D printer would simply continue printing even though there is no more filament. The entire print would then have to be repeated.
Stability of the z-axis of the Neptune 4
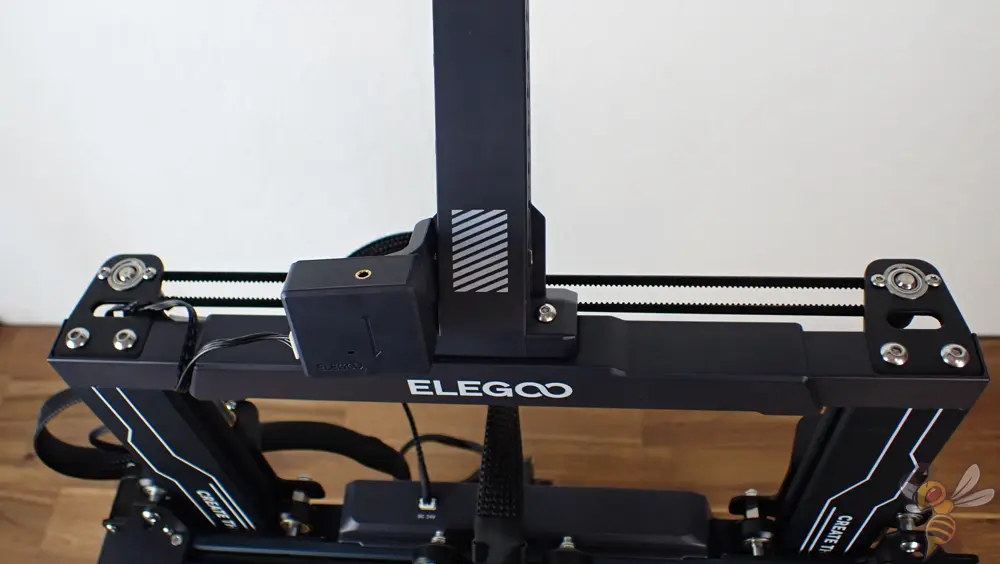
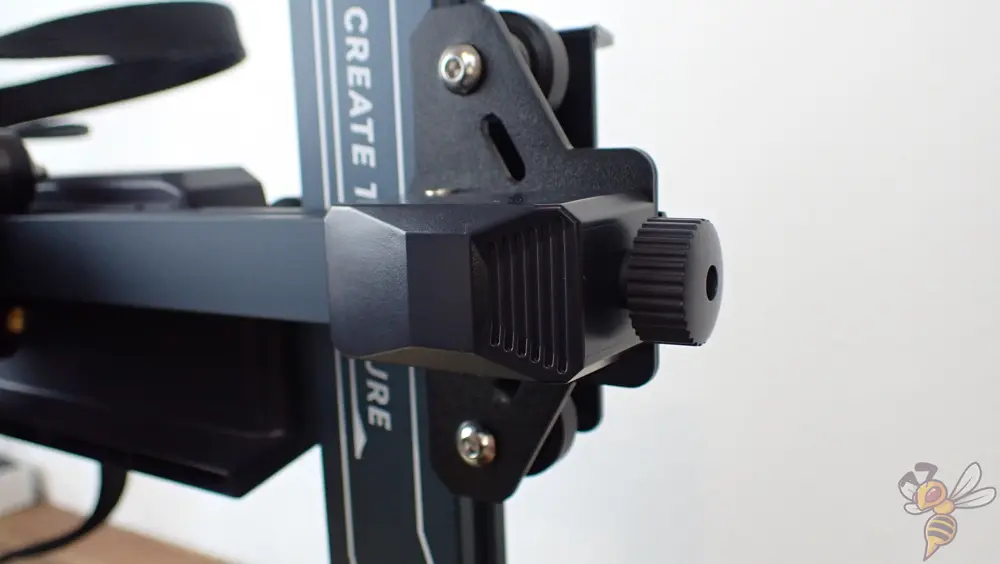
The Neptune 4 has a dual z-axis, which are also connected and synchronized via a toothed belt at the top of the frame.
In general, a dual z-axis improves stability and accuracy. However, with the new fan system, the double z-axis also serves another purpose.
With the new x-axis fan system and direct drive extruder, the x-axis is heavier overall than in comparable 3D printers. To ensure that one side of the x-axis does not lag behind when moving in the z-direction, both should be driven by a stepper motor. Synchronization also ensures that they always move in the same way.
This design means that even very tall objects at the top of the print volume can be printed accurately and without vibration.
LEDs illuminate the Neptune 4
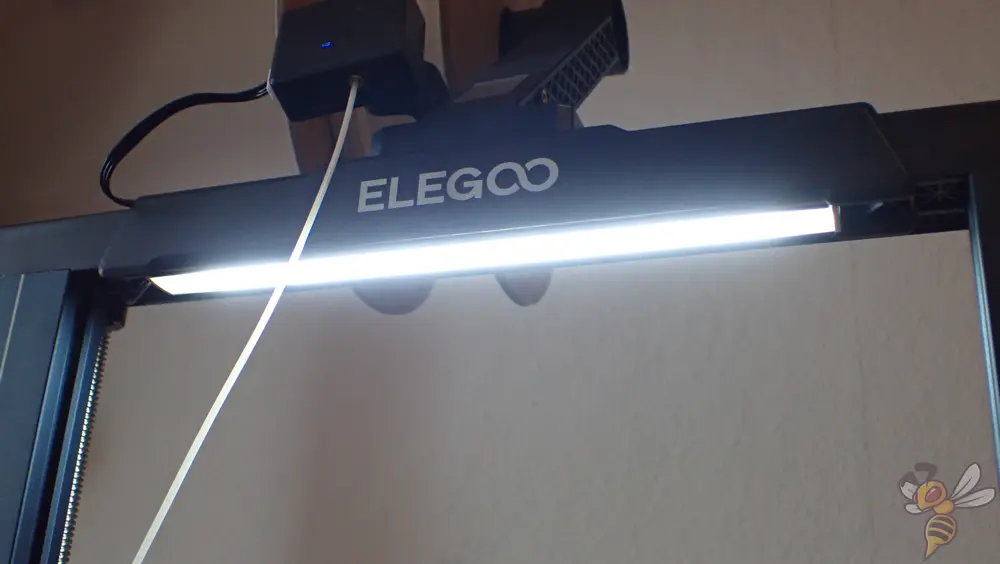

LED strips at the top of the print volume have been mostly reserved for the pro-versions of FDM 3D printers. However, the Neptune 4 now also has such an LED strip, plus an LED light in the print head.
I find the small LED light to be ingenious, as it allows you to watch closely during printing to see if there are any printing errors. Normally, there is a pitch-black shadow directly under the print head at the nozzle. But this way you can keep a close eye on everything. Both LEDs can also be turned on and off via the menu during printing.
Dual-Gear Direct Extruder of the Neptune 4

The Neptune 4’s direct drive extruder has been redesigned and is said to offer greater precision and less risk of clogging through more effective cooling and more precise heating.
During my testing, I did not experience any clogging of the nozzle, but neither did I with the Neptune 3 series. Subjectively, the precision and print quality is also pretty much identical. However, I did not work at such high print speeds with the Neptune 3 series. This certainly requires a more efficient heater to be able to melt the filament quickly.
I’m happy that the basic version of the Neptune 4 now has a direct drive extruder instead of a Bowden extruder. This means that you can also process flexible filaments without errors.
With a Bowden extruder, the extruder sits far away from the nozzle. This gives flexible filament the opportunity to compensate for the movements of the extruder on the long path, which leads to printing errors. This cannot happen with the Neptune 4’s direct drive extruder, as the path between the extruder and the nozzle is minimal.
Slicers compatible with the Neptune 4

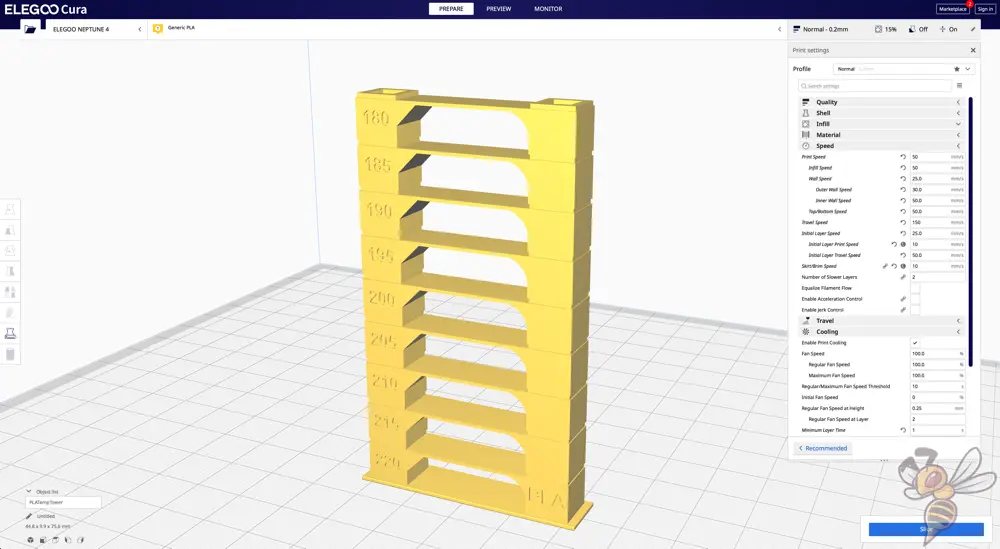
The Neptune 4 is compatible with the usual slicers that can be used for FDM 3D printers. These mainly include Elegoo’s Cura clone, Cura by itself, and PrusaSlicer.
In this article, I’ll show you my Cura settings for the Neptune 4, which I’ve calibrated for the main standard filaments: Elegoo Neptune 4 | Cura Settings – Guide & List
Test prints and calibration of the Neptune 4
To achieve good printing results with the Neptune 4, it is also necessary to calibrate the most important settings in the slicer. There is already a finished model on the included USB stick, but this will only show you if you did everything right during assembly and if all components are working properly.
I calibrated the print temperature and the retraction. For this purpose, there are various calibration objects where you can change the corresponding settings per layer. So you can see with one print which setting is the right one. In this article, you will find more details: 3D Printer Calibration: Step-by-Step to Perfect Results
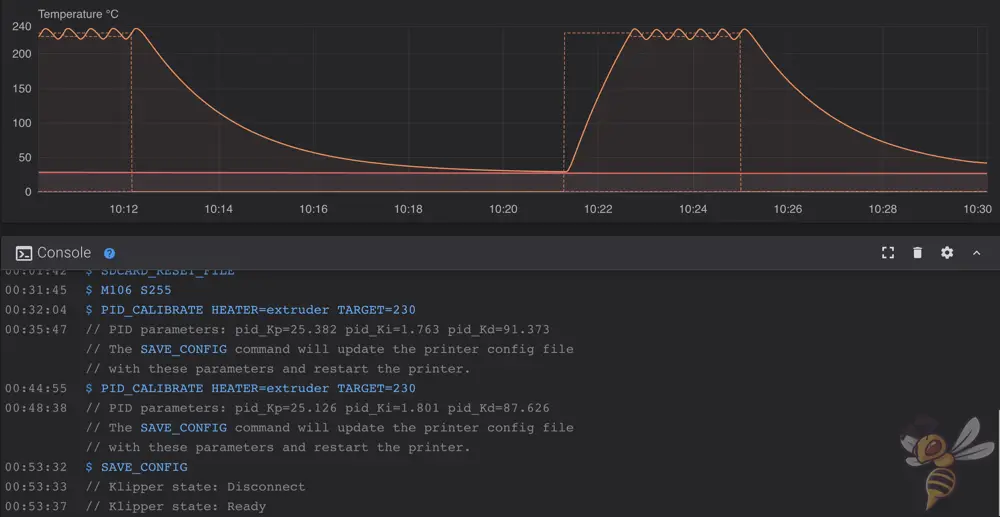
I also did a PID tuning via Klipper to make the hotend even more accurate. This calibration involves running several heating cycles and measuring the response of the temperature. From the ratio of the set temperature and the actual temperature, new parameters for heating the hotend are determined.
PID tuning avoids printing errors caused by inconsistent heating of the hotend. If the hotend heats more in one layer than in another, that layer becomes wider. This can cause horizontal lines along the z-axis and various other printing errors.
If you’re interested, here are the appropriate commands for this, which you can enter in Klipper’s console:
- TURN_OFF_HEATERS: This will let the hot end and the print bed cool down. Wait until the temperature is close to room temperature.
- M106 S255: To simulate the conditions during printing, this command will set the fan to 100%.
- PID_CALIBRATE HEATER=extruder TARGET=230: This starts the PID calibration of the extruder, with a target temperature of 230 °C.
- SAVE_CONFIG: Once all the cycles are done and the calibration is complete, the console will show the new PID values. With this command, you can save them to be applied in future jobs.
Volume of the Neptune 4 during printing

With the x-axis layer cooling disabled, the volume of the Neptune 4 is 30 to 40 decibels during printing. This is really quiet and comparable to rustling leaves.
However, with x-axis layer cooling enabled, the Neptune 4’s volume is over 60 decibels. This is the only real drawback to this 3D printer.
Since this layer cooling is the first iteration of Elegoo, I imagine it will be quieter in future versions. The problem with that, however, is that quieter fans are pricier and heavier.
The weight is probably still manageable, since they only need to move in the z-direction. However, the price will definitely affect the purchase price of an improved version.
Print speed of the Elegoo Neptune 4

With normal filament, the Neptune 4 reaches speeds of up to 250 mm/s. With special filament with better flow and melting characteristics, even speeds of 500 mm/s can be achieved.
Hyper PLA from Creality* is one of these filaments. With it, I was able to achieve a speed of 500 mm/s. In the future, there will also be a special filament for high speeds from Elegoo.

With the Hyper PLA, I was able to print a 3DBenchy within 19 minutes and that with an almost perfect print quality. With the predecessor of the Neptune 4, the Neptune 3 Pro, printing this object still took about an hour!
I printed all the other objects from regular filament at 250 mm/s in this review. The print quality is excellent, even at this high speed.
Print quality of the Elegoo Neptune 4 (pictures of 3D prints)
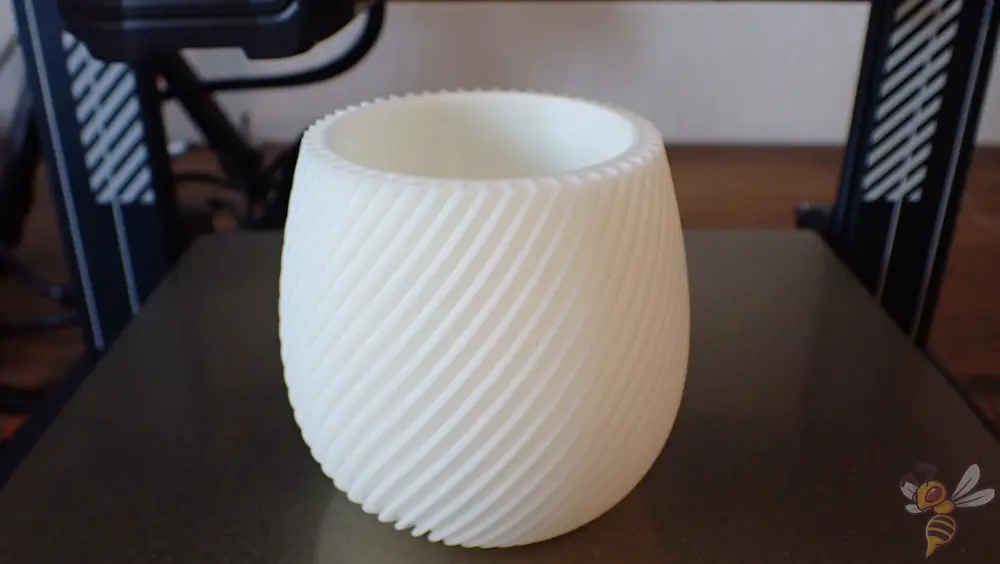
After calibration, the first thing I printed was a small vase. The main focus here was to see if there were any print defects on the outer walls due to the quick changes in direction.
Print settings of the vase:
- Layer height: 0.2 mm
- Line width: 0.4 mm
- Print speed: 250 m/s
- Infill density: 10%
- Infill pattern: Tri-Hexagonal
- Number of walls: 3
- Duration: 3h 39m
- Filament consumption: 90 g
Despite the high printing speed, however, the vase printed absolutely flawlessly and evenly.
After that, I wanted to test how the results would look with an even more complicated geometry.
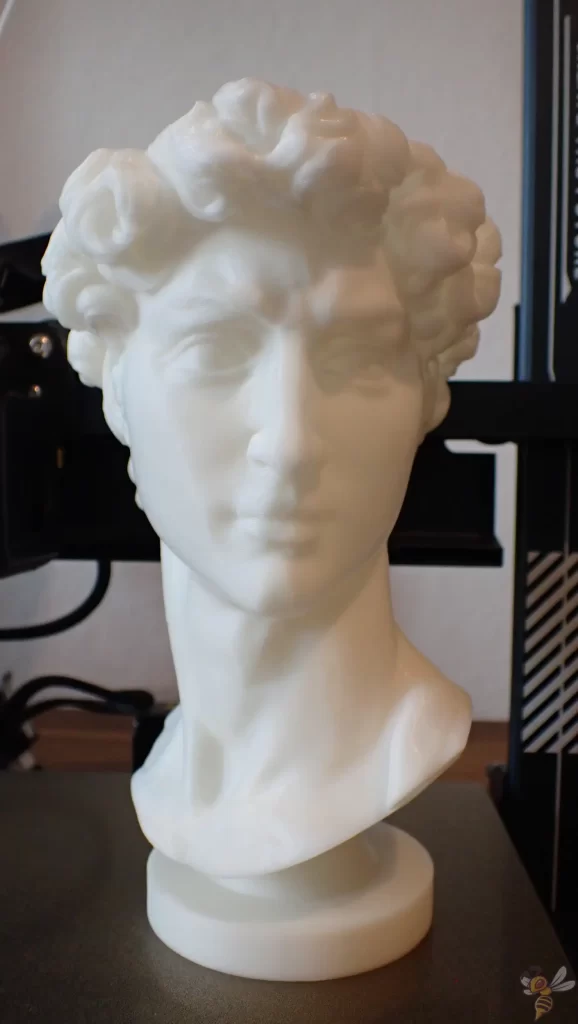
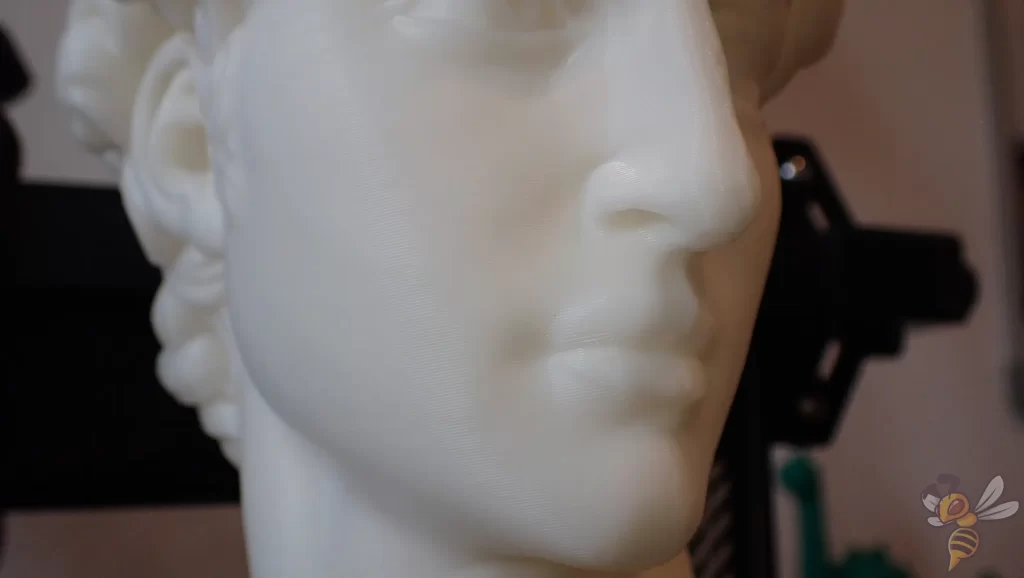
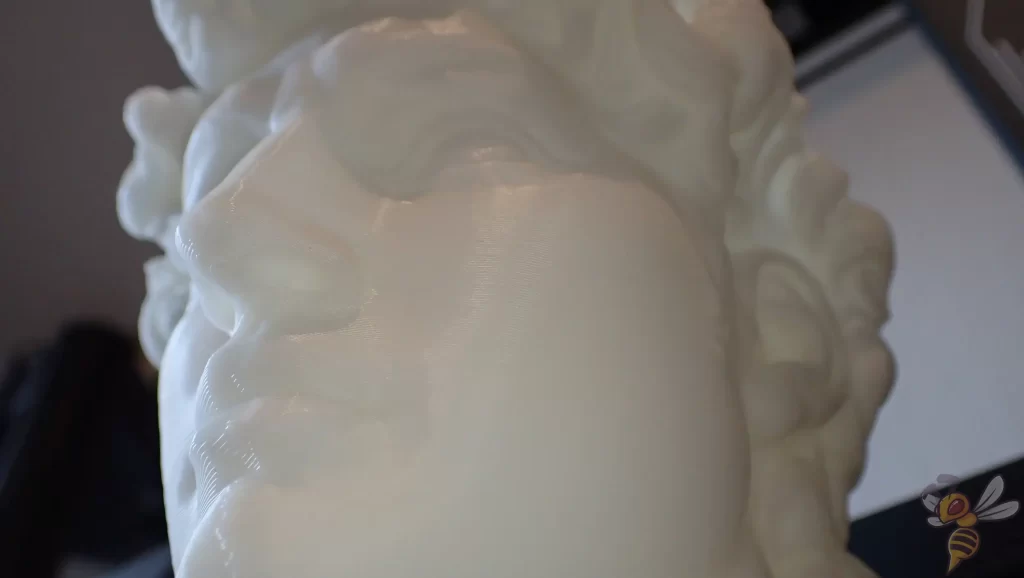
As a test object, I used a plant pot in the shape of David’s head (link to the file). The object is designed so that no supports need to be used. It also has a lot of detail, which allowed me to optimally test the accuracy of the Neptune 4.
Print settings of the David flowerpot:
- Layer height: 0.28 mm
- Line width: 0.4 mm
- Print speed: 250 m/s
- Infill density: 15%
- Infill pattern: Grid
- Number of walls: 3
- Duration: 5h 15m
- Filament consumption: 193 g
Even during printing, I was amazed by the print quality. From a meter away, you can hardly see any lines, even though the layer height is relatively large. Despite the high speed, the XY accuracy is excellent and no printing errors occur.


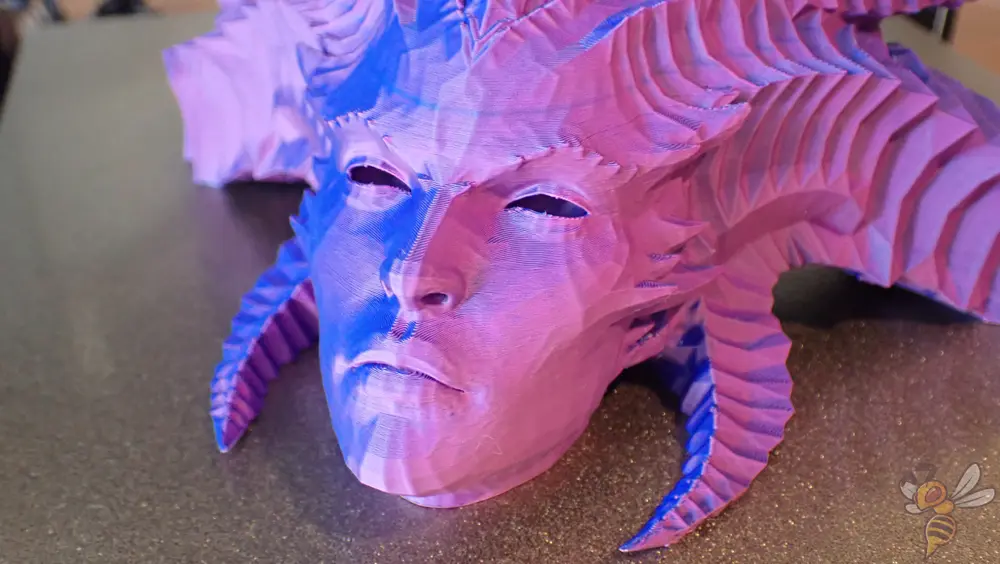
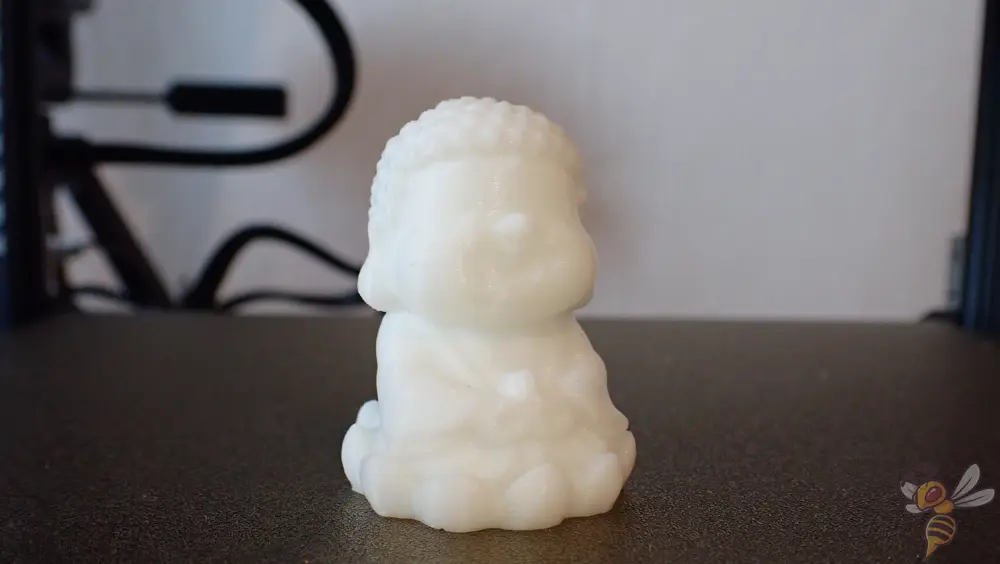
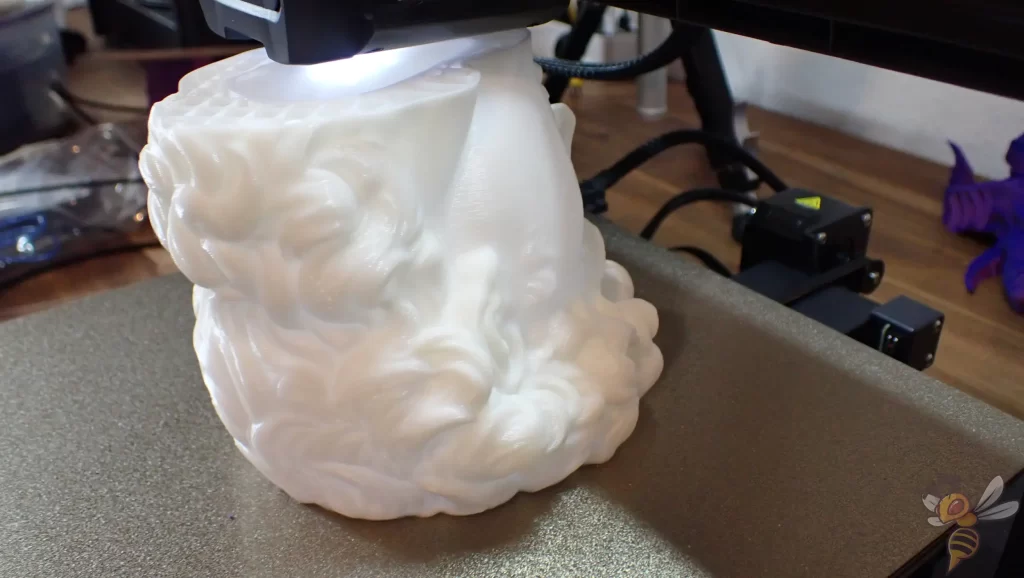
Finally, I printed the head of Lilith from Diablo IV (link to the print file). The model is very detailed and requires supports in many places. The many small corners, edges and horns of this model should challenge the 3D printer.
Print settings of Lilith:
- Layer height: 0.12 mm
- Line width: 0.3 mm
- Print speed: 250 m/s
- Infill density: 10%
- Infill pattern: Grid
- Number of walls: 3
- Duration: 15h 50m
- Filament consumption: 170 g
While this model used less filament than the David planter, it took about three times as long to print due to the small layer height.
The result is truly amazing, although there is occasionally some room for improvement on the supports. Except for subtle defects on some horns, not a single printing error occurred, and the effect of the two-color filament further contributes to making this a very outstanding model.
Operating the Elegoo Neptune 4 & Ease of Use Features
There are various reasons why I rate the Neptune 4 as one of the best, if not the best, entry level 3D printer right now. This is not only because of the excellent print quality, but also because of the many features that make it easier to use.
Automatic leveling: Manual leveling doesn’t have to be flawless, as the Neptune 4 also has automatic leveling. This automatically compensates for any remaining unevenness in the print bed. Especially for beginners, this feature is very valuable as it can avoid a lot of frustration.
Easy loading and unloading of filament: I have tested about 50 different FDM 3D printers so far. Only a small fraction of them offer a smooth filament loading without the filament getting stuck on various corners inside the hotend. Ideally, as it is with the Neptune 4, it should just be able to be pushed through the extruder to the nozzle without getting stuck.
No adhesives or spatula needed: One of the most common problems with 3D printing is that the print bed adhesion is too poor. I have now tested just about every print bed surface and am most satisfied with the PEI surface, which was also used on the Neptune 4. The print bed adhesion is ideal for most filaments. The fact that it’s flexible also means you no longer require a spatula to peel off the finished objects. Usually, they come off on their own after cooling.
Is the Elegoo Neptune 4 the right 3D printer for you?
What I really liked about the Neptune 4:
✓ The high speeds made possible by the layer cooling and Klipper.
✓ The easy handling.
✓ A very high printing accuracy, without much calibration effort.
The disadvantages of the Neptune 4:
× The printer gets very noisy when layer cooling is activated.
In my test, the Elegoo Neptune 4* shined in all areas. If the medium print volume is enough for you and you don’t mind the high noise, the Neptune 4 is ideal for you!
The Neptune 4 from Elegoo uses Klipper as firmware and can compensate for the vibrations of the print head. Together with the new X-axis fan system, it achieves high printing speeds.
Build Volume: 225 × 225 × 265 mm³
Speed: max. 500, normal 250 mm/s
Extruder: Direct Drive
Print Bed: Flexible PEI
Leveling: Automatic
Firmware: Klipper
Nozzle Temp.: max. 300 °C
Bed Temp.: max. 110 °C
Connectivity: USB, MicroSD, LAN
Pros:
✓ Klipper
✓ High print speed
✓ Touchscreen
✓ Good print bed adhesion
✓ Easy to use
✓ LED’s
Cons:
× Loud with layer fans on
Elegoo Neptune 4 vs. Neptune 4 Pro
I tested both the basic version of the Neptune 4 and the Pro version. In my opinion, the Pro version is not worth it this time.
Here you can read my review: Elegoo Neptune 4 Pro Review: Is the Pro Upgrade Worth It?
The two heating zones of the print bed are a good idea, but the new metal rails need to be greased regularly. Otherwise there will be a lot of abrasion.
At least on my copy, after a few hours the coating on the metal rails on the print bed dissolved and settled as fine dust. On one of my prints, which took over 10 hours, this resulted in strange print errors as the print bed was no longer positioned correctly. After cleaning and greasing the rail, however, the printer ran perfectly again.
The Neptune 4 from Elegoo uses Klipper as firmware and can compensate for the vibrations of the print head. Together with the new X-axis fan system, it achieves high printing speeds.
Build Volume: 225 × 225 × 265 mm³
Speed: max. 500, normal 250 mm/s
Extruder: Direct Drive
Print Bed: Flexible PEI
Leveling: Automatic
Firmware: Klipper
Nozzle Temp.: max. 300 °C
Bed Temp.: max. 110 °C
Connectivity: USB, MicroSD, LAN
Pros:
✓ Klipper
✓ High print speed
✓ Touchscreen
✓ Good print bed adhesion
✓ Easy to use
✓ LED’s
Cons:
× Loud with layer fans on
Important accessories for an FDM 3D printer
Most filaments need to be stored dry to avoid printing errors such as stringing. Vacuum bags with desiccant are perfect for this.
Filament Storage Vacuum Bags:
Desiccant Silica Gel Packs:
Hydroscopic filaments such as PETG or nylon absorb water from the air. This results in printing errors. A filament dryer dries the filament before printing.
Disclosure: This website is the property of Martin Lütkemeyer and is operated by Martin Lütkemeyer. Martin Lütkemeyer is a member of the Amazon Services LLC and other Affiliate Programs. These are affiliate advertising programs designed to enable websites to earn advertising revenue through advertising and linking to Amazon.com and others. Links marked with * are affiliate links.
