
- Wet Filament: Prevention, Symptoms & Drying - July 18, 2024
- Sovol SV08 – Best PrusaSlicer Settings & Profile - June 26, 2024
- Sovol SV08 – Best Orca Slicer Settings & Profile - June 26, 2024
Disclosure: Links marked with * are Affiliate Links. I earn from qualifying purchases if you decide to make a purchase through these links – at no additional cost for you!
The Creality K1 can deliver exceptional print quality at high speeds. However, the key to achieving optimal results with this device lies in the correct configuration of the print settings in the slicer.
Whether you’re working with PLA, ABS, PETG, or TPU materials, it is essential to fine-tune these settings accurately to ensure the highest level of detail, dimensional accuracy, and structural integrity in your 3D-printed objects.
After extensive testing and calibration of the Creality K1, I have managed to find the perfect settings for each material – PLA, ABS, PETG, and TPU. This article aims to share these meticulous configurations, achieved after countless iterations and adjustments. By following these settings, you can unlock the maximum potential of your Creality K1 or get a good head start in calibrating.
And if these settings do not get you perfect results, you should read this post on 3D printer calibration, or even better, get my 3D printing course!
| PLA | ABS | TPU | PETG | |
|---|---|---|---|---|
| Print Temperature | 220-240 °C | 260 °C | 220 °C | 250-270 °C |
| Print Bed Temperature | 60 °C | 100 °C | 70 °C | 70-75 °C |
| Chamber | Open | Closed | Open | Open |
| Speed | 200-300 mm/s | 200-300 mm/s | 80 mm/s | 200-300 mm/s |
| Print Acceleration | 12000 mm/s² | 12000 mm/s² | 12000 mm/s² | 12000 mm/s² |
| Travel Acceleration | 12000 mm/s² | 12000 mm/s² | 12000 mm/s² | 12000 mm/s² |
| Retraction | 0.5 mm at 40 mm/s | 0.5 mm at 40 mm/s | 0.5-1.0 mm at 30-40 mm/s | 0.5 mm at 40 mm/s |
| Cooling | 100 % | 50-70% | 100 % | 50-100 % |

Calibrated Cura Profile
For optimal print quality with minimal effort, you can download my calibrated Cura profile for this 3D printer and import it directly into Cura. All settings are perfectly adapted to this printer, e.g. the accelerations, jerk, supports and the first layer.
Table of Contents:
How to Create a Profile for the Creality K1 in Cura
A 3D printer profile in Cura is a comprehensive dataset that includes both machine settings and print settings. The machine settings define the physical attributes of the printer, such as the build volume, nozzle size, and filament diameter.
Conversely, the print settings are a group of parameters that dictate how the printer operates during the printing process. These parameters, which include factors like layer height, print speed, and temperature play a pivotal role in determining the quality of the final print.
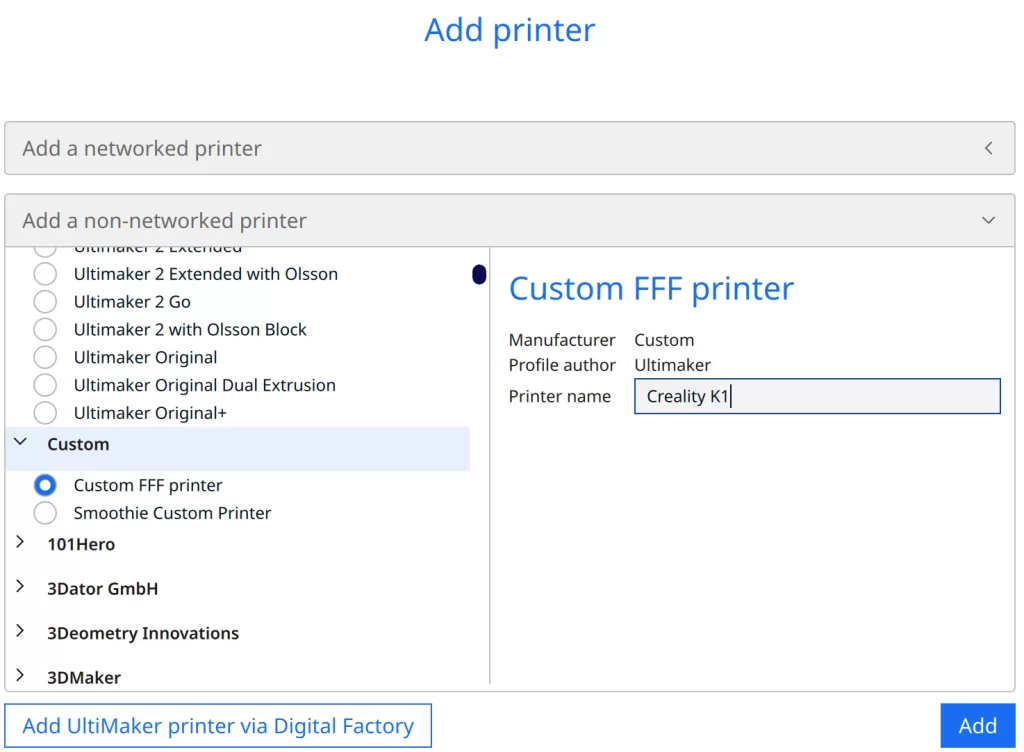
To add a 3D printer in Cura, start by navigating to the ‘Settings’ menu, followed by the ‘Printer’ option, and finally select ‘Add Printer.’ You will then encounter a choice of ‘networked printers’ and ‘non-networked printers.’ Opt for the ‘non-networked printers’ to proceed further.
The subsequent screen presents a list of manufacturers and their corresponding models. As we are setting up a custom printer, skip these options and directly select the ‘Custom’ category. Within this category, select ‘Custom FFF printer.’ This will open a dialog box where you can input the name of your 3D printer.
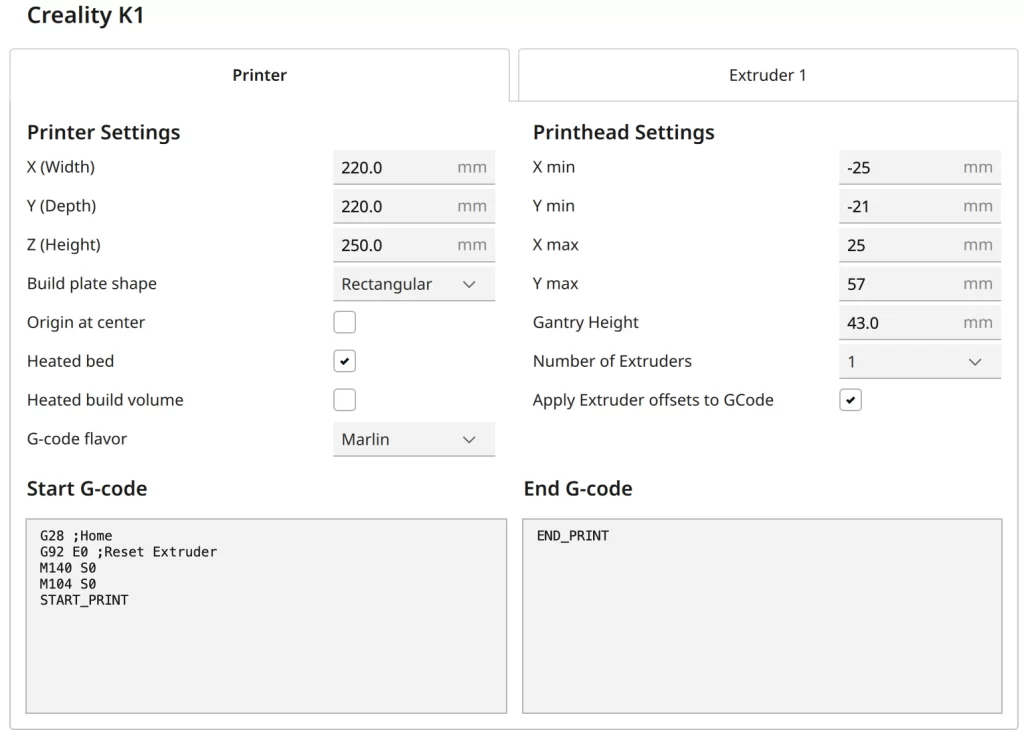
After clicking ‘Add’, the machine settings have to be defined. In the Machine Settings dialog box within Cura, you will be asked to enter details about your 3D printer. This includes information about the printer’s physical dimensions, such as the X, Y, and Z (height, width, and depth) measurements of the build plate. Other details include the number of extruders, as well as specifics about the printer’s nozzle and filament diameter.
It’s important to understand that the values you will input in these fields are dependent on your specific printer model. Please refer to the screenshot provided for the filled-out machine settings for the Creality K1.
Once the printer profile is successfully created, you can go on to define the print settings. This is where you specify parameters that drive the behavior of your 3D printer during the printing process. These parameters include settings for print speed, layer height, print temperature, and other factors crucial to the print quality and precision.
We start with the settings I found perfect for the different standard filaments.
You can find more information on how to create a 3D printer profile in Cura and what you need to pay attention to in this article: How to Create a Custom 3D Printer Profile in Cura
PLA Settings
These are the correct Cura settings for the Creality K1 for PLA:
- Print temperature: 220-240 °C
- Print bed temperature: 60 °C
- Print speed: 200-300 mm/s
- Retraction: 0.5 mm at 40 mm/s
- Cooling: 100%
- First layer: 5-10 mm/s, 0% cooling, 100% extrusion width, 100% layer height
The Creality K1 can print PLA with speeds of up to 600 mm/s. To get perfect print quality, however, you have to calibrate the settings mentioned above meticulously to avoid printing errors.
With normal PLA you get good results between 200 and 300 mm/s. Above these printing speeds, it is easier to get perfect quality with the high-speed PLA from Creality*.
Otherwise, PLA is fairly easy to print with the K1. And due to the Klipper firmware, printing errors like ringing or ghosting are almost non-existent.
Klipper firmware offers a unique feature called ‘Vibration Compensation’ designed to mitigate the effects of vibration during the printing process, thus enhancing print quality. This advanced feature essentially works by predicting the printer’s future movements and adjusting the stepper motor currents accordingly to offset any unwanted vibrations.
It makes use of a process called ‘input shaping’. This process effectively reduces the resonant frequencies of the printer’s hardware, mitigating the occurrence of ringing or ghosting effects. Through this feature with the K1 can print 5 to 10 times faster than traditional 3D printers.
ABS Settings
These are the correct Cura settings for the Creality K1 for ABS:
- Print temperature: 260 °C
- Print bed temperature: 100 °C
- Print speed: 200-300 mm/s
- Retraction: 0.5 mm at 40 mm/s
- Cooling: 50-70% + closed chamber
- First layer: 5-10 mm/s, 0% cooling, 100% extrusion width, 100% layer height
ABS is a widely used 3D printing filament notable for its durability, heat resistance, and impressive mechanical properties. Well-suited for applications that demand structural integrity and detail, ABS has become a favorite choice among 3D printing enthusiasts.
However, it’s important to note that to successfully print with ABS, certain printer conditions need to be met.
Like many 3D printing materials, ABS has specific processing requirements to ensure quality prints. It tends to warp if cooled too quickly, hence the need for a consistent and adequately heated print bed – typically around 100 °C. Furthermore, ABS prints best in a closed chamber to maintain a stable temperature throughout the print process, reducing the risk of warping.
Another essential parameter to consider is the print speed, which should be maintained within the 200-300 mm/s range for optimal results with the Creality K1. But you can go faster if you dial in the cooling settings.
Using a slower first layer speed is also highly recommended to ensure better bed adhesion. The correct retraction settings can help prevent stringing and oozing, common issues when printing with ABS. The settings above should work for most ABS filaments, but you should calibrate the retraction for optimal results.
TPU Settings
These are the correct Cura settings for the Creality K1 for TPU:
- Print temperature: 220 °C
- Print bed temperature: 70 °C
- Print speed: 80 mm/s
- Retraction: 0.5-1.0 mm at 30-40 mm/s
- Cooling: 100%
- First layer: 5-10 mm/s, 0% cooling, 100% extrusion width, 100% layer height
TPU is the most popular flexible filament. But it is challenging to print. To ensure a good quality with TPU, the print speed and retraction settings need meticulous calibration (how you do that, I’ll explain further down in this article).
Setting the print speed too high with TPU can lead to extruder jams. A moderate speed, generally around 80 mm/s resulted in good results for most TPU filaments for me.
Direct drive extruders, like the extruder of the K1, offer a significant advantage when printing with TPU due to their design. In a direct drive setup, the extruder is directly connected to the hot end, reducing the distance the filament must travel. This results in better control over the filament’s movement, crucial when dealing with flexible filaments like TPU, which can be difficult to push over longer distances.
Consequently, direct drive extruders provide better precision and eliminate issues such as jamming or excessive stringing, prevalent with Bowden extruders that try to print with flexible filaments. This is why the K1 is well-equipped for TPU.
PETG Settings
These are the correct Cura settings for the Creality K1 for PETG:
- Print temperature: 250-270 °C
- Print bed temperature: 70-75 °C
- Print speed: 200-300 mm/s
- Retraction: 0.5 mm at 40 mm/s
- Cooling: 50-100%
- First layer: 5-10 mm/s, 0% cooling, 100% extrusion width, 100% layer height
PETG filament is renowned for its strength and flexibility, but it tends to string, which can be quite problematic in 3D printing. Stringing or oozing occurs when small strands of plastic are drawn out from the nozzle, leaving behind unwanted lines between different parts of your print.
To manage this, a key aspect is the calibration of the retraction and the print temperature. I have calibrated the K1 with various PETG filaments and the values above should result in a good print quality for you.
One of the most crucial factors to consider while printing with PETG filaments is the cooling. It’s important to note that different PETG filaments can respond quite differently to various cooling settings. Therefore, it might be necessary to experiment a bit with the cooling settings to finely tune your prints. Some PETG filaments might give better results when cooled less, while others could yield a more precise print when cooled more. Adjusting the cooling can lead to significant improvements in the final print quality.
In my tests 50-100% cooling seemed to be the sweet spot for the K1, but it’s always a good idea to experiment and see what works best with your specific filament and settings.
Best Cura Settings for the Creality K1
Having shared my individual filament settings, let’s now delve into the specific settings and explore how to calibrate them. This will guide you in fine-tuning your 3D printing process for optimal results with the Creality K1.
Print Temperature
The best printing temperatures for the Creality K1 in Cura:
- PLA: 220-240 °C
- ABS: 260 °C
- TPU: 220 °C
- PETG: 250-270 °C
An incorrectly set print temperature can lead to multiple issues that compromise the quality and integrity of the final print. On one hand, if the temperature is too high, it may cause the filament to become overly viscous.
This can lead to stringing, where thin strands of filament are drawn out from the nozzle, negatively affecting print quality. Additionally, an excessive temperature can result in over-extrusion, leading to blobs and zits on the print surface, or even causing the printer to jam.
On the other hand, if the print temperature is set too low, the filament might not fully melt, leading to under-extrusion. In this case, the print layers may not adhere to each other adequately, resulting in prints with weak structural integrity and visible gaps.
Furthermore, a suboptimal temperature may impact the aesthetic quality of the print, causing it to appear dull or uneven. Therefore, accurate temperature calibration is essential for successful 3D printing with any type of filament.
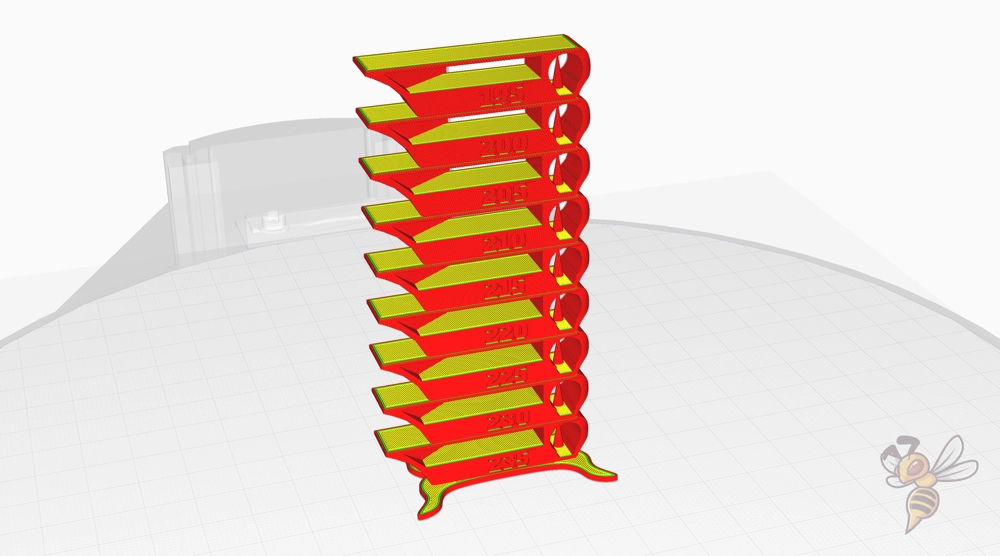
A Temperature Tower is an effective method to calibrate the print temperature of your K1. This is essentially a test print comprised of a range of different temperature settings. By printing a temperature tower, you can visually evaluate the impact of temperature on the print quality and select the optimal settings.
To start the process, download a temperature tower model (like this one). Load the model into your slicer software and modify the temperature settings at different layers according to the design of the tower with a script. The idea is to test a range of temperatures within the safe operating limits of your specific filament.
In this article, I show you how to do that in detail.
Upon completion of the print, evaluate the results. Look for issues such as stringing, layer adhesion problems, or uneven extrusion across the tower. The section with the least amount of these problems will indicate the optimal temperature for your filament. Adjust your slicer settings accordingly for future prints.
Print Bed Temperature
The best print bed temperatures for the Creality K1 in Cura:
- PLA: 60 °C
- ABS: 100 °C
- TPU: 70 °C
- PETG: 70-75 °C
Striving for the highest possible printing temperature can enhance print quality. However, it’s crucial to avoid the occurrence of an ‘elephant foot‘, a phenomenon where the base layers of your print expand outward, ruining the model’s accuracy and appearance.
Careful calibration is key. Start with the suggested temperatures for your filament type, then incrementally increase until you notice signs of the ‘elephant foot.’ At this point, reduce the temperature slightly to find your ideal setting.
Or you could just use the settings listed above!
Print Speed
The best print speed for the Creality K1 in Cura:
- PLA: 200-300 mm/s
- ABS: 200-300 mm/s
- TPU: 80 mm/s
- PETG: 200-300 mm/s
Ringing and ghosting are common artifacts that occur when 3D print speeds are set too high. The former is characterized by echoes of sharp corners along the print’s path, while the latter creates a faint duplicate image of your print design. These anomalies are undesirable as they compromise the print quality and precision of your 3D model.
To mitigate these issues, calibration of print speed is essential. Start by setting your print speed to a lower rate. In the case of the Creality K1 and PLA, for instance, begin with a speed of 200 mm/s.
Next, incrementally increase the speed while closely monitoring the print quality. If you begin to observe ringing or ghosting, slightly reduce the print speed. This iterative method will help you determine your optimal speed, balancing both print time efficiency and quality.
The acceleration settings for the Creality K1 are set at 12000 mm/s².
Layer Height
The best layer heights for the Creality K1 in Cura:
- Decorative objects: 0.1 mm
- Standard: 0.2 mm
- Coarse, fast prints: 0.3 mm and above
Layer height is a crucial setting in 3D printing, correlating directly with the resolution of the printed object. Defined as the thickness of each individual layer of extruded plastic, it is usually measured in mm or microns. The layer height can be adjusted according to the nozzle size of your 3D printer.
In the case of Creality K1, a 0.4 mm nozzle is used. This size is considered as a universal standard in FDM 3D printers and is suitable for a wide range of prints. The nozzle size sets the upper limit for the layer height, meaning that with a 0.4 mm nozzle, the maximum layer height should never surpass 0.4 mm.
Selecting an appropriate layer height depends on your print requirements. Higher layer heights (close to the maximum limit) yield faster prints but sacrifice detail and surface smoothness. Conversely, lower layer heights produce fine details and smooth surfaces but increase print time significantly. Hence, an optimal balance based on your requirements must be achieved.
In my suggestions for the Creality K1, I recommend a layer height of 0.1 mm for decorative objects to capture intricate details. For standard prints, a layer height of 0.2 mm is fine, while for coarse, fast prints, you can go as high as 0.3 mm and above. Each setting offers a different balance between print speed and resolution, so choose based on your specific needs.
Flow Rate
The best flow rate for the Creality K1 in Cura:
- Default value: 100%
- For over-extrusion: 90% to 99%
- For under-extrusion: 101% to 110%
The flow rate is a crucial setting in 3D printing that controls the amount of filament extruded during the printing process. Its calibration is essential to achieving quality prints. The default setting is typically 100%.
However, the flow rate may need adjustment based on the print condition. For instances of over-extrusion, where too much filament is deposited, reducing the flow rate to between 90% and 99% can be beneficial. Conversely, in cases of under-extrusion, where too little filament is extruded, increasing the flow rate to between 101% and 110% can help to counterbalance this.
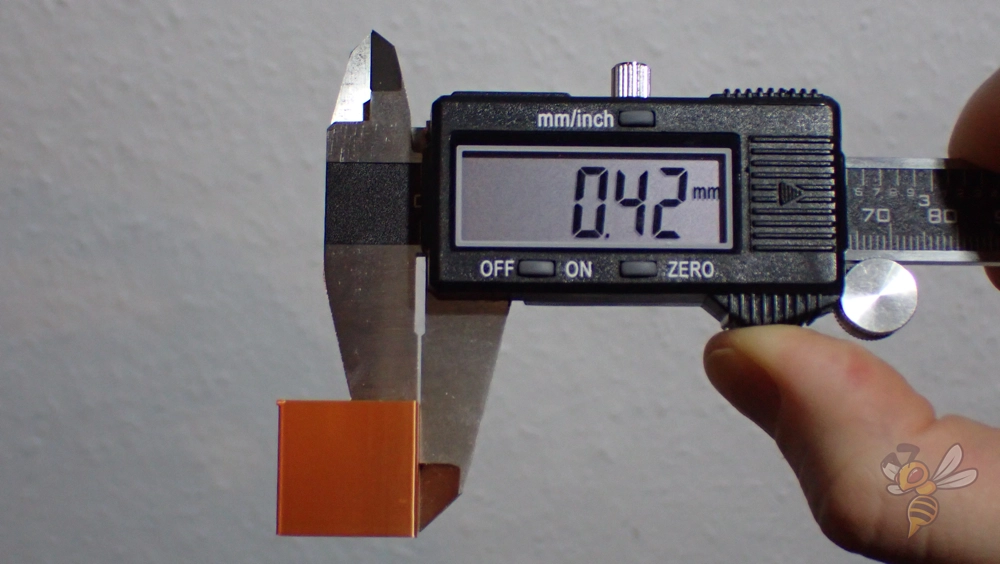
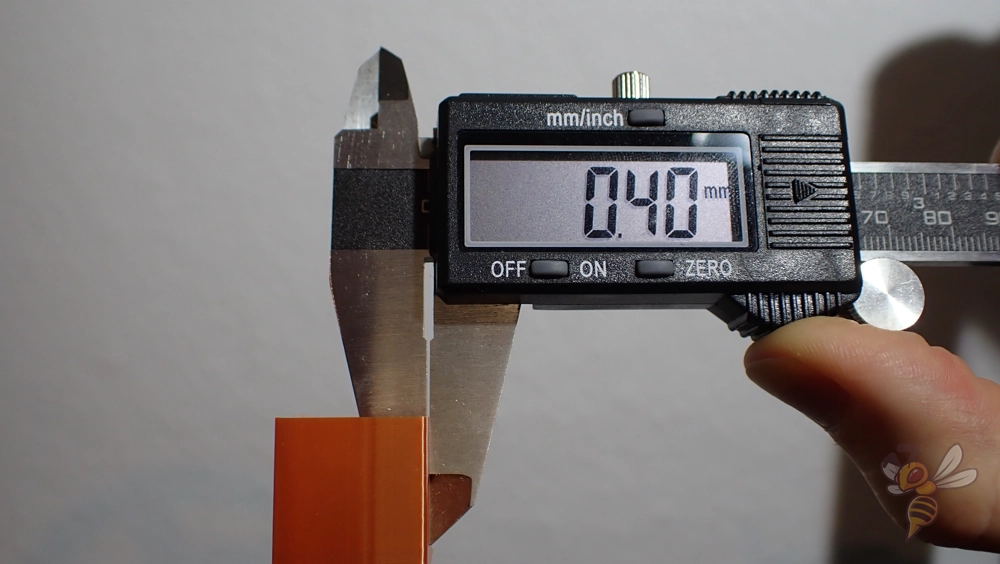
To calibrate the flow rate, begin by printing a hollow cube with two walls. This simple geometry will provide clear and measurable results, allowing you to accurately assess the amount of filament extruded.
After the cube has been printed, proceed to measure the wall thickness using a caliper. Calipers provide a precise reading, which is critical for accurate calibration. Remember, the reading must be taken at multiple points to account for any possible inconsistencies.
Upon acquiring the measurement, divide the value by two. This calculation will provide the average thickness of a single wall. Finally, compare this value to the wall thickness set in the slicer. This direct comparison allows you to determine if any adjustments are needed, and guides you in tuning the flow rate for optimal print quality.
Retraction
The best retraction settings for the Creality K1 in Cura:
- PLA: 0.5 mm at 40 mm/s
- ABS: 0.5 mm at 40 mm/s
- TPU: 0.5-1.0 mm at 30-40 mm/s
- PETG: 0.5 mm at 40 mm/s
Improper retraction settings can lead to a common 3D printing issue known as stringing. Stringing occurs when small threads or strings of filament are left behind as the print head moves across the print space. This happens primarily due to the filament continuing to ooze out of the nozzle when the print head is moving between points, but not depositing filament.
This results in fine filament strings that connect different parts of the printed object, compromising the aesthetic quality and precision of the final print.
The retraction settings provided above for different filament types are a good starting point for the K1. However, they may not deliver perfect results for every print due to variations in filament characteristics, environmental factors, and individual printer behavior. Calibration becomes essential in such cases to fine-tune the retraction settings for optimal results.
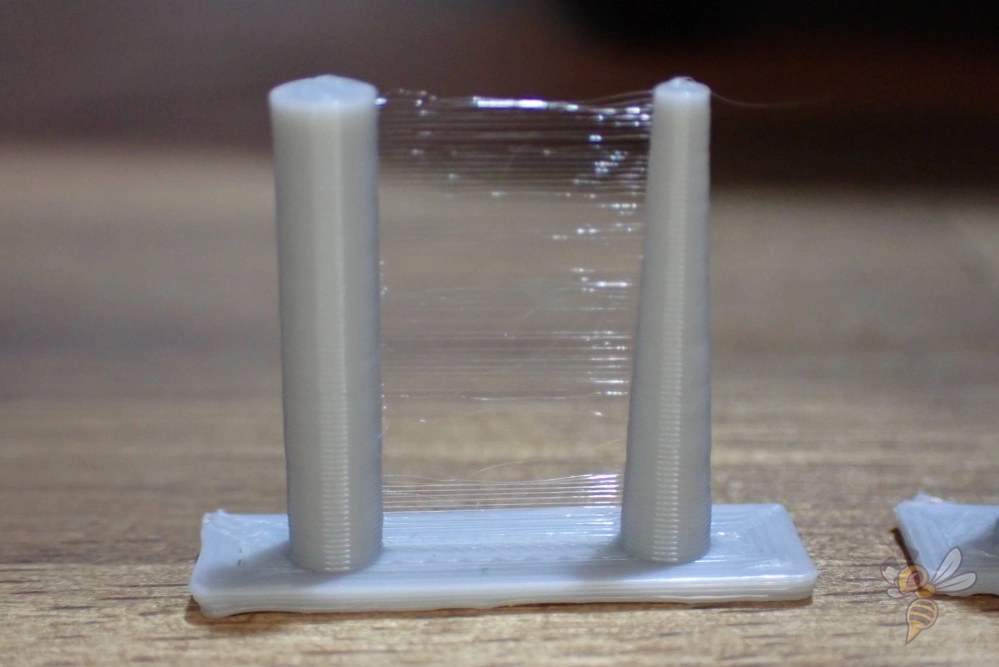
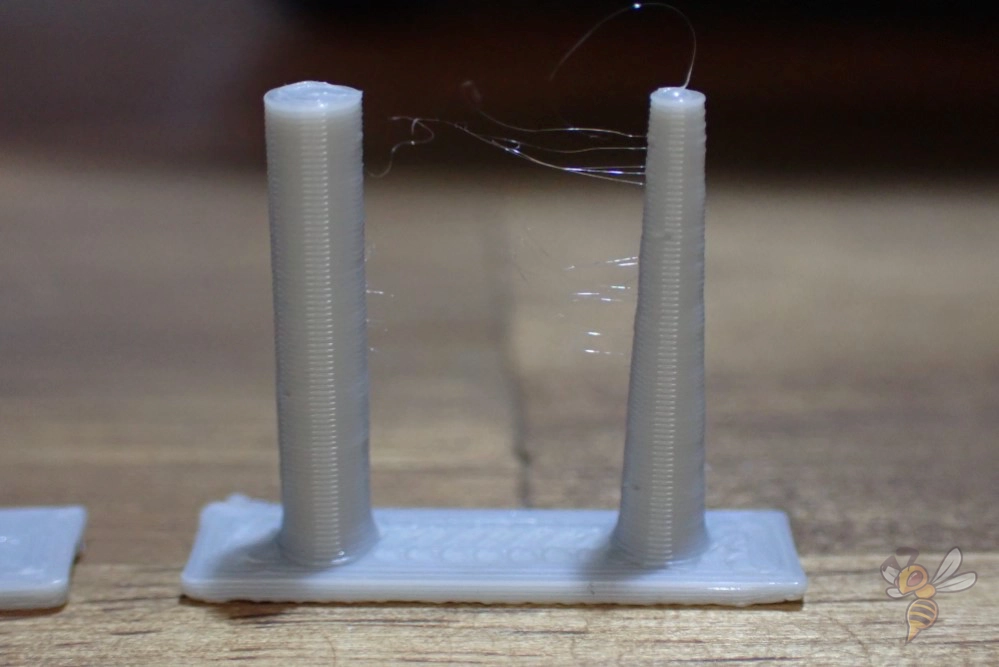
Calibration involves testing various retraction distances and speeds to identify the optimal settings that minimize stringing for each specific filament type. A series of test prints, typically using models designed specifically for retraction calibration, are printed with incremental changes in retraction settings. The results are then compared to identify the settings that yield the best print quality.
In conclusion, while the provided retraction settings are a good starting point, it is crucial to understand their role and the potential issues that can arise from incorrect settings. Calibration is a necessary step towards achieving perfect prints, reducing stringing, and enhancing the overall quality and precision of the Creality K1.
Infill
The best infill density for the Creality K1 in Cura:
- Decorative objects: 0-15%
- Standard objects: 15-50%
- Stable objects: 50-100%
In the context of 3D printing, the term ‘infill density’ refers to the amount of material printed inside an object. It’s a percentage value, where 0% infill means that the object is entirely hollow on the inside, and 100% infill indicates that it is entirely solid.
For decorative objects that are meant for display and require less durability, an infill density of 0-15% is sufficient. For standard objects that require a good balance between strength and material usage, an infill density of 15-50% is recommended. For objects that need to be sturdy and strong, an infill of 50-100% is ideal.
First Layer
These are the best Cura settings for the first layer with the Creality K1:
- Layer height: 100-200% of normal layer height (higher values to increase print bed adhesion)
- Line width: 100-200% of normal line width (higher values to increase print bed adhesion)
- Print temperature: Same as the rest of the object, or 5-10 °C higher for better print bed adhesion.
- Print speed: 50% of normal print speed (i.e. 25 mm/s for a normal print speed of 50 mm/s) or 5-10 mm/s for high print bed adhesion
- Flow rate: 100-110% (higher values in case of poor print bed adhesion)
- Raft/Brim/Skirt: Not necessary, since the Creality K1 has a PEI print bed and already extrudes a line at the edge of the print bed due to the start G-code.
The primary goal of the first layer settings is to extend the cooling period of the filament. Because the longer it can remain warm post-extrusion, the better it adheres to the print bed.
By tweaking parameters such as print speed and temperature, Cura settings can be configured to maximize the filament cooling duration. A reduced print speed for the first layer means the filament is exposed to the print head heat for a longer time, thus promoting adhesion.
Similarly, setting the print temperature equal to or slightly higher than the rest of the object ensures the filament remains warm longer. This improved thermal period directly enhances print bed adhesion, resulting in more reliable 3D prints with reduced warping or detachment issues.
Conclusion
To sum it up, the Creality K1 is an outstanding 3D printer that produces impressive high-quality prints. However, achieving its impeccable performance relies on properly adjusting the Cura settings.
Adjusting parameters like layer height, line width, print temperature, speed, and flow rate significantly impact the quality of your 3D prints. Mastering these settings is essential to unlock the full potential of the Creality K1 and consistently achieve flawless results.
I hope this guide proves helpful in mastering your Creality K1’s Cura settings. Remember, the right adjustments can make all the difference in your printing results!
Disclosure: This website is the property of Martin Lütkemeyer and is operated by Martin Lütkemeyer. Martin Lütkemeyer is a member of the Amazon Services LLC and other Affiliate Programs. These are affiliate advertising programs designed to enable websites to earn advertising revenue through advertising and linking to Amazon.com and others. Links marked with * are affiliate links.
