
- Wet Filament: Prevention, Symptoms & Drying - July 18, 2024
- Sovol SV08 – Best PrusaSlicer Settings & Profile - June 26, 2024
- Sovol SV08 – Best Orca Slicer Settings & Profile - June 26, 2024
Disclosure: Links marked with * are Affiliate Links. I earn from qualifying purchases if you decide to make a purchase through these links – at no additional cost for you!
The Voxelab Aquila D1 is a powerful 3D printer. It’s compatible with Cura, one of the most popular slicing software options available.
However, achieving perfect print quality isn’t about just using Cura. Success lies in fine-tuning the settings to match the specific printer. This guide will help you understand and adjust these settings for optimal results with your Aquila D1.
I’ve spent considerable time testing the Voxelab Aquila D1 thoroughly. Each setting has been finely calibrated to ensure the best print quality possible. It wasn’t a quick process – it involved a series of trial and error, careful adjustments, and patience.
In this article, I’m going to share these carefully honed settings with you. It’s my hope that they’ll serve as a valuable guide to get the most out of your Aquila D1.
If you require additional details on how to calibrate these settings, you can refer to this post. For a more in-depth understanding, consider enrolling in my comprehensive 3D printing course. This course offers extensive insights into mastering 3D printing techniques, beyond just the settings.
| PLA | ABS | TPU | PETG | |
|---|---|---|---|---|
| Print Temperature | 205-210 °C | 240 °C | 220 °C | 240-250 °C |
| Print Bed Temperature | 60 °C | 100 °C | 40-60 °C | 70 °C |
| Speed | 60 mm/s | 60 mm/s | 30 mm/s | 50 mm/s |
| Retraction | 1.5 mm at 30 mm/s | 1.5 mm at 30 mm/s | 0.5 mm at 20 mm/s | 1.5 mm at 30 mm/s |
| Cooling | 100 % | 0% | 100 % | 50-100 % |

Calibrated Cura Profile
For optimal print quality with minimal effort, you can download my calibrated Cura profile for this 3D printer and import it directly into Cura. All settings are perfectly adapted to this printer, e.g. the accelerations, jerk, supports and the first layer.
Table of Contents:
How to Create a Profile for the Voxelab Aquila D1 in Cura
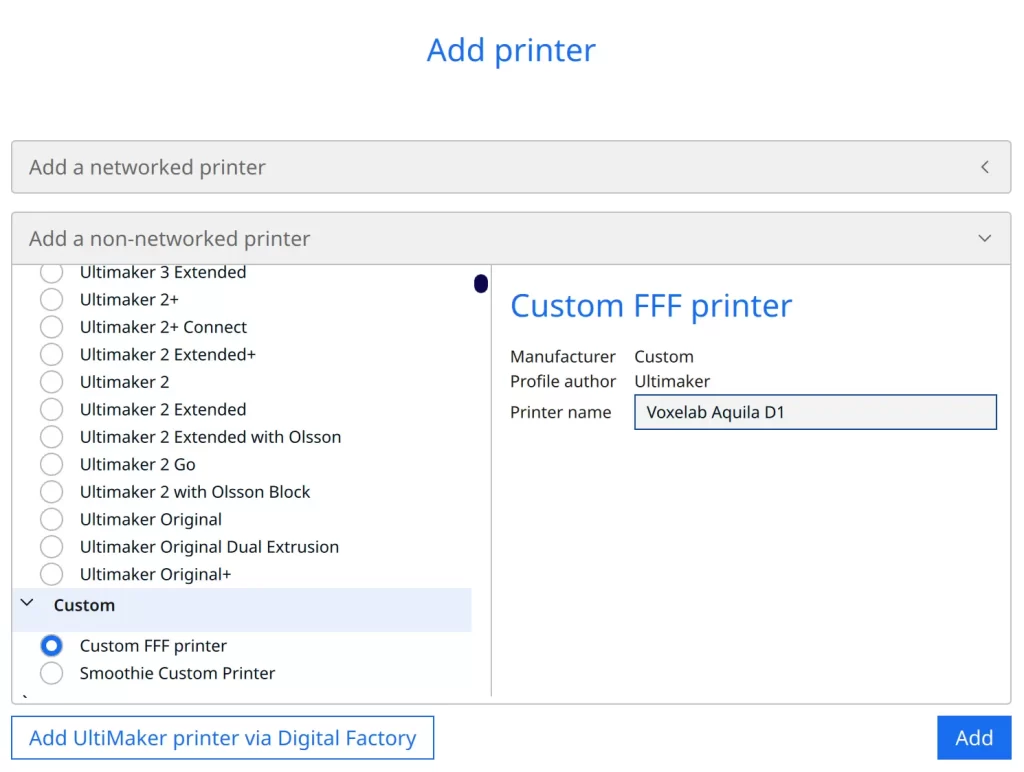
To add your Voxelab Aquila D1 as a 3D printer in Cura, follow these simple steps:
- Open Cura.
- Click on the ‘Settings’ menu at the top of the screen.
- In the drop-down list, click on ‘Printer’.
- From the extended options, select ‘Add Printer’.
- You will see two categories: ‘Networked printers’ and ‘Non-networked printers’. Click on ‘Non-networked printers’.
- Scroll down the options, find and click on ‘Custom’.
- Finally, select ‘Custom FFF Printer’.
In Cura, the next step is to configure your ‘Machine Settings’. This is where you input the details of your 3D printer. These parameters include the printer’s X, Y, and Z dimensions; the build plate shape; and the number of extruders in your printer.
The screenshot below displays the recommended values for the Voxelab Aquila D1. Fill in these values accurately and ensure they match the specifications of your printer. This one-time setup ensures your 3D printer and Cura software communicate correctly, leading to higher-quality prints.
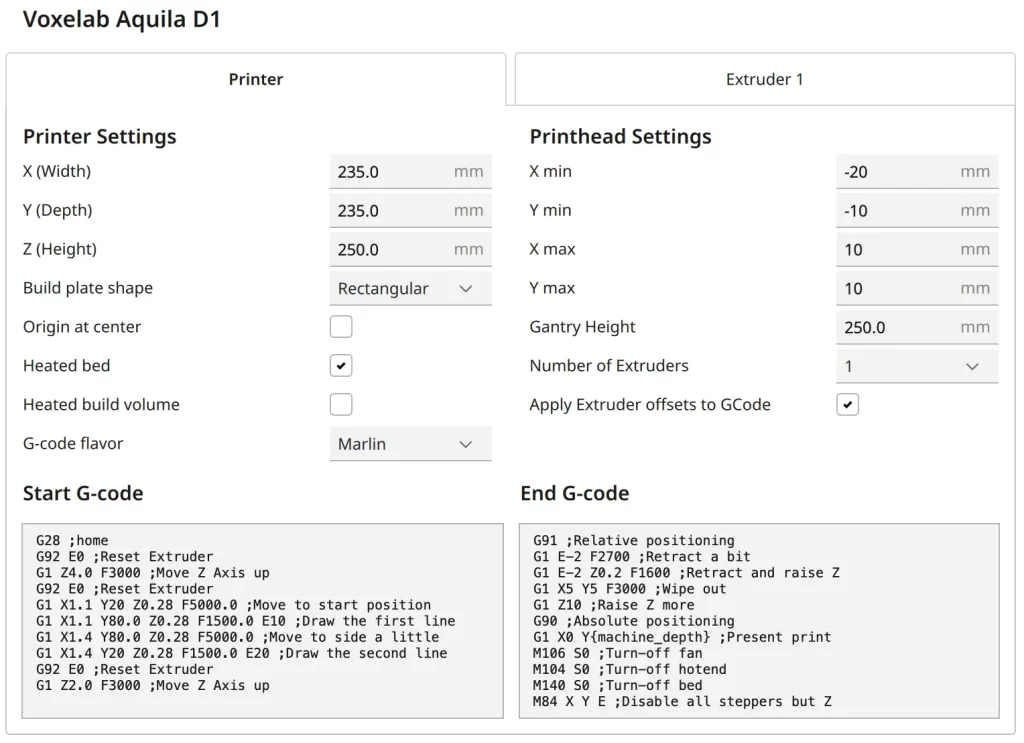
Start G-Code:
- G28 ;home
- G92 E0 ;Reset Extruder
- G1 Z4.0 F3000 ;Move Z Axis up
- G92 E0 ;Reset Extruder
- G1 X1.1 Y20 Z0.28 F5000.0 ;Move to start position
- G1 X1.1 Y80.0 Z0.28 F1500.0 E10 ;Draw the first line
- G1 X1.4 Y80.0 Z0.28 F5000.0 ;Move to side a little
- G1 X1.4 Y20 Z0.28 F1500.0 E20 ;Draw the second line
- G92 E0 ;Reset Extruder
- G1 Z2.0 F3000 ;Move Z Axis up
End G-Code:
- G91 ;Relative positioning
- G1 E-2 F2700 ;Retract a bit
- G1 E-2 Z0.2 F1600 ;Retract and raise Z
- G1 X5 Y5 F3000 ;Wipe out
- G1 Z10 ;Raise Z more
- G90 ;Absolute positioning
- G1 X0 Y{machine_depth} ;Present print
- M106 S0 ;Turn-off fan
- M104 S0 ;Turn-off hotend
- M140 S0 ;Turn-off bed
- M84 X Y E ;Disable all steppers but Z
After successfully creating the printer profile, the next step involves defining the print settings. This is a critical step as it determines the overall quality, precision, and finish of your 3D print.
These settings include parameters like layer height, print speed, and infill density. Tailoring these settings to match your 3D model specifications and printer capabilities ensures a successful and efficient print job.
You can find more information on how to create a 3D printer profile in Cura and what you need to pay attention to in this article: How to Create a Custom 3D Printer Profile in Cura
PLA Settings
These are the correct Cura settings for the Voxelab Aquila D1 for PLA:
- Print temperature: 205-210 °C
- Print bed temperature: 60 °C
- Print speed: 60 mm/s
- Retraction: 1.5 mm at 30 mm/s
- Cooling: 100%
- First layer: 5-10 mm/s, 0% cooling, 100% extrusion width, 100% layer height
Retraction settings are a critical component of the 3D printing process, particularly when using the Voxelab Aquila D1 for PLA. The retraction setting is tuned at 1.5 mm at a speed of 30 mm/s. This setting is vital to prevent ‘stringing‘ – the formation of thin threads of plastic between separate parts of your print. Stringing occurs due to the movement of the extruder between different areas of the print while filament is still being extruded.
The above settings serve as an excellent starting point. They have been fine-tuned to offer an optimal balance between speed, temperature, and retraction for PLA, ensuring high-quality prints. However, it’s important to remember that these are not definitive values, but rather a baseline that can be adjusted and optimized based on your specific requirements and the unique characteristics of your 3D model.
Further down in this guide, I have provided a comprehensive explanation on how to calibrate these settings, ensuring you can make the most of your Voxelab Aquila D1 for PLA printing.
ABS Settings
These are the correct Cura settings for the Voxelab Aquila D1 for ABS:
- Print temperature: 240 °C
- Print bed temperature: 100 °C
- Print speed: 60 mm/s
- Retraction: 1.5 mm at 30 mm/s
- Cooling: 0% + enclosure
- First layer: 5-10 mm/s, 0% cooling, 100% extrusion width, 100% layer height
It’s important to note that the Voxelab Aquila D1 printer does not come equipped with an enclosure. Despite this, with the right settings, it is capable of printing small to medium-sized objects from ABS effectively without warping.
To increase print bed adhesion for ABS without an enclosure, it is crucial to start with printing the first layer at a low speed range of 5-10 mm/s. This slower pace ensures that the initial layer has ample time to adhere properly to the print bed, setting the foundation for the remaining layers. Directing more focus on the first layer aids in reducing the potential issue of warping, which increases with the complexity and size of the print.
Another effective strategy is to increase the initial layer’s line width to 120% of the nozzle diameter. This makes the first layer thicker, thereby improving its capacity to adhere to the print bed.
Furthermore, enabling the “Brim” setting in Cura can also help. A brim is a thin, flat layer that extends from the base of the model, providing extra surface area and, thus, enhanced bed adhesion. The brim can be easily removed post-printing, leaving the final product with a clean finish.
TPU Settings
These are the correct Cura settings for the Voxelab Aquila D1 for TPU:
- Print temperature: 220 °C
- Print bed temperature: 40-60 °C
- Print speed: 30 mm/s
- Retraction: 0.5 mm at 20 mm/s
- Cooling: 100%
- First layer: 5-10 mm/s, 0% cooling, 100% extrusion width, 100% layer height
TPU is known for its flexibility, durability, and ability to withstand high amounts of stress, making it a commonly used filament for 3D printing. It’s perfect for printing objects that need to flex or bend, such as phone cases, footwear, and medical devices.
However, printing with TPU can be more challenging than other materials due to its flexible nature. This is where the direct drive extruder of the Aquila D1 comes in handy. A direct drive extruder is designed with a short path from the drive gear to the nozzle, which means there’s less room for the filament to bend or warp. This makes it ideal for printing with flexible materials like TPU, as it provides better control over the filament and reduces the likelihood of clogging or jamming.
Printing with TPU requires a slower pace than rigid filaments. It’s crucial to adjust your speed settings to accommodate TPU’s flexible nature.
The values provided above, tested and verified by me, serve as a reliable starting point for TPU printing. Adjust accordingly based on your specific model requirements.
PETG Settings
These are the correct Cura settings for the Voxelab Aquila D1 for PETG:
- Print temperature: 240-250 °C
- Print bed temperature: 70 °C
- Print speed: 50 mm/s
- Retraction: 1.5 mm at 30 mm/s
- Cooling: 50-100%
- First layer: 5-10 mm/s, 0% cooling, 100% extrusion width, 100% layer height
PETG is relatively easy to print on the Voxelab Aquila D1. However, it can be prone to stringing. The main culprits of stringing are moisture absorption and incorrect print temperature and retraction, so dry storage and accurate calibration are essential.
The settings outlined above should yield a good print quality when using the Voxelab Aquila D1. However, to achieve optimal results, it’s imperative to focus on calibrating the temperature and retraction settings – especially with PETG. This step is crucial as it can greatly affect the final product. Fine-tuning these parameters will help you eliminate small imperfections and ensure the highest possible print quality.
The cooling setting can exhibit significant variation across different PETG brands. This is primarily due to differences in the formulation of the filament, which can impact how quickly the material solidifies post-extrusion. Therefore, careful calibration of the cooling setting to match the specific brand of PETG used also helps achieve the best printing results.
Best Cura settings for the Voxelab Aquila D1
Having shared the specific filament settings, let’s now delve into the detailed settings and their calibration process. In-depth understanding and precise adjustments to these settings are crucial to achieving flawless print quality.
Print Temperature
The best printing temperatures for the Voxelab Aquila D1 in Cura:
- PLA: 205-210 °C
- ABS: 240 °C
- TPU: 220 °C
- PETG: 240-250 °C
Incorrectly set print temperature can have a significant impact on your print’s outcome. If the temperature is too high, it can lead to stringing, warping, or blobbing, as the filament becomes too liquid and doesn’t solidify properly. This can also cause your print to have a glossy finish, which might not be desirable.
On the other hand, if the temperature is too low, it can lead to poor layer adhesion, resulting in a weak and brittle print. Additionally, under-extrusion might occur where the filament is not melted enough to be extruded properly through the nozzle.
Both scenarios can lead to failed prints or subpar print quality. Therefore, finding the right print temperature for your specific filament is crucial for achieving optimal print results.
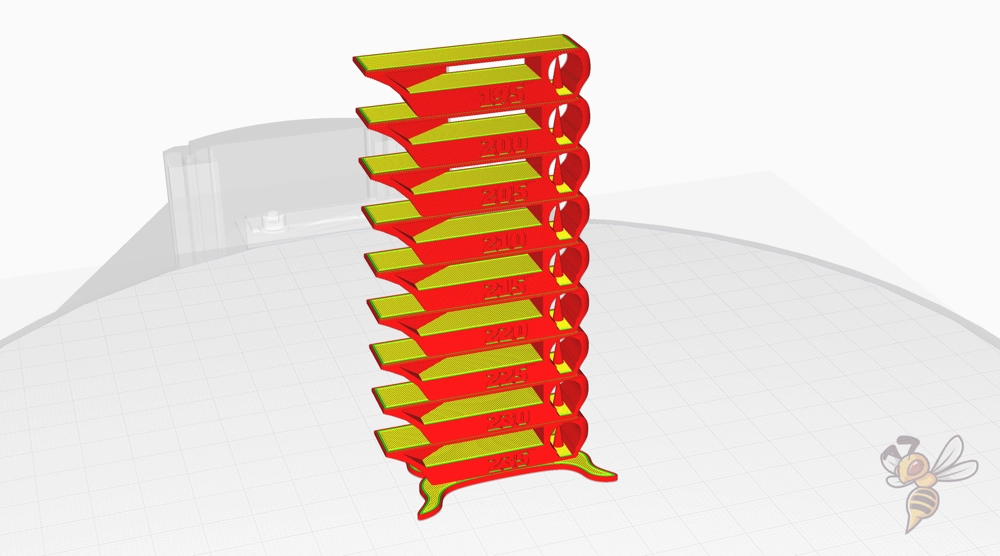
To calibrate the print temperature of an FDM 3D printer, you can use a temperature tower. This is a 3D model that tests different temperatures within the same print. Here are the steps to follow:
- Download a Temperature Tower model: There are several free models available online. Make sure to choose one that covers the temperature range for your specific filament.
- Set up the temperature settings in Cura: In Cura, set up a temperature gradient script that matches the increments on your temperature tower model.
- Print the Temperature Tower: Start the print. As the print progresses, the temperature will change according to the settings you’ve input into the slicing software.
- Evaluate the Results: Once the print is complete, evaluate the quality at each temperature level. Look for issues like stringing, under-extrusion, or poor layer adhesion. The level with the best quality indicates the optimal temperature for your filament.
Proper calibration of print temperature is crucial for achieving high-quality prints. A temperature tower simplifies this process by allowing you to test a range of temperatures in a single print.
Print Bed Temperature
The best print bed temperatures for the Voxelab Aquila D1 in Cura:
- PLA: 60 °C
- ABS: 100 °C
- TPU: 40-60 °C
- PETG: 70 °C
To avoid the common ‘elephant foot’ issue in 3D printing, which refers to a flare or bulge in the lower layers of a print, it is necessary to find the right balance with the print bed temperature.
Aim for the highest possible temperature that facilitates optimal adhesion of filament, but not so high that it causes the filament to overheat and expand at the base. This delicate balance will help keep your prints dimensionally accurate from bottom to top.
Finding the right bed temperature is actually quite easy with the Voxelab Aquila D1. Thanks to the strong adhesion of its PEI coating, the filament sticks well to the bed. The temperatures listed above should work well for you.
Print Speed
The best print speed for the Voxelab Aquila D1 in Cura:
- PLA: 60 mm/s
- ABS: 60 mm/s
- TPU: 30 mm/s
- PETG: 50 mm/s
Print speeds that are too high can have a negative impact on your print quality. Specifically, it can lead to issues like ringing and ghosting. Ringing is a wavy pattern that appears on the print surface, and ghosting is a faint duplicate image. Keep your print speed at the recommended settings to avoid these issues.
TPU should be printed slower, at around 30 mm/s. The unique properties of this flexible filament require a slower print speed for optimal results. TPU is softer and more pliable than other materials like PLA or ABS. This means it needs more time to cool and solidify after being extruded.
Printing TPU too fast may cause it to stretch or deform, which can lead to print failures or poor print quality. By reducing the print speed, you allow the TPU filament more time to cool, ensuring a cleaner, more precise print.
Layer Height
The best layer heights for the Voxelab Aquila D1 in Cura:
- Decorative objects: 0.1 mm
- Standard: 0.2 mm
- Coarse, fast prints: 0.3 mm and higher
The layer height you select depends largely on the nozzle used in your 3D printer. In the case of the Voxelab Aquila D1, it is equipped with a 0.4 mm nozzle. For decorative prints requiring high detail, a layer height of 0.1 mm is recommended. This provides a finer resolution, capturing intricate features of the design.
For standard prints, a layer height of 0.2 mm is typically used. This offers a balance between speed and detail. It’s the common choice for functional parts or models that don’t require fine details.
If you’re after speed and not overly concerned with detail, layer heights of 0.3 mm and higher are suitable. These are coarse prints, completed faster, but the layer lines will be more visible, and intricate details may be lost.
Remember, while it’s crucial to adjust the layer height, maintain the nozzle diameter at 0.4 mm as altering it may require significant changes to the printer settings that could compromise print quality and reliability.
Flow Rate
The optimum flow rate for the Neptune 4 when using Cura is:
- Default value: 100%
- For over-extrusion: 90% to 99%
- For under-extrusion: 101% to 110%
It’s essential to note that adjusting the flow rate should be done only after calibrating both the printing temperature and the retraction. The flow rate, while significant, operates in tandem with these other two variables. Neglecting to first establish the correct temperature and retraction settings can lead to inconsistencies in your print.
Thus, after you’ve dialed in your temperature and retraction, you can fine-tune your flow rate for the optimal print quality.
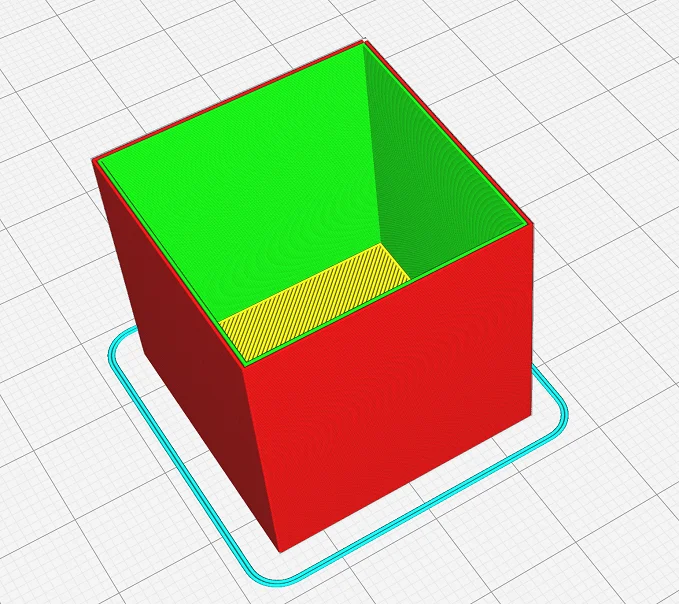
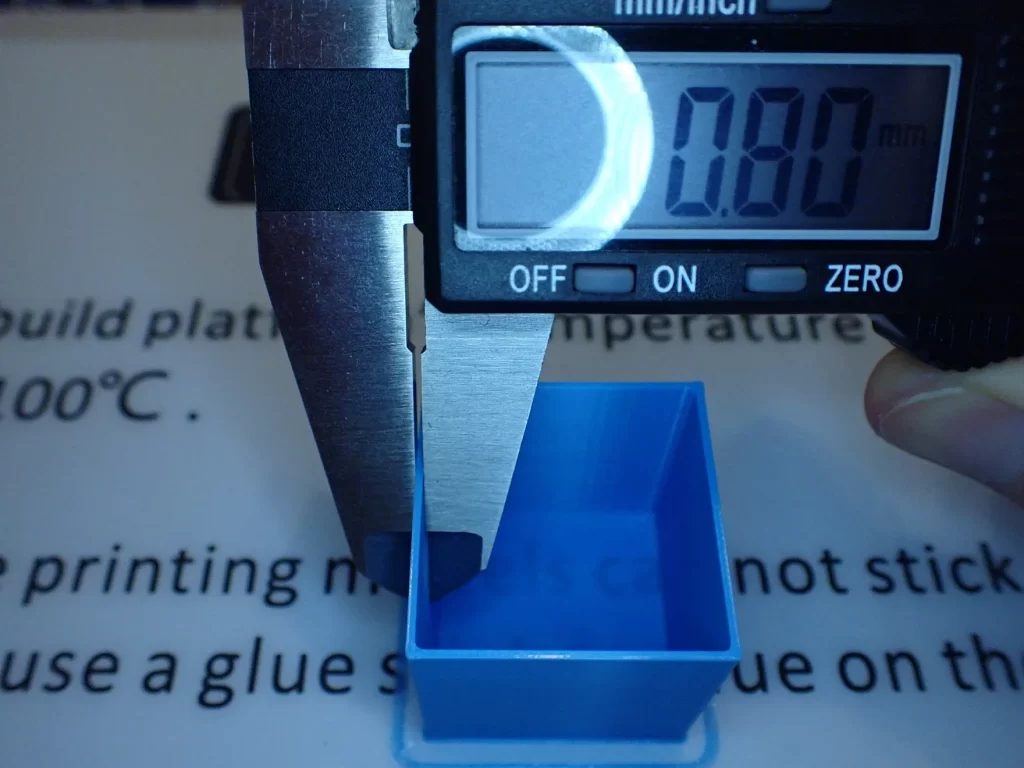
To calibrate your flow rate, you’ll need to print a simple, hollow cube with just two walls. Ensure that your slicer settings match these requirements: no top or bottom layers, and only two perimeter walls.
After the cube has been printed, use a digital caliper to measure the wall thickness. Be sure to take several measurements at different points of the cube to get an average.
Once you have the average wall thickness, divide this value by two. This gives you the actual, measured wall thickness of a single wall. Compare this to the wall thickness set in your slicer.
If the measured value is higher than the slicer value, decrease your flow rate. If it’s lower, increase your flow rate. Make small, incremental changes for precision. Repeat this process until the measured wall thickness closely matches the slicer setting. Proper calibration ensures accurate, high-quality prints.
Retraction
The best retraction settings for the Voxelab Aquila D1 in Cura:
- PLA: 1.5 mm at 30 mm/s
- ABS: 1.5 mm at 30 mm/s
- TPU: 0.5 mm at 20 mm/s
- PETG: 1.5 mm at 30 mm/s
A wrong retraction setting can lead to several print issues, the most common being stringing. Stringing happens when thin, hair-like strands of filament are left behind as the printer’s extruder moves across open spaces. This is due to excess filament being pulled out of the nozzle, which can be a result of incorrect retraction settings.
The values provided above for the Voxelab Aquila D1 in Cura are a solid starting point, but they may not provide perfect results for every filament brand. Different filament types, print designs, and even ambient conditions can affect the optimal retraction settings.
Therefore, calibration is essential for achieving the best results. Through calibration, you can fine-tune your retraction settings to match the specific requirements of your prints, thereby enhancing the quality and accuracy of your final product.
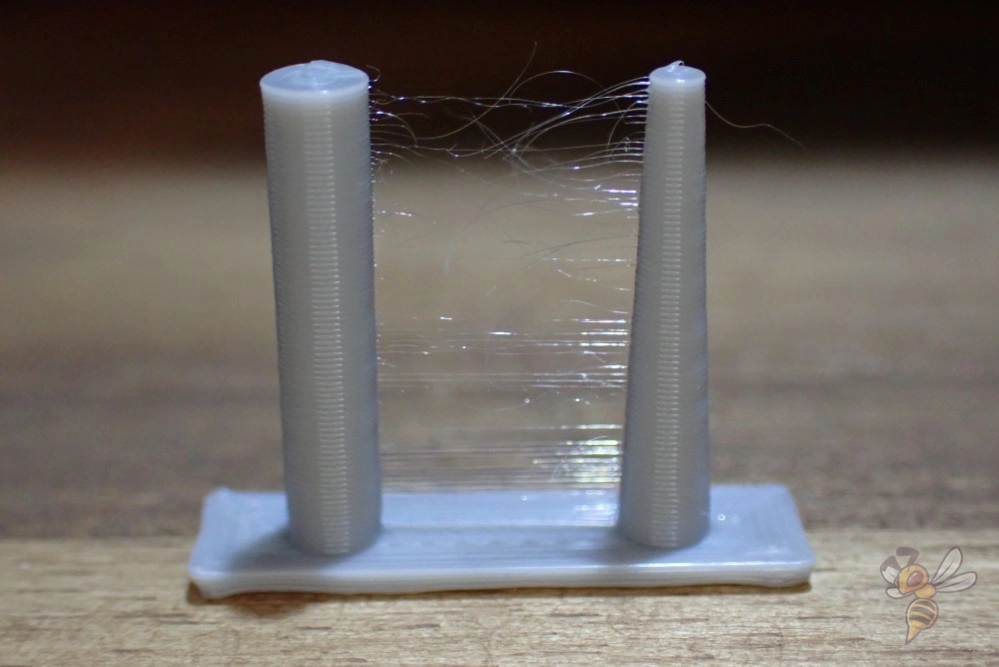
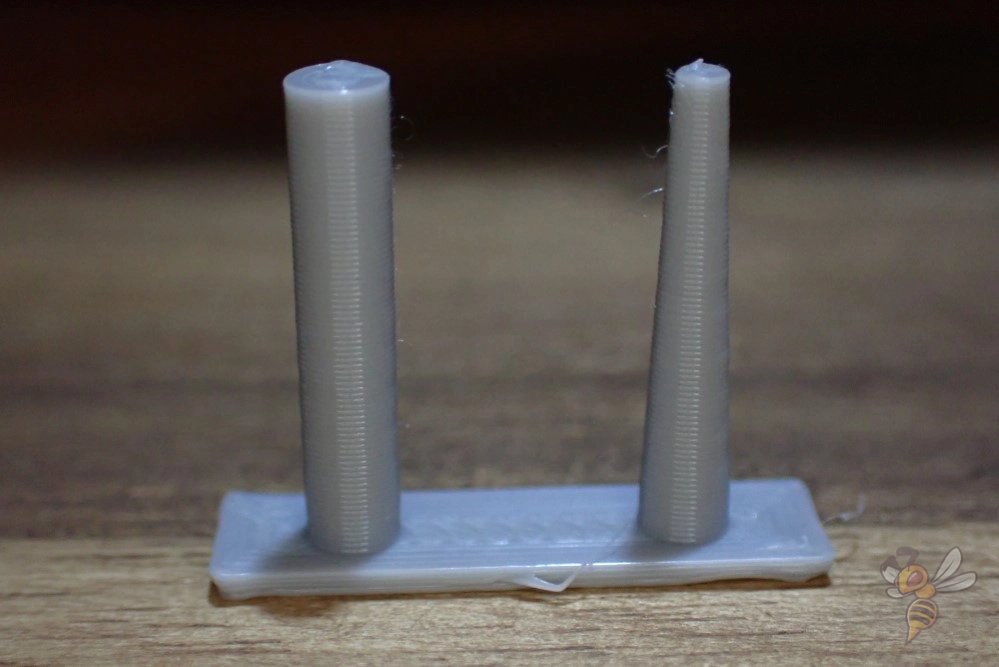
To calibrate the retraction, use a simple object with two columns. The goal is to find the settings that eliminate stringing between the two columns. Start by adjusting one setting at a time, either the retraction distance or speed.
If you see stringing, increase the retraction distance by 0.1 mm and print again. If stringing persists, continue to incrementally adjust until you find a distance that eliminates stringing.
Once you have the optimal retraction distance, move on to adjusting retraction speed. Start with the recommended speed for your filament. Print your two-column object. If you see stringing, increase the speed by 5 mm/s and print again. If stringing continues, adjust the speed incrementally until you find the speed that eliminates stringing.
Remember, the optimal retraction settings will depend on a variety of factors. It may take some trial and error to find the perfect settings. However, this iterative process will ultimately result in higher quality prints with less stringing.
Infill
The best infill density for the Voxelab Aquila D1 in Cura:
- Decorative objects: 0-15%
- Standard objects: 15-50%
- Stable objects: 50-100%
The infill values provided are key for determining the strength, weight, and printing duration of your 3D print with the Voxelab Aquila D1. For decorative objects, a 0-15% infill is sufficient. These items don’t need to withstand physical strain, so a lower infill saves material and time.
Standard objects, which require a balance of strength and material usage, typically use a 15-50% infill.
Finally, stable objects that need to be robust and durable require a high infill of 50-100%. This range uses more filament and increases print time but provides the highest strength.
Remember, adjusting infill is a balancing act between strength, print time, and material usage, so choose wisely based on your object’s requirements.
First Layer
These are the best Cura settings for the first layer with the Voxelab Aquila D1:
- Layer height: 100-200% of normal layer height (higher values to increase print bed adhesion)
- Line width: 100-200% of normal line width (higher values to increase print bed adhesion)
- Print temperature: Same as the rest of the object, or 5-10 °C higher for better print bed adhesion.
- Print speed: 50% of normal print speed (i.e. 25 mm/s for a normal print speed of 50 mm/s) or 5-10 mm/s for high print bed adhesion
- Flow rate: 100-110% (higher values in case of poor print bed adhesion)
- Raft/Brim/Skirt: Not necessary, since the Voxelab Aquila D1 has a PEI print bed and already extrudes a line at the edge of the print bed due to the start G-code.
When the filament is warmer, it has more time to bond with the print bed. Each of these settings for the first layer is designed to lengthen the amount of time the filament stays viscous. This extended viscosity period allows for better adhesion and a more successful print.
Conclusion
In conclusion, the Voxelab Aquila D1 is an impressive printer that can produce perfect prints when used with the right Cura settings. By understanding and adjusting these parameters, you can fully unlock the potential of this device.
I hope this article has provided helpful insights and serves as a guide in your 3D printing journey. If you still face difficulties, remember the course mentioned earlier, which can offer further assistance and equip you to handle any printing challenge.
Disclosure: This website is the property of Martin Lütkemeyer and is operated by Martin Lütkemeyer. Martin Lütkemeyer is a member of the Amazon Services LLC and other Affiliate Programs. These are affiliate advertising programs designed to enable websites to earn advertising revenue through advertising and linking to Amazon.com and others. Links marked with * are affiliate links.
