
- Wet Filament: Prevention, Symptoms & Drying - July 18, 2024
- Sovol SV08 – Best PrusaSlicer Settings & Profile - June 26, 2024
- Sovol SV08 – Best Orca Slicer Settings & Profile - June 26, 2024
Disclosure: Links marked with * are Affiliate Links. I earn from qualifying purchases if you decide to make a purchase through these links – at no additional cost for you!
The TwoTrees SK-1 is also compatible with Cura and can deliver perfect results with the right Cura settings.
In this article, I share my personally optimized Cura settings for the TwoTrees SK-1. These settings provide you with a solid foundation for high print quality. I have carefully tested and calibrated these settings to ensure that you can achieve good printing results right from the start.
However, perfect printing results always require individual calibration for the respective filament. Each material has its particularities and the optimal adjustment of your printer to it is crucial. For detailed instructions on calibration and further tips, I recommend you take a look at my comprehensive calibration guide or take my 3D printing course. There you will find valuable knowledge and practical steps to get the best out of your SK-1.

Calibrated Cura Profile
For optimal print quality with minimal effort, you can download my calibrated Cura profile for this 3D printer and import it directly into Cura. All settings are perfectly adapted to this printer, e.g. the accelerations, jerk, supports and the first layer.
Table of Contents:
How to Create a Cura Profile for the TwoTrees SK-1
A Cura profile is made up of machine and print settings. The machine settings define the basics of your 3D printer, for example its size and technical capabilities. The print settings, on the other hand, specify the conditions for the printing process itself, such as temperature and speed.
Before you start printing, it is important to define the machine settings in Cura. Start with an empty profile and add the appropriate values (see screenshots).
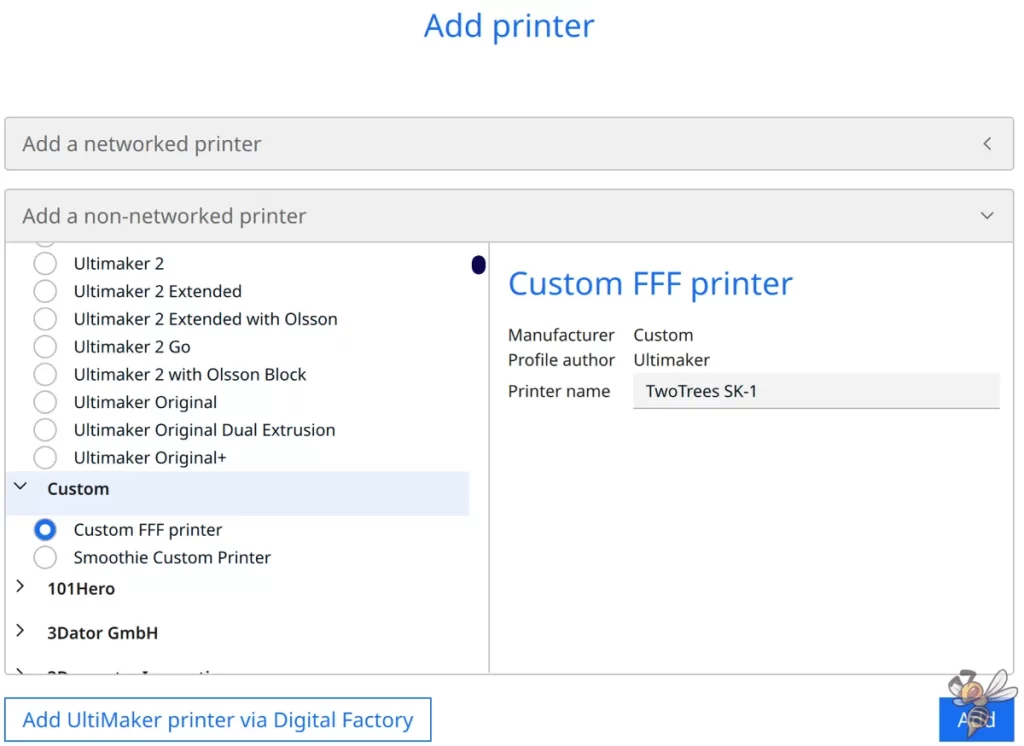
To add your 3D printer in Cura, navigate to ‘Settings’, then to ‘Printers’ and select ‘Add printer’. Then click on ‘Non-networked printer’, select ‘Custom’ and go to ‘Custom FFF printer’. Enter the name of your printer and confirm with ‘Add’.

The basic parameters of your printer are defined in the machine settings shown above. The G-code snippets are listed in detail below so that you can simply copy them:
- Start G-Code:
- M107 ; Turn off the fan
- G21 ; set units to millimeters
- G90 ; use absolute coordinates
- M83 ; use relative distances for extrusion
- M104 S220 ; set extruder temp
- M140 S60 ; set bed temp
- M109 S220 ; wait for extruder temp
- M190 S60 ; wait for bed temp
- G1 E-1 F2100 ; retract
- g32 ;load bed mesh
- G28 ;home
- G29 ;bed leveling
- M104 S{material_print_temperature_layer_0} ; set extruder temp
- M140 S{material_bed_temperature_layer_0} ; set bed temp
- M109 S{material_print_temperature_layer_0} ; wait for extruder temp
- M190 S{material_bed_temperature_layer_0} ; wait for bed temp
- G0 Z2.0 F600;
- G0 X50 Y10 F12000;
- G92 E0.0 ; reset extruder distance position;
- G0 Z0.4 F600;
- G1 X100.0 E10 F3000.0 ; intro line
- G92 E0.0 ; reset extruder distance position;
- G1 X200.0 E15 F3000.0 ; intro line
- G92 E0.0 ; reset extruder distance position;
- G0 Z0.8 F600;
- G1 X100.0 E15 F3000.0 ; intro line
- G1 Z0.4 F600 ;Wipe
- G0 Y12 F6000 ;Wipe
- G1 X100 F6000 ;Wipe
- G0 Y8 F12000 ;Wipe
- G1 X200 F6000 ;Wipe
- G1 X190 Y12 F6000 ;Wipe
- G1 X180 Y8 F6000 ;Wipe
- G1 X170 Y12 F6000 ;Wipe
- G1 X160 Y8 F6000 ;Wipe
- G1 X150 Y12 F6000 ;Wipe
- g0 Z2.0 F600;
- G92 E0.0 ; reset extruder distance position;
- M82
- ;SET_PRESSURE_ADVANCE ADVANCE=0.05
- ;SET_VELOCITY_LIMIT ACCEL_TO_DECEL=10000
- End G-Code:
- M104 S0 ; turn off temperature
- M140 S0 ; turn off heatbed
- G92 E0.0 ; reset extruder distance position;
- G1 E-1 F2100 ; retract
- G28 X ; home X axis
- G28 Y ; home X axis
- M84 ; disable motors
- M107 ; turn off fan
- ;SET_VELOCITY_LIMIT ACCEL_TO_DECEL=4000
Once you have created the profile for your printer in Cura, it’s time to adjust the print settings. These settings affect the printing process itself and include important aspects such as the settings for temperature, speed and retraction.
You can find more information on how to create a 3D printer profile in Cura and what you need to pay attention to in this article: How to Create a Custom 3D Printer Profile in Cura
PLA Settings
These are the correct Cura settings for printing PLA filament with the TwoTrees SK-1:
- Print temperature: 220 °C
- Print bed temperature: 60 °C
- Print speed: 300 mm/s
- Retraction: 0.8 mm at 50 mm/s
- Cooling: 100 %
The TwoTrees SK-1 can process PLA filament almost perfectly with minimal calibration. Thanks to its precise design and high-quality extruder, it delivers excellent results with PLA filaments.
PLA is known for its uncomplicated handling in 3D printing. However, the optimum setting of printing temperature and retraction is particularly important in order to achieve the best results.
However, it should be noted that the values given above will not be perfect for every type of PLA. Each material may have slightly different requirements and a slight adjustment may be necessary. Further down in this article I will go into more detail about calibration to help you get the best out of each PLA grade.
ABS Settings
These are the correct Cura settings for printing ABS filament with the TwoTrees SK-1:
- Print temperature: 250 °C
- Print bed temperature: 100 °C
- Print speed: 200 mm/s
- Retraction: 0.8 mm at 50 mm/s
- Cooling: 50 %
ABS filament is a material known for its durability and heat resistance. However, the TwoTrees SK-1 does not have an enclosure, which can lead to difficulties when printing ABS. ABS tends to warp or crack when exposed to temperature fluctuations or drafts.
For smaller objects, however, the SK-1 can process ABS quite effectively. A useful technique to minimize warping is the use of a draft shield in Cura. This creates a kind of barrier around the object, which helps to keep the temperature constant and reduce airflow. However, you should note that larger or more complex ABS prints are more difficult to handle without a closed enclosure.
TPU Settings
These are the correct Cura settings for printing TPU filament with the TwoTrees SK-1:
- Print temperature: 220 °C
- Print bed temperature: 60 °C
- Print speed: 50-100 mm/s
- Retraction: 1.6 mm at 50 mm/s
- Cooling: 100 %
The TwoTrees SK-1 is equipped with a direct drive extruder, which makes it particularly suitable for printing flexible filaments such as TPU. The direct drive ensures precise and consistent feeding of the filament, which is very important for flexible materials.
TPU requires some specific settings to achieve optimal results. Speed is particularly important here. TPU should be printed at a slower speed to ensure high print quality and avoid problems such as jamming or uneven filament flow.
The retraction setting is also crucial, as too much retraction can lead to problems with flexible material. However, if the retraction setting is only slightly too low, TPU stringing will occur very quickly.
PETG Settings
These are the correct Cura settings for printing PETG filament with the TwoTrees SK-1:
- Print temperature: 230 °C
- Print bed temperature: 80 °C
- Print speed: 150 mm/s
- Retraction: 1.2 mm at 50 mm/s
- Cooling: 50 %
PETG is an interesting filament because it combines the properties of PLA and ABS. It offers the ease of printability of PLA and the strength and heat resistance of ABS. A common problem with PETG is stringing.
To reduce stringing, it is important to carefully calibrate the retraction settings. A good retraction setting helps to avoid unwanted stringing without clogging the extruder.
Another important point when printing with PETG is the storage of the filament. PETG attracts moisture, which can affect the print quality. It should therefore be stored in a dry place to achieve optimum results.
With the right settings and good storage, the TwoTrees SK-1 can deliver excellent results with PETG.
The Best Cura Settings for the TwoTrees SK-1
In this section, you will find the optimal Cura settings for various filaments that can be used with the TwoTrees SK-1. These settings provide you with an excellent starting point for achieving high-quality prints.
Print Temperature
The best printing temperatures for the TwoTrees SK-1 in Cura:
- PLA: 220 °C
- ABS: 250 °C
- TPU: 220 °C
- PETG: 230 °C
The printing temperature is one of the key factors for successful 3D prints. It is advisable to calibrate the printing temperature for each filament and each printer, as small differences can have a major impact on the quality of the end product.
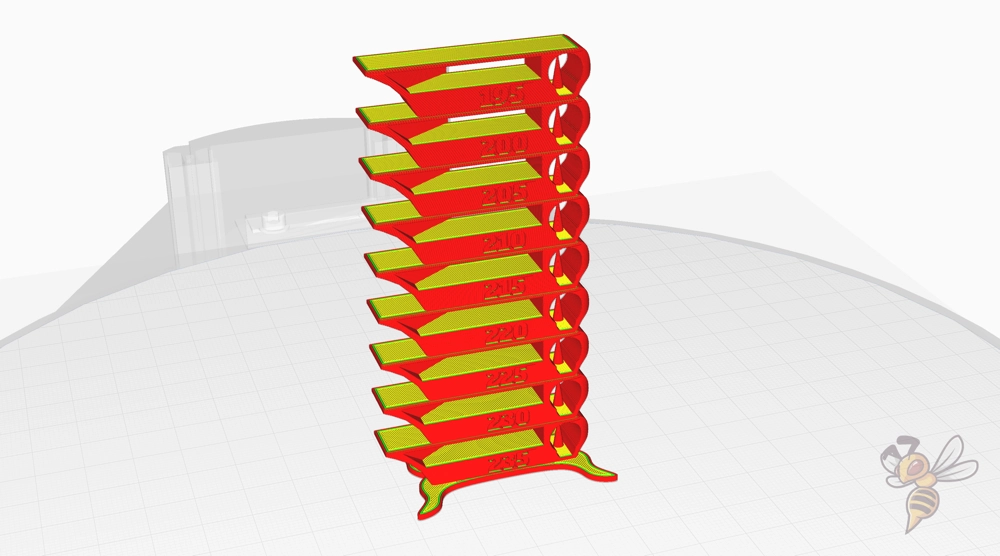
A useful tool for calibrating the printing temperature is the so-called temperature tower. This is a print test consisting of a tower in which each layer is printed at a different temperature.
This allows you to visually assess at which temperature your printer and the filament used deliver the best results. This helps you to precisely set the perfect printing temperature for different materials.
You can find out how to use such a temperature tower correctly and how to write a suitable script for it in Cura in the calibration guide I linked at the beginning of the article.
Print Bed Temperature
The best print bed temperatures for the TwoTrees SK-1 in Cura:
- PLA: 60 °C
- ABS: 100 °C
- TPU: 60 °C
- PETG: 80 °C
The correct setting of the print bed temperature is crucial for the adhesion of the first layer to the print bed. A well-adjusted print bed temperature helps to avoid printing errors such as warping or peeling of the first layers. This is particularly important for materials such as ABS, which tend to warp more.
A common problem with an incorrect print bed temperature is the so-called elephant foot. This is where the lower layers of the print object deform due to the print bed temperature being too high, as they expand more than the upper layers.
For me, the print bed of the SK-1 provided perfect adhesion at the temperatures specified above. If you still have problems, here is the right article for you: 3D Print Not Sticking to the Bed: How to Fix it Step-by-Step
Print Speed
The best print speeds for the TwoTrees SK-1 in Cura:
- PLA: 300 mm/s
- ABS: 200 mm/s
- TPU: 50-100 mm/s
- PETG: 150 mm/s
Speeds that are too high can lead to problems such as uneven layers and recurring vibrations, while speeds that are too slow can unnecessarily prolong the printing process.
An important aspect when setting the printing speed is to avoid ringing. Ringing is the vibration pattern that becomes visible at the edges of printed objects, especially after sharp changes in direction. These occur when the print speed is too high for the stability of the printer.
To find the optimum print speed, I recommend carrying out a ringing test. This involves printing a special test object that helps to determine the speed at which your printer delivers the best results without producing ringing effects.
Layer Height
These are the best layer heights for the TwoTrees SK-1 in Cura:
- Decorative objects: 0.1 mm
- Standard: 0.2 mm
- Rough, fast prints: 0.3 mm
Choosing the right layer height is crucial for the balance between print quality and speed. A lower layer height, such as 0.1 mm, is ideal for decorative objects where fine details and a smooth surface are important. However, this setting requires more time for printing.
A layer height of 0.2 mm is considered a good standard for a variety of printing projects. It offers a good combination of print quality and speed, making it the ideal choice for general printing tasks.
For rough, fast prints where detail is less important, a layer height of 0.3 mm is an effective choice. This setting allows for faster prints, which can be useful for large objects or when time is an important factor. However, it should be noted that fine details may be lost at such a layer height.
Flow Rate
These are the best flow rates for the TwoTrees SK-1 in Cura:
- Standard: 100%
- For over-extrusion: 90% to 99%
- For under-extrusion: 101% to 110%
Adjusting the flow rate should only be considered after the print temperature and retraction have been carefully calibrated. These factors have a direct influence on the print quality and should be optimized before further adjustments are made.
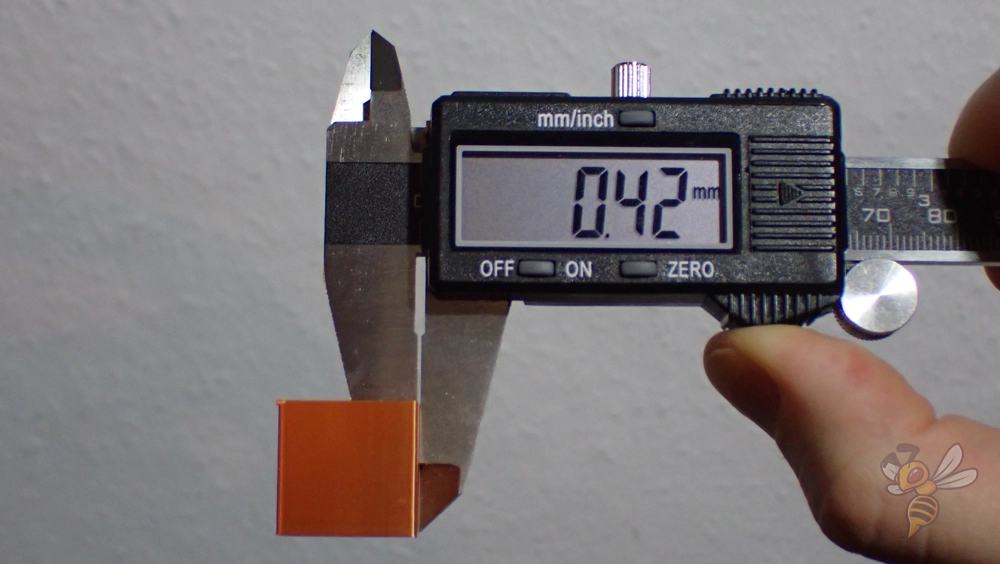
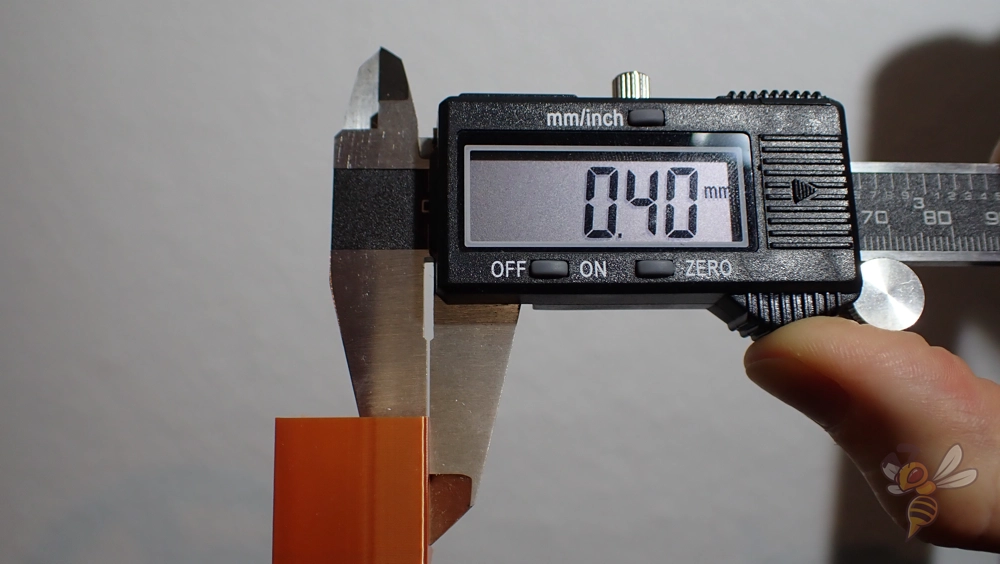
To calibrate the flow rate, I recommend printing a calibration cube without infill or top layers. This approach allows the wall thickness to be used as an indicator of flow rate accuracy.
If the walls of the cube are the expected thickness set in your slicer program, your flow rate is set correctly. If there are deviations upwards or downwards, you must adjust the flow rate accordingly to avoid over- or under-extrusion.
This method helps you to set a precise flow rate for your TwoTrees SK-1 and thus optimize the quality of your prints.
Retraction
The best retraction settings for the TwoTrees SK-1 in Cura:
- PLA: 0.8 mm at 50 mm/s
- ABS: 0.8 mm at 50 mm/s
- TPU: 1.6 mm at 50 mm/s
- PETG: 1.2 mm at 50 mm/s
Retraction is a crucial aspect of 3D printing to avoid stringing and other problems. It is important to calibrate both the retraction distance and speed for each filament type individually.
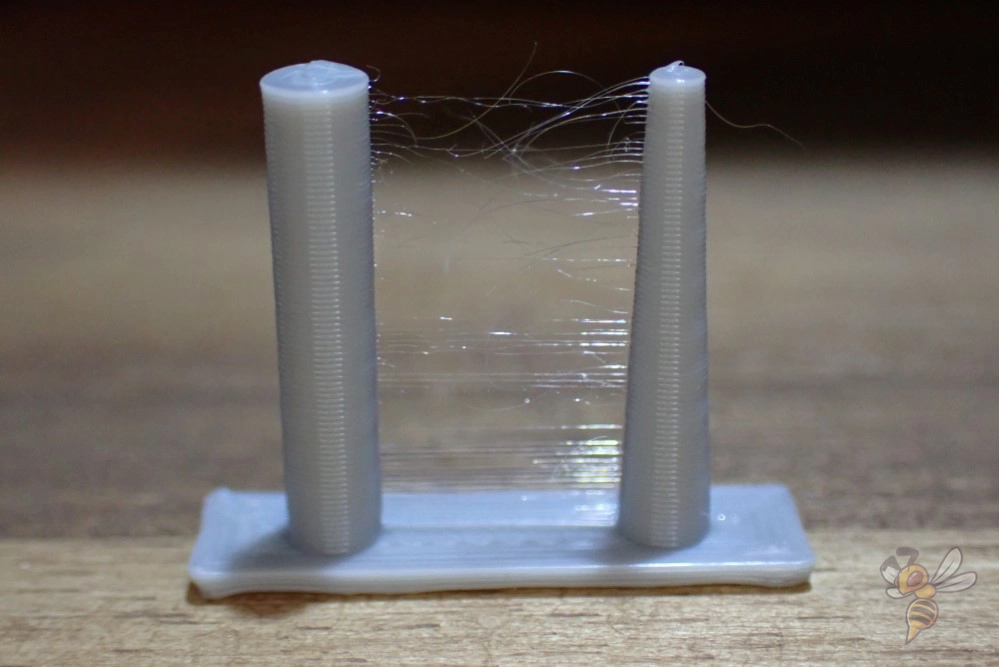
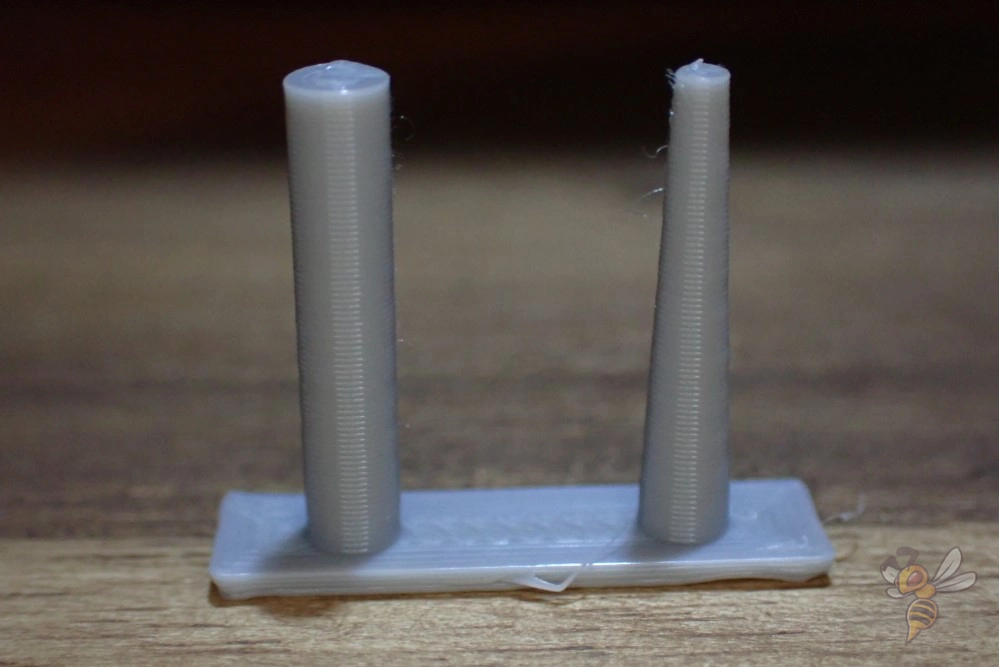
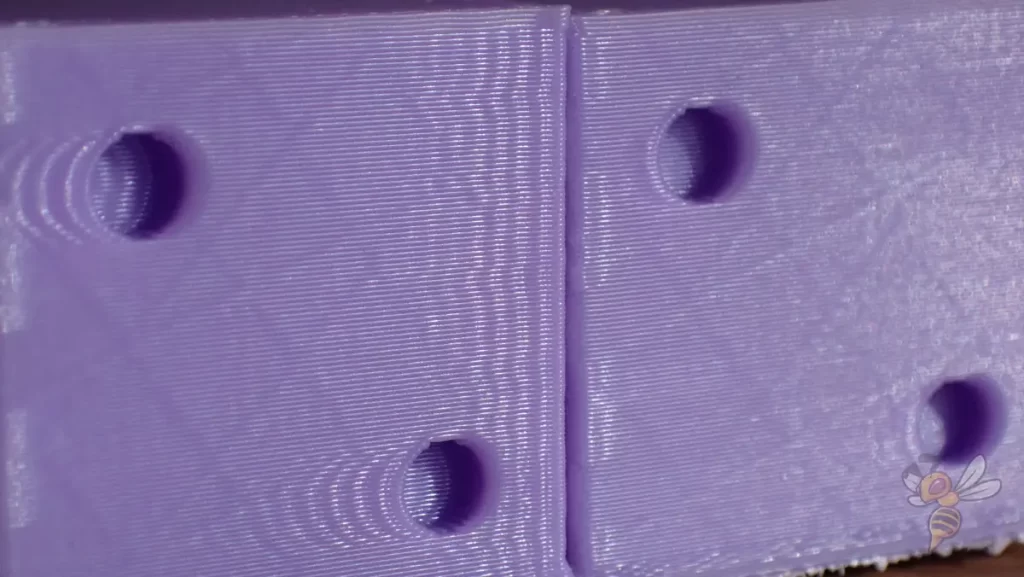
Calibration of retraction can be done by printing special test objects where different retraction settings are tried out. These objects typically consist of small towers or columns placed close together.
By observing the amount of stringing between these towers, the optimal retraction distance and speed can be determined for each filament type. The goal is to find a balance where stringing is minimized without causing problems such as clogging of the hotend or poor layer bonding.
Infill
The best infill density for the TwoTrees SK-1 in Cura:
- Decorative objects: 0-15%
- Standard objects: 15-50%
- Stable objects: 50-100%
The infill density is an important factor that influences the strength, weight and material consumption of your 3D prints. These values are largely printer-independent, as they depend more on the type of object to be printed and the specific requirements of the project in question.
First Layer
These are the best Cura settings for the first layer with the TwoTrees SK-1:
- Layer height: 100%
- Line width: 100%
- Print temperature: Same as the rest.
- Print speed: 10 mm/s
- Raft/Brim/Skirt: Skirt.
A slower print speed for the first layer is essential to ensure strong adhesion to the print bed. This is arguably one of the most effective ways to ensure that your print object stays firmly on the print bed throughout the printing process.
By reducing the speed, you give the filament more time to lay down evenly and bond firmly to the surface of the print bed.
Another important aspect is the temperature of the filament. The longer the filament stays hot, the better the adhesion to the print bed. A higher temperature allows the filament to bond to the print bed more effectively, which can be particularly helpful with materials that are more difficult to adhere to, such as ABS.
This combination of slow speed and adjusted temperature ensures that the first layer adheres strongly and forms a solid base for the rest of the printing process.
Disclosure: This website is the property of Martin Lütkemeyer and is operated by Martin Lütkemeyer. Martin Lütkemeyer is a member of the Amazon Services LLC and other Affiliate Programs. These are affiliate advertising programs designed to enable websites to earn advertising revenue through advertising and linking to Amazon.com and others. Links marked with * are affiliate links.
