
- Wet Filament: Prevention, Symptoms & Drying - July 18, 2024
- Sovol SV08 – Best PrusaSlicer Settings & Profile - June 26, 2024
- Sovol SV08 – Best Orca Slicer Settings & Profile - June 26, 2024
Disclosure: Links marked with * are Affiliate Links. I earn from qualifying purchases if you decide to make a purchase through these links – at no additional cost for you!
Without good print bed adhesion, the first layer of the 3D print will detach from the print bed. To prevent this, there are several solutions for PLA filament.
If a PLA 3D print does not stick to the print bed, the first thing to do is to clean and re-level the print bed. A smaller Z-offset, disabled first layer cooling, higher print bed temperature, wider lines and higher layers can increase print bed adhesion. Mouse ears, rafts and adhesives are effective emergency solutions.
I have printed with PLA on over 40 different FDM 3D printers and can assure you that the steps described in this article will work to increase print bed adhesion for PLA.
Each step is explained in detail, and the order of the steps is also the priority in which you should apply them.
Table of Contents:
- 1 Step 1: Stop Printing
- 2 Step 2: Clean the Print Bed
- 3 Step 3: Level the Print Bed & Lower the Z-Offset
- 4 Step 4: Reduce the Printing Speed for the First Layer
- 5 Step 5: Don’t Cool the First Layer
- 6 Step 6: Increase the Print Bed Temperature
- 7 Step 7: Print Thicker Lines & Higher Layers
- 8 Step 8: Use Mouse Ears
- 9 Step 9: Use a Raft
- 10 Step 10: Use Adhesives
- 11 Step 11: Use a Different Print Bed
Step 1: Stop Printing
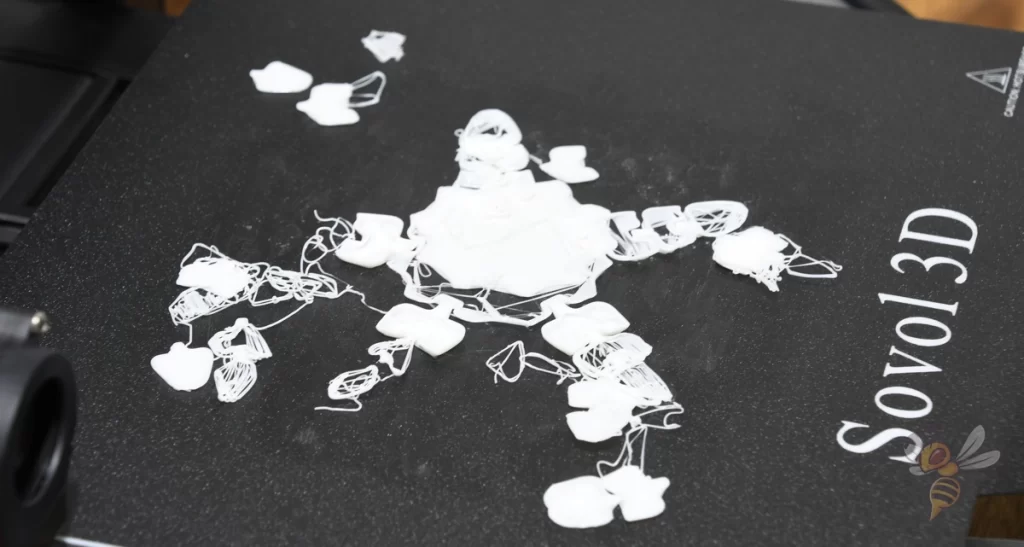
Before troubleshooting, possibly restarting the print, or panicking, the print should be stopped. The print job can be aborted at any time – and this should happen immediately.
Because if the PLA does not adhere to the print bed, the material will warp and not form a clean layer. The next layer can therefore also not be built up cleanly on it. Each additional layer that the printer now applies is a waste of material.
Step 2: Clean the Print Bed
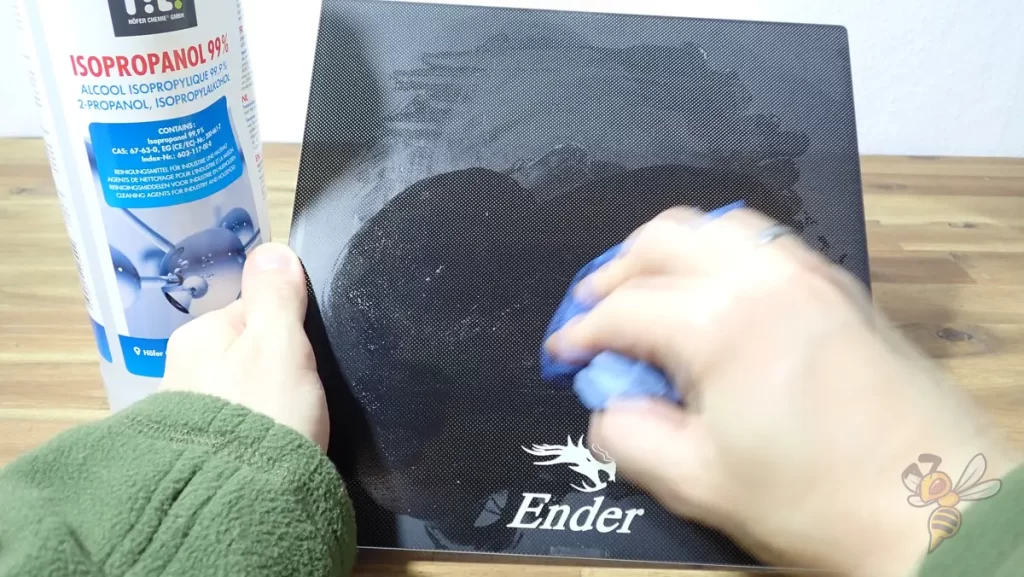
PLA filament cannot adhere to a dirty print bed. If there is dust, old filament residue, adhesive residue or other foreign objects on the print bed, the PLA filament will adhere to them and not to the print bed.
After each print, you should remove filament residues from the print bed with a spatula. In addition to poor print bed adhesion, larger filament residues can also lead to collisions or mix different colors with each other.
With some print bed surfaces, you can also easily remove the filament residues with a fingernail. With a PEI print bed*, you can bend the print bed after printing and remove the object cleanly. Filament residues rarely remain on the print bed.
If you are working with adhesives, adhesive residues should be carefully removed after each print. With some adhesives, water is sufficient for this, but for certain adhesives you need acetone or isopropyl alcohol.
If you clean your print bed carefully after each print, you only need to remove some dust before the next print and apply new adhesive if you require it.
Step 3: Level the Print Bed & Lower the Z-Offset
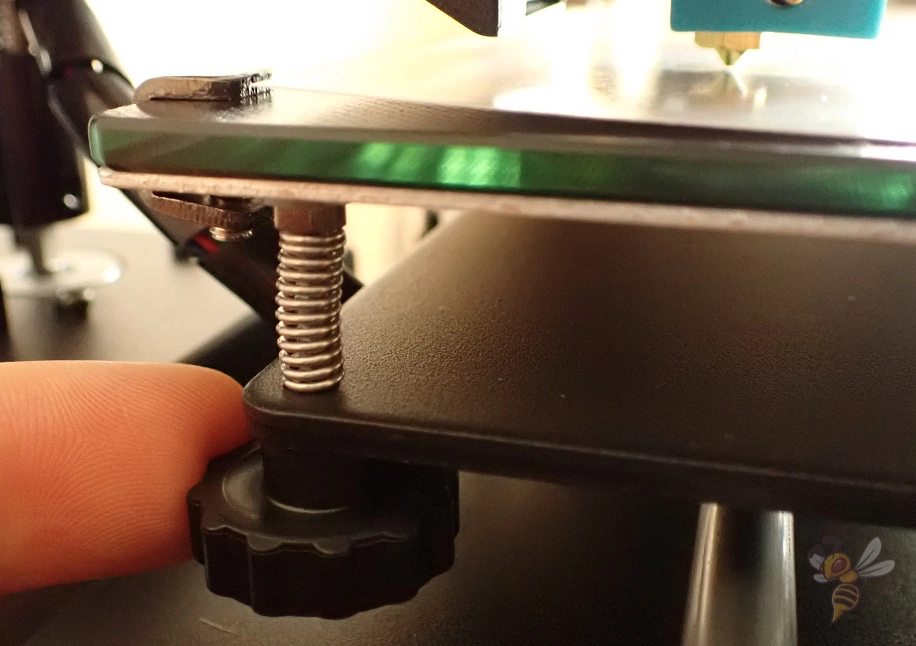
In addition to cleaning the print bed, leveling the print bed is also one of the basics in 3D printing. If the print bed is not properly leveled, the distance between the nozzle and the print bed is not the same everywhere.
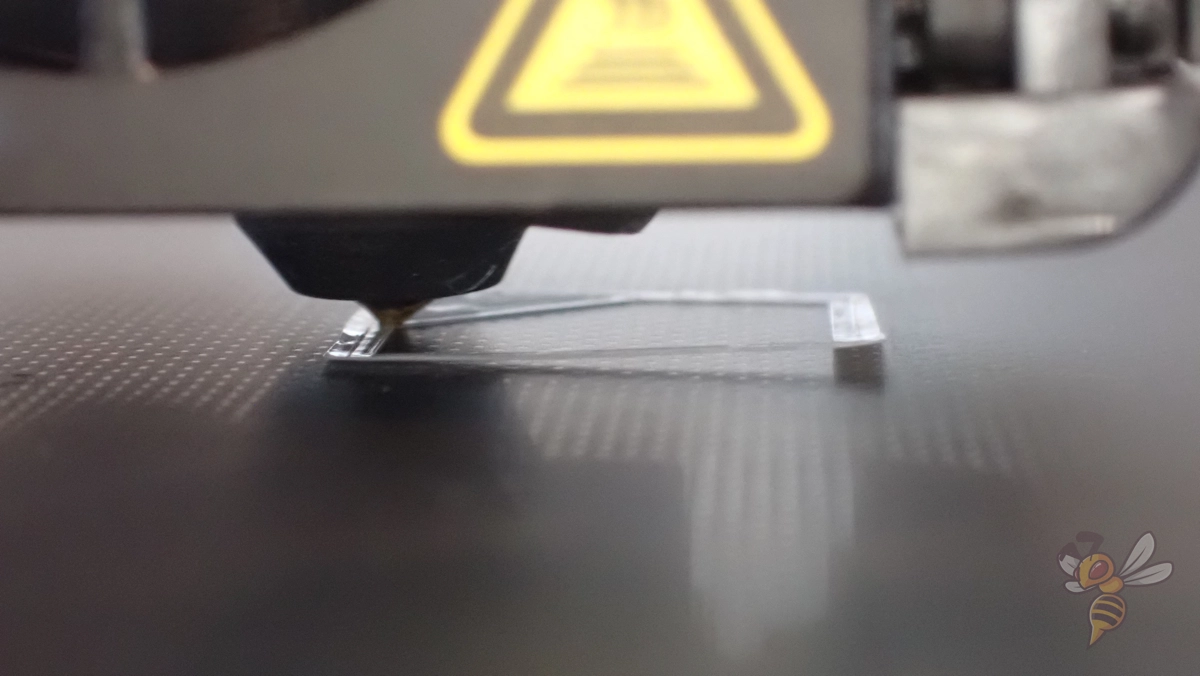
If the object, or more specifically the first layer, comes off preferably at one spot on the print bed, this is an indication of an improperly leveled print bed.
Even if your 3D printer has automatic print bed leveling, most 3D printers have screws under the print bed to adjust the tilt. Using the paper method, you can set the distance between the nozzle and the print bed to be the same everywhere on the print bed. Then you can run the automatic print bed leveling to compensate for the smallest remaining unevenness.
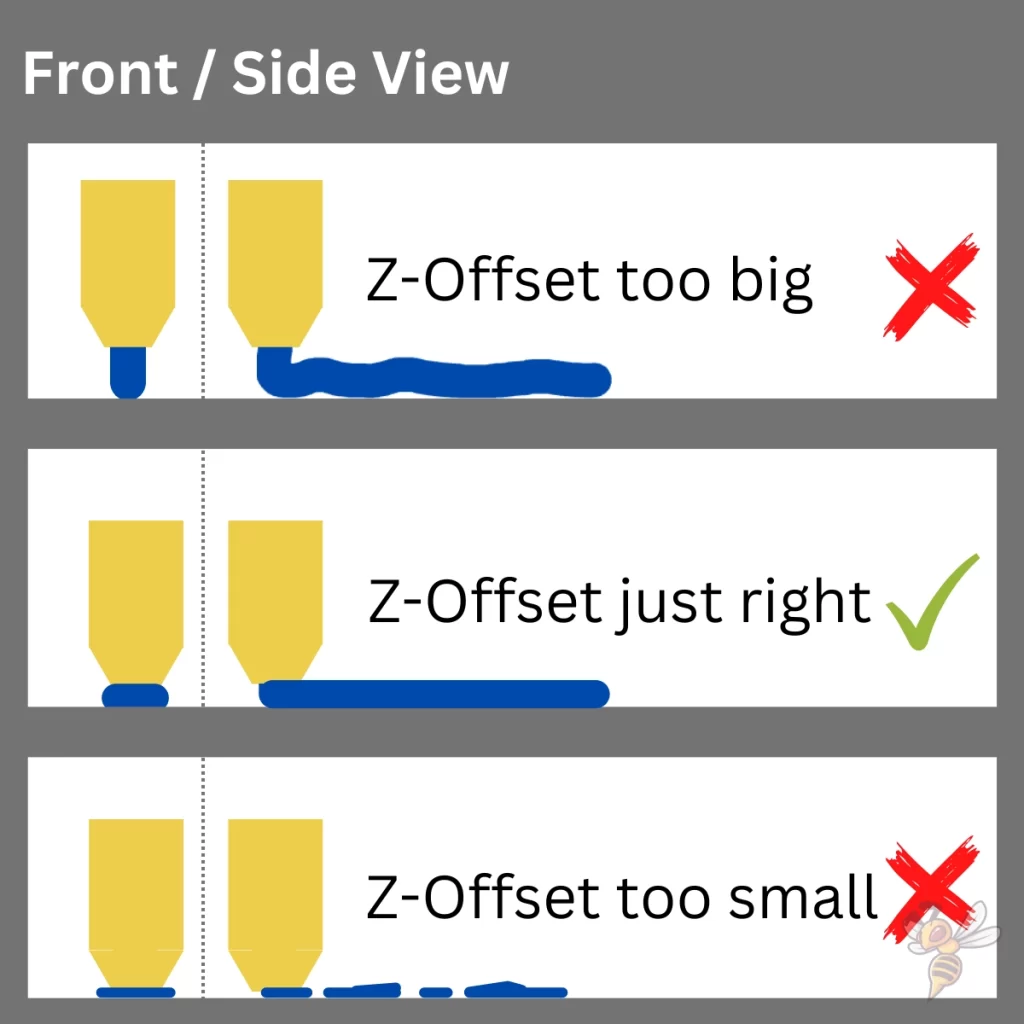
When the print bed is level, there is still the adjustment of the z-offset. This is the global distance between the nozzle and the print bed. It is defined in the menu on most 3D printers and is usually adjusted at the end of the leveling process.
Even on 3D printers with automatic print bed leveling, the z-offset has to be adjusted with a piece of paper after leveling.
If the z-offset is too large, the filament will not be pressed onto the print bed and will adhere poorly. However, the z-offset must not be too small either, otherwise the filament will be squeezed too much, an artificial elephant foot will form or no filament can be extruded at all.
Try to set the z-offset as small as possible before these phenomena occur.
Step 4: Reduce the Printing Speed for the First Layer
The longer the filament stays warm and liquid on the print bed, the better the adhesion between filament and print bed.
By lowering the print speed of the first layer, the hot nozzle stays longer with the printed filament, causing the filament to cool much more slowly. As a result, the filament flows into the smallest recesses of the print bed and creates a stronger bond.
In all the 3D printers I’ve used and tested so far, a print speed for the first layer of 5 to 10 mm/s has worked well. Usually, this is sufficient to create strong print bed adhesion for PLA.
After the basics already discussed and reducing the z-offset, reducing the print speed for the first layer is by far the most effective measure to increase print bed adhesion for PLA. No matter which print bed surface I have worked with so far, the print bed adhesion for PLA is increased enormously by this method.
Step 5: Don’t Cool the First Layer


To keep the PLA filament hot on the print bed for as long as possible, the cooling rate for the first layer has to be set to 0%. With some slicers, the cooling rate cannot be adjusted for the first layers, but only for the first millimeters. For PLA, the first millimeter should not be cooled.
PLA filament is one of the filaments that is most sensitive to excessive cooling of the first layer. Cool drafts of air can also destroy the print bed adhesion of PLA. If this might be your problem, you can try a draft shield.
A draft shield is a small wall around the object, similar to a skirt, only higher. This protects the first layers of the object from air currents.
Most slicers set the cooling rate for PLA to 0% by default. However, some programs do not do this, so be sure to check this setting in your slicer.
Step 6: Increase the Print Bed Temperature


The correct print bed temperature for PLA is between about 60 °C. To find the right temperature, increase the temperature until the first signs of an elephant foot appear. In an elephant foot, the first layer is wider than the rest of the object. The filament is then too hot and flows away to the outside.
Due to the higher temperature of the print bed, the filament is more fluid and can bond better with the print bed. However, it must not be too liquid, so that it cannot flow uncontrolled into the width.
Sometimes you notice this later, when the dead weight of the object crushes the first layers. Then the first layers are too soft due to the high temperature and can be crushed by the layers above.
The perfect temperature for the print bed is highly dependent on the particular 3D printer and filament used. Try to adjust the temperature in small steps and observe the result.
Step 7: Print Thicker Lines & Higher Layers
As with the slower print speed, higher bed temperature and disabled cooling of the first layer, the goal of a larger line width and layer height is to allow the filament to cool as slowly as possible.
The thicker and higher a printed line is, the greater the thermal inertia of the printed filament. This causes the filament to cool down more slowly. When the filament cools more slowly, it bonds better to the print bed.
Normal values for line width are between 100 and 120% of the Nozzle diameter, but values up to 200% can be used. The layer height can be between 25 and 75% of the nozzle diameter.
In most slicers, it is possible to change these settings only for the first layer. Be aware that the first layer will be slightly different from the rest of the object. Usually however, the difference is small and only visible on closer inspection. A small price to pay for good print bed adhesion.
In my experience, it is usually sufficient to increase only the line width. This also does not change the appearance of the object.
Step 8: Use Mouse Ears
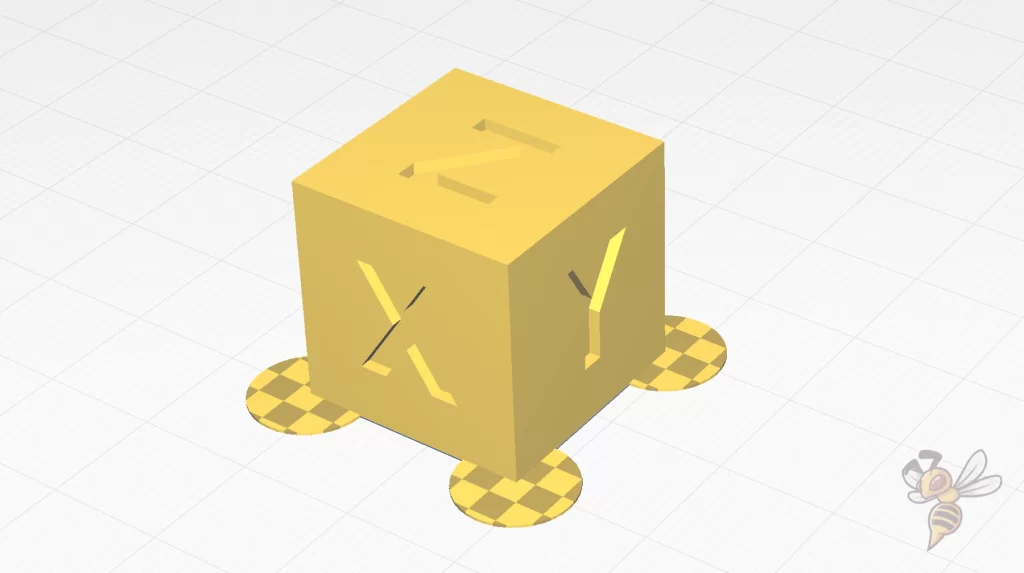
If all previous steps did not help to increase the print bed adhesion of PLA, here comes an emergency solution with the least influence on the final result.
Mouse ears are small brims that are applied to critical areas and corners of the object to selectively increase the print bed adhesion.
Mouse ears are useful for objects with filigree first layers or, for example, the corners of a cube. They artificially increase the contact area between the object and the print bed. The overall print bed adhesion generated is thus increased. In addition, the round shape of mouse ears favors print bed adhesion, as they do not tend to detach or lift off as much as pointed corners.
Since mouse ears usually consist of only one layer, are relatively small, and are applied only to certain areas of the object, they are easy to remove after printing. There is no such ugly residue as with brims.
Often mouse ears are therefore a quick solution if you want to avoid getting too involved with your printer’s settings and how to optimize them. It is easier for many users to add mouse ears and not have to worry about print bed adhesion.
If you would rather not create the mouse ears manually in a CAD program, there is a handy plugin in Cura that lets you add mouse ears automatically. However, some other slicers have this feature built in.
Step 9: Use a Raft
The larger the contact area with the print bed, the stronger the print bed adhesion. Rafts are based on this principle.
In a sense, a raft forms a new print bed for the object. A raft consists of several layers printed between the print bed and the object. It is much wider than the first layer and thus creates a much greater print bed adhesion.
However, in addition to this advantage, there are a few disadvantages to using a raft with PLA filament to increase its print bed adhesion:
Unclean underside of the object: Since the first layer of the object is printed on the raft rather than the smooth print bed, the underside of the object will not be smooth and will often have minor filament residue after peeling the raft off. While this is irrelevant for most objects, you should still be aware of it.
Higher filament consumption and printing time: A raft has a wide surface and consists of a few layers. The material consumption is not negligible and the printing time is also sometimes greatly increased.
Because of these disadvantages, the use of a raft is therefore only an emergency solution for me. The steps described before this one should be sufficient to get a high enough adhesion. If this is not the case and you want to avoid using a raft, there are two other emergency solutions that you can use.
Step 10: Use Adhesives
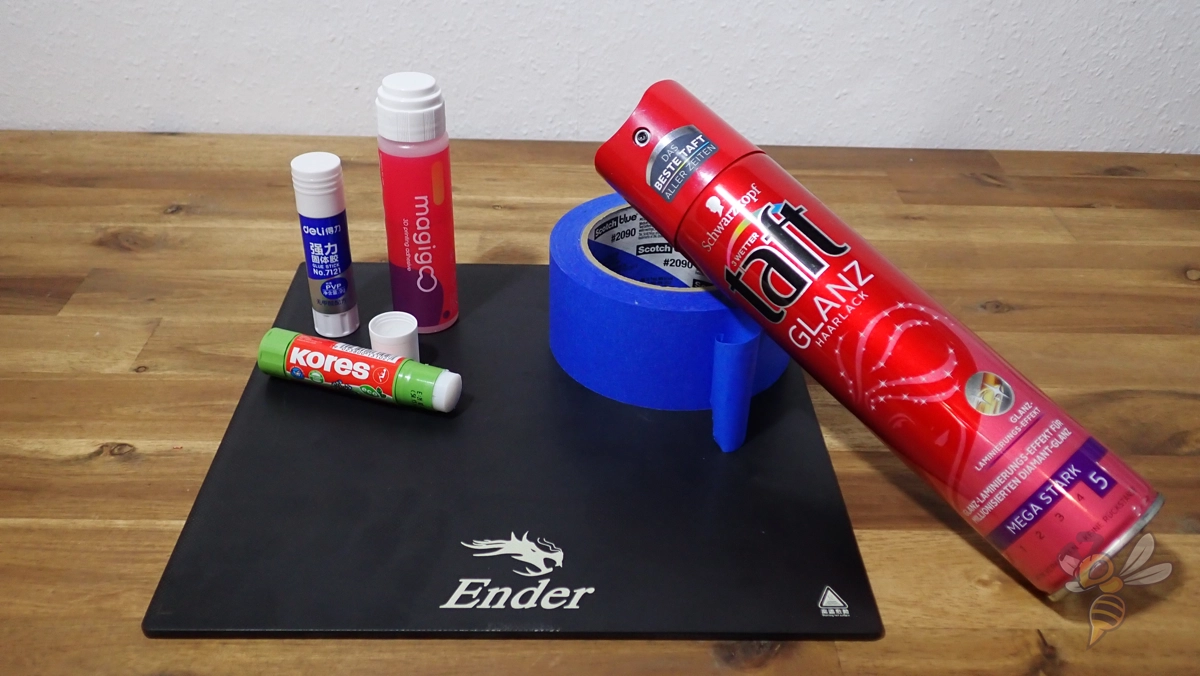
To enforce strong print bed adhesion, certain adhesives can be used. For PLA filament, hairspray, normal glue sticks, Blue Tape and special 3D printing adhesives like Magigoo are suitable.
Hairspray and normal glue sticks are the improvised and not recommended adhesives. While hairspray creates a very fine layer on the print bed and can create good print bed adhesion, it should not get into the 3D printer’s electronics and will stick to the printer’s moving parts as well.
Glue sticks often leave chunks on the print bed that can interfere with the printing process. In addition, glue sticks sometimes make the print bed adhesion so strong that the object can hardly be removed.
The better solution for PLA filament is therefore Blue Tape or Magigoo. Blue Tape is a special adhesive tape with a rough surface. It creates sufficient adhesion for many filaments like PLA. Magigoo is a special 3D printing adhesive that applies a fine film to the print bed and creates a perfect print bed adhesion on most surfaces.
Step 11: Use a Different Print Bed
Most modern 3D printers have a print bed made of flexible spring steel with a PEI* or PC coating*. These coatings have proven successful for most filaments and especially for PLA.
PEI and PC coatings produce very high print bed adhesion when hot. Once the object and print bed have cooled after printing, the object can be easily released. If not, you can remove the flexible print bed from the magnetic plate and bend it. Then the object will release on its own.
I have never had problems with the print bed adhesion of PLA filament on a print bed coated with PEI or PC. Usually, it is enough here if the print bed is clean and leveled, and the z-offset is well-adjusted.
If you “only” have a glass print bed, print bed surfaces coated with PEI are available in many sizes for gluing on*. With this, you can effectively upgrade your printer for PLA.
But with the steps described in this article, you should also be able to increase the adhesion of PLA filament sufficiently for a glass print bed without having to use rafts, adhesives or replace the print bed.
Disclosure: This website is the property of Martin Lütkemeyer and is operated by Martin Lütkemeyer. Martin Lütkemeyer is a member of the Amazon Services LLC and other Affiliate Programs. These are affiliate advertising programs designed to enable websites to earn advertising revenue through advertising and linking to Amazon.com and others. Links marked with * are affiliate links.
