
- Wet Filament: Prevention, Symptoms & Drying - July 18, 2024
- Sovol SV08 – Best PrusaSlicer Settings & Profile - June 26, 2024
- Sovol SV08 – Best Orca Slicer Settings & Profile - June 26, 2024
Disclosure: Links marked with * are Affiliate Links. I earn from qualifying purchases if you decide to make a purchase through these links – at no additional cost for you!
The Flashforge Adventurer 5M Pro is one of the best 3D printers for exotic filaments such as ABS. But it can also achieve perfect results with simple filaments such as PLA. But to utilize the full potential of this device, the right slicer settings are crucial. Only by precisely adapting the software to the printer and the material used can you achieve the perfect results you want.
In this article, I share my optimized Cura settings for the Flashforge Adventurer 5M Pro. These settings provide a solid foundation for high-quality printing results. Whether you’re working with PLA, ABS, TPU or PETG, these carefully adjusted parameters will help you get the most out of your 3D printer.
However, perfect printing results require more than just using the right slicer settings. A specific calibration for the respective filament is essential to achieve optimal results. If you want to learn more about calibration, I recommend you take a look at my detailed calibration guide or my 3D printing course. There you will find comprehensive information and instructions to help you set up your 3D printer perfectly and get the most out of every printing project.

Calibrated Cura Profile
For optimal print quality with minimal effort, you can download my calibrated Cura profile for this 3D printer and import it directly into Cura. All settings are perfectly adapted to this printer, e.g. the accelerations, jerk, supports and the first layer.
| PLA | ABS | TPU | PETG | |
| Print Temp. | 220 °C | 250 °C | 220 °C | 230 °C |
| Bed Temp. | 60 °C | 100 °C | 60 °C | 80 °C |
| Speed | 200 mm/s | 200 mm/s | 50-100 mm/s | 150 mm/s |
| Retraction | 0.8 mm at 30 mm/s | 0.8 mm at 30 mm/s | 1.2 mm at 30 mm/s | 1.0 mm at 30 mm/s |
| Cooling | 100 % | 50 % | 100 % | 50 % |
Table of Contents:
How to Create a Cura Profile for the Flashforge Adventurer 5M Pro
A Cura profile consists of machine settings and print settings, which together form the basis for successful printing results.
The machine settings define the physical and technical aspects of your 3D printer, such as build volume, print head configuration and if the printer has a heating bed. These settings tell Cura what type of printer it is working with in order to customize the print preparation accordingly.
The print settings refer to the parameters that you customize for each print, such as print temperature, print speed, layer height and support structures. These settings are crucial for the quality of the printed object.
The first step is to define the machine settings, using an empty profile as a template.
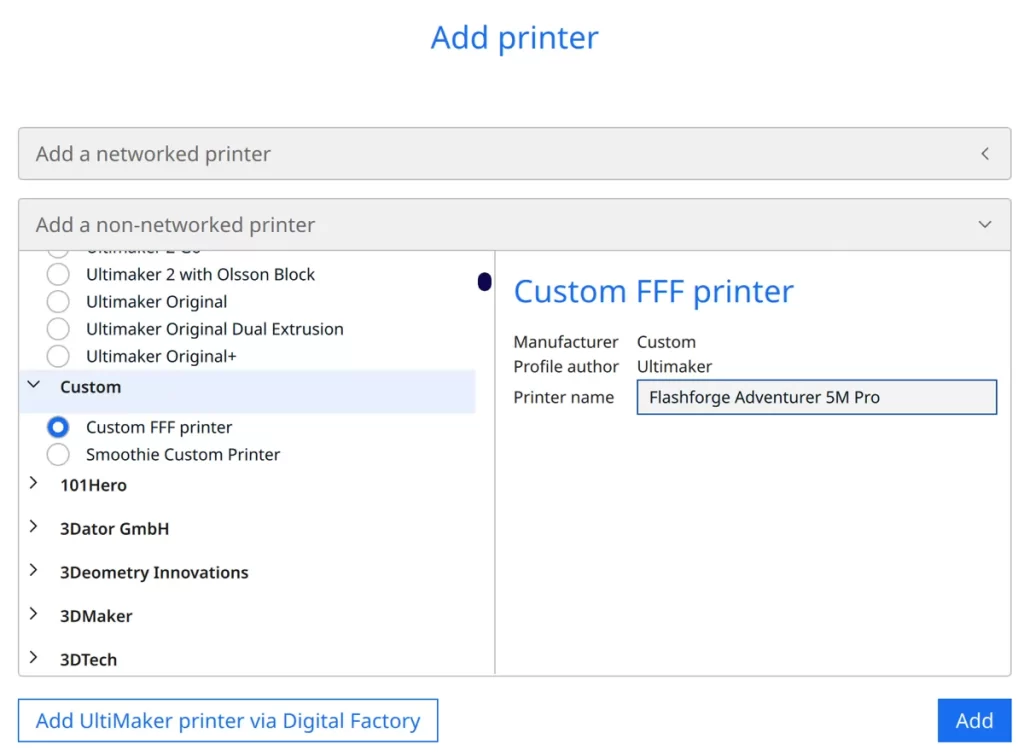
To add a 3D printer in Cura, click on ‘Settings’, ‘Printer’, ‘Add printer’. Then click on ‘Non-networked printer’. Then select ‘Custom’ and ‘Custom FFF printer’. Enter the name of the printer and click on ‘Add’.

The machine settings in the screenshot above show you how to configure your printer correctly. The G-code snippets are listed again directly after this to make it easier to copy them:
Start G-Code:
- G28
- M132 X Y Z A B
- G1 Z50.000 F420
- G161 X Y F3300
- M7 T0
- M6 T0
- M651 S255
End G-Code:
- M104 S0 T0
- M140 S0 T0
- G162 Z F1800
- G28 X Y
- M132 X Y A B
- M652
- G91
- M18
After creating the machine profile, it is important to define the print settings. These determine the specific parameters for the printing process and allow you to optimize the quality of your prints depending on the material used and the desired level of detail.
And that’s exactly what we’re doing now!
You can find more information on how to create a 3D printer profile in Cura and what you need to pay attention to in this article: How to Create a Custom 3D Printer Profile in Cura
PLA Settings
These are the correct Cura settings for printing PLA filament with the Flashforge Adventurer 5M Pro:
- Print temperature: 220 °C
- Print bed temperature: 60 °C
- Print speed: 200 mm/s
- Retraction: 0.8 mm at 30 mm/s
- Cooling: 100 %
The Flashforge Adventurer 5M Pro handles printing with PLA filament almost flawlessly and requires hardly any calibration. This makes it an excellent choice for both beginners and experienced users looking for high-quality prints with minimal preparation.
Thanks to its ease of use, PLA is one of the easiest materials to use in 3D printing and the Adventurer 5M Pro is perfectly adapted to work with this material. In particular, the print temperature and retraction settings are key parameters that should be fine-tuned for optimal results with PLA.
However, it should be noted that not every PLA brand reacts identically. Differences in the composition of different manufacturers may make adjustments necessary. To help you achieve the best possible printing results, I will go into more detail about calibration in the rest of this article and give you tips on how to perfect your settings.
ABS Settings
These are the correct Cura settings for printing ABS filament with the Flashforge Adventurer 5M Pro:
- Print temperature: 250 °C
- Print bed temperature: 100 °C
- Print speed: 200 mm/s
- Retraction: 0.8 mm at 30 mm/s
- Cooling: 50 %
ABS is a material known for its durability and heat resistance, but it can also have a tendency to shrink or warp during the cooling process.
Fortunately, the Flashforge Adventurer 5M Pro is perfect for printing ABS with its enclosure and an internal ventilation system that even has air filters.
These features help to maintain a constant temperature during the printing process, minimizing the risk of warping. Thanks to this ingenious design of the printer, warping issues are also rare, making it an ideal choice for projects that require the use of ABS.
TPU Settings
These are the correct Cura settings for printing TPU filament with the Flashforge Adventurer 5M Pro:
- Print temperature: 220 °C
- Print bed temperature: 60 °C
- Print speed: 50-100 mm/s
- Retraction: 1.2 mm at 30 mm/s
- Cooling: 100 %
The Flashforge Adventurer 5M Pro is characterized by its direct drive extruder, which makes it ideal for handling flexible filaments such as TPU. This type of extruder feeds the TPU filament in a very precise and controlled manner, which is essential for creating high-quality prints with flexible materials.
When using TPU, the adjustment of certain printing parameters is of great importance. It is particularly important to set the print and print bed temperature accordingly and to reduce the print speed in order to avoid problems caused by filament entanglement. A carefully adjusted retraction is also crucial to minimize stringing in TPU and thus ensure clean and precise printing results.
PETG Settings
These are the correct Cura settings for printing PETG filament with the Flashforge Adventurer 5M Pro:
- Print temperature: 230 °C
- Print bed temperature: 80 °C
- Print speed: 150 mm/s
- Retraction: 1.0 mm at 30 mm/s
- Cooling: 50 %
PETG filament combines the best properties of PLA and ABS in that it is both easy to print and strong and temperature resistant. However, PETG is also known to have a strong tendency to “string”, which means that fine threads can appear between the printed parts.
To minimize this problem, it is important to carefully calibrate the retraction settings. Precise retraction prevents excess material from escaping as the print head moves, reducing stringing.
It is also crucial to store PETG in a dry place as it is hygroscopic and absorbs moisture from the environment. Moist filament can lead to printing problems and affect the quality of your print results.
Best Cura Settings for the Flashforge Adventurer 5M Pro
Print Temperature
The best printing temperatures for the Flashforge Adventurer 5M Pro in Cura:
- PLA: 220 °C
- ABS: 250 °C
- TPU: 220 °C
- PETG: 230 °C
The printing temperature is a critical factor for the quality of your prints and should be carefully calibrated. One method to find the optimal printing temperature for your material is to use a temperature tower.
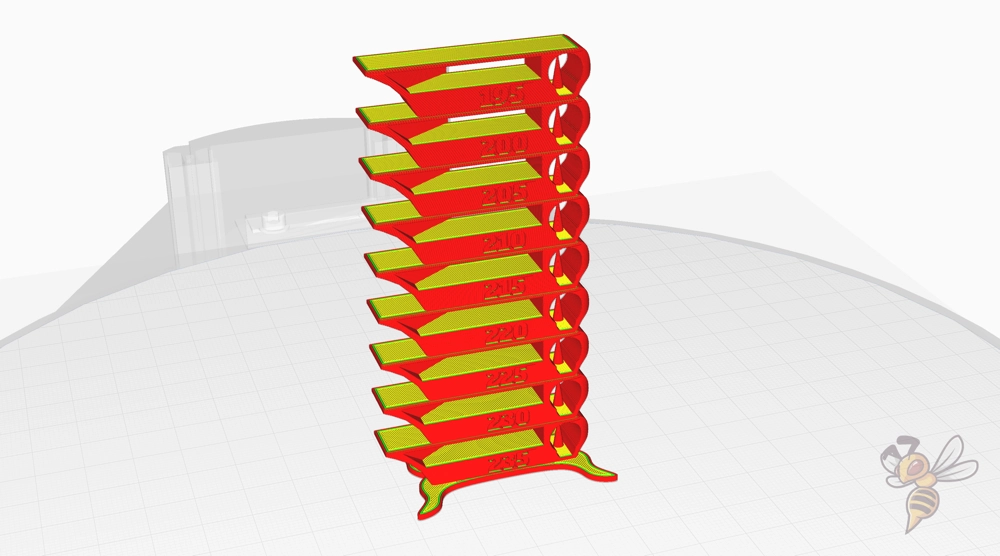
A temperature tower is a test print that allows you to test different temperature settings in a single print. This allows you to assess the effects of different temperatures on print quality and determine the ideal setting for your specific filament.
This step is particularly important as filaments from different manufacturers may have different ideal printing temperatures.
Print Bed Temperature
The best print bed temperatures for the Flashforge Adventurer 5M Pro in Cura:
- PLA: 60 °C
- ABS: 100 °C
- TPU: 60 °C
- PETG: 80 °C
The right print bed temperature is crucial for the success of your 3D prints. It ensures that the first layer adheres well to the print bed, which in turn forms the basis for the stability and accuracy of the entire printing process.
A print bed temperature that is too low can result in the printed object not adhering properly to the bed, while a temperature that is too high can lead to problems such as an elephant foot. This is a deformation at the base of the printed object where it expands and becomes wider than intended.
With the PEI print bed of the 5M Pro, however, it is not too difficult to find the right print bed temperature. The adhesion to this surface is very good for most filaments.
Print Speed
The best print speeds for the Flashforge Adventurer 5M Pro in Cura:
- PLA: 200 mm/s
- ABS: 200 mm/s
- TPU: 50-100 mm/s
- PETG: 150 mm/s
Print speed is a key element in the balance between print quality and print time. Too high a speed can affect quality, lead to inaccuracies and cause problems such as ringing or ghosting. These are visible vibration patterns or echoes next to sharp edges caused by the movement of the printer.
To determine the optimum print speed, it is advisable to carry out a ringing test. In this test, an object is printed at different speeds to see at which speed the best balance between time and quality is achieved.
By calibrating the print speed using a ringing test, you can fine-tune the settings of your printer to achieve high-quality results without wasting time unnecessarily.
Layer Height
These are the best layer heights for the Flashforge Adventurer 5M Pro in Cura:
- Decorative objects: 0.1 mm
- Standard: 0.2 mm
- Rough, fast prints: 0.3 mm
The choice of layer height has a major influence on the balance between print quality and printing time. A lower layer height, such as 0.1 mm for decorative objects, offers a high level of detail and a smooth surface, but requires more time to print.
The standard layer height of 0.2 mm is a good compromise between print quality and speed and is suitable for most applications.
For rough, fast prints where the fineness of detail is less important, a layer height of 0.3 mm can be selected to significantly reduce printing time. These settings allow the printing parameters to be flexibly adjusted depending on the requirements of the project.
Flow Rate
These are the best flow rates for the Flashforge Adventurer 5M Pro in Cura:
- Standard: 100%
- For over-extrusion: 90% to 99%
- For under-extrusion: 101% to 110%
Before you adjust the flow rate, it is important that the print temperature and retraction have already been finely calibrated. Only then should you adjust the flow rate as an additional parameter to further optimize the print quality.
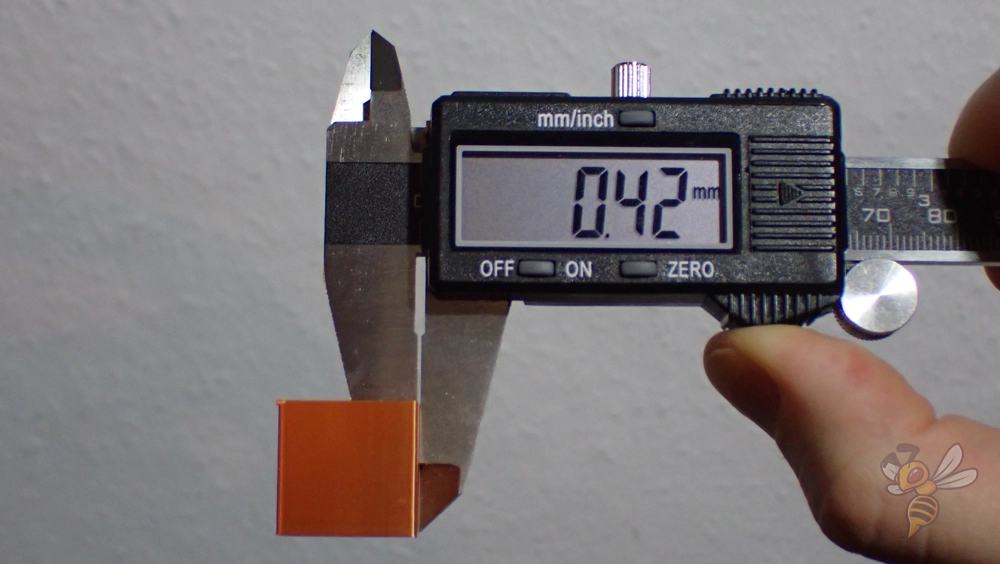
Printing a cube without infill or upper layers is particularly suitable for calibrating the flow rate. The thickness of the walls of this cube shows you whether the flow rate is set correctly or not.
If the wall is too thick, this indicates over-extrusion; if it is too thin, it indicates under-extrusion. By adjusting the flow rate in small steps, you can ensure that the wall thickness corresponds exactly to the specifications, which leads to more precise and higher quality print results.
Retraction
The best retraction settings for the Flashforge Adventurer 5M Pro in Cura:
- PLA: 0.8 mm at 30 mm/s
- ABS: 0.8 mm at 30 mm/s
- TPU: 1.2 mm at 30 mm/s
- PETG: 1.0 mm at 30 mm/s
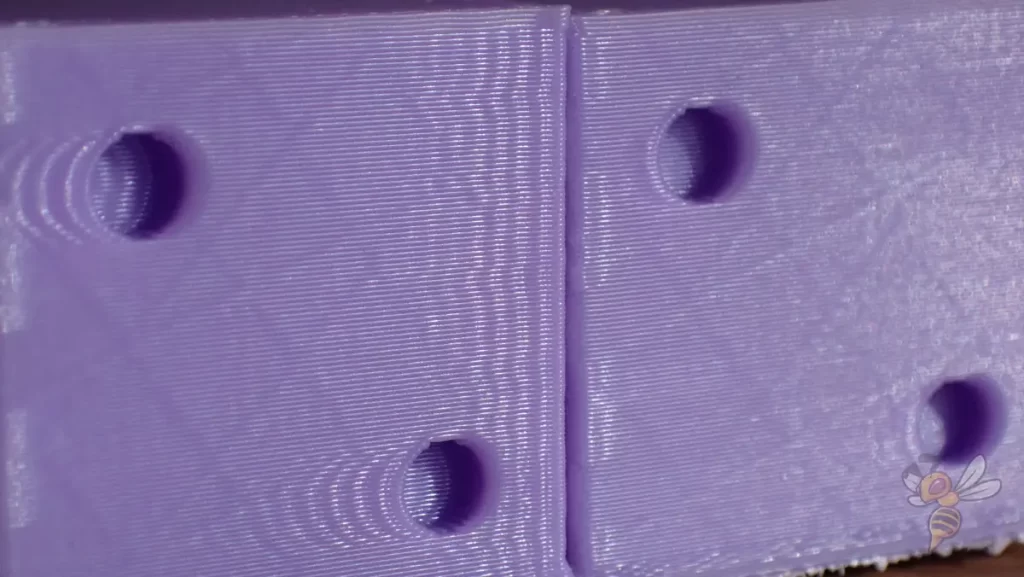
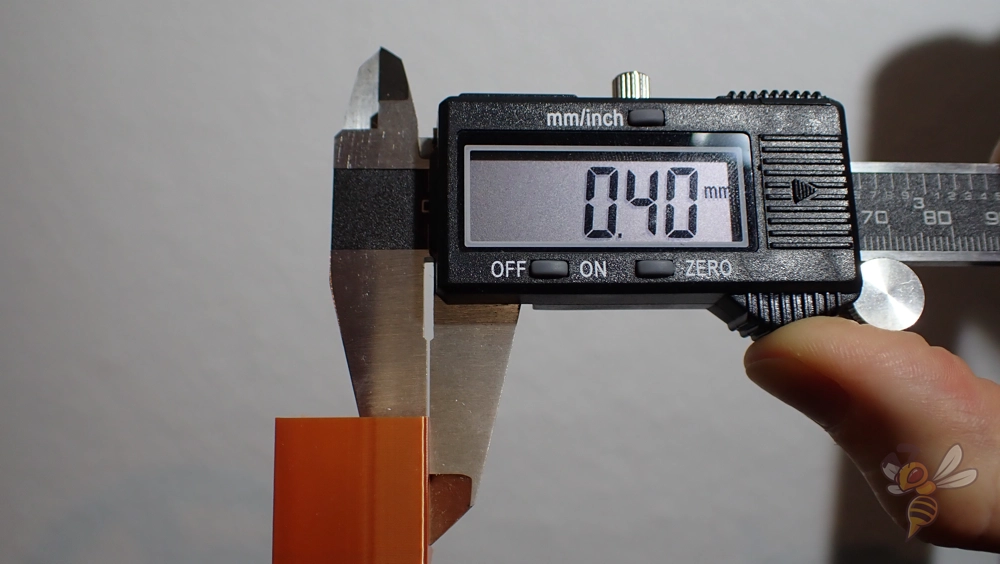
Retraction is a key factor in minimizing stringing and oozing during the printing process. It is important to calibrate both the distance and speed of retraction for each material and printer individually.
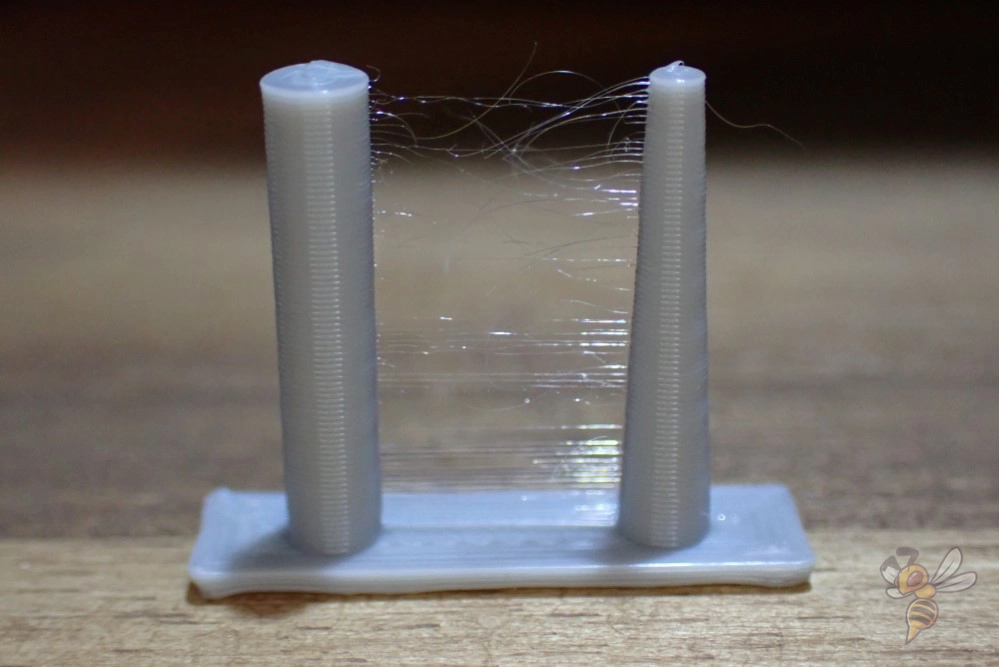
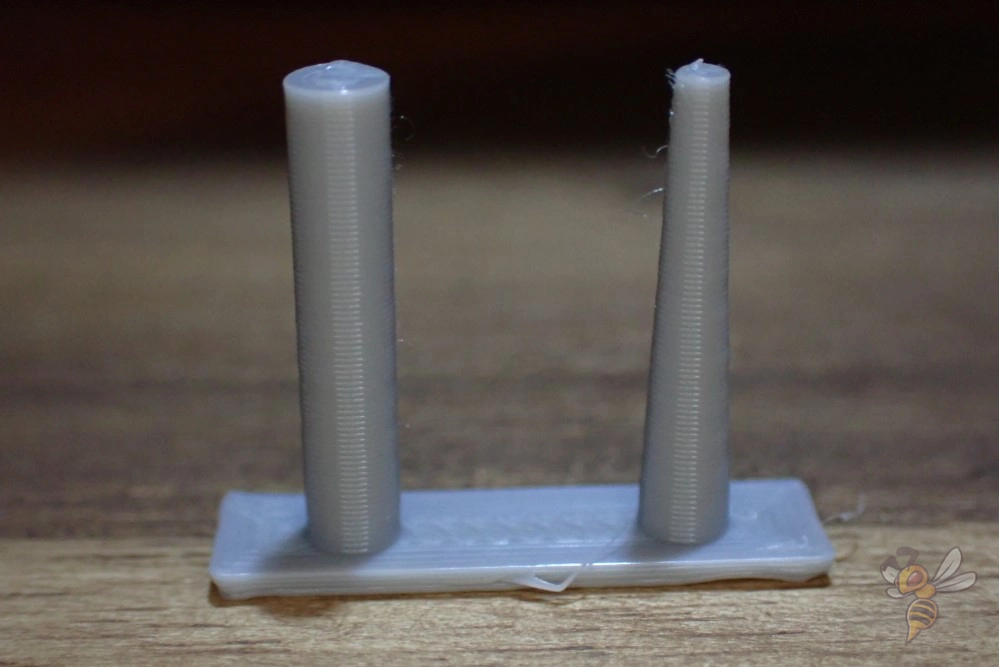
Retraction calibration begins with a test print specifically designed to identify problems with filament retraction. By adjusting the retraction settings and performing repeated test prints, you can determine the optimal values for distance and speed that will prevent stringing without causing other printing problems.
An effective approach is to print small towers or structures with sharp changes in print direction to show the effects of retraction settings.
Infill
The best infill density for the Flashforge Adventurer 5M Pro in Cura:
- Decorative objects: 0-15%
- Standard objects: 15-50%
- Stable objects: 50-100%
These values for the infill density are basically printer-independent and serve as general guidelines for the infill of 3D-printed objects. The choice of infill density depends on the purpose and the required stability of the printed object.
Decorative objects that are mainly used for decoration and are not subject to mechanical stress can be printed with a low infill density. This saves material and printing time without compromising the aesthetic quality of the object.
For standard objects that need to withstand moderate stress, an infill density of 15-50% offers a good compromise between material consumption, printing time and mechanical strength.
Objects that require high stability should be printed with an infill density of 50-100%. A higher density ensures better structural integrity and resistance to physical stress.
When determining the optimal infill density, it should also be taken into account that a higher infill not only increases material consumption and printing time, but can also improve the mechanical properties of the object to a certain extent.
First Layer
These are the best Cura settings for the first layer with the Flashforge Adventurer 5M Pro:
- Layer height: 100%
- Line width: 100%
- Print temperature: Same as the rest.
- Print speed: 10 mm/s
- Raft/Brim/Skirt: Skirt.
A slow print speed for the first layer is crucial for good adhesion to the print bed and is considered one of the most effective ways to ensure that the print starts successfully.
A reduced speed allows the filament to stay hot longer and therefore more malleable, which enables the material to form a stronger bond with the print bed.
The longer the filament remains in this malleable state, the better it can adhere to the print bed and the more stable the base of your print object will be. An optimal first layer is the cornerstone for the entire subsequent printing process and helps to avoid problems such as warping or the print detaching from the bed.
Disclosure: This website is the property of Martin Lütkemeyer and is operated by Martin Lütkemeyer. Martin Lütkemeyer is a member of the Amazon Services LLC and other Affiliate Programs. These are affiliate advertising programs designed to enable websites to earn advertising revenue through advertising and linking to Amazon.com and others. Links marked with * are affiliate links.
