
- Wet Filament: Prevention, Symptoms & Drying - July 18, 2024
- Sovol SV08 – Best PrusaSlicer Settings & Profile - June 26, 2024
- Sovol SV08 – Best Orca Slicer Settings & Profile - June 26, 2024
Disclosure: Links marked with * are Affiliate Links. I earn from qualifying purchases if you decide to make a purchase through these links – at no additional cost for you!
The Artillery Sidewinder X4 Plus can deliver perfect printing results. However, to achieve these consistently, the correct slicer settings are crucial. Without them, the printer’s true potential remains untapped and printing errors remain a constant plague.
In this article, I share my optimized Cura settings to give you a strong starting point for excellent print quality. These settings will help you get the best out of your Sidewinder X4 Plus, regardless of the filament you use.
Note that perfect results require careful calibration. For more detailed instructions on calibration, check out my calibration guide or the 3D printing course to deepen your knowledge and maximize the quality of your prints.

Calibrated Cura Profile
For optimal print quality with minimal effort, you can download my calibrated Cura profile for this 3D printer and import it directly into Cura. All settings are perfectly adapted to this printer, e.g. the accelerations, jerk, supports and the first layer.
| PLA | ABS | TPU | PETG | |
| Printing temperature | 215 °C | 245 °C | 215 °C | 230 °C |
| Print bed temperature | 60 °C | 95 °C | 60 °C | 80 °C |
| Printing speed | 300 mm/s | 300 mm/s | 50-100 mm/s | 200 mm/s |
| Retraction | 1.5 mm at 20 mm/s | 1.5 mm at 20 mm/s | 1.8 mm at 25 mm/s | 1.7 mm at 20 mm/s |
| Cooling | 100 % | 50 % | 100 % | 50 % |
Table of Contents:
How to Create a Cura Profile for the Artillery Sidewinder X4 Plus
A Cura profile is made up of machine settings and print settings. The machine settings refer to the hardware specifications of your 3D printer, such as the size of the print bed, the nozzle diameter and the type of extruder. Print settings, on the other hand, relate to the variables of the printing process itself, including the printing temperature, the thickness of the layers, the speed of printing and the support structures.
The machine settings must be defined first, using an empty profile as a basis.
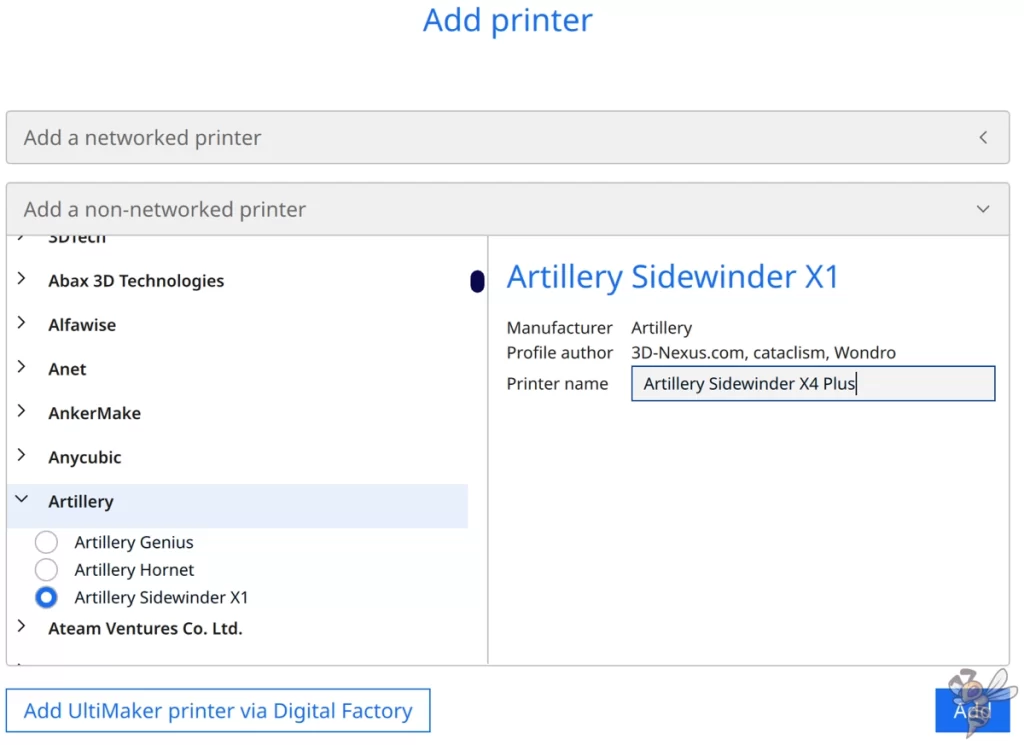
You add a 3D printer in Cura by going to ‘Settings’, selecting ‘Printer’ and clicking ‘Add printer’. Then click on ‘Non-networked printer’ and ‘Custom’ and ‘Custom FFF printer’. Enter the name of your printer and confirm with ‘Add’.
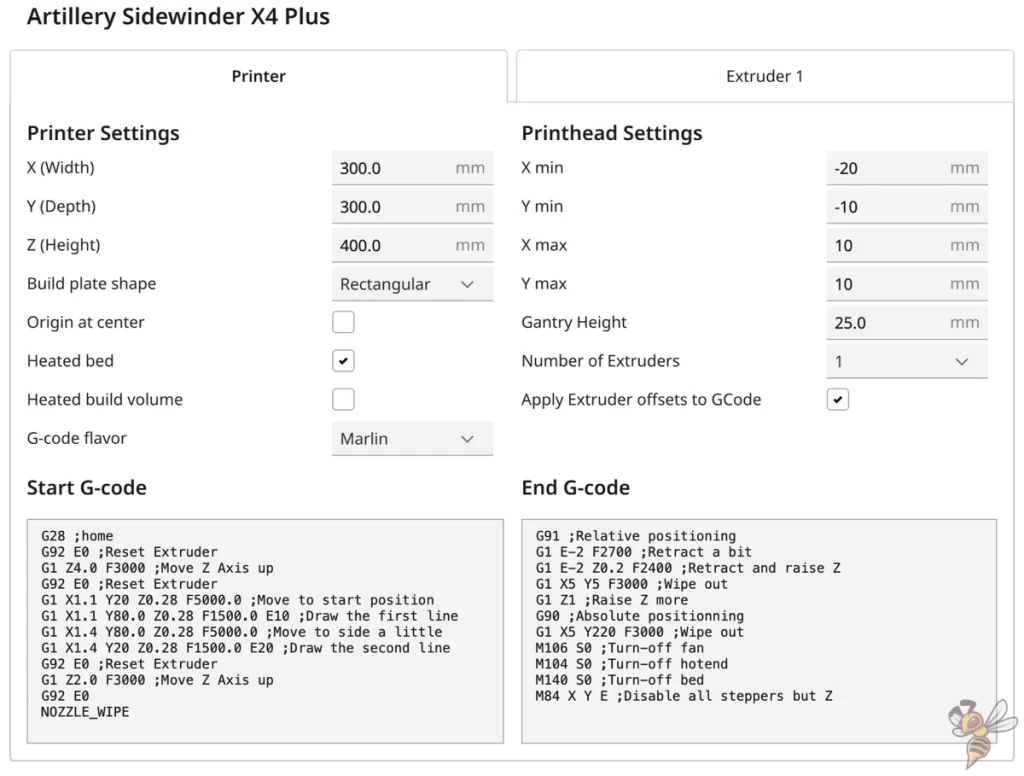
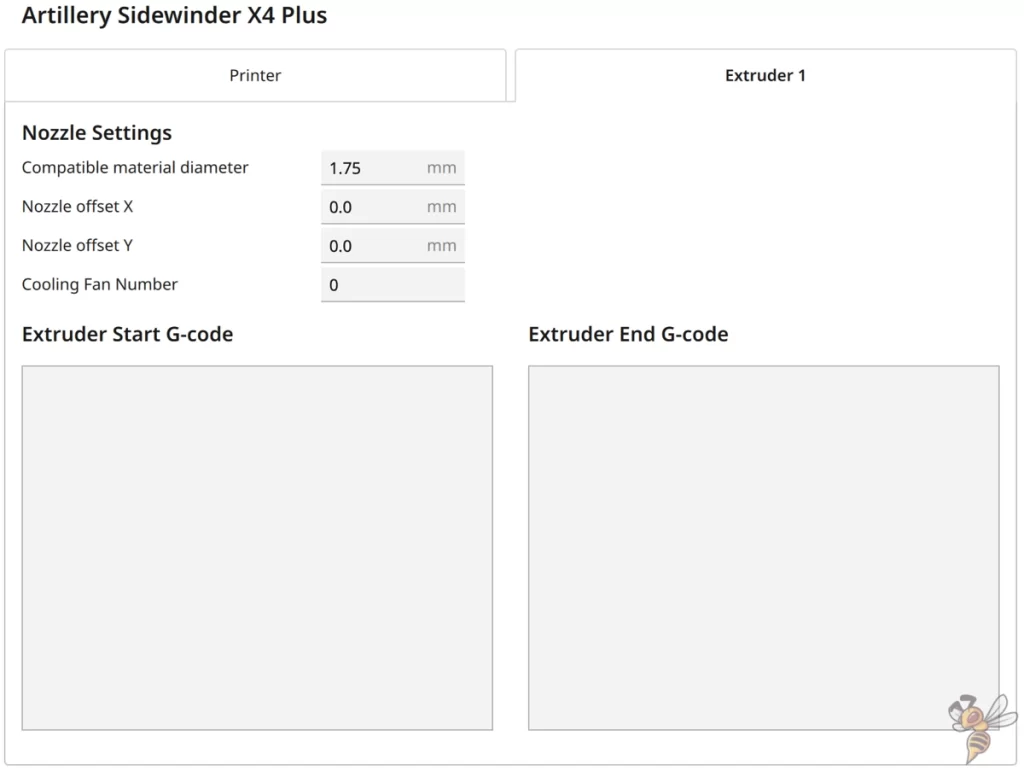
In the screenshot above you can see the machine settings. To make them easier to use, the G-code snippets are listed separately below:
Start G-Code:
- G28 ;home
- G92 E0 ;Reset extruder
- G1 Z4.0 F3000 ;Move Z Axis up
- G92 E0 ;Reset extruder
- G1 X1.1 Y20 Z0.28 F5000.0 ;Move to start position
- G1 X1.1 Y80.0 Z0.28 F1500.0 E10 ;Draw the first line
- G1 X1.4 Y80.0 Z0.28 F5000.0 ;Move to side a little
- G1 X1.4 Y20 Z0.28 F1500.0 E20 ;Draw the second line
- G92 E0 ;Reset extruder
- G1 Z2.0 F3000 ;Move Z Axis up
- G92 E0
- NOZZLE_WIPE
End G-Code:
- G91 ;Relative positioning
- G1 E-2 F2700 ;Retract a bit
- G1 E-2 Z0.2 F2400 ;Retract and raise Z
- G1 X5 Y5 F3000 ;Wipe out
- G1 Z1 ;Raise Z more
- G90 ;Absolute positioning
- G1 X5 Y220 F3000 ;Wipe out
- M106 S0 ;Turn-off fan
- M104 S0 ;Turn-off hotend
- M140 S0 ;Turn-off bed
- M84 X Y E ;Disable all steppers but Z
Once you have set up the machine profile, it is time to adjust the print settings. These are crucial for achieving the best possible print quality and must be adjusted to the material and the specific application.
You can find more information on how to create a 3D printer profile in Cura and what you need to pay attention to in this article: How to Create a Custom 3D Printer Profile in Cura
PLA Settings
The Artillery Sidewinder X4 Plus can process PLA filament with remarkable precision and little calibration effort. This makes it an ideal 3D printer for anyone who wants to start printing quickly and easily.
Here are the correct Cura settings for printing PLA filament with the Artillery Sidewinder X4 Plus:
- Print temperature: 215 °C
- Print bed temperature: 60 °C
- Print speed: 300 mm/s
- Retraction: 1.5 mm at 20 mm/s
- Cooling: 100 %
PLA is one of the most popular printing materials due to its easy handling and low tendency to warp. The Artillery Sidewinder X4 Plus masters PLA printing with ease, making it an excellent choice for both beginners and experienced users.
Two key factors for optimal PLA prints are the printing temperature and retraction. The above settings provide a solid foundation, although individual adjustments may be required depending on the PLA brand.
The PEI print bed surface of the Artillery Sidewinder X4 Plus provides excellent adhesion of PLA, minimizing the need for extensive print bed temperature optimization or adhesion enhancers.
Later in this article, I will discuss how you can fine-tune your settings through calibration to achieve the best possible results with different PLA types.
ABS Settings
These are the correct Cura settings for printing ABS filament with the Artillery Sidewinder X4 Plus:
- Print temperature: 245 °C
- Print bed temperature: 95 °C
- Print speed: 300 mm/s
- Retraction: 1.5 mm at 20 mm/s
- Cooling: 50 %
ABS is known for its durability and heat resistance, but places higher demands on the printing process due to its tendency to warp and crack during the cooling process.
The Artillery Sidewinder X4 Plus does not have an enclosure, which must be taken into account when printing with ABS. A lack of enclosure can lead to difficulties in maintaining a constant temperature around the print object, which can be particularly problematic for large prints.
However, for smaller objects made from ABS, the Sidewinder X4 Plus can deliver perfectly suitable results. One way of counteracting the effects of cool air currents is to use a draft shield, which can be activated in the print settings. This helps to keep the ambient temperature around the print object more stable and reduces the likelihood of warping.
TPU Settings
These are the correct Cura settings for printing TPU filament with the Artillery Sidewinder X4 Plus:
- Print temperature: 215 °C
- Print bed temperature: 60 °C
- Print speed: 50-100 mm/s
- Retraction: 1.8 mm at 25 mm/s
- Cooling: 100 %
The Artillery Sidewinder X4 Plus is equipped with a Direct Drive extruder, which is generally considered advantageous for printing with flexible filaments such as TPU.
A Direct Drive system minimizes the distance the filament has to travel from the extruder to the nozzle, which reduces the risk of clogging and misprints that can otherwise often occur with flexible filaments.
When printing with TPU on the Sidewinder X4 Plus, the print speed setting is particularly important. TPU reacts sensitively to movements that are too fast, as its flexibility can lead to tangling in the extruder. A slower printing speed helps to improve the quality of the print and increase the accuracy of the object.
Together with a fine-tuned retraction that minimizes material pulling during non-printing movements, the Sidewinder X4 Plus can be used effectively for printing with TPU, making it a versatile tool for handling a wide range of filament types.
PETG Settings
These are the correct Cura settings for printing PETG filament with the Artillery Sidewinder X4 Plus:
- Print temperature: 230 °C
- Print bed temperature: 80 °C
- Print speed: 200 mm/s
- Retraction: 1.7 mm at 20 mm/s
- Cooling: 50 %
In a way, PETG combines the best properties of PLA and ABS by offering good printability as well as high strength and temperature resistance.
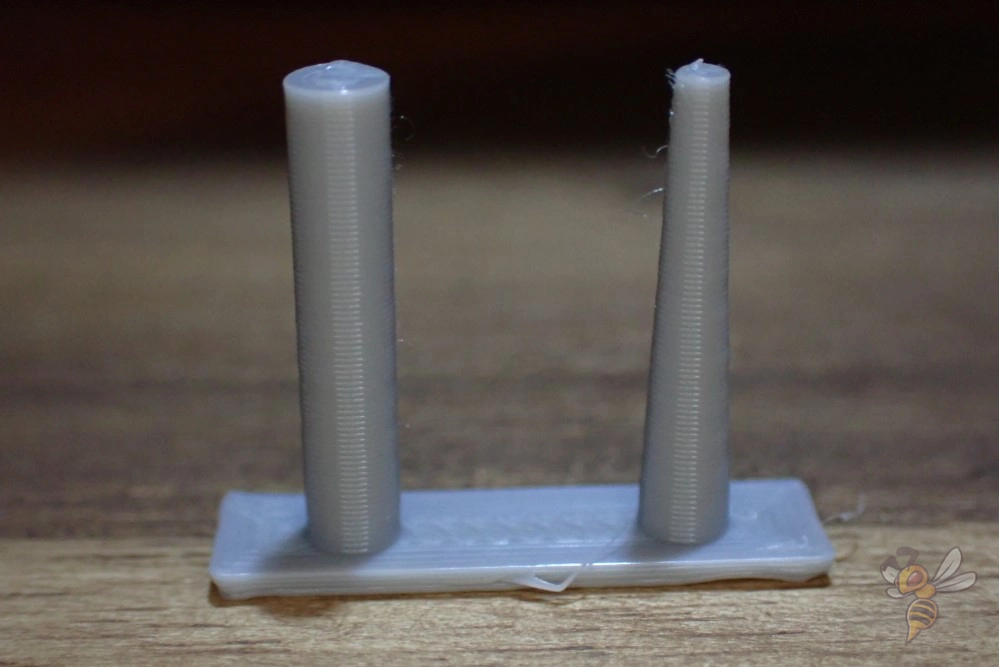
However, PETG is also known to have a strong tendency to string, which means that fine hairs can form between the printed parts. This behavior makes careful calibration of retraction settings essential to minimize the formation of these hairs.
Another important note when printing with PETG is the storage of the filament. PETG is hygroscopic, i.e. it attracts moisture from the environment, which can lead to problems during printing. It is therefore advisable to store PETG in a dry state in order to achieve the best printing results.
With the above settings and an adjusted retraction, you can achieve high-quality PETG prints with the Artillery Sidewinder X4 Plus that are both strong and reliable.
Best Cura Settings for the Artillery Sidewinder X4 Plus
To achieve the best printing results with your Artillery Sidewinder X4 Plus, it is crucial to choose the right settings in Cura.
Print Temperature
The best printing temperatures for the Artillery Sidewinder X4 Plus in Cura:
- PLA: 215 °C
- ABS: 245 °C
- TPU: 215 °C
- PETG: 230 °C
The printing temperature plays a decisive role in the quality of your 3D print. A printing temperature that is not set optimally can lead to problems such as poor layer adhesion, stringing or insufficient detail accuracy. It is therefore important to calibrate the printing temperature for each filament individually. An effective method for this is to print a temperature tower.
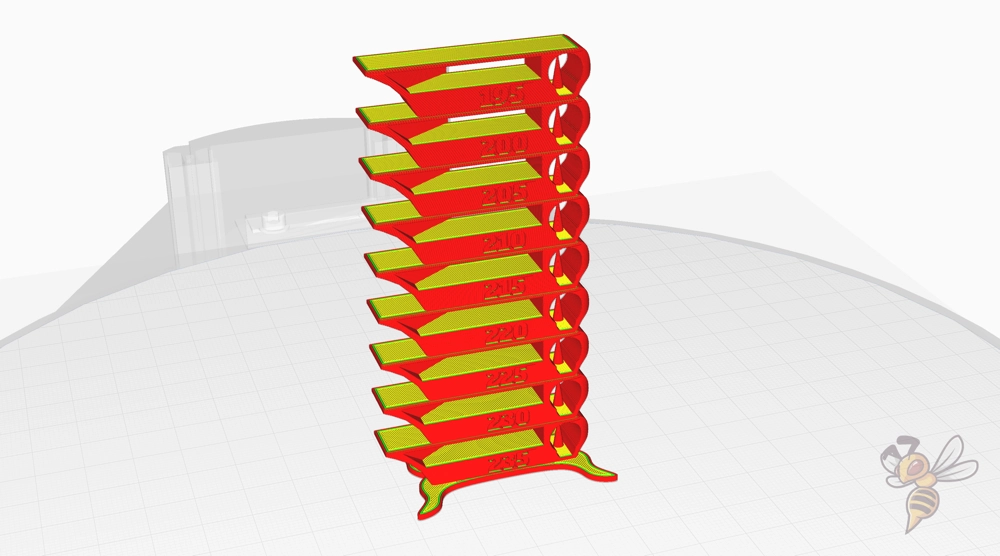
A temperature tower is a specially designed 3D model that is printed at different heights with different temperatures. This allows you to directly observe the effects of temperature changes on print quality and determine the optimal printing temperature for your specific filament.
By adjusting the print temperature based on the results of the temperature tower, you can significantly improve the print quality of your Artillery Sidewinder X4 Plus.
Print Bed Temperature
The best print bed temperatures for the Artillery Sidewinder X4 Plus in Cura:
- PLA: 60 °C
- ABS: 95 °C
- TPU: 60 °C
- PETG: 80 °C
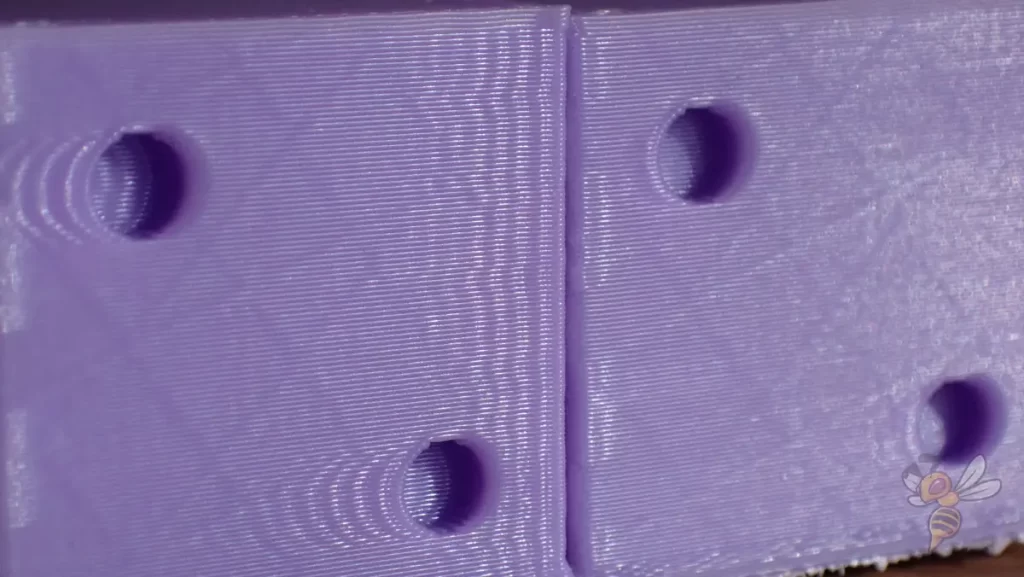
Excessively high temperatures can lead to the problem of an “elephant foot“, where the lower layers of the print expand and the print becomes wider at the base than intended. This not only affects the aesthetics of the printed object, but can also have a negative impact on the accuracy of fit of components that are to be joined together.
By setting the optimal print bed temperature for the filament used, this problem can be minimized or avoided altogether, leading to a precise and reliable print result.
In my experience, it is not too difficult to find the right print bed temperature with the X4 Plus. The PEI print bed is unusually rough and with most filaments offers too much adhesion rather than too little.
Print Speed
The best print speeds for the Artillery Sidewinder X4 Plus in Cura:
- PLA: 300 mm/s
- ABS: 300 mm/s
- TPU: 50-100 mm/s
- PETG: 200 mm/s
The print speed is a critical factor for the quality of the 3D print and the overall duration of the printing process. Too high a speed can lead to problems such as insufficient detail, poor layer adhesion and the phenomenon of ringing, where vibrations from the printer create visible ripples or rings on the surface of the printed object.
To find the optimal print speed for the Artillery Sidewinder X4 Plus, it is recommended to calibrate the print speed. An effective way to do this is to use a ringing test. In this test, an object is printed at certain speeds to see at what speed the quality of the print begins to deteriorate.
This calibration helps to determine the maximum speed at which high-quality prints can still be achieved without causing the problems mentioned above. By setting the print speed to an optimum level, you can achieve a balance between print speed and quality, which is particularly important if you are looking for the highest possible efficiency and quality.
Layer Height
These are the best layer heights for the Artillery Sidewinder X4 Plus in Cura:
- Decorative objects: 0.12 mm
- Standard: 0.24 mm
- Rough, fast prints: 0.36 mm
The layer height has a significant influence on quality, printing time and thickness in 3D printing. Finer layers such as 0.12 mm improve the details and surface for decorative objects, but increase the printing time. A layer height of 0.24 mm is a balanced middle ground for everyday prints, while 0.36 mm is optimal for fast, less detailed prints.
Flow Rate
- Standard: 100%
- For over-extrusion: 90% to 99%
- For under-extrusion: 101% to 110%
Before adjusting the flow rate, it is important that the print temperature and retraction are correctly calibrated. A correct flow rate is crucial for the quality of the print result.
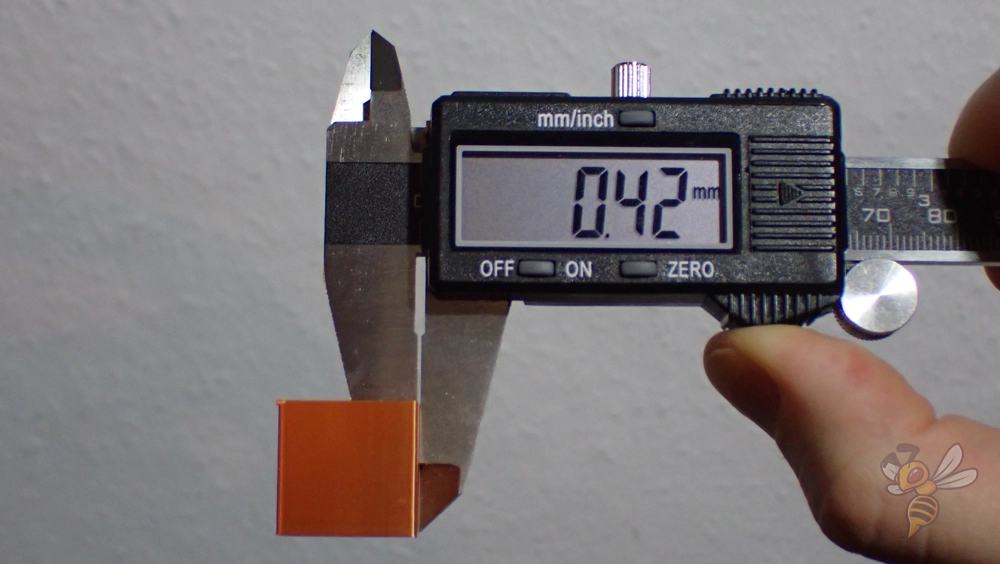
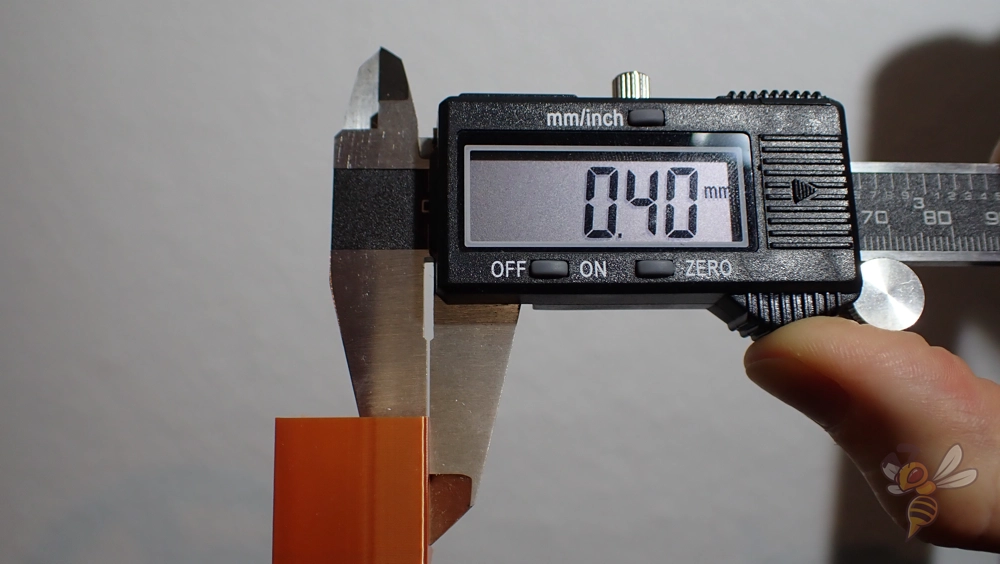
A test print of a cube without infill or upper layers is suitable for calibrating the flow rate. The wall thickness of the cube serves as an indicator for the correct setting of the flow rate. After printing, check whether the wall thickness is as expected and adjust the flow rate accordingly.
Retraction
- PLA: 1.5 mm with 20 mm/s
- ABS: 1.5 mm at 20 mm/s
- TPU: 1.8 mm at 25 mm/s
- PETG: 1.7 mm at 20 mm/s
Retraction is a decisive factor for the quality of 3D printing, as it reduces stringing. It is important to calibrate both the distance and the speed of retraction for each filament type individually.
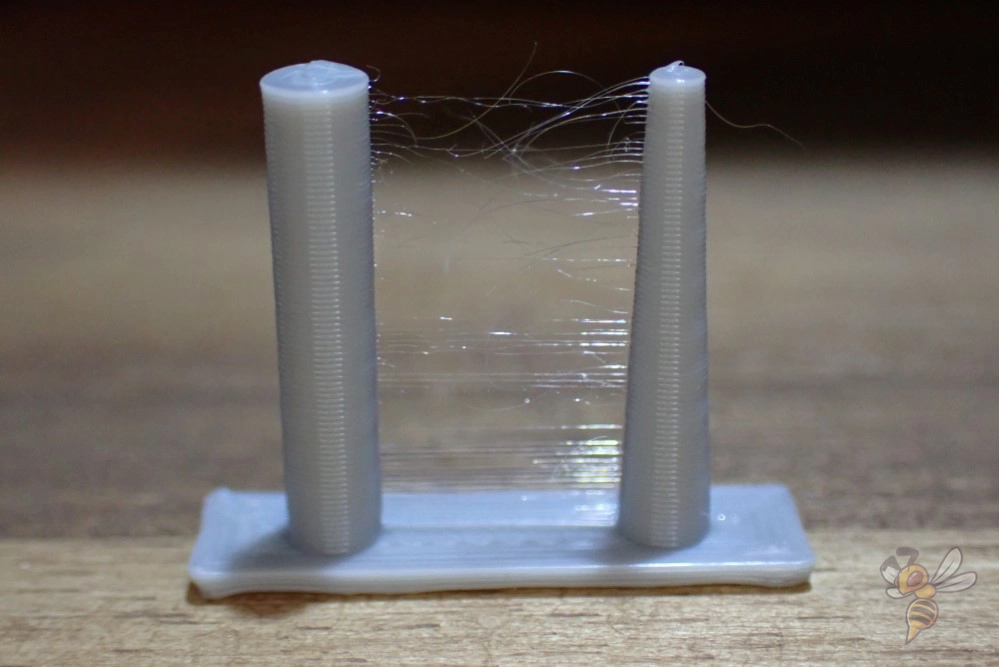
To calibrate the retraction correctly, start with a default value and then print test objects with different settings. Pay attention to how well the material retracts between print areas to avoid stringing.
Adjust the settings based on the test results to find the optimal combination of retraction distance and speed for the specific material.
Infill
- Decorative objects: 0-15%
- Standard objects: 15-50%
- Stable objects: 50-100%
Infill density is a universal concept in 3D printing that is applied regardless of the specific printer model. The above values provide a good guideline to find the balance between material consumption, printing time and mechanical strength. For decorative objects, where appearance is more important than strength, a low infill density of 0 to 15% is sufficient. This saves material and shortens the printing time. For everyday objects that require moderate strength, the ideal infill density is between 15 and 50%. Here you achieve a good balance between compressive strength and resource efficiency.
For objects that are exposed to high loads or require particularly high stability, an infill density of 50 to 100% is recommended. Although this increases material consumption and printing time, it maximizes the strength and durability of the printed object. These values allow you to precisely tailor the 3D printing process to the end goal of the printed object, regardless of whether you are using an Artillery Sidewinder X4 Plus or another printer model.
First Layer
These are the best Cura settings for the first layer with the Artillery Sidewinder X4 Plus:
- Layer height: 100%
- Line width: 100%
- Print temperature: Same as the rest.
- Print speed: 10 mm/s
- Raft/Brim/Skirt: Skirt.
The first layer is crucial for the success of your 3D print. A slower print speed of only 10 mm/s for the first layer is the most effective way to ensure excellent adhesion to the print bed. This reduced speed gives the filament more time to stay hot and bond more effectively to the print bed.
Good contact between the first layer and the print bed is essential for the rest of the printing process. The settings mentioned here help to lay the foundation for a stable and high-quality print by ensuring that the first layer adheres strongly and evenly.
Disclosure: This website is the property of Martin Lütkemeyer and is operated by Martin Lütkemeyer. Martin Lütkemeyer is a member of the Amazon Services LLC and other Affiliate Programs. These are affiliate advertising programs designed to enable websites to earn advertising revenue through advertising and linking to Amazon.com and others. Links marked with * are affiliate links.
