- Wet Filament: Prevention, Symptoms & Drying - July 18, 2024
- Sovol SV08 – Best PrusaSlicer Settings & Profile - June 26, 2024
- Sovol SV08 – Best Orca Slicer Settings & Profile - June 26, 2024
Disclosure: Links marked with * are Affiliate Links. I earn from qualifying purchases if you decide to make a purchase through these links – at no additional cost for you!
To realize the full potential of the Elegoo Neptune 4 Max, the right slicer settings are crucial. Cura is well suited for this giant 3D printer, but you need the right settings in the Cura profile to get good results.
In this article, I’ll show you how to create a new profile in Cura and I’ll share my Cura settings that I’ve optimized specifically for the Elegoo Neptune 4 Max. These settings give you a solid foundation for high print quality.
Nevertheless, you probably won’t get perfect results right away, as every filament behaves differently. The settings in this article should give you a good start for further optimization. You can also find out how to calibrate the settings in this article.
If you want to learn more about the specific calibration of your 3D printer, I recommend you take a look at my detailed calibration guide or my 3D printing course. There you will find in-depth information and instructions to get the most out of your Elegoo Neptune 4 Max.
Tip: Run “Input Shaping” in the menu regularly to improve print quality at high speeds!
| PLA | ABS | TPU | PETG | |
|---|---|---|---|---|
| Print temperature | 220 °C | 240 °C | 210 °C | 230 °C |
| Print bed temperature | 60 °C | 80 °C | 60 °C | 70 °C |
| Speed | 250 mm/s | 250 mm/s | 100 mm/s | 250 mm/s |
| Retraction | 0.5 mm at 45 mm/s | 0.6 mm at 40 mm/s | 0.7-1.0 mm at 45 mm/s | 0.6-0.8 mm at 50 mm/s |
| Cooling | 100 % | 0% | 100 % | 50-100 % |
Table of Contents:
How to Create a Cura Profile for the Elegoo Neptune 4 Max
The entire Cura profile for your Elegoo Neptune 4 Max is divided into two main areas: the machine settings and the print settings. While the machine settings define the basic parameters of your 3D printer, such as the print bed size and the G-code settings, the print settings deal with the specific parameters for each print, such as temperature and speed.
The first step is to define the machine settings, for which you can use an empty profile as a template.
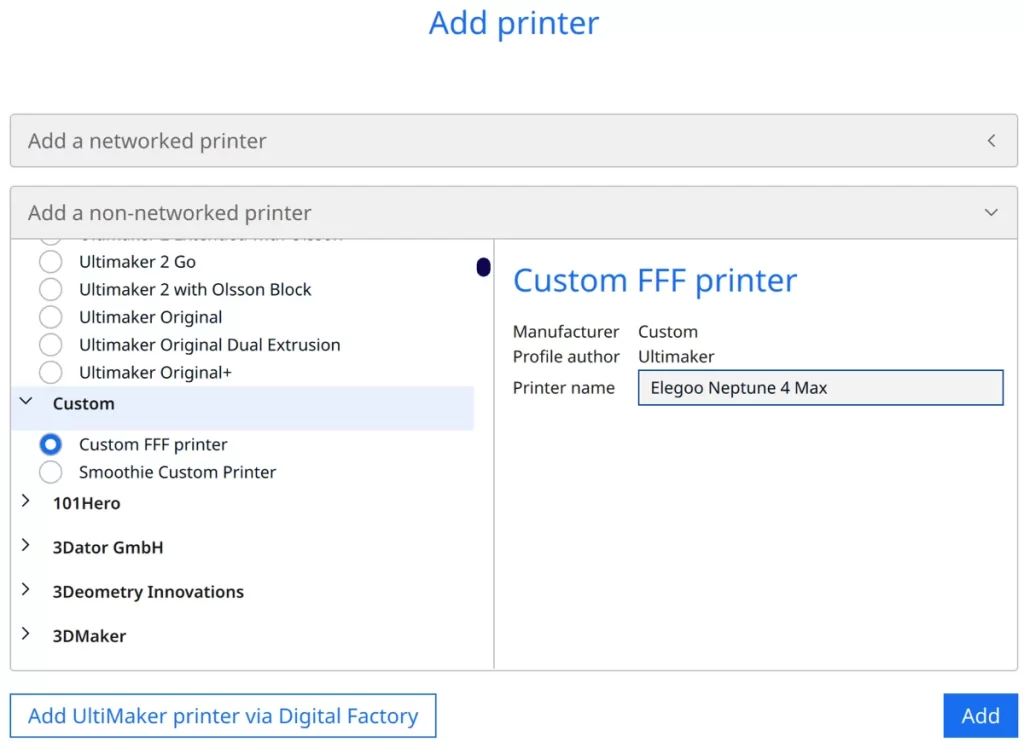
To add your 3D printer in Cura, first click on ‘Settings’, then on ‘Printers’ and finally on ‘Add printer’. Then select ‘Non-networked printer’ and click on ‘Custom’ and ‘Custom FFF printer’. Enter the name of your printer and click on ‘Add’.
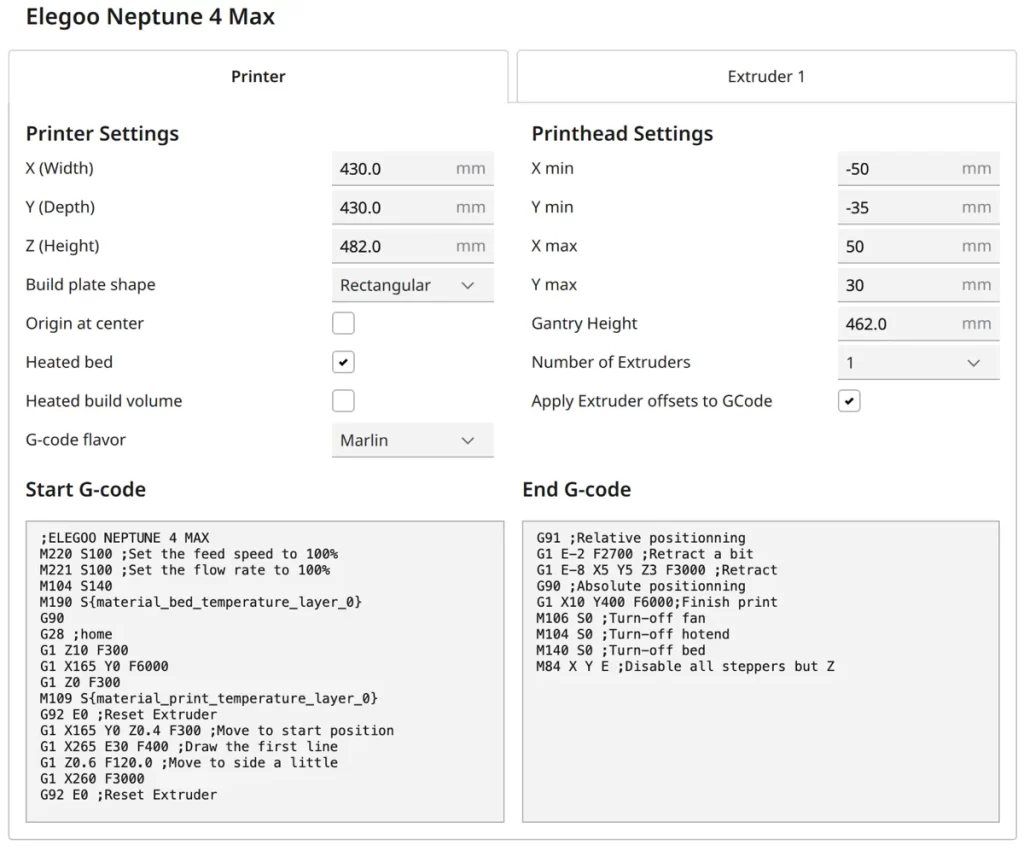
The machine settings, as shown in the screenshot above, are crucial for the functioning of your 3D printer. Here are the G-code snippets listed again to make them easier to copy:
Start G-Code:
- M220 S100 ;Set the feed speed to 100%
- M221 S100 ;Set the flow rate to 100%
- M104 S140
- M190 S{material_bed_temperature_layer_0}
- G90
- G28 ;home
- G1 Z10 F300
- G1 X165 Y0 F6000
- G1 Z0 F300
- M109 S{material_print_temperature_layer_0}
- G92 E0 ;Reset extruder
- G1 X165 Y0 Z0.4 F300 ;Move to start position
- G1 X265 E30 F400 ;Draw the first line
- G1 Z0.6 F120.0 ;Move to side a little
- G1 X260 F3000
- G92 E0 ;Reset extruder
End G-Code:
- G91 ;Relative positioning
- G1 E-2 F2700 ;Retract a bit
- G1 E-8 X5 Y5 Z3 F3000 ;Retract
- G90 ;Absolute positioning
- G1 X10 Y400 F6000 ;Finish print
- M106 S0 ;Turn-off fan
- M104 S0 ;Turn-off hotend
- M140 S0 ;Turn-off bed
- M84 X Y E ;Disable all steppers but Z
Once you have created the printer profile, it is time to define the print settings. These settings include the details for each print project, such as the print temperature, speed and retraction settings.
These print settings are customizable and can be varied for different materials, such as PLA, ABS, TPU and PETG, and saved in individual Cura profiles to achieve the best possible print results.
You can find more information on how to create a 3D printer profile in Cura and what you need to pay attention to in this article: How to Create a Custom 3D Printer Profile in Cura
PLA Settings
These are the correct Cura settings for printing PLA filament with the Elegoo Neptune 4 Max:
- Print temperature: 220 °C
- Print bed temperature: 60 °C
- Print speed: 250 mm/s
- Retraction: 0.5 mm at 45 mm/s
- Cooling: 100 %
The Elegoo Neptune 4 Max can process PLA filament very efficiently, often without much calibration effort. This is especially beneficial for beginners in the world of 3D printing, as PLA is one of the easiest materials to print with.
When using PLA filament, it is important to keep a few basics in mind. The values given above are a good starting point, but further optimization may be necessary for your specific projects or PLA types.
Further down in this article, I’ll cover how to calibrate the most important settings to ensure you get the best possible print results with your Elegoo Neptune 4 Max.
ABS Settings
These are the correct Cura settings for printing ABS filament with the Elegoo Neptune 4 Max:
- Print temperature: 240 °C
- Print bed temperature: 80 °C
- Print speed: 250 mm/s
- Retraction: 0.6 mm at 40 mm/s
- Cooling: 0 %
ABS (acrylonitrile butadiene styrene) is a popular filament in 3D printing, known for its high strength and heat resistance. These properties make it ideal for functional parts and objects that are exposed to high temperatures or mechanical stress.
However, printing with ABS can be relatively challenging as it is prone to warping and cracking, especially if the printing environment is not optimal.
The Elegoo Neptune 4 Max does not have an enclosure, which means that temperature fluctuations and drafts can affect the printing of ABS filament.
For smaller ABS objects, the Neptune 4 Max can print without errors. To avoid warping, it is helpful to set a lower print speed for the first layer to ensure better adhesion to the print bed. In addition, using a draft shield in Cura can help minimize the effect of drafts and create a more stable printing environment.
TPU Settings
These are the correct Cura settings for printing TPU filament with the Elegoo Neptune 4 Max:
- Print temperature: 210 °C
- Print bed temperature: 60 °C
- Print speed: 100 mm/s
- Retraction: 0.7-1.0 mm with 45 mm/s
- Cooling: 100 %
TPU is a flexible filament that is characterized by its elasticity and stretchability. The Elegoo Neptune 4 Max is well suited to processing such flexible filaments, especially thanks to its direct drive extruder. In this article, you will find out why this is an advantage.
The printing speed for TPU must be significantly lower than for rigid filaments. This is because TPU can be easily deformed during the printing process due to its flexibility. A slower printing speed ensures that the filament is extruded evenly and without distortion and does not get tangled up in the extruder so quickly.
TPU also has a strong tendency towards stringing, i.e. the formation of fine threads between the printed parts. It is therefore important to carefully calibrate the retraction settings and the printing temperature, especially with this filament. A precise setting of these parameters can be decisive in achieving a clean print result without unwanted threads.
PETG Settings
These are the correct Cura settings for printing PETG filament with the Elegoo Neptune 4 Max:
- Print temperature: 230 °C
- Print bed temperature: 70 °C
- Print speed: 250 mm/s
- Retraction: 0.6-0.8 mm at 50 mm/s
- Cooling: 50-100 %
PETG filament often shows a tendency to string, but the Elegoo Neptune 4 Max can be effectively adjusted to minimize this problem. The suggested values for retraction and printing temperature provide a solid basis for good printing results. However, in order to achieve perfect quality, a specific calibration is required that is specially adapted to the PETG filament used (you will find more details on this later in the article).
The properties of PETG filaments vary greatly, especially in terms of cooling requirements. It is therefore crucial to match the cooling settings to the particular filament you are using.
Some PETG variants require more intensive cooling for optimal printing results, while others can be processed better with less cooling. Such adjustments are essential to ensure both the quality and uniformity of your PETG prints.
The Best Cura Settings for the Elegoo Neptune 4 Max
In the following sections, we will take a detailed look at the individual print settings and explain how you can optimally calibrate them for your Elegoo Neptune 4 Max in Cura.
Print Temperature
The best printing temperatures for the Elegoo Neptune 4 Max in Cura:
- PLA: 220 °C
- ABS: 240 °C
- TPU: 210 °C
- PETG: 230 °C
Setting the correct printing temperature is crucial for the quality of your 3D print. Too high a temperature can lead to deformation and stringing, while too low a temperature may not be enough to melt the filament properly, resulting in poor layer adhesion.
The temperature values given here provide a solid starting point for most filaments, but for perfect results they should be fine-tuned to the specific filament you are using.
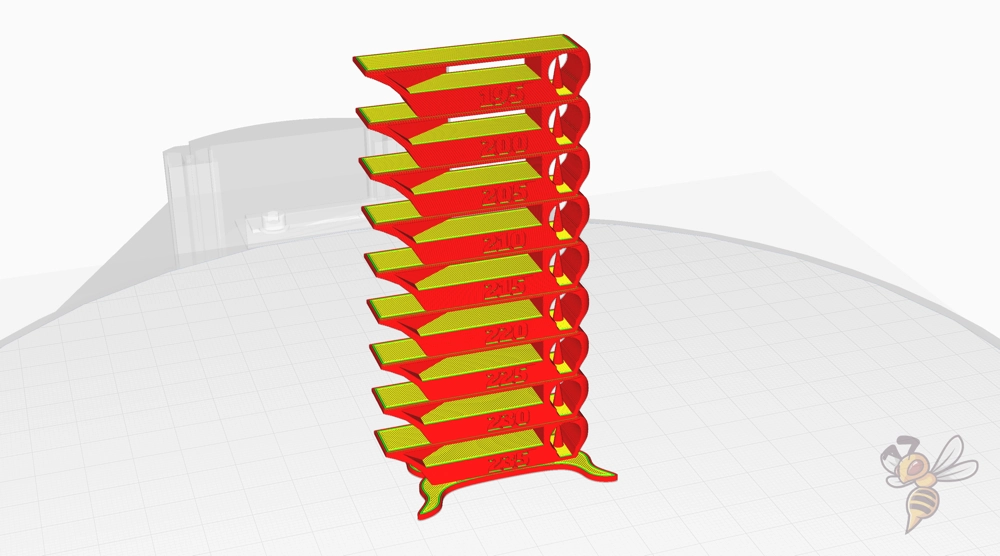
An effective way to determine the ideal printing temperature for your 3D printer is to print a temperature tower. This test will help you find the optimal temperature for each filament to maximize print quality.
The individual steps of temperature calibration are explained in detail here:
- Preparing a temperature tower: A temperature tower is printed in different temperature ranges, usually in 5 °C increments. When printing, the printer changes the temperature in these steps so you can see how different temperatures affect the print.
- Adjusting the G-code settings: Before you print the temperature tower, you need to adjust the G-code so that it changes the temperature in the defined increments. In Cura, you need to create a script for this (here is a guide on how to do that).
- Print and evaluate: Print the temperature tower and observe the results. The sections that show the best surface quality, lowest stringing and best layer adhesion will give you the optimal printing temperature for that specific filament.
- Adjust the print settings: Once you have identified the ideal temperature, adjust your print settings accordingly and save them. Use this temperature for future prints with the same filament type.
- Repeat as needed: As each filament is different, you should repeat this process for each new filament type or even each new filament roll.
Print Bed Temperature
The best print bed temperatures for the Elegoo Neptune 4 Max in Cura:
- PLA: 60 °C
- ABS: 80 °C
- TPU: 60 °C
- PETG: 70 °C
The correct print bed temperature for a 3D printer is important to ensure good adhesion of the first layer and to prevent warping. An optimum bed temperature ensures that the first layer lies evenly and firmly on the print bed.
Avoid print bed temperatures that are too high. Otherwise there is a risk of so-called elephant foot. This printing defect occurs when the lower layers of the print expand and widen too much due to the heat, resulting in an uneven base of the printed object.
Setting the correct print bed temperature on the Elegoo Neptune 4 Max is usually not very difficult thanks to its PEI print bed, which offers excellent adhesion for most filaments. The values specified above should already allow the print bed to adhere perfectly. If this is not the case, the temperature can be increased in small steps. Further tips on improving print bed adhesion can be found further down in this article.
Print Speed
The best print speeds for the Elegoo Neptune 4 Max in Cura:
- PLA: 250 mm/s
- ABS: 250 mm/s
- TPU: 100 mm/s
- PETG: 250 mm/s
An incorrectly set print speed can have various effects on your prints. A print speed that is too slow leads to unnecessarily long printing times, which ultimately means a waste of time.
However, too high a speed can lead to printing errors such as ringing and ghosting. Ringing is an effect where vibrations from the printer leave wavy patterns on the surface of the printed piece, while ghosting creates unwanted shadows or echoes of sharp edges or other details on the surface.
The Elegoo Neptune 4 Max has the “Input Shaping” feature that can minimize vibrations caused by high speeds. Use it regularly!
To find the maximum print speed at which no print errors occur, you should also calibrate this setting.
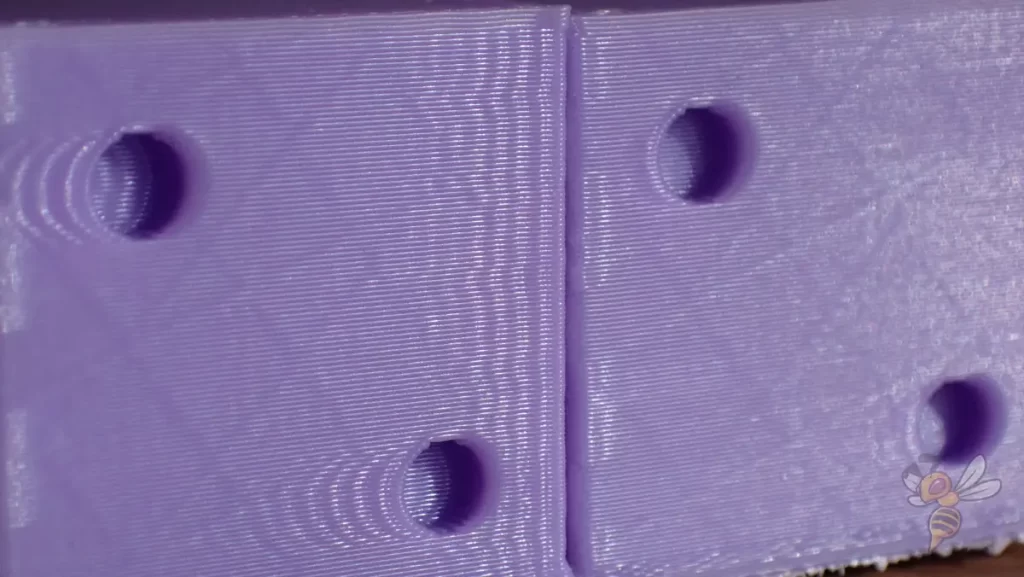
Here is a detailed guide to calibrating the print speed:
- Start a test print: start with a test print. I like to use this cube.
- Set standard speed: Start with a standard speed that is generally recommended for the material you are using. The speeds mentioned above can serve as a starting point.
- Gradual adjustment: Change the speed in your slicer gradually. Increase or decrease the speed by 10-20 mm/s for each test version to observe the effect of the speed changes.
- Observe the print quality: During printing, pay attention to the quality of the first layers. Look for signs of ringing, ghosting or other print defects.
- Fine-tuning: Find the highest speed at which your printer still delivers high-quality results without signs of ringing or other problems.
- Repeat for different filaments: Different materials react differently to different speeds. Repeat the calibration process for each material you use.
Layer Height
These are the best layer heights for the Elegoo Neptune 4 Max in Cura:
- Decorative objects: 0.1 mm
- Standard: 0.2 mm
- Rough, fast prints: 0.3 mm
A layer height of 0.1 mm is ideal for decorative objects. This fine layer height produces highly detailed, smooth surfaces, which are particularly advantageous for models with many small details. However, this significantly increases the printing time, as more layers are required to build up the object.
A layer height of 0.2 mm is considered the standard for many printing projects. This setting offers a good compromise between print quality and print speed. It is ideal for everyday printing tasks where good surface quality is required, but printing time also plays a role.
The layer height of 0.3 mm is perfect for rough, fast prints. This setting significantly reduces the printing time as fewer layers are needed to build up the object. Of course, this results in visible layers and a rougher surface, but this is acceptable for many applications.
Flow Rate
These are the best flow rates for the Elegoo Neptune 4 Max in Cura:
- Standard: 100%
- For over-extrusion: 90% to 99%
- For under-extrusion: 101% to 110%
The flow rate is an important parameter that indicates how much filament is extruded during the printing process. A correctly set flow rate ensures that the correct amount of filament is used.
It is important that the temperature and retraction are correctly calibrated before you adjust the flow rate, as these settings can have a direct impact on the amount of filament extruded.
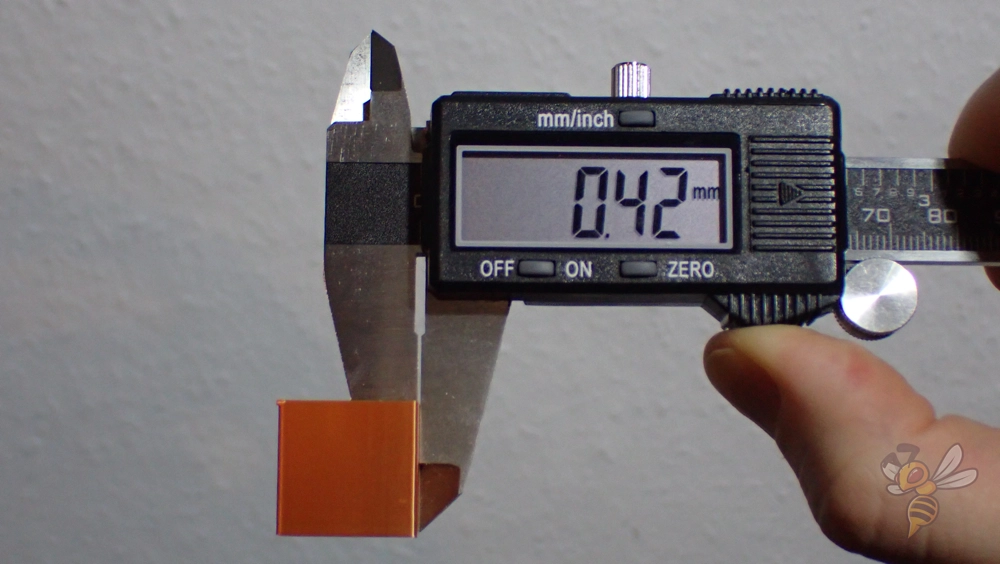
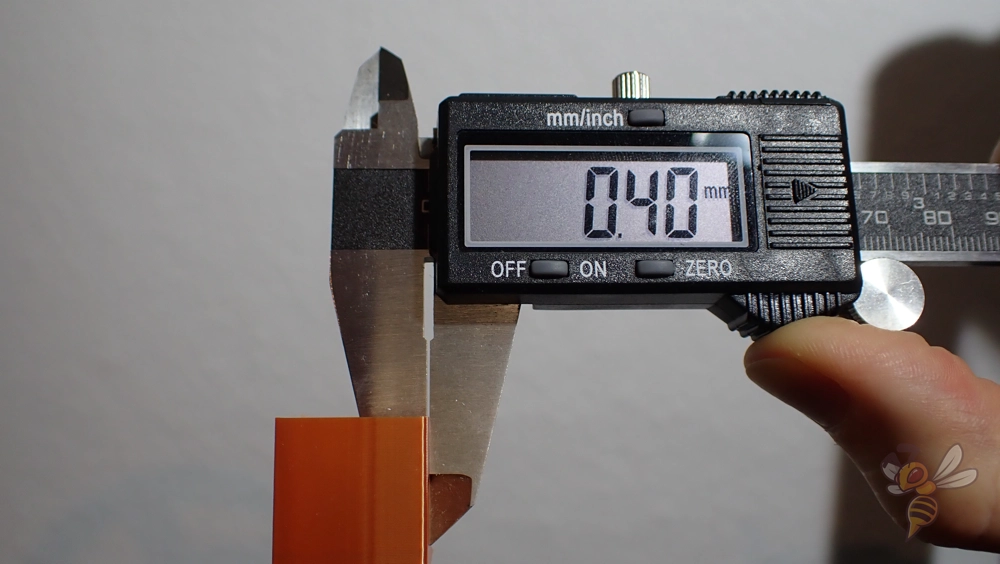
A simple test print, such as printing a cube without infill or top layers, is suitable for calibrating the flow rate. This allows you to accurately measure the wall thickness after printing and adjust the flow rate accordingly. Follow these steps:
- Print a test cube: Choose a simple cube as a test model. Make sure that the cube has no infill or top layers so that you can easily measure the individual walls.
- Measure the wall thickness: After printing, use a caliper to measure the thickness of the cube’s walls. The measured thickness should correspond to the wall thickness set in Cura.
- Calculate the required adjustment: If the measured wall thickness is greater than the set wall thickness, this indicates over-extrusion. In this case, you should reduce the flow rate. If the measured wall thickness is less, this indicates under-extrusion and you should increase the flow rate.
- Adjust the flow rate in Cura: Based on your measurements, adjust the flow rate in Cura. If you detect over-extrusion, reduce the flow rate to 90% to 99%. For under-extrusion, increase it to 101% to 110%.
- Repeat the test: After you have made the adjustments, repeat the test print and measurement to ensure that the flow rate is now set correctly. Several iterations may be required to find the optimum setting.
Retraction
The best retraction settings for the Elegoo Neptune 4 Max in Cura:
- PLA: 0.5 mm at 45 mm/s
- ABS: 0.6 mm with 40 mm/s
- TPU: 0.7-1.0 mm at 45 mm/s
- PETG: 0.6-0.8 mm at 50 mm/s
An incorrectly set retraction on the Elegoo Neptune 4 Max can quickly lead to printing errors such as stringing. Stringing occurs when small threads are pulled between the printed parts during the printing process, especially when moving from one position to the next.
The correct retraction setting prevents this stringing by pulling the filament back slightly to prevent it from leaking during movement.
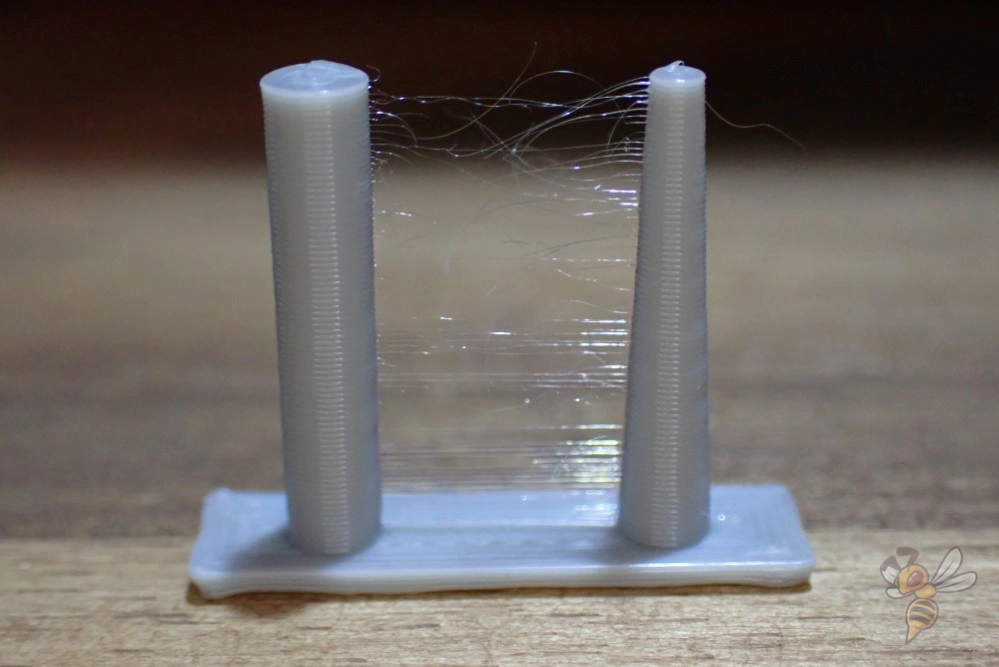
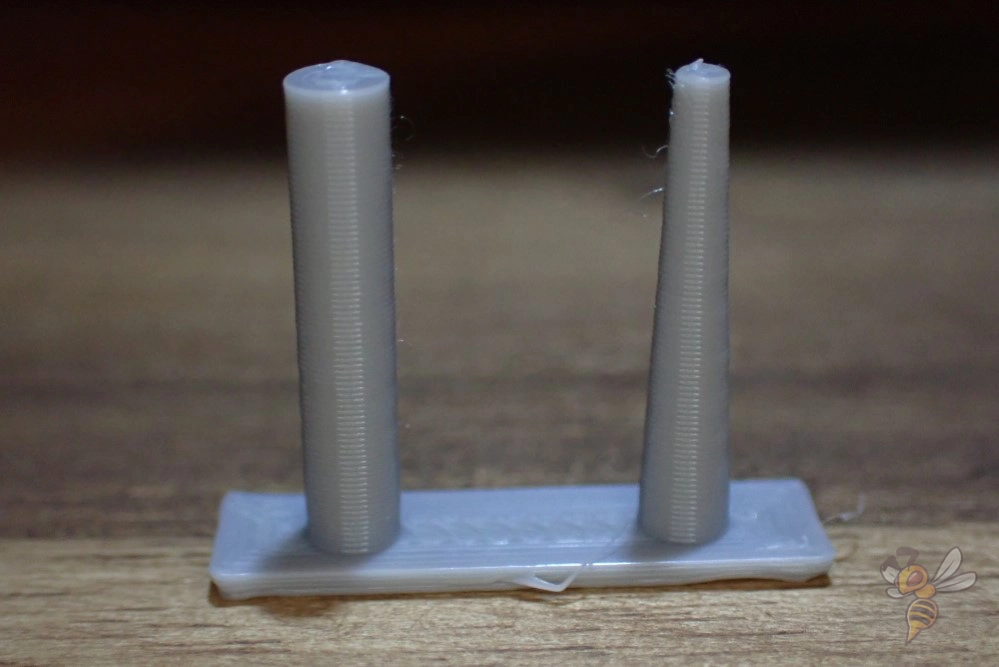
To calibrate the retraction on an FDM 3D printer, you can follow the steps below:
- Choose a suitable test model: A good test model for retraction is a model with columns or towers, as these simulate the movement of the print head between the dots well.
- Print the test model: Use the current retraction setting to print the test model. Observe whether and how much stringing occurs.
- Adjust the retraction settings: If you notice stringing, gradually increase the retraction distance by 0.1 mm and the speed by 5 mm/s. Repeat the print to see if the stringing decreases.
- Optimize the settings: Find the balance between too little and too much retraction. Too much retraction can lead to other problems such as insufficient extrusion at the beginning of a print section.
- Log your results: Record the settings that give the best results for different materials.
Infill
The best infill density for the Elegoo Neptune 4 Max in Cura:
- Decorative objects: 0-15%
- Standard objects: 15-50%
- Stable objects: 50-100%
Infill density is an important factor in 3D printing as it influences the strength, weight and material consumption of your print objects. These values are essentially printer-independent, which means that they apply to most FDM printers, including the Elegoo Neptune 4 Max.
First Layer
These are the best Cura settings for the first layer with the Elegoo Neptune 4 Max:
- Layer height: 100%
- Line width: 100%
- Print temperature: Same as the rest
- Print speed: 10 mm/s
- Raft/Brim/Skirt: Skirt
For successful 3D printing, it is essential that the first layer adheres well to the print bed. The suggested settings usually ensure strong adhesion of the first layer for most filament types.
However, if adhesion problems occur, changes to parameters such as layer height, line width and print bed temperature can be helpful. In situations where adhesion is particularly critical, such as with large objects or prints with special adhesion requirements, aids such as Raft or Brim can be used.
An important aspect for a high-quality first layer is to keep the filament hot and liquid for as long as possible. The longer the filament remains in this state, the better it can bond with the print bed surface.
The printing speed plays a key role here. By reducing the speed for the first layer, the filament remains above the print bed for longer, which improves heat transfer and consequently adhesion.
For this reason, the print speed for the first layer is set to 10 mm/s. This allows the filament to adhere evenly and securely to the print bed, providing a stable base for the subsequent layers.
Summary
I hope the settings shared in this article have been helpful and serve as a solid base for you to get started with the Neptune 4 Max with Cura.
If you have further questions or need more detailed information on calibration, please refer to the calibration guide and 3D printing course mentioned at the beginning of the article.
Have fun with your Neptune 4 Max!
Disclosure: This website is the property of Martin Lütkemeyer and is operated by Martin Lütkemeyer. Martin Lütkemeyer is a member of the Amazon Services LLC and other Affiliate Programs. These are affiliate advertising programs designed to enable websites to earn advertising revenue through advertising and linking to Amazon.com and others. Links marked with * are affiliate links.

