
- Wet Filament: Prevention, Symptoms & Drying - July 18, 2024
- Sovol SV08 – Best PrusaSlicer Settings & Profile - June 26, 2024
- Sovol SV08 – Best Orca Slicer Settings & Profile - June 26, 2024
Disclosure: Links marked with * are Affiliate Links. I earn from qualifying purchases if you decide to make a purchase through these links – at no additional cost for you!
Due to the nature and physics of 3D printers, it is rarely possible to print workpieces without support constructions. On the one hand because, for example, it is an overhang where the material is to be printed practically “free-floating” in the air, but on the other hand also because some edges produce a better transition with the help of support constructions. Last but not least, there are also techniques for “gluing” the workpiece to the bed with a certain base so that the next layers can be printed more precisely.
When to use “Raft”, “Brim” and “Skirt” and how can they help improve my print results?
Raft, Brim and Skirt are three very common techniques for improving print results. Which technique to use and when depends very much on the expected errors and on one’s own assessment or experience. Instead of following a simple scheme, one should reconsider for each workpiece at which point support or support constructions are appropriate because their use always means that reworking is necessary.
Since beginners, in particular, lack the experience to be able to assess whether support constructions are necessary or not, in the following article we will not only explain exactly how to construct them in the slicers or 3D programs, but also in which cases you should possibly think about using them or whether they are perhaps even sometimes obligatory in order to be able to achieve an appropriate print result at all.
Table of Contents:
Raft
A Raft is a support construction that lifts the actual workpiece off the print bed. A thin layer of filament is printed as a “base” before the actual printing begins.
The technology dates back to the early days of 3D printers. Older generations in particular had problems with the adhesion of the print bed. At first, people made do by spreading water on the print bed, and later there were special sprays that were also supposed to counteract this problem, but no method was as successful as Rafting. The name comes from the fact that the workpiece is lifted out of the water, or in this case print bed, as if on a Raft.
Raft – When to Use?
When to use the Raft depends on various aspects. If you have made the experience that the print bed of the printer does not have particularly good adhesion properties and you do not want to resort to additives, you should generally use a Raft on workpieces that do not have a particularly large base area. However, even for such workpieces with a large base area, it may be worthwhile to print a thin base layer to give the first layer the opportunity to bond directly with the filament.
There are three main reasons when you should use the Raft for your workpieces. The decisive factors are the material, the nature of the print bed and the properties of the workpiece. If you use an FDM printer and ABS as the material, you can hardly avoid Rafting, because it has a tendency to warp, which can lead to the complete workpiece becoming unusable and unattractive, especially with the first layers. This error can be prevented with a Raft.
If you want to print workpieces that do not have a large base, Rafting is usually required as well, since the first, fine layers cannot support their own weight and may deform. Rafting distributes the weight over a larger base and keeps the workpiece in shape.
Although most printing beds today are significantly straighter, depending on the model, the adhesion properties may still not be sufficient for some workpieces. Even then, the largest possible Raft should be used to give the first layers the possibility of a good bond.

Raft – Possible Disadvantages
Regardless of which method is used for support constructions, there are always disadvantages. The following applies to all of them: Support constructions consume additional material that must be disposed of in the end and, of course, the support construction must somehow be separated from the actual workpiece.
This can be a problem, especially with Rafts, as the thick additional material is strongly bonded to the workpiece. After successful separation, it is also necessary to rework the surfaces, as a very rough surface result.
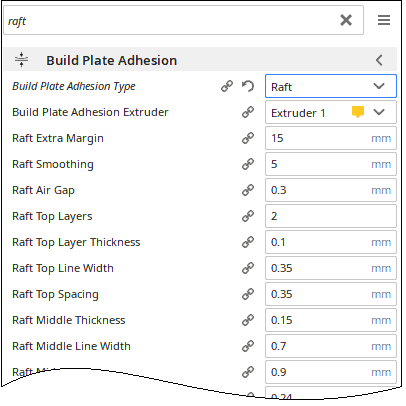
Raft – Construction and Settings
The construction of the Raft is relatively simple. You take the largest dimension of the surface that lies on the print bed with regard to the X and Y coordinates, increase this by a set value or factor and “lift” the workpiece off the print bed with a few layers. What may sound complicated is quite simple in practice, however, because almost all slicers can handle the function and only need to be fed with the correct settings.
- Air Gap: This value specifies how large the gap between the Raft and the actual workpiece should be. If the workpiece were printed directly onto the Raft, the layers would bond together too strongly and would no longer be separable. However, by printing the first layer “in the air”, so to speak, the filament already cools down on the way and does not form such a strong bond, making separation noticeably easier. A value of approx. 0.1 mm is recommended; in other words, you should use half the diameter of the nozzle.
- Raft Base Layer: There are two values to set here, namely the thickness and the printing speed. The greatest priority should be to achieve the greatest possible adhesion. Therefore, it is important that the layer is relatively thick and printed at low speed. Of course, you also don’t want to waste any material. A value between 0.3 mm and 0.5 mm has proven to be effective. The speed should never exceed 30 mm/s.
- Raft Top Layer: The thickness of the top layer determines how good the surface of the workpiece will be. If the base is large, the thickness value should be set accordingly to achieve a good surface finish. If the workpiece is only on a small base, the surface finish of the bottom is not quite as important. In the former case, the value should be selected higher than 0.3 mm, in the latter case it is possible to go below this to 0.1 mm.
- Offset: With this value, you enter either the factor or the distance that determines the difference between the size of the workpiece and the Raft. Depending on the size of the workpiece, this value can vary greatly. To reduce material consumption, the Raft should normally be no more than 10% larger than the base area. Exceptions can be made here if the workpiece has very small legs.
Rafts with Double Extruders
With a single extruder, support constructions such as Rafts are printed with the same material as the actual workpiece. With a double extruder, however, one has the option of using so-called “support materials” that reduce or completely eliminate a large part of the disadvantages.
HIPS* (high-impact polystyrene) or PVA* (polyvinyl alcohol) are often used for Rafts. The former has the same properties as ABS, but can be dissolved completely with chemicals such as Limonene. The latter works similarly and can even be dissolved in water. So if a Raft is built with one of these materials, the part can be subsequently immersed in a bath of the appropriate chemical and completely freed from the support structures. Reworking is then only necessary in rare cases.
Brim
The so-called “Brim” is comparable to the Raft and is also intended to optimize adhesion to the print bed, but is not quite as radical a measure. Unlike the Raft, the Brim is only printed around the workpiece and does not extend below it.
The biggest advantage of this: The surface texture of the ground remains largely unaffected. Although the technique is less destructive than Rafting, it is not used very often because, especially as a beginner, the opinion “a lot helps a lot”. While this is true in the case of adhesion force, one must of course also consider other characteristics.
Brim – When to Use?
In fact, there is a large overlap in the use cases for the Brim and the Raft, as both processes are designed to achieve the same thing at their core. So it is important to differentiate here and to look at the projects closely.
A Brim can prevent warping and is recommended in any case when using ABS materials. The additional layers on the outer edge enlarge the base of the workpiece and increase stability.
A poor adhesion force of the print bed is also mitigated by a Brim because the bearing surface is greatly increased. Brims are often used in conjunction with other support structures because it is possible to create a large base with simple means and increase stability many times over. Small columns or legs can therefore be provided with a Brim in most cases as a precautionary measure.
Brim – Possible Disadvantages
A Brim also wastes material that is not part of the actual workpiece. However, since a Brim is only one layer high and does not form the entire base of the workpiece, this is kept within modest limits.
Finishing of the finished object is also necessary, but only the excess material has to be removed. Surface reworking is not necessary with Brimming, since the Brim is only welded to the bottom layer and does not undercut it as with Rafting.
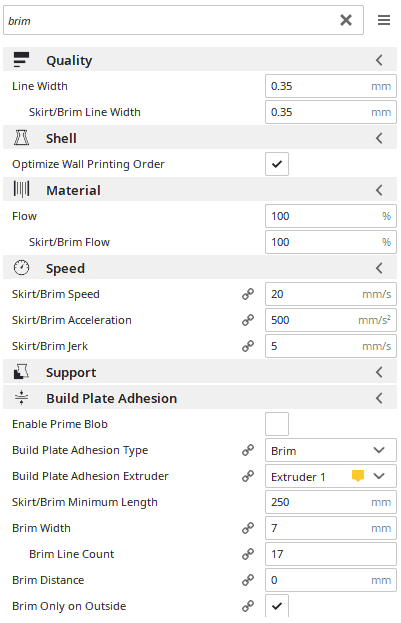
Brim – Construction and Settings
With the Brim, the base layer is extruded to the outside. The outline of the Brim always corresponds to the bottom layer. In manual construction, however, it is important to ensure that each revolution has its own polygon base, otherwise, problems are likely to arise during slicing.
However, since the Brim is already built into many slicers as a function, you hardly need to worry about it these days.
Two values, in particular, are important in the settings:
- Width: This value specifies how wide the Brim should be. It is the total width of the Brim and not the width of a single line. Depending on the value set, the slicer calculates how many lines are needed to reach it. The basis of the calculation is the width of the nozzle and the material used.
- Brim Line Count: It is common to limit the number of lines from a Brim to 3 to 5 and let the slicer calculate the width. This ensures that you do not make any gross errors in the conversion and you do not need to know the diameter of the nozzle. Be careful with very high values beyond 10 lines, as this makes removal after printing very difficult.
Brims with Double Extruders
As with Rafting, there is a distinct advantage to Brimming when working with dual extruders and being able to use different materials for the workpiece and support structures.
This is crucial mainly because it is also possible to use the special soluble materials to remove the support structures without leaving any residue and obtain an optimized workpiece without much reworking.
Skirt
Basically, the Skirt is not a support construction, but a testing mechanism that often helps identify problems before they can become problems.
In the early days of 3D printers, it was often necessary to test the printer before the actual printing process. The “Benchy“, a small but complexly designed boat that helps to eliminate errors in the printer settings, was the most popular way of doing this. However, such a large test print costs a lot of material and time, which is why people have now switched to a much simpler technique: the Skirt.
The Skirt is actually just a small series of lines that are printed in front of the actual workpiece, forming a sort of outline, but not touching the actual workpiece. Since the printing process is detached from the actual project, it is possible to pause the printer at any time, adjust any settings, and start again until everything fits.
Skirt – When to Use?
The answer to this question is simple: always. In fact, you should never start printing until you are sure that the settings are correct, and the best way to do this, apart from a proper test print, is to lay down a Skirt. This has several advantages:
Many printers need quite a while to heat up properly. This time can be passed when laying the Skirt. At the same time, it is possible to observe whether any problems are emerging during this process. Perhaps the filament has not melted properly or there are difficulties with adhesion.
In addition, you can see from the lines whether the bed has been leveled correctly. With some practice, you can even save yourself the time-consuming alignment later and only correct occasional errors that sometimes occur. So in principle, Skirting is a good technique for preparing the printer and optimizing final settings. You should take advantage of these benefits for every printing project.
Skirt – Possible Disadvantages
As with Rafting and Brimming, a Skirt creates trash, but compared to the trash that potentially comes out if you print with the wrong settings, this is negligible.
The only difficulty is removing the Skirt from the print bed after printing. However, since it is not directly connected to the workpiece, this should not really be a problem either. It should be said, however, that this naturally results in an additional work step that not only costs time, but possibly (with very large print models) limits the size of the possible print product or the number of possible simultaneous prints.
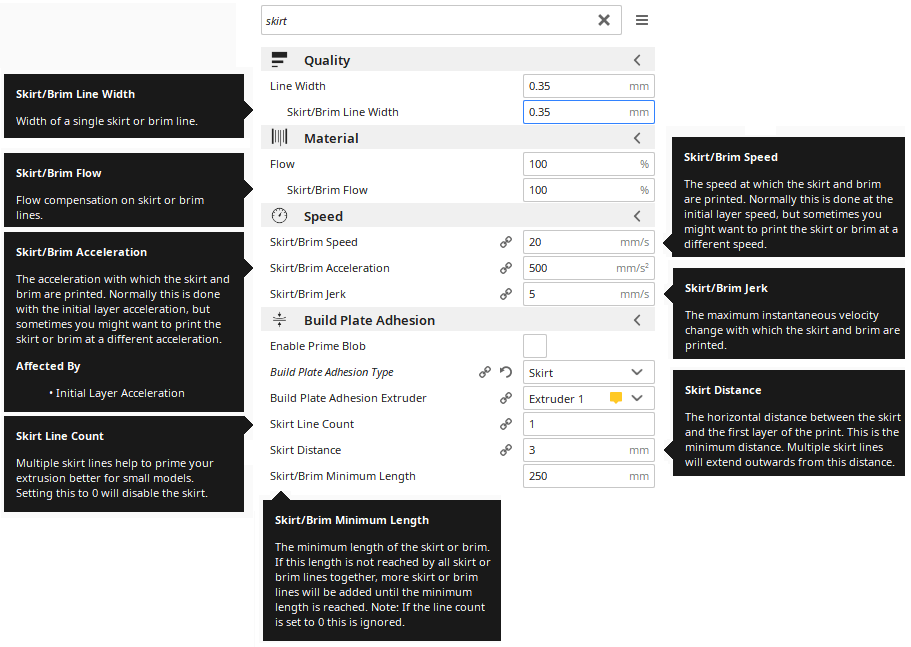
Skirt – Construction and Settings
The construction is very simple. A trace is built up that roughly circles the base of the workpiece in its shape. The resulting line can then be extruded outward as desired. In general, most slicers can handle Skirting without any problems, so that only rarely does manual construction have to be resorted to.
With regard to the adjustable options, two values are particularly important, namely the number of lines and the distance that the Skirt is away from the actual object. The latter should be selected large enough so that the nozzle has a relatively short travel distance to the starting point of the workpiece after it is closed.
A spacing of about 4 to 6 millimeters has proved successful. The number of lines should be chosen high enough to allow enough time to detect any errors and correct them if necessary.
Other Forms of Support Constructions
In addition to the Brim, Raft and Skirt, there are other forms of support structures that support the workpiece during the printing process, allowing for overhangs or more complex structures.
Many slicers are able to construct support constructions independently, which can be adjusted based on various parameters. Whether you need support structures depends primarily on which materials you use and whether the workpiece contains angles that exceed the so-called “overhang angle”. Typically, this is the case with most 3D printers from an angle of less than 45°. However, it is recommended to test this beforehand, as printers can differ here.
Support structures include columns, stairs, ladder structures, racks, bridges and the like. Basically, it’s about giving the material enough room to bond with the lower layer without warping. With complex models, this takes a few tries, and experience helps to gauge where support structures are needed and where they are not.
Which Filaments Profit from Support Constructions?
Generally, support constructions such as Raft, Brim and Skirt are only used with filament-based 3D printers (FDM printers). The resins of SLA printers have entirely different properties and rarely require support constructions beyond supporting the workpiece.
Filaments are a different story. Some of the materials used have a great tendency to warp or are known to have poor adhesion. In the following, we will take a closer look at a few of them:
- ABS: ABS is probably the most commonly used material in connection with FDM printers. ABS comes in many varieties, as a standard plastic (transparent or opaque), biocompatible engineering plastic, or as a static-resistant plastic for electrical device housings. For almost all of them without exception, support constructions are needed, since both adhesion and warping are a general problem of these materials.
- PLA: PLA is a biodegradable plastic made from plant parts, which is especially recommended for beginners. Warping is usually not a problem due to the low glass transition temperature, but depending on the print bed, the adhesion force may fluctuate, making it necessary to take measures.
- ASA: ASA* has many of the properties of ABS, but is UV resistant. In general, the same problems can be expected as with ABS.
- TPU: As a thermoplastic polyurethane, TPU is designed for high elasticity and therefore it is necessary to take measures against warping. In terms of adhesion, there should be fewer problems due to the better melting properties.
- PC: PC* is another thermoplastic, sometimes also in the variant PC-ABS* with similar properties to ABS in terms of dissolution and surface finish. Adhesion is less of a problem, but as with TPU, high warping is to be expected, so countermeasures should be taken.
- Nylon: In recent years, nylon* has been used more frequently, but it is not easy to process. It is very susceptible to warping and also sensitive to moisture. For this reason, there is usually no way around a Raft, since even low humidity can lead to greatly reduced adhesion properties.

Related Questions
How much time and materials do I need to plan for printing Raft, Skirt and Brim?
This depends largely on the workpiece that is to be printed. In general, it can be said that a Raft requires approx. 10% more time for the printing process and consumes up to 25% more material.
The Brim is about 5% more material and just as much time in the printing process and the Skirt consumes only 1% of the printing time or material. It is important that you take these values into account in your planning and get plenty of material accordingly.
How can I cleanly separate Raft or Brim from my workpiece?
With the Brim, this is usually not a big problem. If the thickness has been chosen appropriately small, the Brim can simply be “snapped off” from the workpiece. In stubborn cases, a knife can be used for this purpose. Afterwards, the last remnants should be removed from the broken edge with sandpaper.
With the Raft, this is usually not enough. The spatula has proven itself as an instrument here. Simply place the sharp edge between the workpiece and the Raft and push it in under force until the two elements slowly separate. The surface must then be reworked, possibly straightened and brought to the desired roughness with sandpaper.
Can all slicers automatically create support constructions?
In principle, yes. The quality of the support constructions can differ depending on the slicer, because different algorithms are used, but with the established slicers there are hardly any errors in the construction so that the differences here lie more in the possible settings.
Of course, you have the maximum control if you create your support constructions yourself, for example with a 3D program, but you need a lot of experience for this and you also have to know the program very well.
Conclusion
Support constructions such as Raft, Skirt and Brim can help to optimize the printing process and to identify or eliminate problems before they occur. However, it is important to know when to use them.
In summary, a Skirt should actually be present on every print to test filament flow and give the heating elements enough time to heat up.
In addition, the printing process can still be easily interrupted in this step in order to make settings.
Raft and Brim generally aim at the same thing and are intended to improve the adhesion strength of the bed and prevent warping. In this context, the Brim is the rather gentle method, which can be easily removed and also does not change the surface, while the Raft should only be used in emergencies due to the disadvantages it creates.
Disclosure: This website is the property of Martin Lütkemeyer and is operated by Martin Lütkemeyer. Martin Lütkemeyer is a member of the Amazon Services LLC and other Affiliate Programs. These are affiliate advertising programs designed to enable websites to earn advertising revenue through advertising and linking to Amazon.com and others. Links marked with * are affiliate links.
