- Wet Filament: Prevention, Symptoms & Drying - July 18, 2024
- Sovol SV08 – Best PrusaSlicer Settings & Profile - June 26, 2024
- Sovol SV08 – Best Orca Slicer Settings & Profile - June 26, 2024
Disclosure: Links marked with * are Affiliate Links. I earn from qualifying purchases if you decide to make a purchase through these links – at no additional cost for you!
The Creality CR-M4 can be used with Cura. However, the printer’s ability to produce flawless prints relies heavily on the correct configuration of the settings inside Cura. Incorrect settings can lead to imperfect prints. Consequently, ensuring these parameters are properly aligned is crucial for achieving the highest quality prints.
I’ve tested the Creality CR-M4 extensively for optimal performance. Each setting was calibrated, ensuring perfect prints every time. In this article, you’ll find the settings I used.
If you need more details on how to calibrate these settings, check out this post for a comprehensive guide. For a more structured learning experience, consider enrolling in my 3D printing course. The course covers everything from basic setup to advanced printing techniques.
| PLA | ABS | TPU | PETG | |
|---|---|---|---|---|
| Print Temperature | 200-210 °C | 235-240 °C | 220 °C | 230-240 °C |
| Print Bed Temperature | 60 °C | 90 °C | 60 °C | 70 °C |
| Speed | 50 mm/s | 50 mm/s | 30 mm/s | 50 mm/s |
| Retraction | 0.8 mm at 40 mm/s | 0.8 mm at 35 mm/s | 1.0 mm at 40 mm/s | 0.9 mm at 35 mm/s |
| Cooling | 100 % | 0% | 100 % | 50-100 % |
Table of Contents:
How to Create a Profile for the Creality CR-M4 in Cura
Creating a profile for the Creality CR-M4 in Cura begins with defining the machine settings. This includes identifying the type of printer, its dimensions, and other physical characteristics.
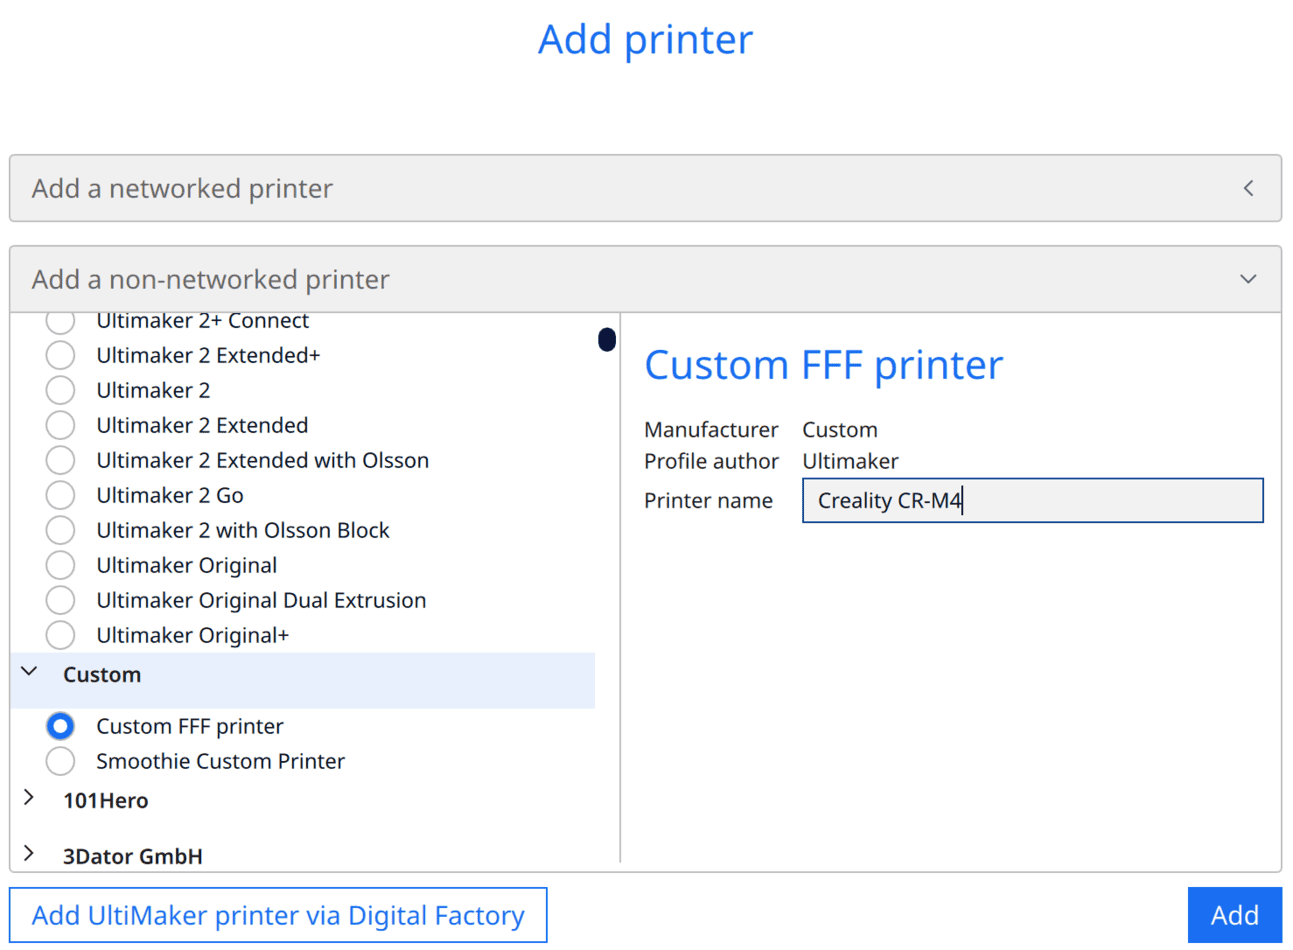
To add a 3D printer in Cura, navigate to ‘Settings’ in the main menu. From there, select ‘Printer’, then ‘Add Printer’. You’ll find yourself in a new window, where you’ll need to click on ‘non-networked printer’.
This opens a list of manufacturers. Ignore these, and instead choose ‘Custom’. Within the Custom section, select ‘Custom FFF printer’.
A new window will pop up for you to input your printer’s specific details. This process is straightforward, but remember to double-check all the information before moving on.
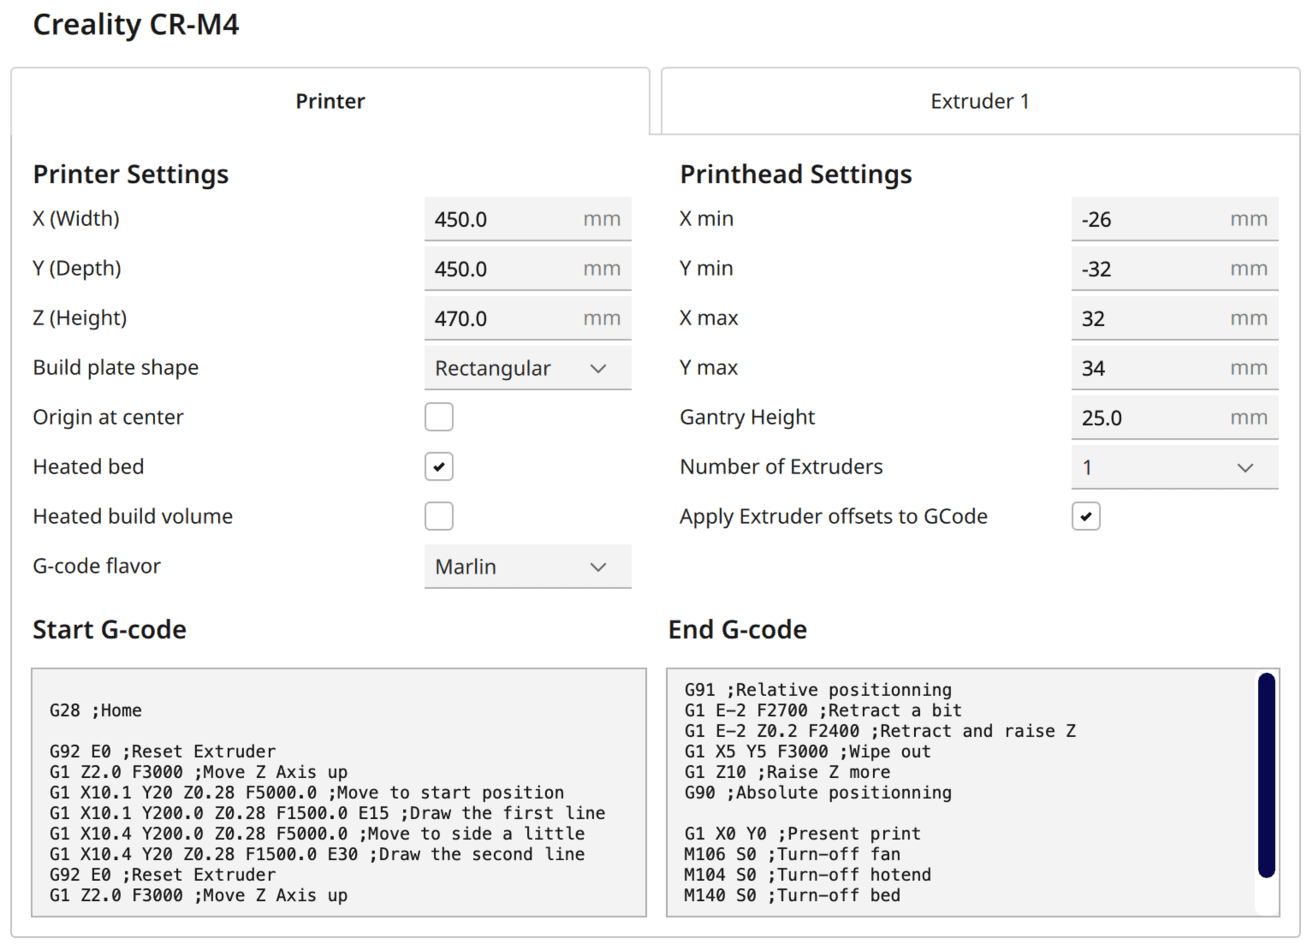
Here, you’ll be inputting parameters about your 3D printer, such as X, Y, and Z dimensions, nozzle size, heated bed details, and more. These settings provide Cura with the necessary information about the physical limitations and capabilities of your printer. Refer to the screenshot for the exact values you’ll need to input. Remember, these values are specific to the Creality CR-M4.
Start G-Code:
- G28 ;Home
- G92 E0 ;Reset Extruder
- G1 Z2.0 F3000 ;Move Z Axis up
- G1 X10.1 Y20 Z0.28 F5000.0 ;Move to start position
- G1 X10.1 Y200.0 Z0.28 F1500.0 E15 ;Draw the first line
- G1 X10.4 Y200.0 Z0.28 F5000.0 ;Move to side a little
- G1 X10.4 Y20 Z0.28 F1500.0 E30 ;Draw the second line
- G92 E0 ;Reset Extruder
- G1 Z2.0 F3000 ;Move Z Axis up
End G-Code:
- G91 ;Relative positionning
- G1 E-2 F2700 ;Retract a bit
- G1 E-2 Z0.2 F2400 ;Retract and raise Z
- G1 X5 Y5 F3000 ;Wipe out
- G1 Z10 ;Raise Z more
- G90 ;Absolute positionning
- G1 X0 Y0 ;Present print
- M106 S0 ;Turn-off fan
- M104 S0 ;Turn-off hotend
- M140 S0 ;Turn-off bed
- M84 X Y E ;Disable all steppers but Z
Once you’ve created your printer profile, the next step is to define your print settings. This involves setting parameters like layer height, print speed, and infill density, among others.
In the following sections, I share my calibrated Cura settings. They should give you nice results, but for perfect results you’ll have to calibrate them. Every printer/filament-combination is unique!
You can find more information on how to create a 3D printer profile in Cura and what you need to pay attention to in this article: How to Create a Custom 3D Printer Profile in Cura
PLA Settings
These are the correct Cura settings for the Creality CR-M4 for PLA:
- Print temperature: 200-210 °C
- Print bed temperature: 60 °C
- Print speed: 50 mm/s
- Retraction: 0.8 mm at 40 mm/s
- Cooling: 100%
- First layer: 5-10 mm/s, 0% cooling, 100% extrusion width, 100% layer height
The retraction setting is key in 3D printing, as it prevents oozing or stringing between points when the nozzle moves without extruding plastic. For the Creality CR-M4, a retraction of 0.8 mm at 40 mm/s worked perfectly for me and different PLA brands.
This, coupled with the other settings provided above – a print temperature of 200-210 °C, bed temperature of 60 °C, print speed of 50 mm/s, 100% cooling and specific first layer parameters, provides a solid baseline for printing with PLA.
These settings are a great starting point, but remember that to achieve the best results, you’ll have to calibrate them specifically for your setup. Further down, I’ll explain how to properly go about this calibration process.
ABS Settings
These are the correct Cura settings for the Creality CR-M4 for ABS:
- Print temperature: 235-240 °C
- Print bed temperature: 90 °C
- Print speed: 50 mm/s
- Retraction: 0.8 mm at 35 mm/s
- Cooling: 0%
- First layer: 5-10 mm/s, 0% cooling, 100% extrusion width, 100% layer height
The Creality CR-M4 lacks an enclosure. However, with the correct settings, it can still effectively print small to medium-sized objects from ABS without signs of warping.
Warping is a common issue faced in ABS 3D printing. It occurs when the printed material cools down unevenly, causing the corners of the print to lift off the build plate and distort the shape of the object. This phenomenon is more prevalent with ABS due to its higher shrinkage rate when compared to other 3D printing materials such as PLA.
Factors like low bed temperature, poor adhesion, and a cool printing environment can exacerbate warping. To mitigate this issue, use the bed temperature of at least 80 °C, apply an adhesive on the print surface, and maintain a stable, warm environment during the printing process.
TPU Settings
These are the correct Cura settings for the Creality CR-M4 for TPU:
- Print temperature: 220 °C
- Print bed temperature: 60 °C
- Print speed: 30 mm/s
- Retraction: 1.0 mm at 40 mm/s
- Cooling: 100%
- First layer: 5-10 mm/s, 0% cooling, 100% extrusion width, 100% layer height
TPU is a flexible filament known for its elasticity and resistance. Due to these properties, it can be challenging to print with, especially on printers without a direct drive extruder. The direct drive extruder, which situates the extruder motor directly above the hot end, enables precise control over the filament.
The reason the direct drive extruder of the CR-M4 is beneficial for TPU printing lies in the filament’s flexibility. TPU can easily buckle or kink in the bowden tube of a Bowden extruder, leading to inconsistent extrusion or even clogs. With a direct drive extruder, the path that the filament must travel is drastically shortened, allowing for more consistent extrusion of flexible filaments like TPU.
TPU filaments require slower printing than rigid materials. The slow speed ensures smooth extrusion and high-quality prints. The above values, tested firsthand, offer a reliable baseline.
Experimenting with different settings is key, but the provided parameters can guide initial trials. Fine-tuning these settings will enhance the overall print quality.
PETG Settings
These are the correct Cura settings for the Creality CR-M4 for PETG:
- Print temperature: 230-240 °C
- Print bed temperature: 70 °C
- Print speed: 50 mm/s
- Retraction: 0.9 mm at 35 mm/s
- Cooling: 50-100%
- First layer: 5-10 mm/s, 0% cooling, 100% extrusion width, 100% layer height
PETG, compared to some other filaments, is relatively easy to print using the Creality CR-M4. However, a common issue with this filament is stringing, where thin threads of plastic stretch between parts of the print.
To prevent this, ensure the filament is stored in a dry environment to reduce moisture exposure. Additionally, using the correct print temperature, as specified above, is crucial. Properly adjusting the retraction settings can also prevent stringing, pulling the filament back during movement to avoid unwanted extrusion.
Calibrating these settings greatly enhances the quality of your PETG prints.
Cooling settings can vary significantly among different PETG brands. Some brands may require higher cooling for optimal print quality, while others might need lower levels to prevent warping or shrinking. Therefore, it’s essential to experiment and adjust the cooling settings based on the specific brand of PETG you’re using.
Best Cura Settings for the Creality CR-M4
After walking you through my specific settings for individual filaments, let’s dive deeper into these parameters and how to calibrate them. This fine-tuning process is crucial for achieving the best printing results with your Creality CR-M4.
Print Temperature
The best printing temperatures for the Creality CR-M4 in Cura:
- PLA: 200-210 °C
- ABS: 235-240 °C
- TPU: 220 °C
- PETG: 230-240 °C
Setting the print temperature incorrectly can lead to a multitude of problems. Too high a temperature may cause the filament to overheat, leading to stringing and oozing, negatively impacting the print quality.
Conversely, a temperature that’s too low may prevent the filament from properly adhering to the print bed and other layers. This often results in prints failing to complete, or finished prints featuring poor layer bonding and weak structural integrity. An incorrect print temperature can therefore drastically compromise the success of your 3D prints and the overall printing experience.
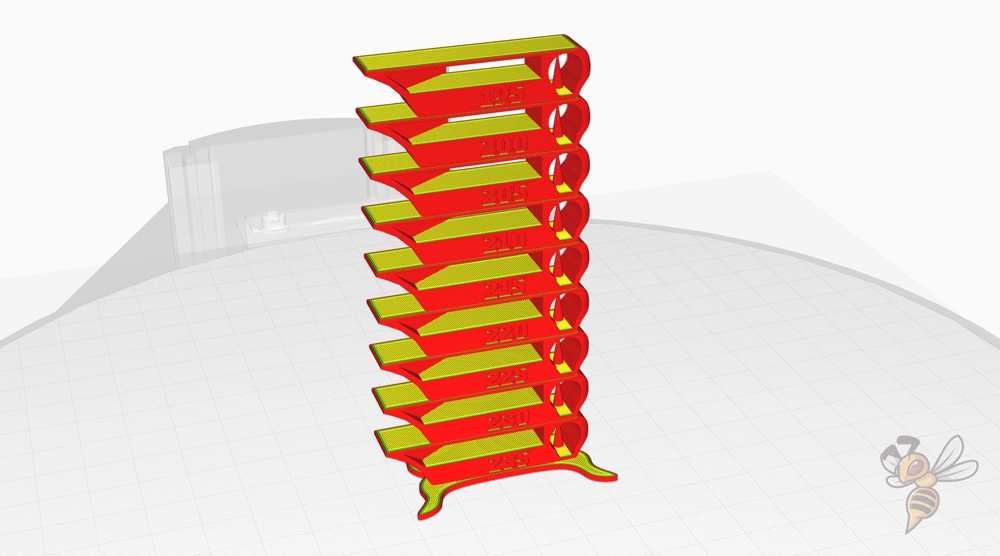
To accurately calibrate the print temperature of your CR-M4, a temperature tower is a valuable tool. A temperature tower is a pre-designed 3D model, that, when printed, serves to demonstrate the outcomes at varying temperatures.
Here’s a step-by-step guide:
- Download a Temperature Tower Model: This can be easily found on 3D printing model websites like Thingiverse. The tower has labels for different temperature levels.
- Set up the G-code: Adjust the G-code of the model to change temperatures at specified layers. This can be done in a slicer software such as Cura with a script. For instance, you might set the printer to start at 210 °C, then decrease by 5 °C every 20 layers.
- Print the Temperature Tower: Load your preferred filament and print the tower.
- Evaluate the Results: Once the print is done, evaluate the quality of the print at each temperature level. Look for issues such as stringing, blobbing, or poor layer adhesion.
- Select the Optimal Temperature: The temperature at which the tower shows the best quality is the optimal print temperature for that filament on your printer.
Following these steps will help ensure your prints have the right balance between strength and quality. Remember, the optimal temperature might vary between different brands or colors of the same type of filament.
Print Bed Temperature
The best print bed temperatures for the Creality CR-M4 in Cura:
- PLA: 60 °C
- ABS: 90 °C
- TPU: 60 °C
- PETG: 70 °C
While setting the print bed temperature, strive for the highest temperature that does not produce an “elephant foot” on your prints. The “elephant foot” phenomenon occurs when the initial layers of your model bulge outward due to excessive heat.
This can compromise the accuracy of your print dimensions and overall print quality. Therefore, finding the maximum temperature that avoids creating an elephant foot is essential for optimal printing results.
Finding the right bed temperature for the Creality CR-M4 is straightforward, largely due to the excellent adhesion provided by the PC coating of the print bed. The temperatures mentioned above should ideally suit your needs. However, if you encounter any issues, refer to this post for further assistance.
Print Speed
The best print speed for the Creality CR-M4 in Cura:
- PLA: 50 mm/s
- ABS: 50 mm/s
- TPU: 30 mm/s
- PETG: 50 mm/s
Exceeding the recommended print speeds can often result in issues like ringing and ghosting in your 3D prints.
Ringing occurs when vibrations from the printer’s movements cause ripples in the print, particularly around sharp corners or details.
On the other hand, ghosting is an echo or duplicate of a print’s details, visible as faint, repeated patterns on the print’s surface. These problems significantly detract from the print quality, making it important to adhere to the recommended print speeds.
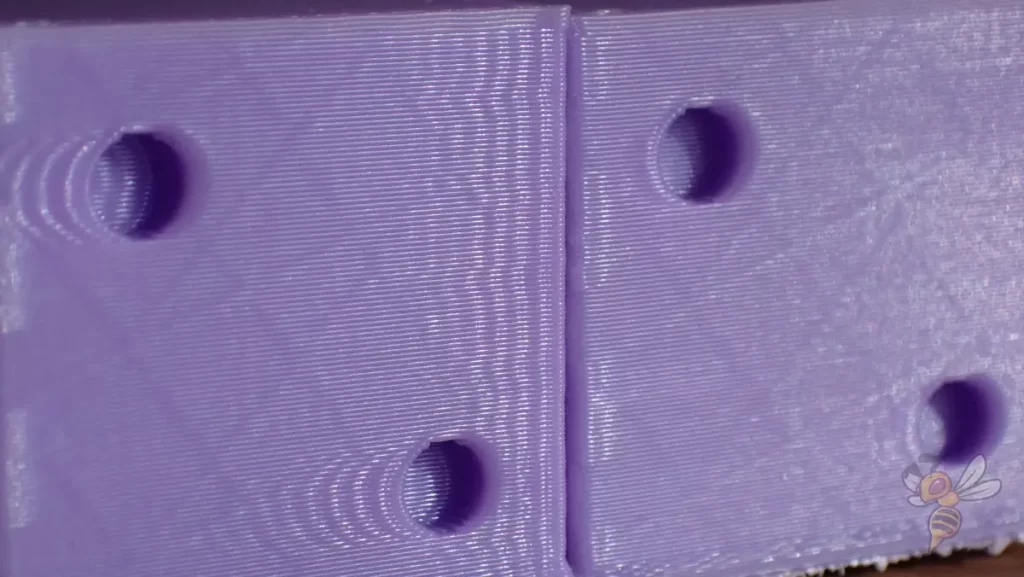
The values specified above typically provide excellent results in terms of print quality and speed with the CR-M4. However, 3D printing is an intricate process and can vary depending on numerous factors.
To ensure you’re maximizing your print speed without compromising accuracy or quality, consider utilizing calibration objects. These tools can assist in determining the highest speed your specific setup can handle without errors.
Layer Height
The best layer heights for the Creality CR-M4 in Cura:
- Decorative objects: 0.1 mm
- Standard: 0.2 mm
- Coarse, fast prints: 0.3 mm and higher
The layer height values outlined are tailored to the Creality CR-M4’s 0.4 mm standard nozzle.
For decorative objects, a layer height of 0.1 mm is best. This ensures high detail and smooth finish. A standard layer height of 0.2 mm works well for general printing needs, providing a balance of speed and quality.
When speed is the top priority, go for a coarse layer height of 0.3 mm or higher. It might compromise on the finer details, but it accelerates the printing process. Always remember, adjusting these values requires careful consideration, as they impact the final print’s quality and the time it takes to complete.
Flow Rate
The best flow rate for the CR-M4 in Cura:
- Default value: 100%
- For over-extrusion: 90% to 99%
- For under-extrusion: 101% to 110%
Once you’ve calibrated both the printing temperature and the retraction settings, you might want to consider adjusting the flow rate. This adjustment should be made only after these other factors have been properly calibrated.
Changing the flow rate can potentially improve your print quality, but it’s critical to ensure that the previous settings are correctly dialed in first. Remember, every adjustment you make impacts the final print quality and speed.
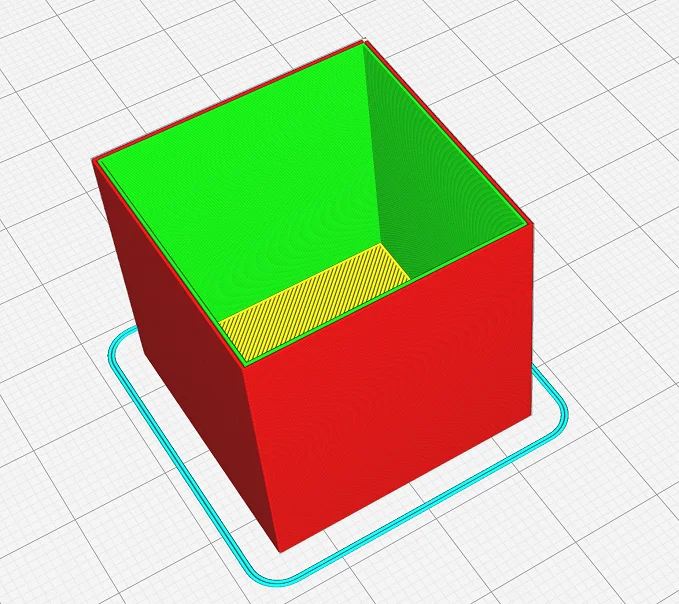
Calibrating the flow rate is a key step in getting optimal print quality. It involves printing a test object, measuring it, and then making adjustments. Here’s a straightforward method I mainly use:
- Print a Hollow Cube: Set your printer to print a hollow cube with 2 walls. No top layers or infill. This will give you a precise structure for measuring wall thickness.
- Measure the Wall Thickness: Once the cube is printed, use a caliper to measure the thickness of the cube walls. Make sure to take measurements from several points to get the most accurate average.
- Calculate the Average Wall Thickness: Divide the total measurement by 2 to get the average wall thickness of the cube.
- Compare to Slicer Wall Thickness: Check this average against the wall thickness set in your slicer. If it’s more, you’re over-extruding. If it’s less, you’re under-extruding. Adjust your flow rate accordingly.
Retraction
The best retraction settings for the Creality CR-M4 in Cura:
- PLA: 0.8 mm at 40 mm/s
- ABS: 0.8 mm at 35 mm/s
- TPU: 1.0 mm at 40 mm/s
- PETG: 0.9 mm at 35 mm/s
Incorrect retraction settings can lead to a common 3D printing issue known as stringing. This occurs when small threads or strings of plastic are left behind as the printer head moves across open spaces.
The retraction settings provided for the Creality CR-M4 in Cura are a good starting point, but you may need to fine-tune these settings based on the specific filament you’re using or the climatic conditions in your printing environment.
Calibration is key to achieving flawless results. Begin with the suggested settings, observe the results, and adjust incrementally until you achieve the perfect print.
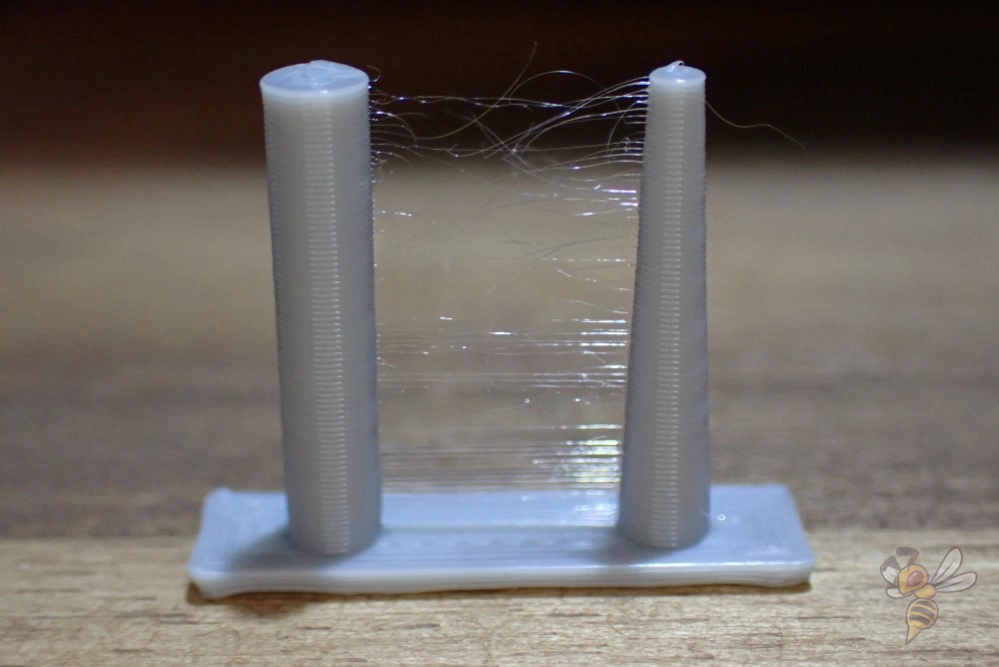
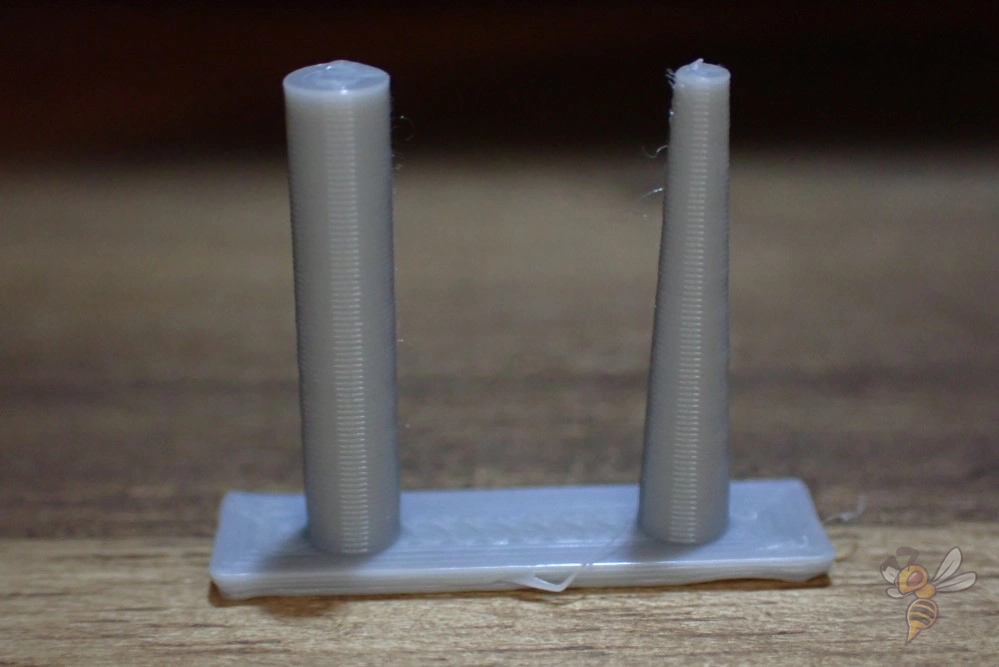
Retraction calibration is crucial in preventing stringing in your 3D prints. Here are steps on how to calibrate retraction using a simple object with two columns (like the one in the calibration-shapes plugin in Cura):
- Set Initial Retraction Settings: Start with the recommended settings above.
- Print the Object: Print the object with these initial settings. Observe if there’s any stringing between the two columns.
- Adjust Retraction Distance: If you see stringing, adjust the retraction distance. Increase it by 0.1 mm and print the object again. Note: Adjust only one setting at a time.
- Analyze the Outcome: Look for any changes in the level of stringing. If it’s reduced but still present, increase the retraction distance by another 0.1 mm and repeat the process.
- Adjust Retraction Speed: Once you find the optimal retraction distance, turn to retraction speed. If stringing persists, increase the speed by 5 mm/s and print again.
- Iterate Until Perfect: Keep adjusting one setting at a time and printing the object until you achieve a print with no stringing.
Infill
The best infill density for the Creality CR-M4 in Cura:
- Decorative objects: 0-15%
- Standard objects: 15-50%
- Stable objects: 50-100%
Infill density values on the Creality CR-M4 serve different purposes depending on the type of object you’re printing. For decorative objects, a lower infill density of 0-15% is usually sufficient as it needs less structural support.
Standard objects, which require a balance of aesthetics and durability, are best printed with an infill density of 15-50%.
For objects that need to be very durable and stable, an infill density of 50-100% is recommended, providing maximum internal structure.
Always remember, the higher the infill percentage, the stronger and heavier the object will be, but it will also require more material and print time.
First Layer
These are the best Cura settings for the first layer with the Creality CR-M4:
- Layer height: 100-200% of normal layer height (higher values to increase print bed adhesion)
- Line width: 100-200% of normal line width (higher values to increase print bed adhesion)
- Print temperature: Same as the rest of the object, or 5-10 °C higher for better print bed adhesion.
- Print speed: 50% of normal print speed (i.e. 25 mm/s for a normal print speed of 50 mm/s) or 5-10 mm/s for high print bed adhesion
- Flow rate: 100-110% (higher values in case of poor print bed adhesion)
- Raft/Brim/Skirt: Skirt as a standard, Brim/Raft only if you have adhesion issues.
The goal of each setting for the first layer is to extend the time the filament remains viscous, which improves print bed adhesion. The longer the filament maintains this state, the better it adheres to the bed, ensuring the stability of the subsequent layers.
Conclusion
In summary, the Creality CR-M4 is a good 3D printer. Its capabilities and performance are great, but they are only fully realized with the correct application of Cura settings.
I hope the values provided in this article have been beneficial in optimizing your printing process. If you’re still finding things a bit tricky, remember that there’s always the course I referenced at the start of this post. It’s a valuable resource, packed with plenty of insights to enhance your 3D printing experience.
Disclosure: This website is the property of Martin Lütkemeyer and is operated by Martin Lütkemeyer. Martin Lütkemeyer is a member of the Amazon Services LLC and other Affiliate Programs. These are affiliate advertising programs designed to enable websites to earn advertising revenue through advertising and linking to Amazon.com and others. Links marked with * are affiliate links.

