
- Wet Filament: Prevention, Symptoms & Drying - July 18, 2024
- Sovol SV08 – Best PrusaSlicer Settings & Profile - June 26, 2024
- Sovol SV08 – Best Orca Slicer Settings & Profile - June 26, 2024
Disclosure: Links marked with * are Affiliate Links. I earn from qualifying purchases if you decide to make a purchase through these links – at no additional cost for you!
The Creality CR-10 SE is an outstanding 3D printer that delivers perfect results when used correctly. To exploit its full potential, the right slicer settings are crucial.
In this article, I share my tried-and-tested Cura settings, which should serve as a solid foundation for you. With these settings, you can achieve good print quality.
Careful calibration is essential for perfect results. Each filament behaves differently and the settings need to be adjusted accordingly. For more information and detailed instructions on calibration, you can refer to my detailed calibration guide or my 3D printing course.
| Filament | PLA | ABS | TPU | PETG |
|---|---|---|---|---|
| Printing temperature | 210 °C | 250 °C | 215 °C | 230 °C |
| Print bed temperature | 60 °C | 100 °C | 60 °C | 80 °C |
| Printing speed | 150-250 mm/s | 150-250 mm/s | 100 mm/s | 150-200 mm/s |
| Retraction | 0.85 mm with 40 mm/s | 1.0 mm with 40 mm/s | 2.0 mm with 40 mm/s | 1.2 mm at 40 mm/s |
| Cooling | 100 % | 50 % | 100 % | 50-75 % |
Table of Contents:
How to Create a Cura Profile for the Creality CR-10 SE
A Cura profile is divided into machine and print settings. The machine settings define the hardware-specific parameters of your printer, while the print settings define the actual print parameters, such as temperature and speed.
Start by defining the machine settings, using an empty profile as a template for the CR-10 SE.
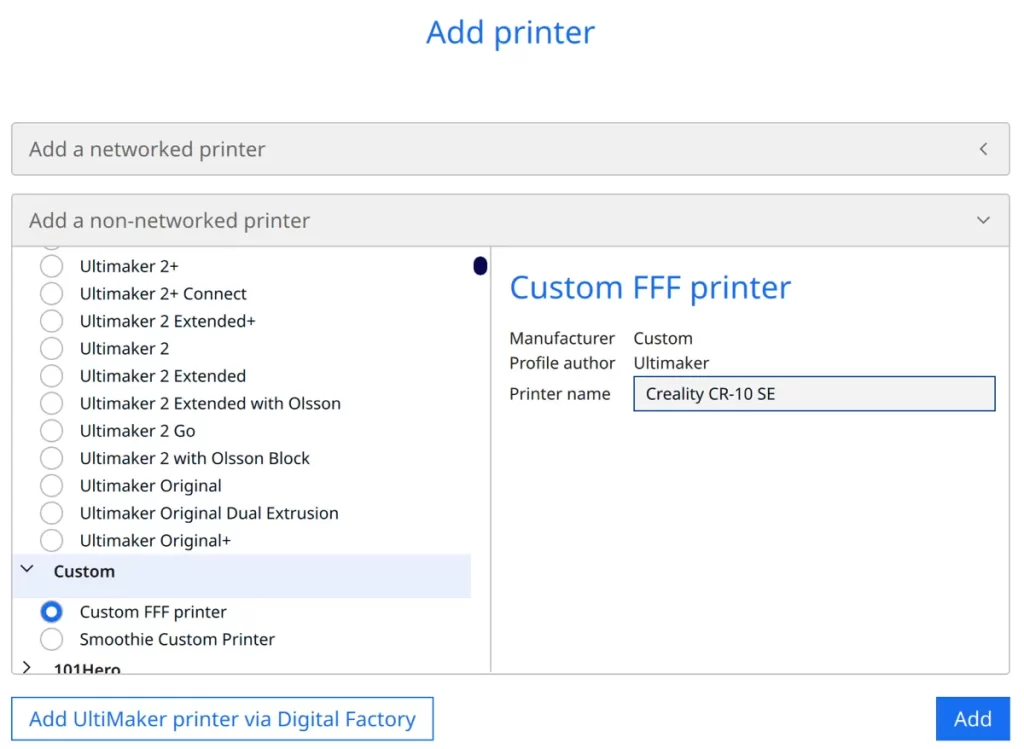
To add your 3D printer in Cura, click on ‘Settings’, then ‘Printers’ and ‘Add printer’. Select ‘Non-networked printer’ and then ‘Custom’, followed by ‘Custom FFF printer’. Enter the name of your printer and click ‘Add’.
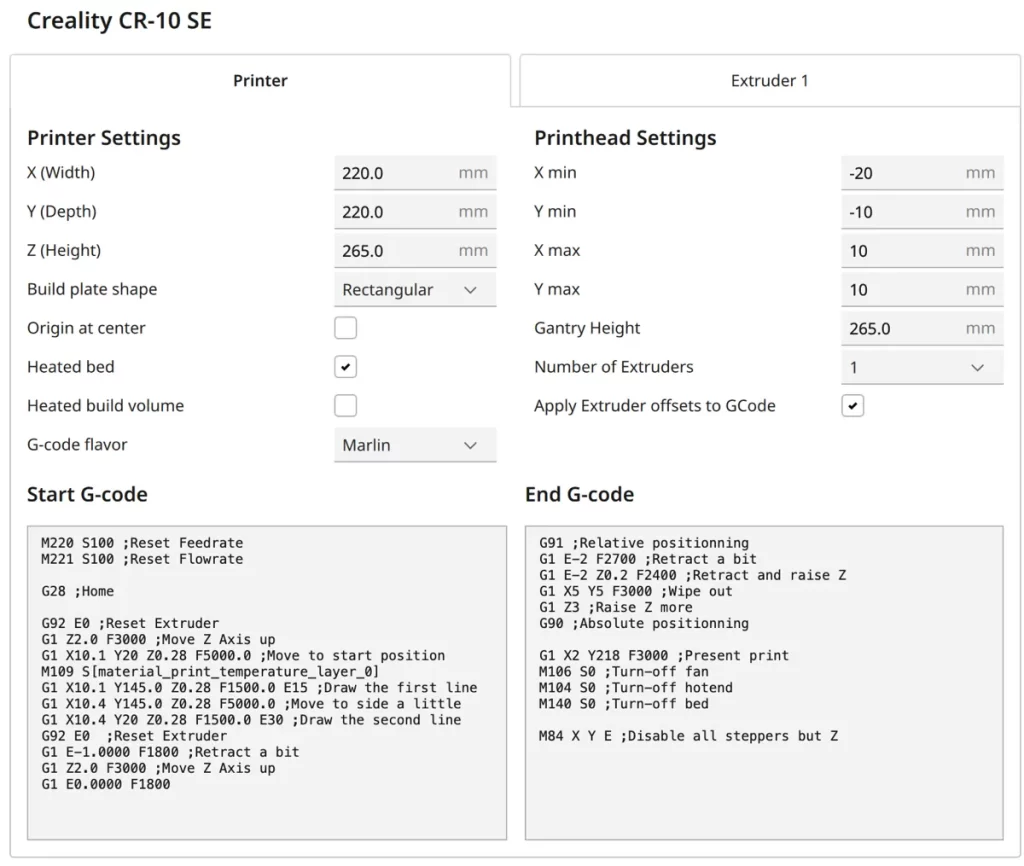
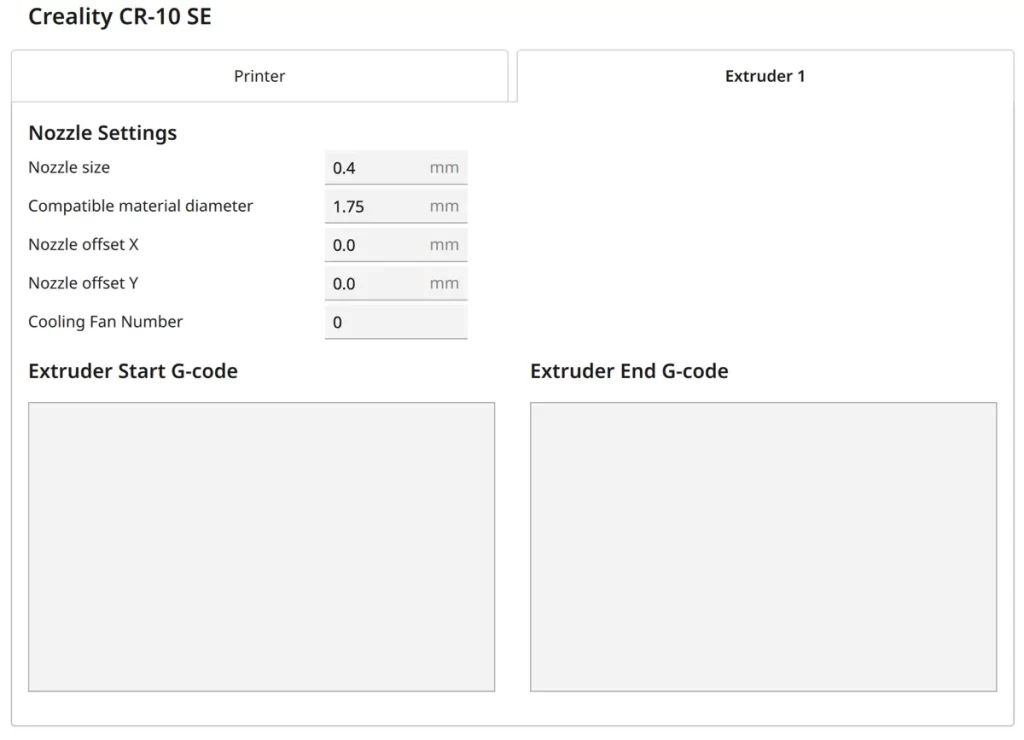
The machine settings of the CR-10 SE are shown in the screenshot above. Directly below you will find the G-code snippets so that you can copy them more easily:
Start G-Code:
- M220 S100 ;Reset feed rate
- M221 S100 ;Reset flow rate
- G28 ;Home
- G92 E0 ;Reset extruder
- G1 Z2.0 F3000 ;Move Z Axis up
- G1 X10.1 Y20 Z0.28 F5000.0 ;Move to start position
- M109 S[material_print_temperature_layer_0]
- G1 X10.1 Y145.0 Z0.28 F1500.0 E15 ;Draw the first line
- G1 X10.4 Y145.0 Z0.28 F5000.0 ;Move to side a little
- G1 X10.4 Y20 Z0.28 F1500.0 E30 ;Draw the second line
- G92 E0 ;Reset extruder
- G1 E-1.0000 F1800 ;Retract a bit
- G1 Z2.0 F3000 ;Move Z Axis up
- G1 E0.0000 F1800
End G-Code:
- G91 ;Relative positioning
- G1 E-2 F2700 ;Retract a bit
- G1 E-2 Z0.2 F2400 ;Retract and raise Z
- G1 X5 Y5 F3000 ;Wipe out
- G1 Z3 ;Raise Z more
- G90 ;Absolute positioning
- G1 X2 Y218 F3000 ;Present print
- M106 S0 ;Turn-off fan
- M104 S0 ;Turn-off hotend
- M140 S0 ;Turn-off bed
- M84 X Y E ;Disable all steppers but Z
Once the print profile has been created, the next step is to define the print settings. These include the specific parameters for the various materials to achieve optimum results.
You can find more information on how to create a 3D printer profile in Cura and what you need to pay attention to in this article: How to Create a Custom 3D Printer Profile in Cura
PLA Settings
These are the correct Cura settings for printing PLA filament with the Creality CR-10 SE:
- Print temperature: 210 °C
- Print bed temperature: 60 °C
- Print speed: 150-250 mm/s
- Retraction: 0.85 mm at 40 mm/s
- Cooling: 100 %
The Creality CR-10 SE can process PLA filament almost perfectly right out of the box, often without much calibration effort. The settings listed above are the result of extensive testing and optimization to achieve the best possible print quality with PLA.
They are ideal for various PLA-based projects and should lead to excellent results in most cases. Further optimizations can be made based on these settings to adapt them to specific printing requirements.
Further down in this article, I will discuss how to calibrate the most important settings for PLA.
ABS Settings
These are the correct Cura settings for printing ABS filament with the Creality CR-10 SE:
- Print temperature: 250 °C
- Print bed temperature: 100 °C
- Print speed: 150-250 mm/s
- Retraction: 1.0 mm at 40 mm/s
- Cooling: 50 %
ABS is known for its robustness and heat resistance, making it a popular material for many 3D printing projects. It is particularly suitable for objects that are exposed to higher loads or temperatures. However, printing with ABS can be challenging. It is prone to warping, especially when exposed to temperature fluctuations.
Since the Creality CR-10 SE does not have an enclosure, printing larger ABS parts can be difficult. Open designs offer less protection against temperature fluctuations, which can lead to warping. Nevertheless, it is possible to print smaller ABS objects successfully as long as the correct settings are used.
To avoid warping, it is helpful to reduce the print speed for the first layer to improve adhesion to the print bed. Using a draft shield in Cura can also help to protect the print object from air currents and thus ensure an even temperature during the printing process.
TPU Settings
These are the correct Cura settings for printing TPU filament with the Creality CR-10 SE:
- Print temperature: 215 °C
- Print bed temperature: 60 °C
- Print speed: 100 mm/s
- Retraction: 2.0 mm at 40 mm/s
- Cooling: 100 %
TPU is known for its flexibility and elasticity. The Creality CR-10 SE is well suited for printing such flexible materials, as it has a direct drive extruder. This type of extruder allows for better control and precision when feeding flexible filaments.
Another common problem with TPU is stringing. Due to its elastic properties, TPU tends to pull strings. Therefore, it is often necessary to carefully calibrate the retraction and printing temperature to achieve clean and precise printing results.
When using TPU on a PEI print bed, the material may not adhere perfectly. Reducing the printing speed for the first layer is usually the most effective measure in such cases. Further tips on improving the adhesion of the first layer can be found further down in this article.
PETG Settings
These are the correct Cura settings for printing PETG filament with the Creality CR-10 SE:
- Print temperature: 230 °C
- Print bed temperature: 80 °C
- Print speed: 150-200 mm/s
- Retraction: 1.2 mm at 40 mm/s
- Cooling: 50-75 %
PETG also has a strong tendency to string, but the Creality CR-10 SE can be adjusted relatively easily to minimize this issue. The above values for retraction and print temperature should give pretty good results, but further fine-tuning is required for perfect results.
Different PETG filaments can differ greatly from each other in terms of cooling. It is therefore important to adjust the cooling settings to the respective filament to achieve optimum printing results.
The Best Cura Settings for the Creality CR-10 SE
Now that I’ve shown you my settings for the individual filaments, let’s look at the specific settings and how to calibrate them.
Print Temperature
The best printing temperatures for the Creality CR-10 SE in Cura:
- PLA: 210 °C
- ABS: 250 °C
- TPU: 215 °C
- PETG: 230 °C
The printing temperature is crucial for the quality of your prints. An incorrectly set printing temperature can lead to problems such as poor layer adhesion, various printing errors and inaccurate details.
The values given here are a good starting point, but it is essential to optimize them for the filament used in order to achieve perfect results.

Calibrating the print temperature is an essential step in achieving the best possible print quality. An effective method for this is to use a temperature tower.
This involves printing a test object that is produced at different temperatures. This allows you to visually assess at which temperature your filament delivers the best results.
Print Bed Temperature
The best print bed temperatures for the Creality CR-10 SE in Cura:
- PLA: 60 °C
- ABS: 100 °C
- TPU: 60 °C
- PETG: 80 °C
The correct print bed temperature is crucial for good adhesion of the first layer and therefore for the success of the entire printing process. A well-adjusted print bed temperature prevents the corners of the print from bending up (warping) and contributes to the overall print quality.
A print bed temperature that is too high can lead to a so-called elephant foot. This print defect occurs when the bottom layers of the print expand and widen, resulting in an uneven base and an unclean appearance.
Fortunately, with the Creality CR-10 SE, finding the right print bed temperature is not particularly difficult. Its PEI print bed provides excellent adhesion for most filaments, so the above temperatures should already allow for perfect adhesion in most cases. However, if adhesion problems occur, the temperature can be increased in small steps. Further down in this article, you will find additional tips and tricks to further improve adhesion to the print bed.
Print Speed
The best print speeds for the Creality CR-10 SE in Cura:
- PLA: 150-250 mm/s
- ABS: 150-250 mm/s
- TPU: 100 mm/s
- PETG: 150-200 mm/s
The print speed is an important factor for the quality of your 3D prints. Too high a speed can lead to inaccurate prints, while too low a speed unnecessarily prolongs the printing process.

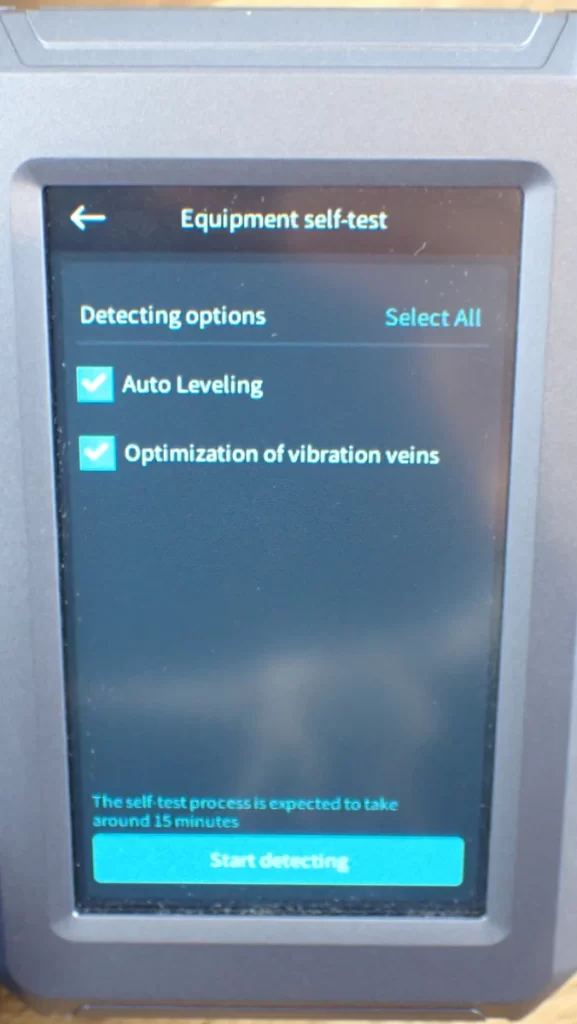
With the CR-10 SE, you should definitely perform vibration compensation or input shaping regularly via the menu. This setting allows you to achieve much higher speeds without generating print errors such as ringing or ghosting.
To set the print speed as high as possible without these print errors occurring, you can use certain calibration objects. I like to use this cube.
For the accelerations, I used the values from Creality Print:
- Accelerations for infill, travel and inner walls: 5000 mm/s²
- Accelerations for the first layer, outer and upper layers or walls: 2000 mm/s²
Layer Height
These are the best layer heights for the Creality CR-10 SE in Cura:
- Decorative objects: 0.1 mm
- Standard: 0.2 mm
- Rough, fast prints: 0.3 mm
The layer height plays an important role in the balance between print quality and print speed. A lower layer height, such as 0.1 mm, is ideal for decorative objects with high detail requirements. The standard layer height of 0.2 mm offers a good mix of detail and print speed for most projects. If speed is more important than detail, such as for prototypes or functional parts, a layer height of 0.3 mm is a good choice.
Flow Rate
These are the best flow rates for the Creality CR-10 SE in Cura:
- Standard: 100%
- For over-extrusion: 90% to 99%
- For under-extrusion: 101% to 110%
The flow rate is crucial to control the exact amount of filament that is pushed through the extruder. The default rate of 100% is suitable in most cases. However, if problems with over or under extrusion occur, these values can be adjusted accordingly. It is essential to adjust the flow rate only after you have correctly calibrated the temperature and retraction to achieve the best results.

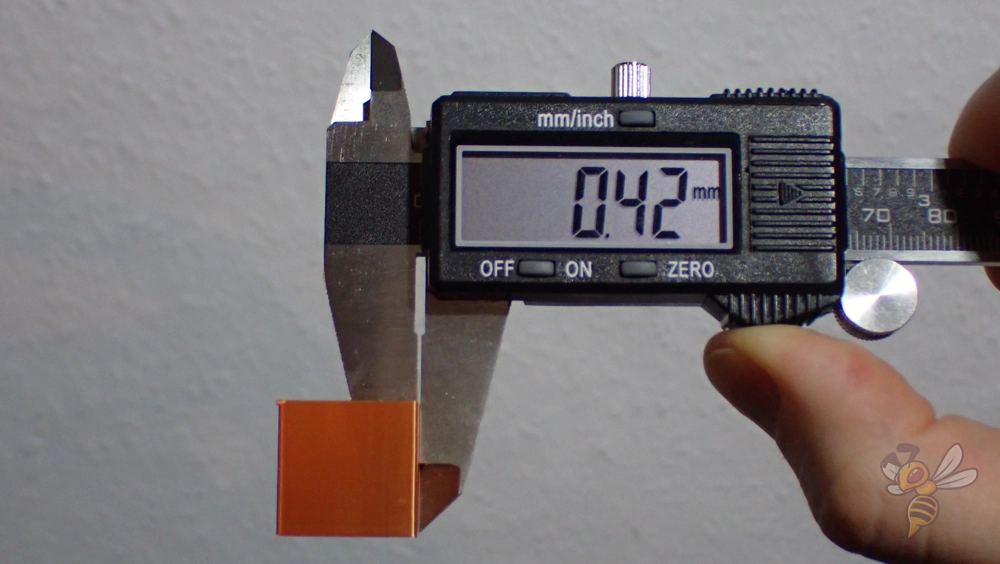
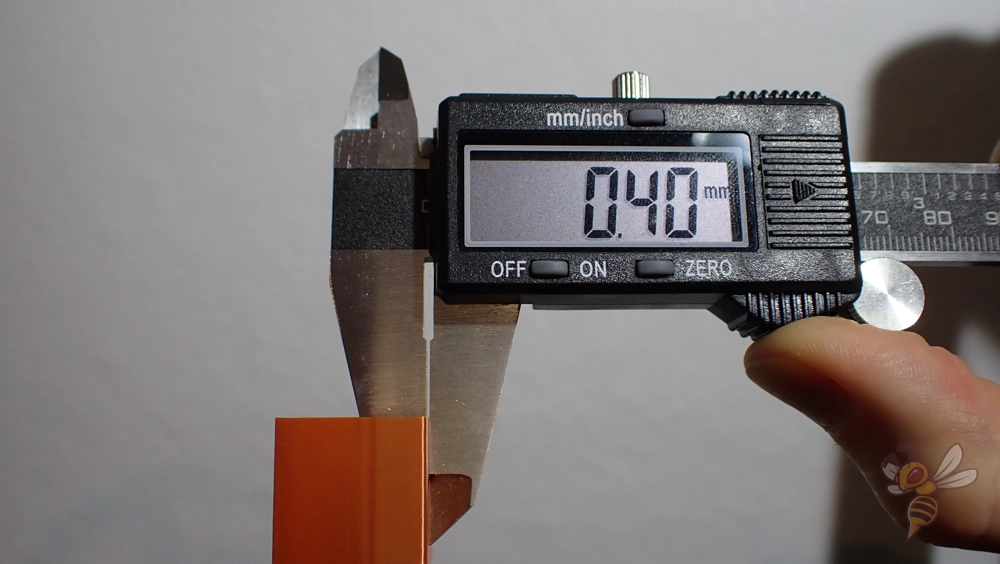
Calibrating the flow rate can be done effectively with a cube without infill or top layers. After printing, measure the wall thickness with a caliper. Depending on the measurement results, adjust the flow rate in Cura to ensure that the actual wall thickness matches the wall thickness set in Cura. This method helps to achieve precise and consistent prints.
Retraction
The best retraction settings for the Creality CR-10 SE in Cura:
- PLA: 0.85 mm at 40 mm/s
- ABS: 1.0 mm at 40 mm/s
- TPU: 2.0 mm at 40 mm/s
- PETG: 1.2 mm at 40 mm/s
Correctly set retraction is essential to avoid printing errors such as stringing, especially with the Creality CR-10 SE. Retraction refers to the pulling back of the filament during the printing process to prevent the filament from dripping or stringing when the extruder is moved over unprinted areas of the print bed.
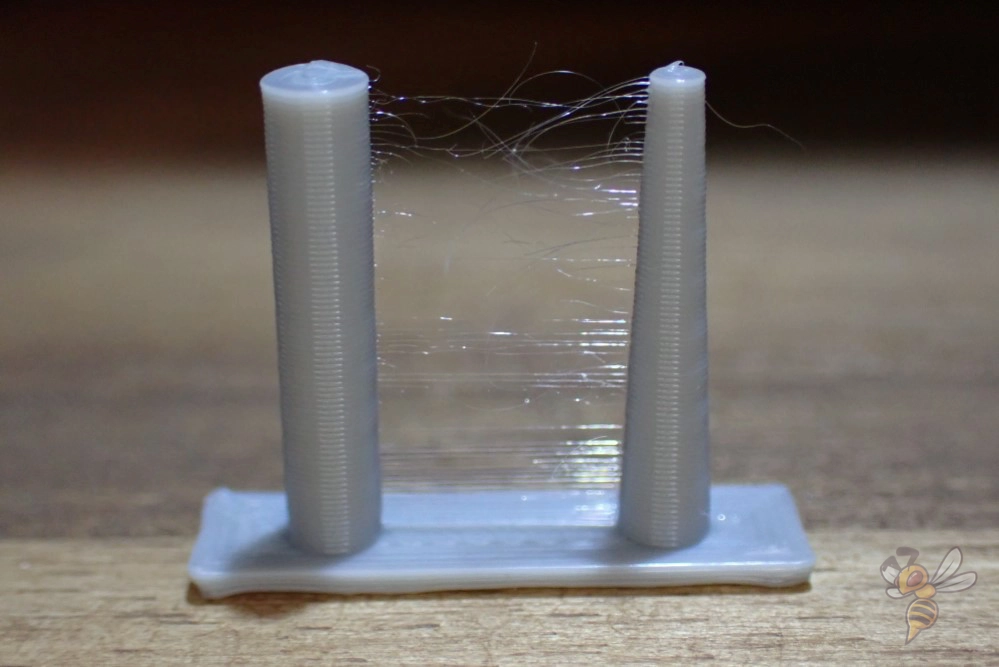

Calibrating the retraction on an FDM 3D printer is an important step in achieving clean and precise prints. This can be done by printing special test models designed to visualize problems with the retraction.
These models often consist of multiple towers or thin structures that are close together. I have used the simple object from Cura’s Calibration Shapes plugin in the example above.
After printing these models, you can adjust the retraction settings in Cura based on how much stringing occurs between the towers or structures. The goal is to adjust the retraction so that the filament does not drip or string to ensure high print quality.
Infill
The best infill density for the Creality CR-10 SE in Cura:
- Decorative objects: 0-15%
- Standard objects: 15-50%
- Stable objects: 50-100%
These values for infill density are general guidelines and tend to be printer-independent. They provide a good basis for adapting the stability and weight of the printed object to its purpose.
Lightweight and decorative objects require less infill, while more functional and stable objects benefit from a higher infill percentage.
First Layer
These are the best Cura settings for the first layer with the Creality CR-10 SE:
- Layer height: 100%
- Line width: 100%
- Print temperature: Same as the rest
- Print speed: 10 mm/s
- Raft/Brim/Skirt: Skirt
With these settings, the first layer should adhere perfectly to the print bed with most filaments. If problems with adhesion occur, the layer height, line width and print bed temperature can be increased.
In extreme cases, the use of a raft or brim can also be useful. The first layer is all about keeping the filament hot and fluid for as long as possible. A low printing speed is crucial here, as it keeps the filament liquid for longer and therefore more adhesive on the print bed.
Summary
With the right Cura settings, the Creality CR-10 SE can achieve perfect results. I hope these settings in this article have helped you and at least provide a good starting point for your printing projects.
If you have any further questions about calibration, I would like to refer you to the calibration guide mentioned at the beginning of the article and my 3D printing course. These resources can help you further refine your 3D printing skills and get the most out of your Creality CR-10 SE.
Disclosure: This website is the property of Martin Lütkemeyer and is operated by Martin Lütkemeyer. Martin Lütkemeyer is a member of the Amazon Services LLC and other Affiliate Programs. These are affiliate advertising programs designed to enable websites to earn advertising revenue through advertising and linking to Amazon.com and others. Links marked with * are affiliate links.
