
- Wet Filament: Prevention, Symptoms & Drying - July 18, 2024
- Sovol SV08 – Best PrusaSlicer Settings & Profile - June 26, 2024
- Sovol SV08 – Best Orca Slicer Settings & Profile - June 26, 2024
Disclosure: Links marked with * are Affiliate Links. I earn from qualifying purchases if you decide to make a purchase through these links – at no additional cost for you!
Z banding and z wobble are a rather rare problem with the Ender 3 (V2/Pro). But this printing error is all the more disastrous for your print objects.
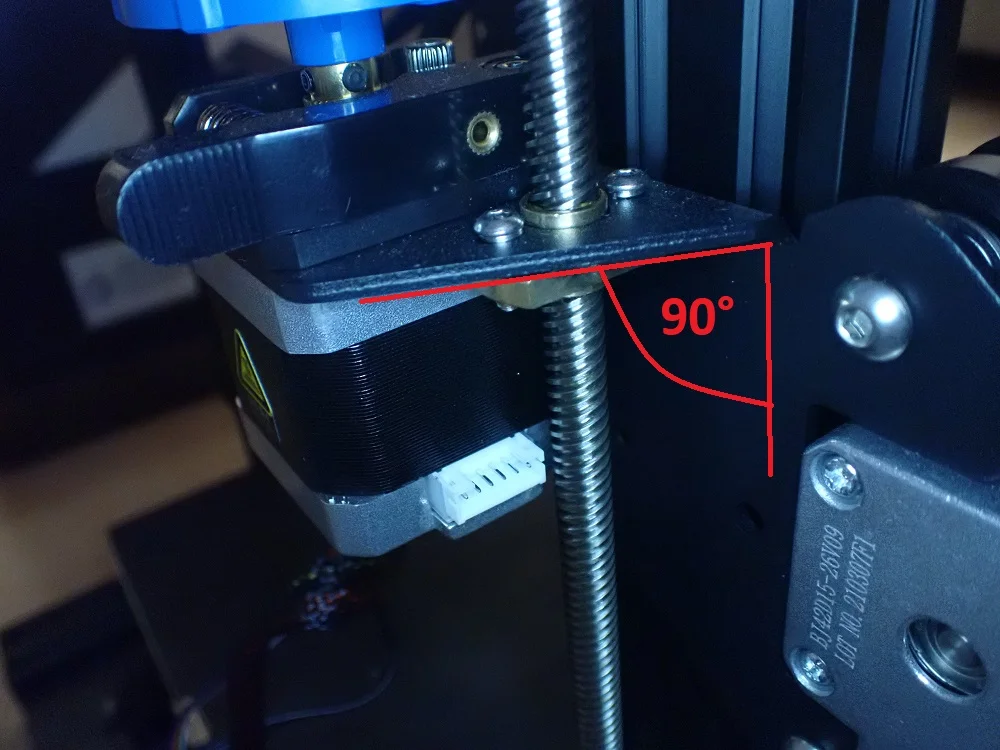
To avoid z banding with the Ender 3 Z, the Z-axis should be straightened and stabilized so that it does not wobble. The mounts of the stepper motor and the X-axis must have a 90° angle. A self-printed part helps to stabilize the Z-axis at the top.
In this article, you will find out what else can cause z banding with the Ender 3 and what solutions there are. At the end, you will find a simple test object with which you can test z banding / z wobble.
Table of Contents:
What is Z Banding / Z Wobble?
There are many printing errors that can occur when 3D printing with filament. Common print defects include stringing or poor print bed adhesion. Z banding is one of the rare print defects and occurs mainly in low-budget 3D printers with only one Z-axis. And the Ender 3 (V2/Pro) is one of them.
Z banding or z wobble is a regularly repeating print defect in the form of horizontal bulges along the Z-axis. The frequency can be different. The defect can occur either in the entire print object or only at certain points.
z banding or z-wobble is very annoying on both decorative and functional parts. Not only do they look unsightly, but they also mean that you cannot maintain any dimensional tolerances.
But even if this printing error is very serious and destroys all your 3D printed objects, you don’t have to panic, because there are a few simple solutions! But before you think about solutions, you need to understand how this printing error can occur.
What Causes Z Banding / Z Wobble on the Ender 3 (V2/Pro)?
Z banding is the phenomenon or symptom and z wobble is one of the possible causes. Z banding is the pattern you see on your printed object. Z wobble refers to a wobbling Z-axis. With the Ender 3, the Z-axis is usually sufficiently stabilized but only if components are straight.
Z banding is most often caused by z wobble (regular z banding) and sometimes by inhomogeneous extrusion (irregular z banding). Z wobble can be corrected by straightening and stabilizing the Z-axis and inhomogeneous extrusion can be corrected by cleaning the Nozzle.
Z wobble: Z wobble is the term used to describe the phenomenon of a wobbly or crooked Z-axis. When the Z-axis does not rotate perfectly on its own axis, z banding can occur. So the solution to z wobble is to straighten the Z-axis and stabilize it so that it cannot wobble back and forth.
Inhomogeneous extrusion: Z banding can also be caused by inhomogeneous extrusion. If the nozzle extrudes a little less filament in one layer and a little more in the next, an irregular surface is created. Most of the time, however, the result is not as regular as with z wobble.
You can usually fix an inhomogeneous extrusion by cleaning or replacing the nozzle. In very rare cases, the heating of the nozzle is defective, which causes the temperature to fluctuate over time and sometimes more and sometimes less filament is extruded.
These were now a few very rough approaches to how you can solve z banding or z wobble on the Ender 3 (V2/Pro). In the next sections, you will learn in detail how to apply the individual solutions, which self-printed parts are useful for this and how you can test at the end whether the solution has worked.
How Do I Fix Z Banding / Z Wobble on the Ender 3 (V2/Pro)?
There are several approaches to solve z banding or z wobble on the Ender 3. I will go into detail on all solutions and their order is the priority or probability of the cause.
Straighten the Z-axis
Z banding is most often caused by z wobble on the Ender 3. Different parts of the Z-axis can be crooked and cause this phenomenon:
- Z-axis rod
- Coupling of the Z-axis
- Stepper motor mount
- X-axis mount
The only part of the Z-axis that will not be bent is the aluminum frame. To bend this requires an extreme amount of force, which makes it very unlikely.
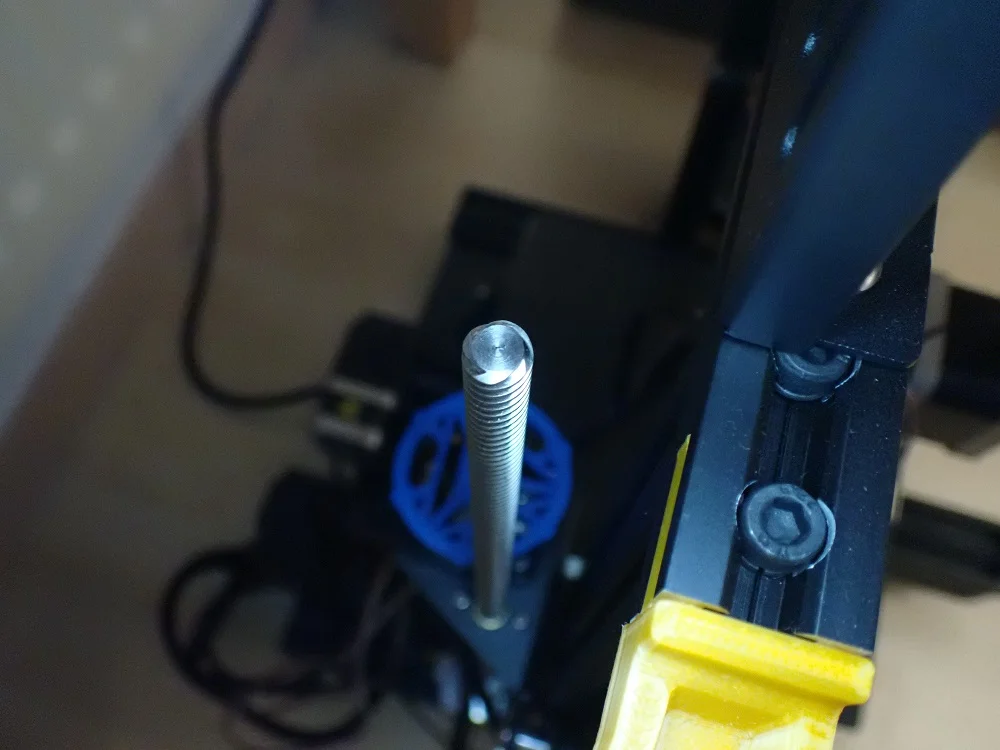
Z-axis: To straighten the screw rod of the Z-axis, you need a lot of force. It is also important that it is really straight after bending. And this is not so easy with such a stable rod and often you just make it worse. That’s why it’s often easier to buy a new Z-axis (you can find them very cheap online*).
If the Z-axis is only slightly bent, you can also try to stabilize it (see next section).
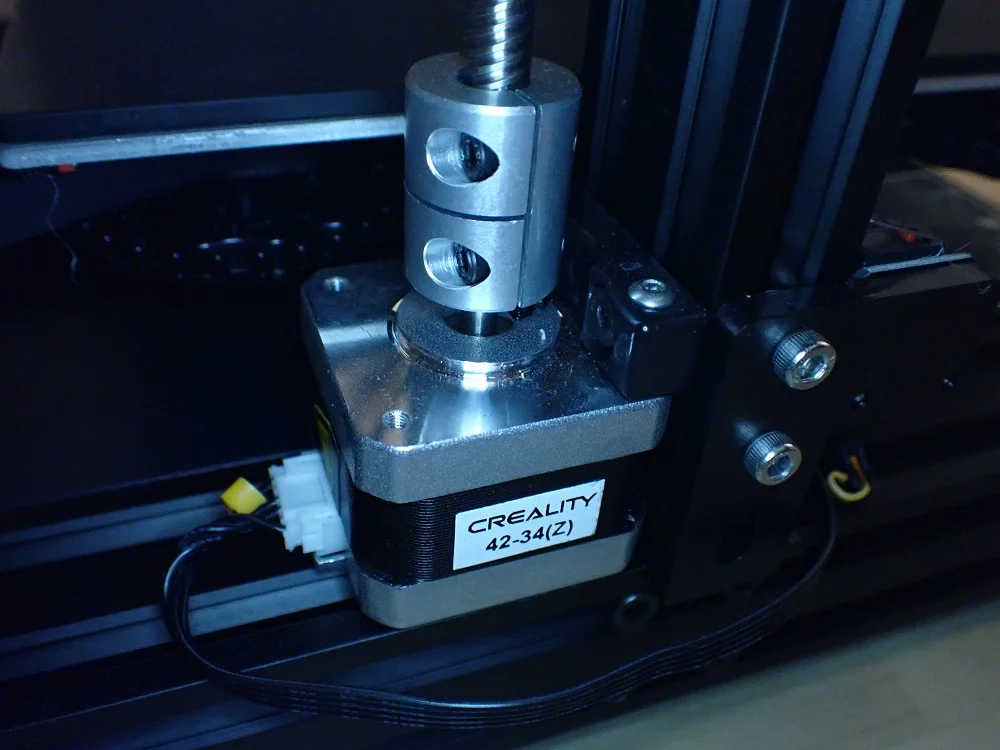
Z-axis coupling: The connection between the stepper motor and the rotating rod of the Z-axis can also be crooked or bent. You can also buy these connections online. The best choice is flexible couplings that can compensate for slight curvatures of the Z-axis (link to product*).
Z-axis mounts: Often neither the Z-axis nor the Z-axis connection are affected, but rather the stepper motor and/or X-axis mounts on the Z-Axis. These two metal parts must be bent at a 90° angle. If they are already bent when shipped or due to a shipping error, you will inevitably end up with z banding on the Ender 3.
You can either straighten them with sheer force or a vise and hammer. Ronald Walters on YouTube had this exact problem and shows in his video how he solved it.
Stabilize the Z-axis
Next, you should stabilize the entire Z-axis. To do this, you should screw all the screws that connect the individual components of the Z-axis to the 3D printer tightly enough and make sure that nothing wobbles.
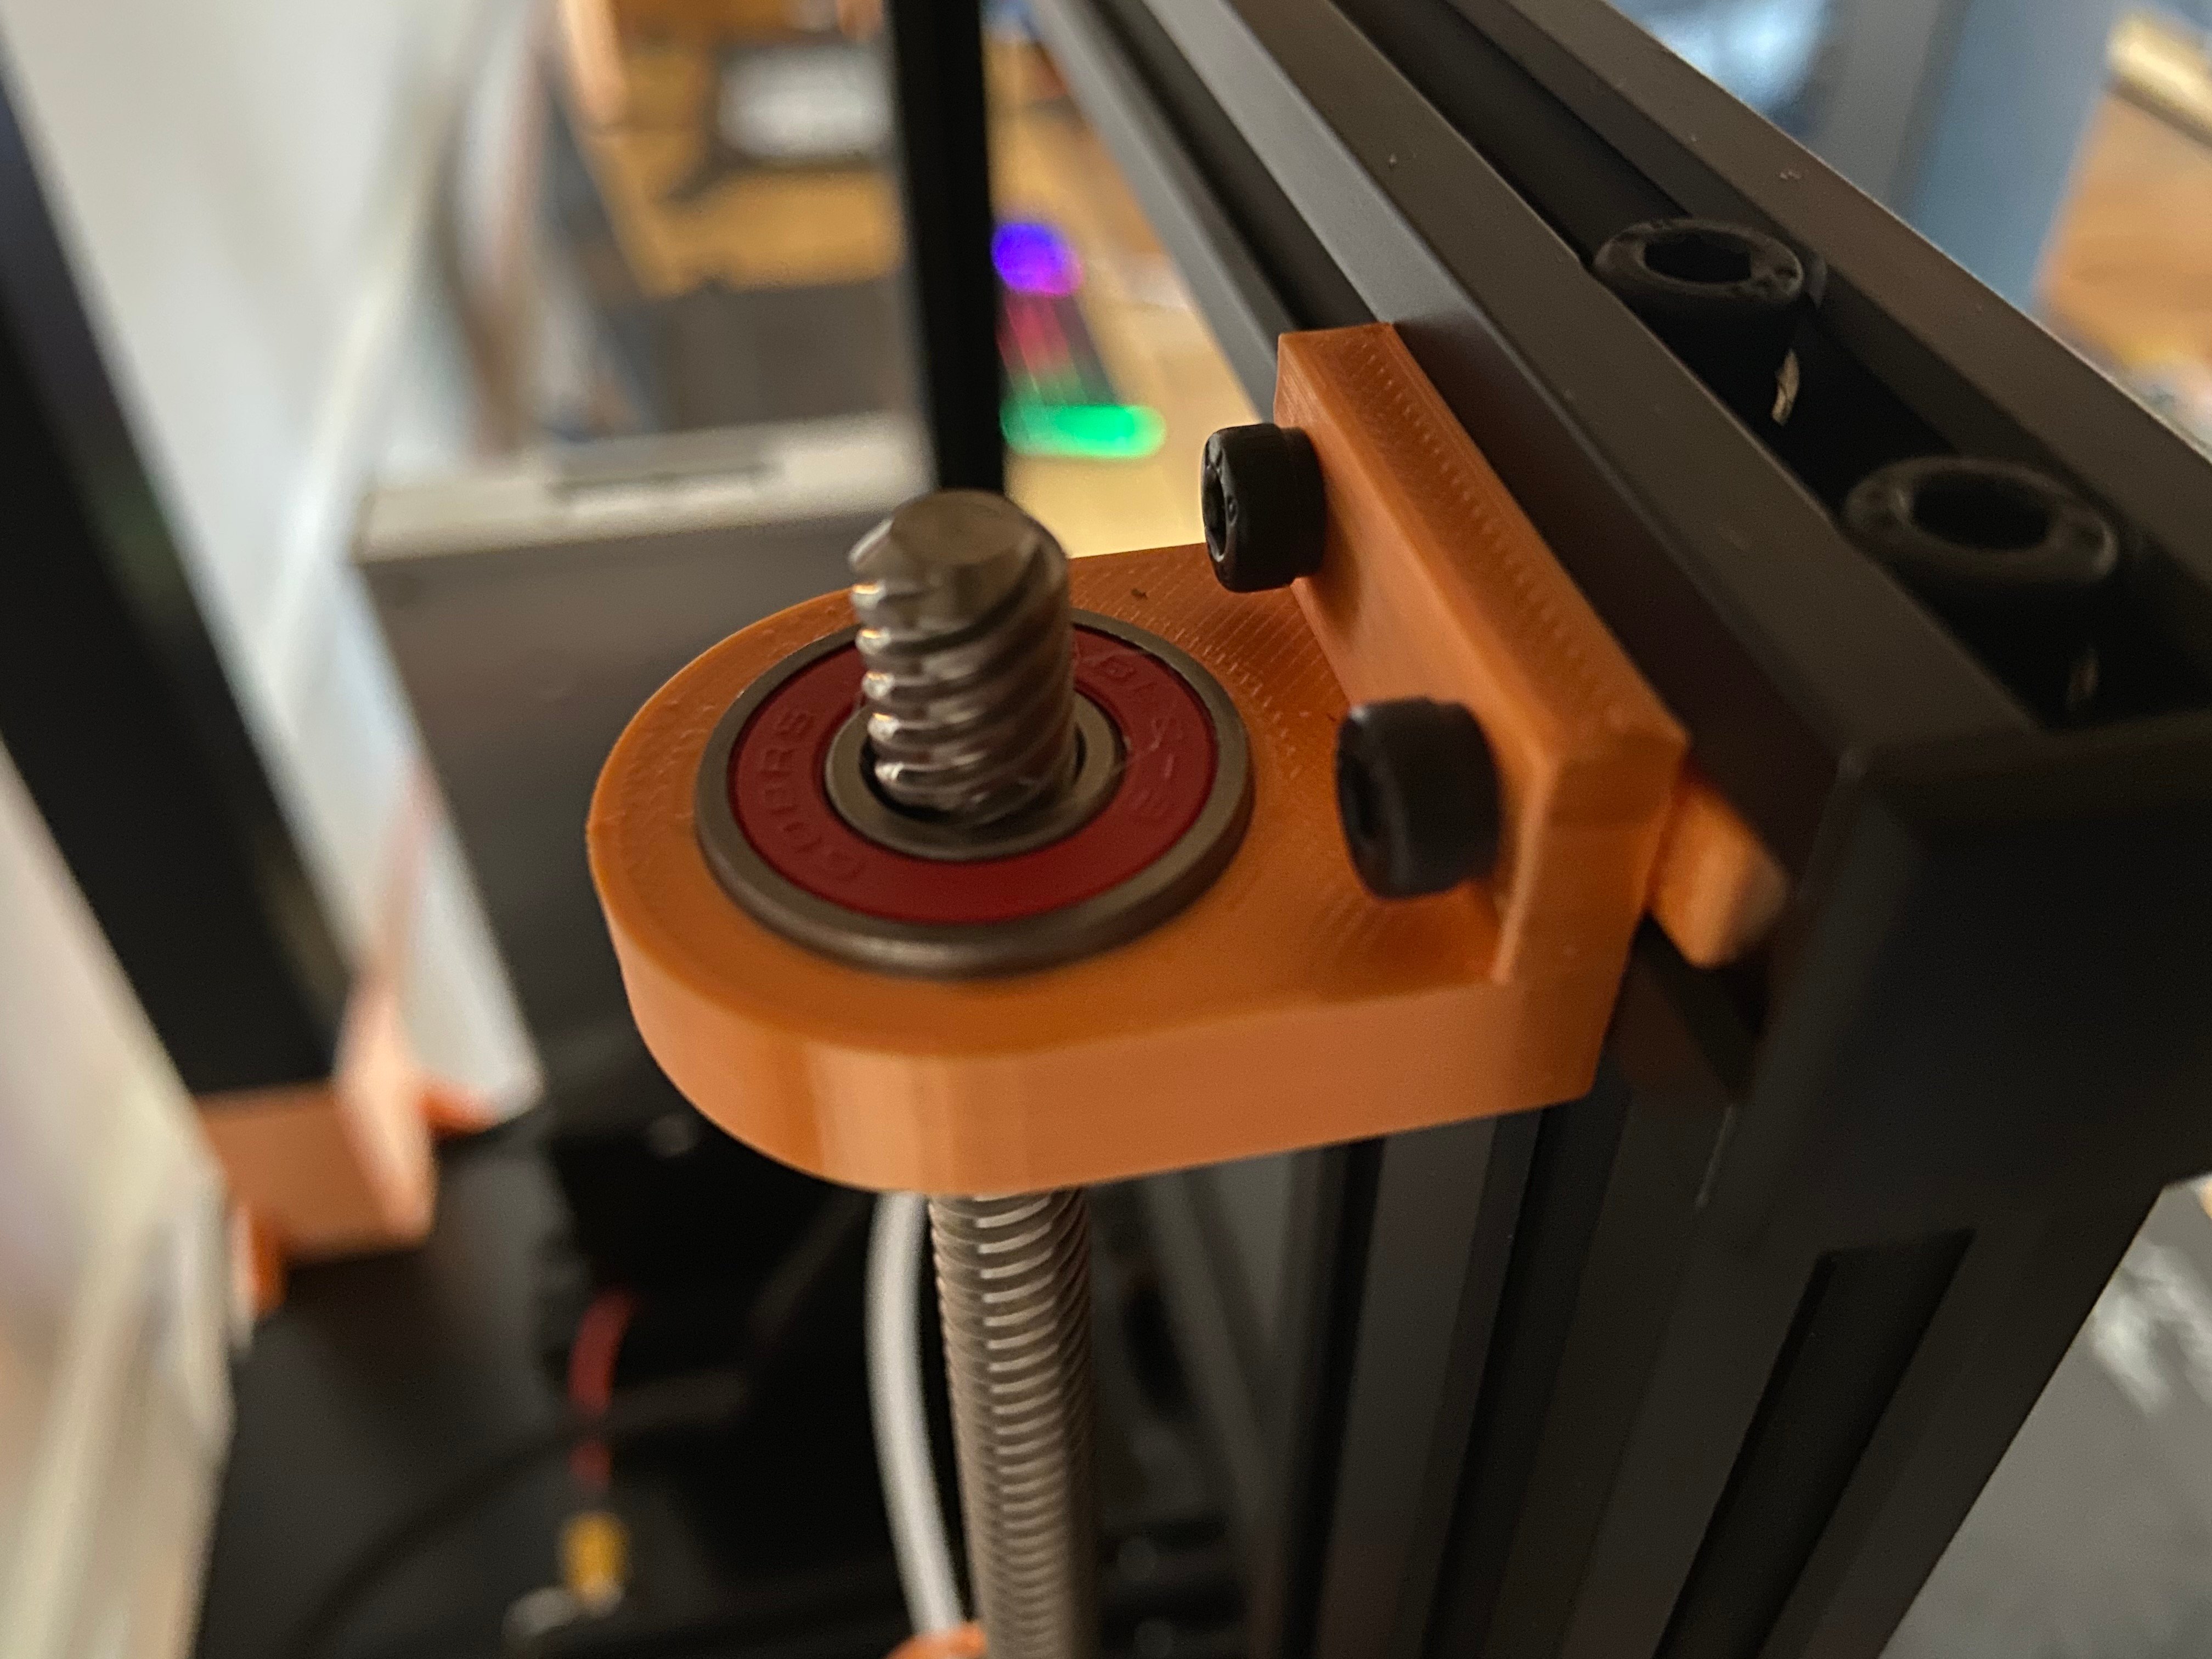
You can also stabilize the Z-axis of the Ender 3 with a guide at the top of the frame. Elmerohueso on Thingiverse has designed an object for this, that with one ball bearing and two M4x10 screws becomes the perfect stabilization of the upper end of the Z-axis (link to the object on Thingiverse).
To make sure the Z-axis is running smoothly, you can remove it from the stepper motor mount and rotate it. If the loose end of the axis does not stay in one place when rotating, the Z-axis is still crooked or not properly stabilized.
Stabilize Stepper Motors, Bearings, Axes and Print Bed
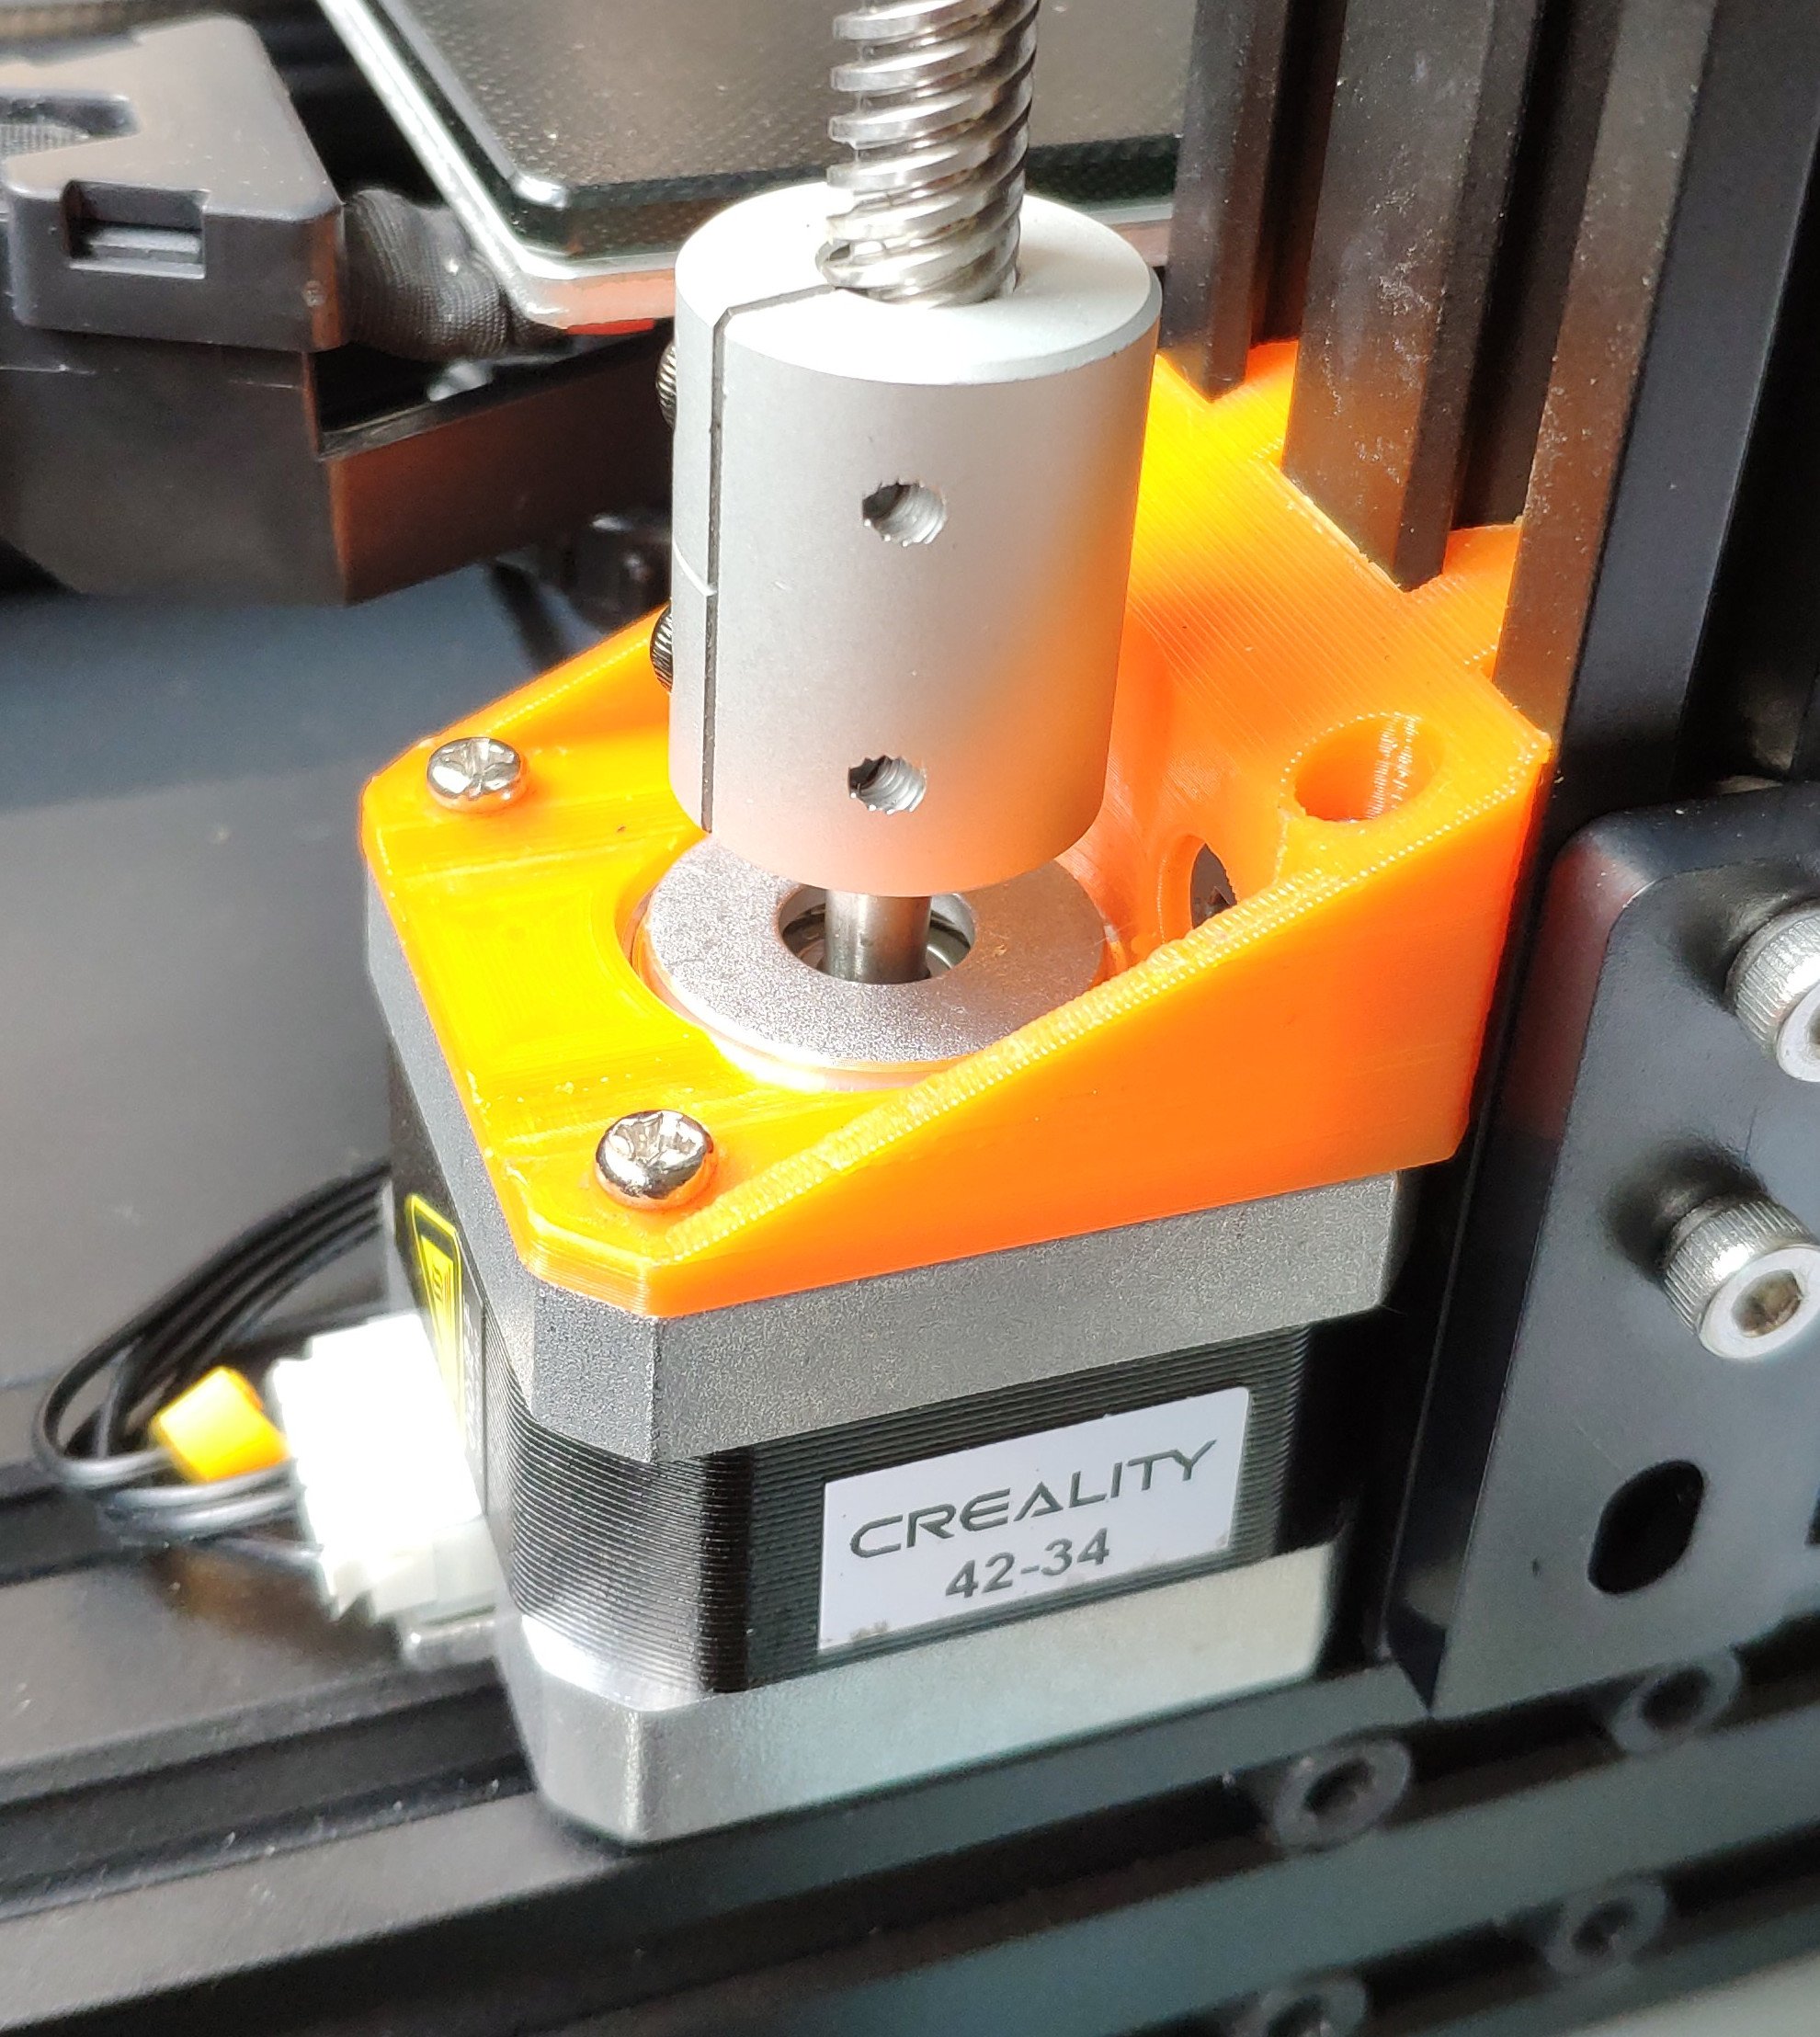
If you can’t get the suspension for the stepper motor bent straight or it keeps wobbling, you can print a new one yourself (link to the object on Thingiverse).
As a further measure, you should rule out a wobbly print bed. To do this, check the screws of the wheels and retighten the timing belt.
Use Magic Numbers for the Layer Thickness
The Magic Numbers on the Ender 3 (V2/Pro) are multiples of 0.04 mm. The stepper motor of the Z-axis moves the Z-axis by 0.04 mm per step. The number is called Magic Number because it seems like magic when the print result suddenly turns out perfect, although you have only changed the layer thickness a little bit.
In some cases, it can happen that layer thicknesses that do not correspond to multiples of this number are printed irregularly. Especially in the earlier versions of the Ender 3 series, this was a frequent problem. In the meantime, this error is becoming rarer and rarer, since the slicers also take these numbers into account and have already set the Magic Numbers in their standard profiles.
The Magic Number of 0.04 mm results in the following ideal layer thicknesses for the Ender 3 series:
- 0.08 mm
- 0.12 mm
- 0.16 mm
- 0.20 mm
- 0.24 mm
Try setting your slicer profile to one of these thicknesses and see if that improves your results. Learn more about the perfect Ender 3 Cura profile in this article: Best Cura Settings for the Ender 3 – Guide & List
Clean the Nozzle
Irregular extrusion can also cause z banding on the Ender 3. By far the most common cause of irregular extrusion is a clogged or only partially clogged nozzle.
So if your z banding is irregular and doesn’t appear in perfectly defined frequencies, you should clean the nozzle completely once or even replace it. You can clean your nozzle with special tools*, acetone*, and several other methods that you can read about in this article: Clogged 3D Printer Nozzle Cleaning | Needle, Acetone & Co.
Other Solutions
Avoid drafts: Liquid and solidifying filament is sensitive to cold air currents. With inhomogeneous cooling, the filament solidifies differently and can sometimes result in thicker or thinner layers. Therefore, make sure that the object is not hit by air currents and print a draft shield or build other obstacles for the air currents. A 3D printer enclosure* would be ideal.
Tighten all screws: Even if you have checked the entire Z-axis and maybe even the print bed, you should make sure that all screws on the 3D printer are tight enough. If any part of the 3D printer vibrates uncontrollably, it will directly affect your print result.
Use a different filament: In rare cases, the low-quality filament is also to blame for z banding. Make sure you use a high-quality filament that has a uniform diameter along its entire length.
If the diameter of the filament is not the same at all points, this will directly affect the layer thickness of your object.
Tight but loose wheels: The wheels on all three axes should be able to move freely. Make sure that they are tightened enough so that they do not wobble.
Grease the Z-axis: The Z-axis of the Ender 3 is well greased from the factory. However, if you have been working on it a lot, a lot of the grease will end up on your hands. To keep the Z-axis moving smoothly, you should grease it again.
Z Banding / Z Wobble Test
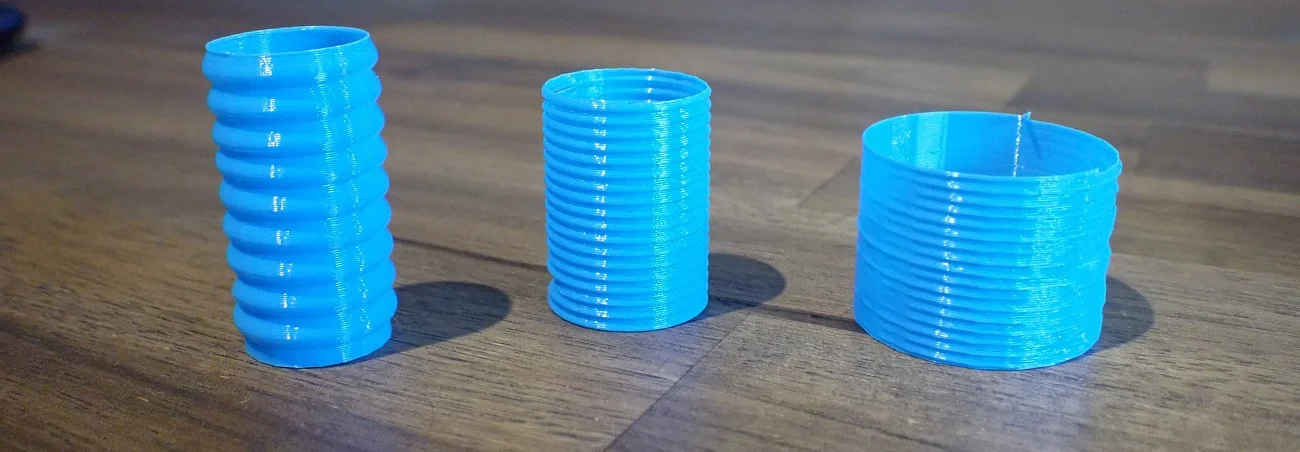
Z-Wobble Test on my X-Max 
Z-Wobble Test with a negative result by Balaji040 via Thingiverse
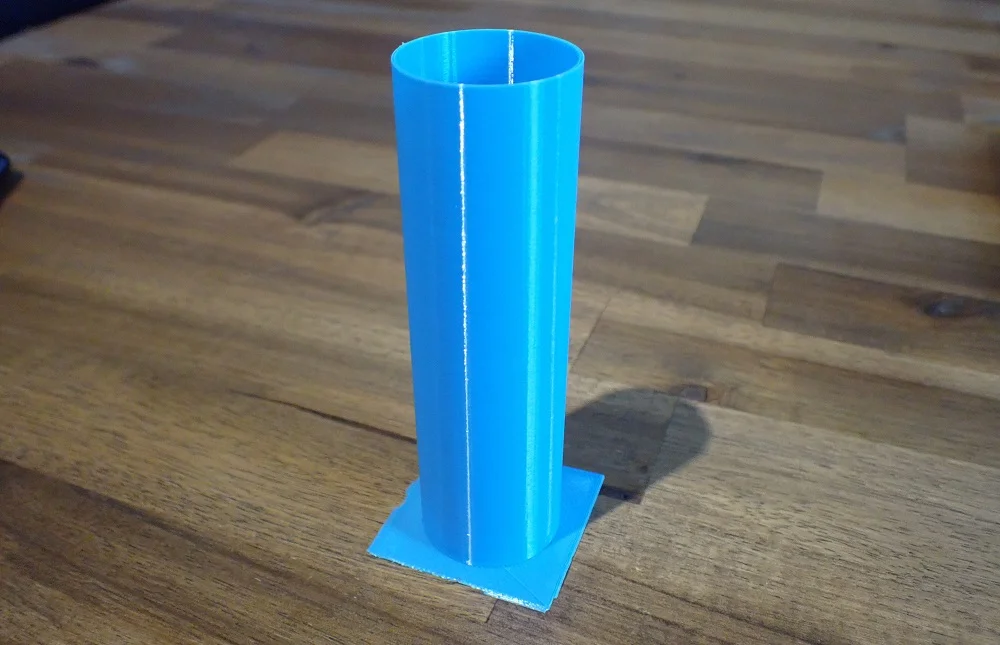
To test if your solution worked, you can do a very simple test print. Tuxcat at Thingiverse has created a very simple test print for this (link to the object).
The test print is basically a vertical hollow cylinder. If you still have z wobble or inconsistent extrusion, you will see z banding on the smooth surface of the cylinder.
Disclosure: This website is the property of Martin Lütkemeyer and is operated by Martin Lütkemeyer. Martin Lütkemeyer is a member of the Amazon Services LLC and other Affiliate Programs. These are affiliate advertising programs designed to enable websites to earn advertising revenue through advertising and linking to Amazon.com and others. Links marked with * are affiliate links.
