
- Wet Filament: Prevention, Symptoms & Drying - July 18, 2024
- Sovol SV08 – Best PrusaSlicer Settings & Profile - June 26, 2024
- Sovol SV08 – Best Orca Slicer Settings & Profile - June 26, 2024
Disclosure: Links marked with * are Affiliate Links. I earn from qualifying purchases if you decide to make a purchase through these links – at no additional cost for you!
The M420 S1 G-Code is built into the Start G-Code commands in the slicer’s machine settings. The command reads the print bed leveling data so that it can be used during printing to compensate for the tilt of the print bed.
G-Code can be confusing if you’ve never had to deal with it before. Especially with the otherwise very simple user interfaces of slicers, defining G-Code snippets in the machine settings can be a bit overwhelming – especially if you want to create your own slicer profile.
Therefore, this article serves to explain the M420 S1 G-Code. You will learn in this article its effect, when to use it and with which other G-Code commands it is related and how it can be combined with them correctly.
Table of Contents:
Key Takeaways
- M420 S1 = Print bed leveling data is used for printing.
- M420 S1 is mostly used after G28 (homing), because G28 deactivates the print bed leveling.
- For a 3D printer without automatic or semi-automatic print bed leveling, the M420 S1 G-Code command has no effect.
What Does the M420 S1 G-Code Do?
The M420 S1 G-Code causes the 3D printer to use the data from the print bed leveling for the started 3D print. The print bed leveling state is activated by this G-Code (M420 = “bed leveling state”; S1 = “enabled”).
However, the M420 S1 G code does not cause the print bed leveling to be executed. It only reads the data from the print bed leveling. So if your 3D printer does not have a print bed leveling and you have to do it manually, this G-Code does nothing.
Without this G-Code, the automatic print bed leveling of your 3D printer would be useless, because it would not be used for printing. If you want to create your own 3D printer profile in your slicer and your 3D printer has an automatic or semi-automatic print bed leveling, you should therefore make sure to insert this G-Code.
Since the 3D printer only accesses data through this command to apply it to the print, you won’t see any specific movements at the beginning of the 3D print like you would with the G28 G-Code (move to home position).
The M420 S1 command is divided into the M420 G-Code and the S1 parameter. Since G-Code is a kind of programming language, the exact order and notation of the command is very important.
How and Where is the M420 S1 G-Code Activated?
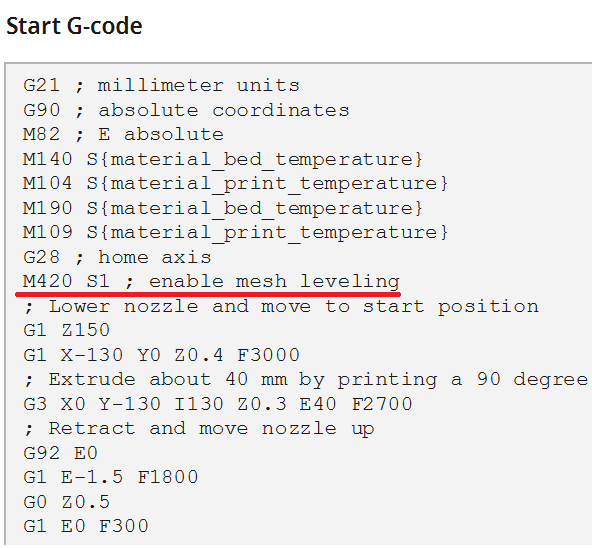
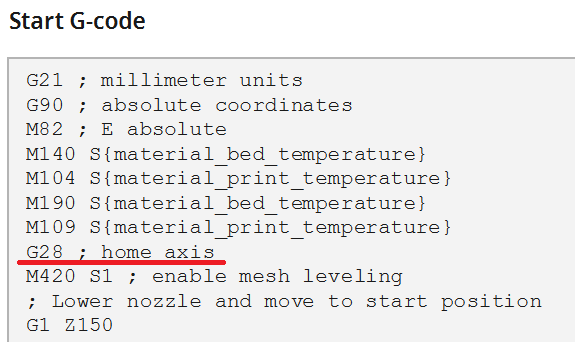
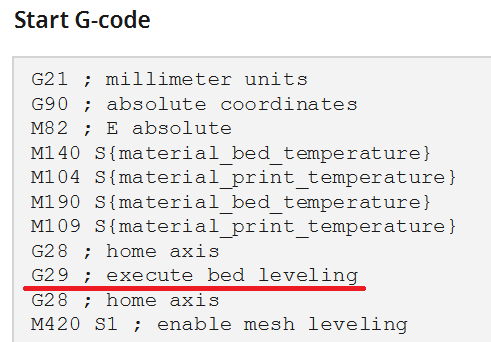
The M420 S1 G-Code is usually entered directly after defining the units and the temperature parameters in the Start G-Code. The Start G-Code can be found in the machine settings of the respective printer.
To access the machine settings in Cura, go to “Settings” > “Printer” > “Manage Printers…”. This will open a list of 3D printers that you have added in Cura. Then click on the 3D printer where you want to insert the G-Code and go to “Machine Settings”.
In the machine settings, you can define basic settings such as the size of the print volume, the shape of the print bed and other values. In the lower part of the machine settings, you can find the Start and End G-Code.
You insert the M420 S1 command directly after the G28 command so that the 3D printer can load the data from the print bed leveling after moving to the home positions.
Comments are always very helpful when programming so that you still know later what the individual commands are there for. In G-Code, anything to the right of a semicolon is considered a comment. I have written behind my M420 S1 command “enable mesh leveling”.
Do I Need M420 S1 After G28?
The G28 G-Code command moves to the home position. In addition, the print bed leveling is deactivated. With the M420 S1 G-Code, the print bed leveling can be activated again afterward.
If your 3D printer has an automatic print bed leveling, you should definitely write the M420 S1 command into the start G-Code after moving to the home position, i.e. the G28 G-Code command. Otherwise, the print bed leveling remains deactivated and the inclination of the print bed is not compensated during printing.
Most 3D printers with automatic print bed leveling will automatically include the M420 S1 command after the G28 command when creating/loading standard profiles. However, if you want to create your own slicer profile, be sure to follow the order so that your 3D printer can apply the values from the print bed leveling when printing.
If you are unsure whether the following commands in the Start G-Code disable the print bed leveling, it does not hurt to write the M420 S1 command again in the G-Code. Since the parameter “S” can only change between 1 and 0, two “S1” commands will not disable it.
Do I Need M420 S1 After G29?
The G29 G-Code starts the automatic print bed leveling before each print if it is in the start G-Code of the printer in the slicer. After that, the M420 S1 G-Code is not necessary, because the data of the leveling are already available and used.
The print bed leveling that is started by the G29 command corresponds to the strategy that you have defined in the configuration file. If nothing has been defined, the G-Code does nothing.
You can define the strategy for the print bed leveling in the configuration file by different commands. The stored data can be retrieved via the M420 S1 command. For modern 3D printers with built-in automatic leveling, this is usually already done. Otherwise here are the respective commands:
- Mesh-based Leveling:
- Mesh Bed Leveling:
#define MESH_BED_LEVELING
An interactive print bed leveling for 3D printers without a sensor. The leveling is supported via the menu and is done with the paper method. - Auto Bed Leveling (Bilinear):
#define AUTO_BED_LEVELING_UBL
A bilinear print bed leveling with or without a sensor. - Unified Bed Leveling:
#define AUTO_BED_LEVELING_BILINEAR
A bilinear print bed leveling with sensor with many options for adjustments.
- Mesh Bed Leveling:
- Matrix-based Leveling:
- Auto Bed Leveling (Linear):
#define AUTO_BED_LEVELING_LINEAR
A linear leveling of the print bed with or without a sensor. - Auto Bed Leveling (3-Point):
#define AUTO_BED_LEVELING_3POINT
A three-point leveling with or without sensor.
- Auto Bed Leveling (Linear):
Other M420 G-Code Parameters
The M420 G-Code can be used to recall and/or set the leveling state of the print bed. According to this G-Code, various parameters can be used to change or recall the leveling data.
After the M420 G-Code commands, various parameters can follow to access the print bed leveling data.
- [C<bool>]: The C here stands for “center“. You can create a new center point in the mesh of the print bed leveling data with C1. This new center point is calculated as the average of the highest and the lowest point.
- [L<int>]: With this command, you can select a specific entry of the data. For example, L3 would be the third entry. With this command, the third record from the EEPROM data is used for the print bed leveling.
- [S<bool>]: With S1, the stored data is used for print bed leveling during printing. With S0 the print bed leveling is deactivated. If no data set is available, as with 3D printers without automatic print bed leveling, nothing happens.
- [T<0|1|4>]: This parameter is used to output the data from the print bed leveling in different formats. T0 stands for human readable, T1 for CSV, and T4 for compact.
- [V<bool>]: The V stands for “Verbose.” With the V1 parameter, the stored data of the print bed leveling are output and displayed.
- [Z<linear>]: The Z stands for “Z fade height“. With this parameter, you can weaken the correction of the print bed leveling the higher the print head is. As soon as the set value is reached, the leveling is no longer applied.
M420 S1 vs. G29
The difference between the two G-Codes M420 S1 and G29 is that G29 performs the print bed leveling and saves the data for 3D printing afterward and M420 S1 only activates the data from a previous leveling for 3D printing.
So if you use G29 before each 3D print, you don’t need the M420 S1 command, because the 3D printer will use the freshly created data.
If you only want to level your print bed occasionally, the M420 S1 G-Code is more suitable, as it uses the data generated by the last leveling for the current print.
However, be aware that the command for the home position (G28) deactivates the print bed leveling again. So if you approach the home position again with G28 after the G29 command, you should reload the data from the leveling with M420 S1.
Here you can read more about the differences between M420 S1 and G29.
G29 vs. G28
The G29 G-Code command executes the print bed leveling. The G28 command moves the printhead to the home position. The relationship between these two commands is that G28 disables print bed leveling.
The G28 command moves the three axes of the 3D printer to the home position one after the other. In doing so, it moves on the axis to the zero point until it reaches the end stop.
The G28 command should be in every startup G-Code. If a 3D printer is not in its home position before it runs the rest of its G-Code, it will most likely come to the end of at least one axis. This could then become relatively noisy and possibly end in a crash.
Summary
In this article, you learned what the M420 S1 command does, how to use it, and how it behaves with related G-Code commands.
Print bed leveling is essential for a good result in 3D printing. Without a well-leveled print bed, the first layer of the object will not adhere well enough to the print bed.
With the M420 S1 command in the Start G-Code of your 3D printer, you can make sure that it uses the data from the last print bed leveling for the print. Make sure that it always comes after the G28 command (home position), as this command disables the print bed leveling.
Disclosure: This website is the property of Martin Lütkemeyer and is operated by Martin Lütkemeyer. Martin Lütkemeyer is a member of the Amazon Services LLC and other Affiliate Programs. These are affiliate advertising programs designed to enable websites to earn advertising revenue through advertising and linking to Amazon.com and others. Links marked with * are affiliate links.
