- Wet Filament: Prevention, Symptoms & Drying - July 18, 2024
- Sovol SV08 – Best PrusaSlicer Settings & Profile - June 26, 2024
- Sovol SV08 – Best Orca Slicer Settings & Profile - June 26, 2024
Disclosure: Links marked with * are Affiliate Links. I earn from qualifying purchases if you decide to make a purchase through these links – at no additional cost for you!
Perfect prints with the Elegoo Neptune 4 Pro come down to one thing: correct Cura settings. If they’re off, so is your print. Nail them, and you’re in the clear. This guide is all about getting those settings right. Ready to start? Let’s dive in.
I’ve put the Neptune 4 Pro through its paces. Spent hours testing, tweaking, adjusting. All to dial in each setting for perfect print quality. The settings you’ll find in this article? They’re the result of that hard work. They’re your shortcut to awesome prints.
Need more information on how to calibrate these settings? No worries. You can refer to this post for a detailed guide. Alternatively, consider checking out my 3D printing course. It’s comprehensive, easy to follow, and will ramp up your printing game.
| PLA | ABS | TPU | PETG | |
|---|---|---|---|---|
| Print Temperature | 225 °C | 245 °C | 220 °C | 250-270 °C |
| Print Bed Temperature | 60 °C | 90 °C | 70 °C | 70-75 °C |
| Speed | 250 mm/s | 250 mm/s | 40-80 mm/s | 200 mm/s |
| Retraction | 0.5 mm at 45 mm/s | 0.5 mm at 45 mm/s | 0.5-1.0 mm at 35-45 mm/s | 0.5 mm at 40 mm/s |
| Cooling | 100 % | 0-20% | 100 % | 50-100 % |
Table of Contents:
How to Create a Profile for the Neptune 4 Pro in Cura
To create a profile for the Neptune 4 Pro in Cura, you start by defining machine settings. That’s your printer’s build volume, nozzle size, and other specifics. Then you set the print settings. These include temperature, speed, and such things.
Your goal: match these settings to your material. PLA, ABS, TPU, or PETG, each one requires different settings. The profile you create in Cura stores these settings.
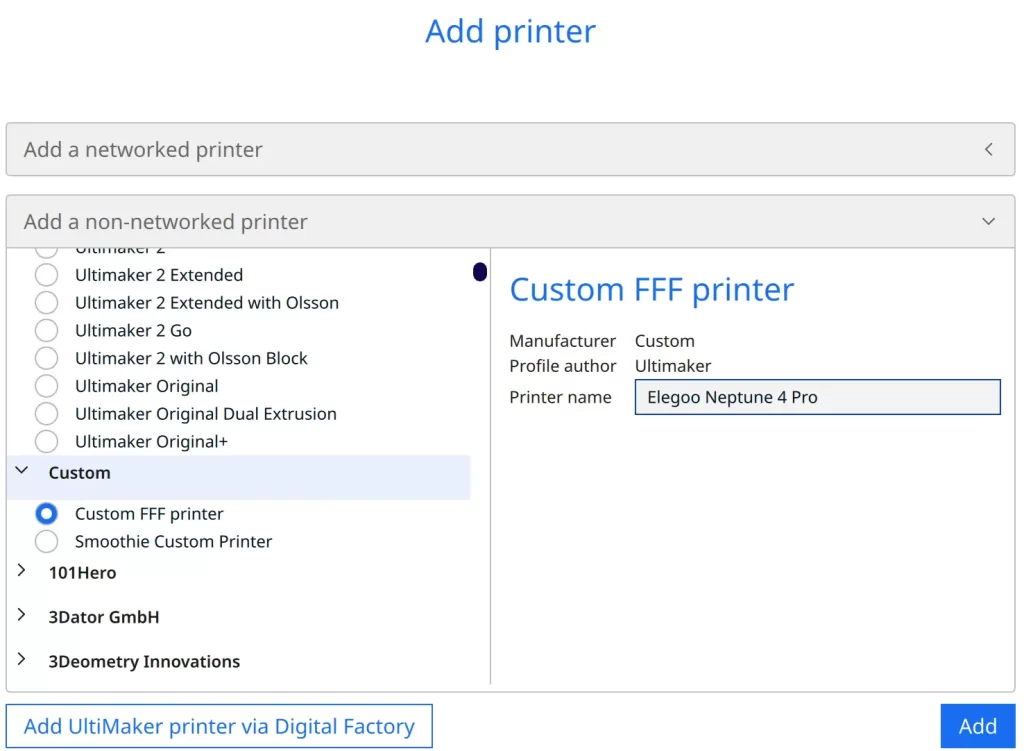
To add a 3D printer in Cura, follow these simple steps:
- Click on ‘Settings’ in the top menu.
- Navigate to ‘Printer’.
- Select ‘Add Printer’ from the dropdown menu.
- In the next window, click on ‘non-networked printer’.
- Choose ‘Custom’ and then ‘Custom FFF printer’.
- Finally, type in the name of your printer and click ‘Add’
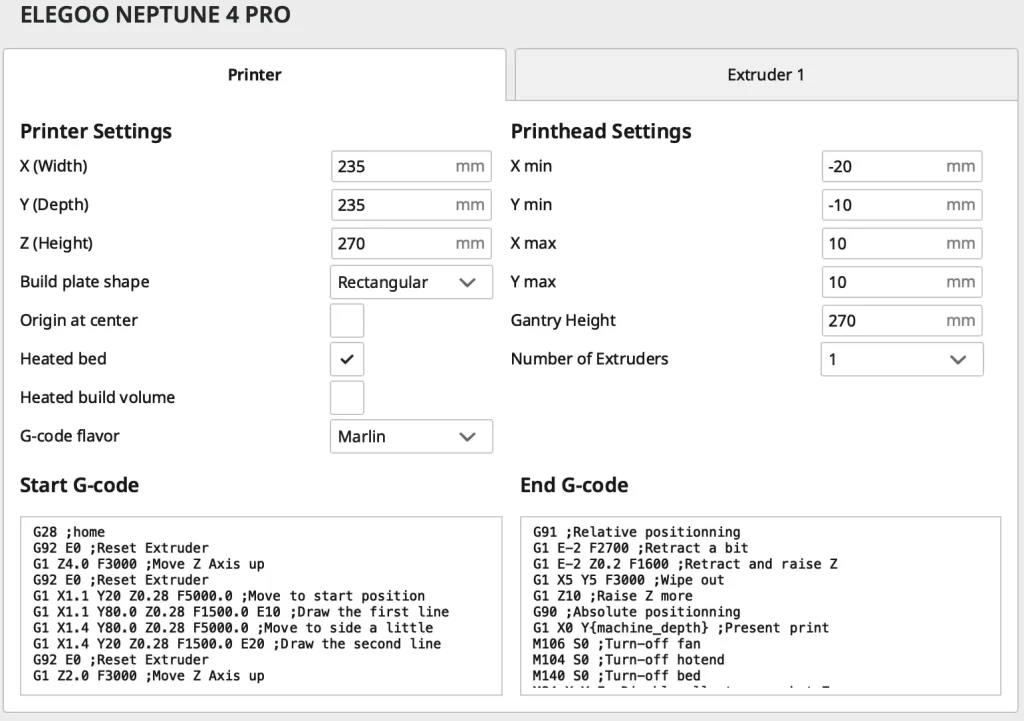
In the ‘Machine Settings’ of Cura, you will find several parameters to set for your printer. These include the build volume dimensions (X, Y, Z), nozzle size, and other specifics unique to your printer model.
Here, input the appropriate values for your Neptune 4 Pro, which you can refer to in the screenshot and the G-Code down below.
Start G-Code:
- G28 ;home
- G92 E0 ;Reset Extruder
- G1 Z4.0 F3000 ;Move Z Axis up
- G92 E0 ;Reset Extruder
- G1 X1.1 Y20 Z0.28 F5000.0 ;Move to start position
- G1 X1.1 Y80.0 Z0.28 F1500.0 E10 ;Draw the first line
- G1 X1.4 Y80.0 Z0.28 F5000.0 ;Move to side a little
- G1 X1.4 Y20 Z0.28 F1500.0 E20 ;Draw the second line
- G92 E0 ;Reset Extruder
- G1 Z2.0 F3000 ;Move Z Axis up
End G-Code:
- G91 ;Relative positionning
- G1 E-2 F2700 ;Retract a bit
- G1 E-2 Z0.2 F1600 ;Retract and raise Z
- G1 X5 Y5 F3000 ;Wipe out
- G1 Z10 ;Raise Z more
- G90 ;Absolute positionning
- G1 X0 Y{machine_depth} ;Present print
- M106 S0 ;Turn-off fan
- M104 S0 ;Turn-off hotend
- M140 S0 ;Turn-off bed
- M84 X Y E ;Disable all steppers but Z
These settings are crucial to ensure that the software can accurately slice your 3D model for your specific printer. Once these settings are correctly entered, Cura will save them, making it easier for future prints. Remember, each printer model is unique, and so are its settings.
After you’ve set up your printer profile, it’s time to define your print settings. These settings include parameters like print speed, layer height, print temperature, and more. These values vary depending on the material you’re using.
Remember, each type of filament – PLA, ABS, PETG, TPU – requires a specific set of print settings. Make sure to adjust these settings to match your chosen material and achieve optimal print results. Just like with the printer profile, Cura will save these settings for future use.
You can find more information on how to create a 3D printer profile in Cura and what you need to pay attention to in this article: How to Create a Custom 3D Printer Profile in Cura
PLA Settings
These are the correct Cura settings for the Neptune 4 Pro for PLA:
- Print temperature: 225 °C
- Print bed temperature: 60 °C
- Print speed: 250 mm/s
- Retraction: 0.5 mm at 45 mm/s
- Cooling: 100%
- First layer: 5-10 mm/s, 0% cooling, 100% extrusion width, 100% layer height
Retraction is key in avoiding stringing or oozing during 3D printing. For the Neptune 4 Pro using PLA filament, a retraction setting of 0.5 mm at 45 mm/s worked best for me.
Other settings such as print temperature, print speed, and cooling also play vital roles. These are set at 225 °C, 250 mm/s, and 100% respectively for optimal PLA printing.
These settings for the Neptune 4 Pro using PLA filament are a solid baseline. They’re not set in stone, rather, they serve as a starting point for fine-tuning.
Optimal print outputs often require calibration. Each 3D print job has unique characteristics and may need specific print settings.
Keep tweaking these settings until you achieve the best results. With time and practice, you’ll find the perfect calibration for your 3D print projects.
I tested these settings with different PLA filaments. They delivered excellent results each time, making them reliable for various PLA prints.
ABS Settings
These are the correct Cura settings for the Neptune 4 Pro for ABS:
- Print temperature: 245 °C
- Print bed temperature: 90 °C
- Print speed: 250 mm/s
- Retraction: 0.5 mm at 45 mm/s
- Cooling: 0-20% + enclosure
- First layer: 5-10 mm/s, 0% cooling, 100% extrusion width, 100% layer height
ABS filament is widely used in 3D printing. However, printing with ABS is not easy. Its properties pose certain challenges during the printing process.
It requires higher temperatures and better cooling management. Furthermore, ABS tends to warp, making adhesion a bit tricky. It’s advised to experiment with different settings to achieve the best results.
The Neptune 4 Pro printer lacks an enclosure. Yet, it’s capable of printing small to medium objects without warping, provided you tweak the settings correctly. Keep refining until you achieve perfect prints.
To increase print bed adhesion for ABS without an enclosure, start by printing the first layer at a slower speed of 5-10 mm/s if you should have trouble on the PEI bed.
TPU Settings
These are the correct Cura settings for the Neptune 4 Pro for TPU:
- Print temperature: 220 °C
- Print bed temperature: 70 °C
- Print speed: 40-80 mm/s
- Retraction: 0.5-1.0 mm at 35-45 mm/s
- Cooling: 100%
- First layer: 5-10 mm/s, 0% cooling, 100% extrusion width, 100% layer height
TPU is a flexible filament used in 3D printing. The Neptune 4 Pro printer, equipped with a direct drive extruder, excels at printing TPU. This is largely due to the short distance between the motor and the hotend in a direct drive setup, which allows for better control of the filament.
Fine control is especially important when printing flexible filaments like TPU to prevent buckling and ensure accurate extrusion.
TPU printing necessitates a slower pace than rigid filaments. This is due to its flexible nature, which requires careful handling during the printing process.
The provided settings, tested on the Neptune 4 Pro printer, serve as a solid starting point. Make sure to adjust and fine-tune as per your specific needs for optimal results.
PETG Settings
These are the correct Cura settings for the Neptune 4 Pro for PETG:
- Print temperature: 250-270 °C
- Print bed temperature: 70-75 °C
- Print speed: 200 mm/s
- Retraction: 0.5 mm at 40 mm/s
- Cooling: 50-100%
- First layer: 5-10 mm/s, 0% cooling, 100% extrusion width, 100% layer height
PETG stands out as a preferred choice in 3D printing due to its ease of use and stability. Its properties combine the strengths of ABS and PLA, blending the toughness and heat resistance of the former with the printability of the latter. Despite its strength, PETG is relatively easy to print, making it a viable option for various applications.
However, PETG tends to string, which requires dry storage and calibration of print temperature and retraction.
The above settings have been thoroughly tested by me with the Neptune 4 Pro and are designed to give good print quality for most standard PETG filaments.
Don’t be afraid to adjust these settings slightly to find what works best for your specific situation. Remember, achieving the best print quality isn’t solely about using preset settings; it also involves understanding how each parameter interacts with the others and making the necessary adjustments.
Best Cura settings for the Neptune 4 Pro
After providing an overview of my settings for different filaments, we will now delve deeper into the specific settings and the calibration process. This following section will guide you on how to tweak and fine-tune these settings to achieve optimal print quality for your specific use-case.
Print Temperature
The best printing temperatures for the Neptune 4 Pro in Cura:
- PLA: 225 °C
- ABS: 245 °C
- TPU: 220 °C
- PETG: 250-270 °C
Setting the print temperature incorrectly can cause a range of issues that deteriorate the quality and structural integrity of the 3D printed object. If the temperature is set too high, the filament can overheat. Overheated filament can flow out of the nozzle in an uncontrolled manner and cause blobs or strings.
Conversely, if the temperature is too low, the filament may not melt properly. This can lead to issues such as under-extrusion, where not enough material is laid down during the print. Consequently, this may result in weak, brittle prints that lack the required strength and detail.
Furthermore, an incorrectly set temperature can affect bed adhesion. Overheated filament tends to curl up from the print bed, especially at the corners, causing a problem known as “warping“. On the other hand, filament that’s not heated enough won’t stick to the print bed properly, leading to failed prints.
Lastly, the incorrect temperature can lead to more extreme issues, such as a complete nozzle blockage. Overheated filament can sometimes carbonize and stick to the inside of the nozzle, blocking it entirely. Resolving this requires disassembling and cleaning the nozzle, or in worst cases, replacing it entirely, which can be time-consuming and expensive.
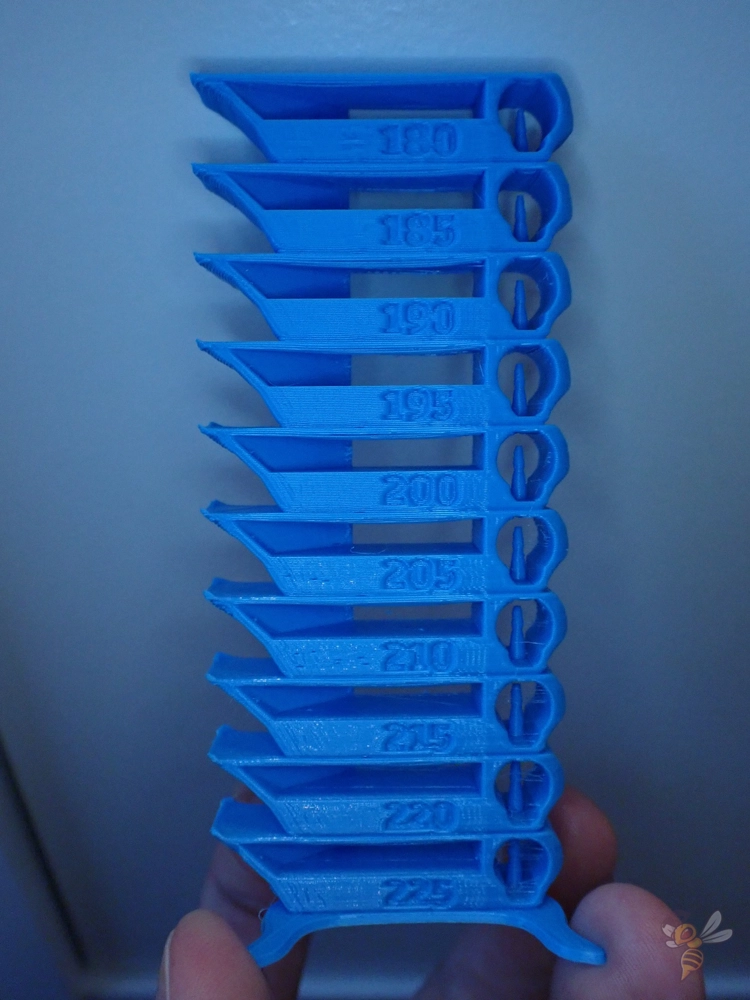
To calibrate the print temperature for an FDM 3D printer, a temperature tower is an invaluable tool. It’s a 3D model designed specifically to test different temperatures in one print, helping you determine the optimal temperature for your filament. The tower consists of several layers, each assigned a different temperature in the printing software.
After printing, examine the temperature tower closely. Look for signs of over or under extrusion, discoloration, or poor surface texture. The layer printed at the temperature where the quality is the highest indicates the optimal temperature setting.
Remember, what you’re seeking is a balance: the print temperature should be high enough to properly fuse the filament layers, yet not so high it induces overheating issues.
Print Bed Temperature
The best print bed temperatures for the Neptune 4 Pro in Cura:
- PLA: 60 °C
- ABS: 90 °C
- TPU: 70 °C
- PETG: 70-75 °C
Aiming for the highest possible print bed temperature can help to ensure optimal layer adhesion and print quality. However, it is critical to avoid exceeding the recommended temperature range for your specific filament type, as this could lead to a common 3D printing issue termed as “elephant foot“. This occurs when the initial layers of your print expand outwards due to the excessive heat, resulting in a bulging base that resembles an elephant’s foot.
To mitigate this, start with the recommended bed temperatures for your filament type and gradually increase in small increments, monitoring your prints closely. If you notice the onset of the “elephant foot” phenomenon, reduce the temperature slightly. This method allows you to find the highest temperature that provides the best print quality without leading to unwanted deformations.
Finding the right bed temperature for the Neptune 4 Pro is straightforward due to the exceptional adhesion properties of its PEI coating. This coating promotes strong adherence between the print and the bed, thus reducing the chances of warping throughout the printing process.
The bed temperatures outlined above for each filament type have been tested and proven effective, providing a good starting point for your prints. With these values as your guide, achieving optimal print adhesion becomes a less daunting task.
Print Speed
The best print speed for the Neptune 4 Pro in Cura:
- PLA: 250 mm/s
- ABS: 250 mm/s
- TPU: 40-80 mm/s
- PETG: 200 mm/s
Excessive print speeds can lead to common 3D printing issues known as ringing and ghosting. When the print head moves too quickly, vibrations can cause wavy lines on your print, known as ringing.
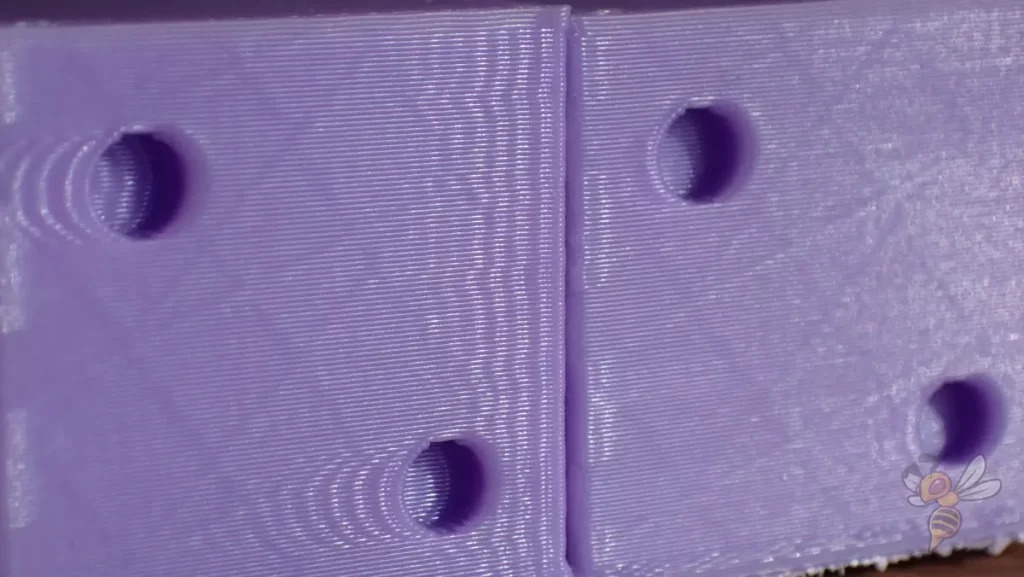
Ghosting, another speed-related issue, appears as echoes or shadows of sharp corners on the printed object. Both ringing and ghosting can degrade the aesthetic quality and precision of your 3D prints.
The Neptune 4 Pro boasts impressive print speeds, thanks to the integration of Klipper firmware. Klipper optimizes the movement of the print head, allowing for higher speeds without sacrificing quality.
However, the print speeds listed above were what worked best in my experience. Striking a balance between speed and quality ensures that you consistently achieve top-notch 3D prints with the Neptune 4 Pro.
Layer Height
The best layer heights for the Neptune 4 Pro in Cura:
- Decorative objects: 0.1 mm
- Standard: 0.2 mm
- Coarse, fast prints: 0.3 mm and higher
The layer height plays a pivotal role in determining the quality of your 3D prints. With the Neptune 4 Pro’s 0.4 mm nozzle, you can adjust this parameter to achieve prints that meet your specific needs.
A layer height of 0.1 mm is ideally suited for decorative objects. This lower value yields higher resolution prints with smoother surfaces, essential for aesthetic appeal in decorative pieces.
For standard print tasks, a layer height of 0.2 mm is typically appropriate. At this height, the printer strikes a balance between detail and printing speed, making it suitable for general use prints.
When speed is a priority over fine detail, a layer height of 0.3 mm or higher is recommended. These coarse, fast prints may lack the smoothness of lower layer heights, but they make up for it in significantly reduced printing times.
Flow Rate
The optimal flow rate in Cura for the Neptune 4 Pro is:
- Default value: 100%
- For over-extrusion: 90% to 99%
- For under-extrusion: 101% to 110%
The flow rate is a critical factor in 3D printing, impacting both the quality and reliability of your prints. This value, set in Cura for the Neptune 4 Pro, controls the amount of filament that is extruded during printing.
The default value is set at 100%, but adjustments may be needed based on certain printing conditions.
For instance, if you’re experiencing over-extrusion, where too much filament is being pushed through the nozzle, leading to blobs and strands on the printed object, it might be beneficial to reduce the flow rate. Values between 90% and 99% can help alleviate this issue, resulting in smoother, cleaner prints.
Conversely, under-extrusion can be just as problematic. This occurs when not enough filament is being extruded, leaving gaps in the print. In these circumstances, increasing the flow rate to between 101% and 110% can help ensure a more consistent, solid print.
As always, these values serve as starting points and may need further adjustment based on your specific printing situation.
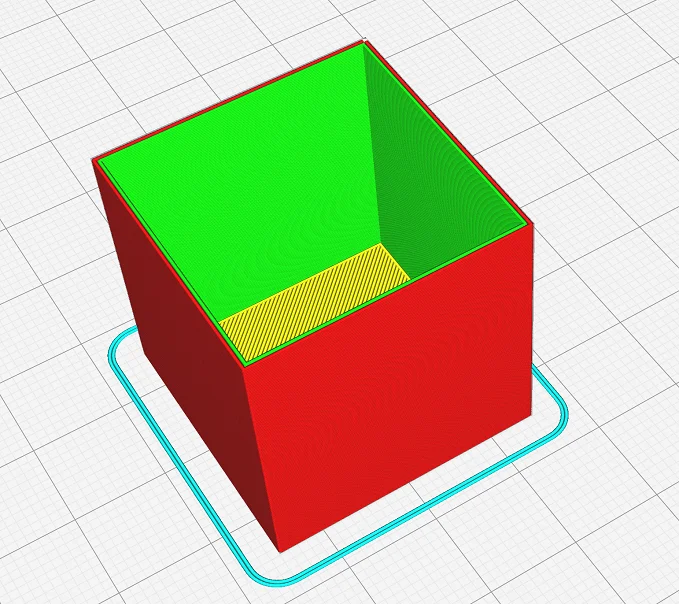
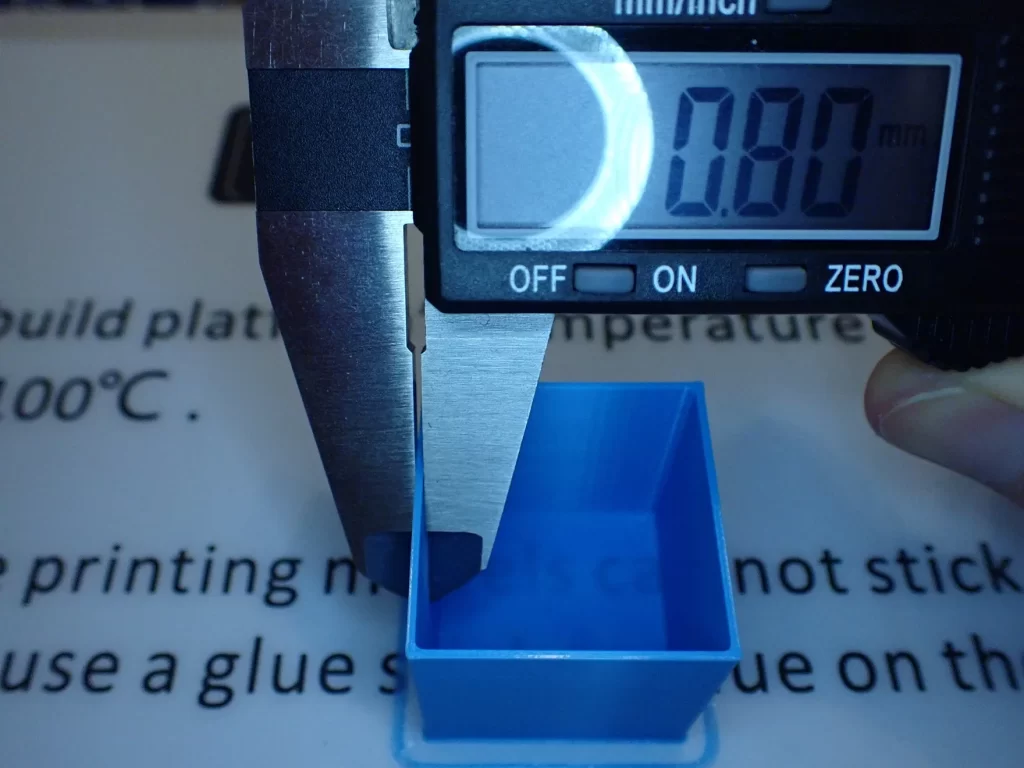
Calibrating the flow rate is a key step in achieving precision in 3D printing. The process commences by printing a test object, typically a hollow cube with two walls. This cube serves as a tangible metric to gauge whether the flow rate is set correctly for optimal printing.
Once the cube is printed, the next step is to measure the thickness of its walls. It’s important to make this measurement as accurately as possible, using tools like a digital caliper. After getting the measurement, you divide it by 2. This value is the actual wall thickness.
The final step is to compare the actual wall thickness with the slicer wall thickness. If the two values match or are very close, your flow rate is correctly calibrated. However, if there’s a significant discrepancy, adjustments to the flow rate might be necessary.
Remember, the aim is to get these two thicknesses as close to each other as possible for the best print quality.
Retraction
The best retraction settings for the Neptune 4 Pro in Cura:
- PLA: 0.5 mm at 45 mm/s
- ABS: 0.5 mm at 45 mm/s
- TPU: 0.5-1.0 mm at 35-45 mm/s
- PETG: 0.5 mm at 40 mm/s
If the retraction settings are not optimized properly, it can lead to an issue known as stringing. This is where thin strands of filament are left behind, creating a web-like structure between parts of the print that should be separate.
These strings can significantly degrade the visual quality of your prints, requiring extensive post-processing or even causing the print to fail. The suggested retraction settings for the Neptune 4 Pro in Cura for PLA are a great place to start in minimizing stringing.
However, remember that these are just starting points. Different filament brands, colors, and types can all react differently, which means that the optimal settings can vary.
These settings worked perfectly for me, but that does not mean they are perfect for your filament/printer combination.
Therefore, it’s crucial to carry out calibration tests for your particular filament and printing conditions. Ensuring your retraction settings are correctly dialed in will help attain prints of the highest possible quality.
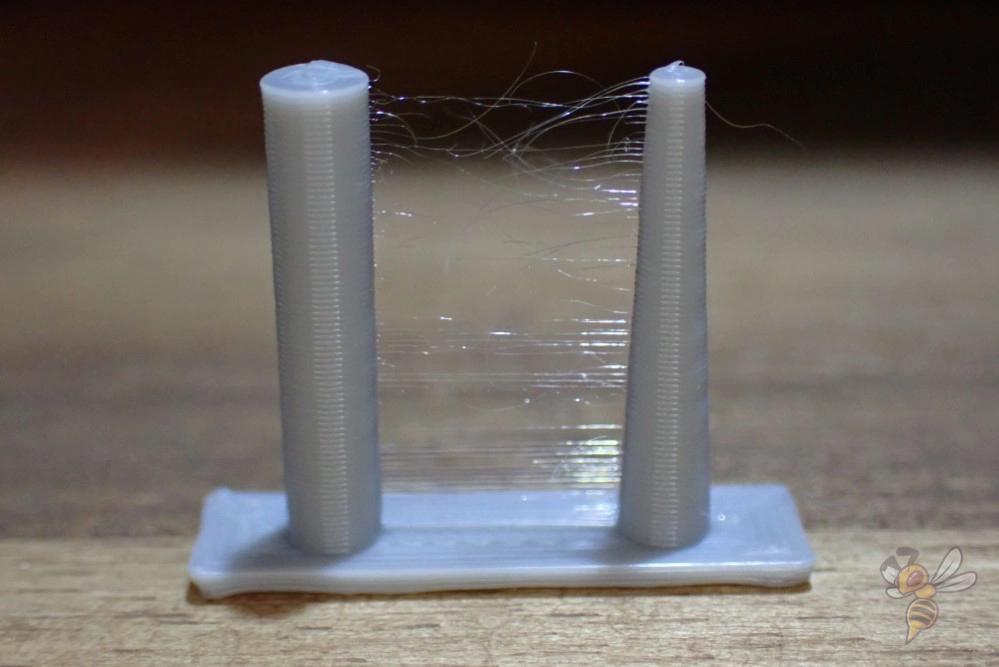
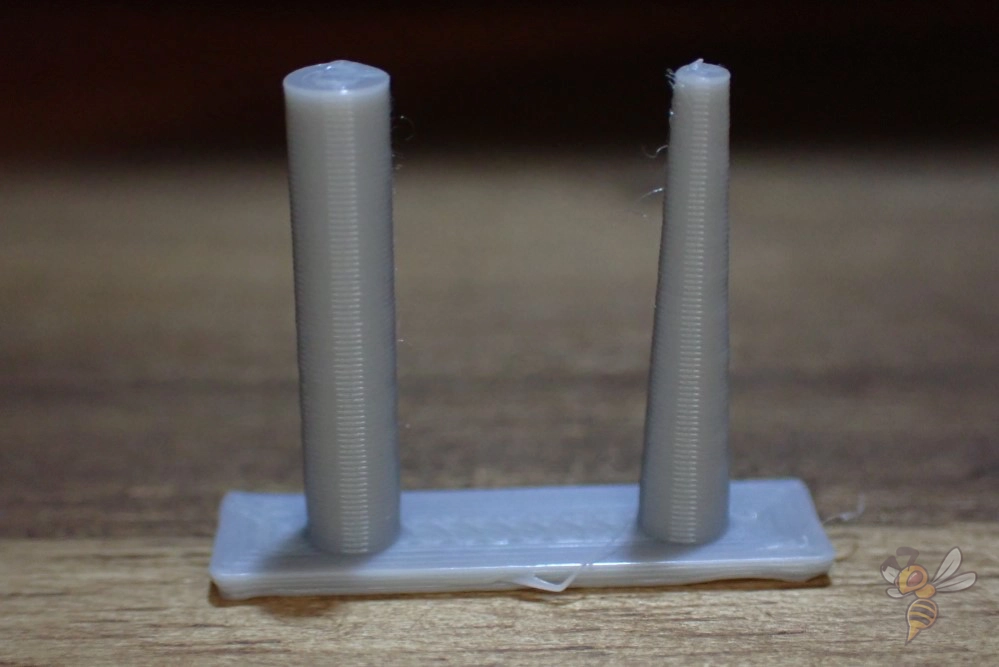
Calibrating retraction settings for your 3D printer involves a series of trials and adjustments. You can start this process by printing a simple object with two columns and adjusting one retraction setting at a time.
Focus first on adjusting the retraction distance. Print the test object with the initial retraction distance, then incrementally increase or decrease the value according to the results. Whilst you may be tempted to make large adjustments, it is crucial to make changes in small steps to find the perfect balance.
Next, consider the retraction speed. Again, print the test object and adjust the retraction speed. Similar to retraction distance, make gradual adjustments to the speed to find the setting that gives the best outcome.
Remember, perfecting retraction settings is an iterative process, and it might take several tests to achieve optimal results. But, the effort spent in calibration will pay off in the form of high-quality, string-free prints.
Infill
The best infill density for the Neptune 4 Pro in Cura:
- Decorative objects: 0-15%
- Standard objects: 15-50%
- Stable objects: 50-100%
The infill density percentages mentioned above are a general guideline for printing objects with the Neptune 4 Pro in Cura. For decorative items, a low infill of 0-15% is adequate since these items don’t need to bear any load and are primarily for display purposes. Keeping the infill low also helps conserve filament and reduces the time taken for printing.
On the other hand, if you’re printing standard objects that might need to bear some load, it’s recommended to have an infill density of 15-50%. This strikes a balance between strength and the amount of filament used. Again, the exact percentage within this range can be fine-tuned based on specific requirements of the object being printed.
Stable objects that are intended to bear significant load or to be functional parts should ideally be printed with a high infill density of 50-100%. A high infill ensures the object is sturdy and durable.
But keep in mind, the higher the infill, the more filament is used, and the longer the print will take. Always consider these factors when deciding the optimal infill density.
First Layer
These are the best Cura settings for the first layer with the Neptune 4 Pro:
- Layer height: 100-200% of normal layer height (higher values to increase print bed adhesion)
- Line width: 100-200% of normal line width (higher values to increase print bed adhesion)
- Print temperature: Same as the rest of the object, or 5-10 °C higher for better print bed adhesion.
- Print speed: 50% of normal print speed (i.e. 25 mm/s for a normal print speed of 50 mm/s) or 5-10 mm/s for high print bed adhesion
- Flow rate: 100-110% (higher values in case of poor print bed adhesion)
- Raft/Brim/Skirt: Not necessary, since the Neptune 4 Pro has a PEI print bed and already extrudes a line at the edge of the print bed due to the start G-code.
The temperature of the filament as it adheres to the print bed significantly influences the overall adhesion of the 3D print. Warmer filament can bond more efficiently with the print bed, ensuring a sturdy base for the object being printed.
This thermal bonding process is particularly critical for the first layer, as it serves as the foundation for the entire print. A higher temperature during the initial layer formation can enhance adhesion, providing a stable starting point for the subsequent layers of filament.
The primary aim of the above settings for the first layer is to extend the period during which the filament remains viscous, thereby enhancing the bonding between the filament and the print bed. By adjusting parameters like layer height, line width, print temperature, print speed, and flow rate, the filament’s viscosity is controlled and sustained for an optimal duration.
Conclusion
In conclusion, the Neptune 4 Pro is an outstanding 3D printer that excels in terms of performance and quality. Its PEI print bed, high-speed capability, and solid construction make it a reliable tool for creating precise, high-resolution 3D prints.
However, achieving perfection in 3D prints with the Neptune 4 Pro requires meticulous adjustment of the Cura settings (as with any other 3D printer). The right balance in parameters such as print temperature, print speed and retraction is critical in ensuring optimal print quality.
I sincerely hope that the detailed Cura settings in this article have proved beneficial for your 3D printing endeavors with the Neptune 4 Pro. If you still encounter any difficulties, remember that there are additional resources available. The course mentioned at the start of this post offers comprehensive guidance on optimizing your 3D printing process and ensuring perfect results.
Disclosure: This website is the property of Martin Lütkemeyer and is operated by Martin Lütkemeyer. Martin Lütkemeyer is a member of the Amazon Services LLC and other Affiliate Programs. These are affiliate advertising programs designed to enable websites to earn advertising revenue through advertising and linking to Amazon.com and others. Links marked with * are affiliate links.

