- Wet Filament: Prevention, Symptoms & Drying - July 18, 2024
- Sovol SV08 – Best PrusaSlicer Settings & Profile - June 26, 2024
- Sovol SV08 – Best Orca Slicer Settings & Profile - June 26, 2024
Disclosure: Links marked with * are Affiliate Links. I earn from qualifying purchases if you decide to make a purchase through these links – at no additional cost for you!
The Anycubic Kobra Max is a great 3D printer with a huge print volume and excellent print quality – as long as the correct slicer parameters are set. Without these customized settings, it is difficult to use the full potential of the Anycubic Kobra Max.
Although there is a ready-made profile for the Anycubic Kobra Max in Cura, it does not deliver very good results. In addition, the default profile contains incomplete machine settings.
In this article, I share my personally optimized Cura settings for the Anycubic Kobra Max. I have carefully tested and adjusted these settings to give you a solid foundation for high-quality printing results.
However, perfect printing results require calibration for the respective filament. Every material behaves differently during 3D printing, and only by making fine adjustments can you get the best out of your Kobra Max. For more detailed information on calibration, please visit my comprehensive calibration guide or my specialized 3D printing course.
| PLA | ABS | TPU | PETG | |
|---|---|---|---|---|
| Printing temperature | 195 °C | 230 °C | 210 °C | 230 °C |
| Print bed temperature | 60 °C | 80 °C | 60 °C | 70 °C |
| Print bed speed | 60 mm/s | 60 mm/s | 30 mm/s | 60 mm/s |
| Retraction | 6 mm with 40 mm/s | 7 mm with 40 mm/s | 8 mm with 60 mm/s | 7 mm with 50 mm/s |
| Cooling | 100 % | 0% | 100 % | 50-100 % |
Table of Contents:
How to Create a Cura Profile for the Anycubic Kobra Max
The Cura profile consists of the machine settings and print settings. The machine settings define basic information about your 3D printer, such as dimensions and print head configuration, while the print settings consist of specific parameters such as temperature and speed.
The machine settings must be defined first.
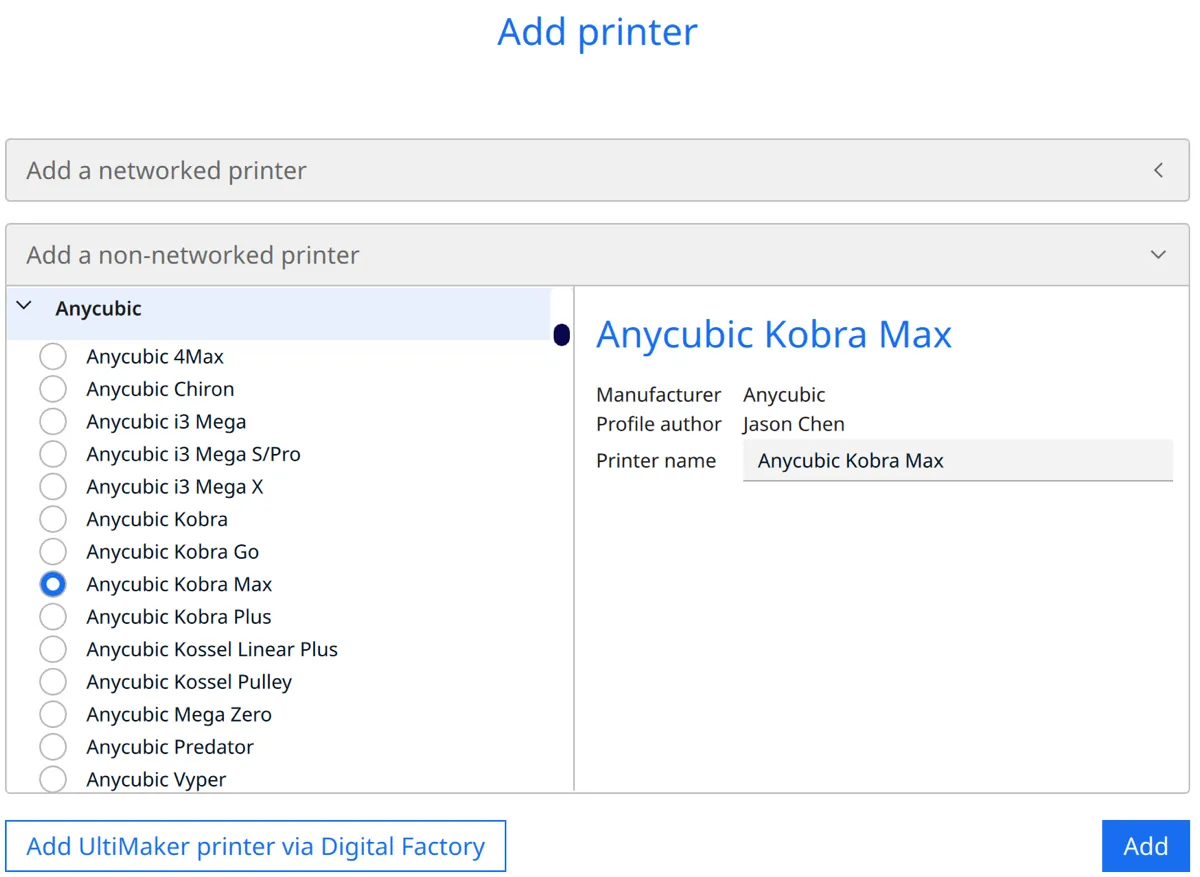
To add the Kobra Max in Cura, click on ‘Settings’, then ‘Printer’ and ‘Add printer’. Select ‘Non-networked printer’ and then ‘Anycubic’ followed by ‘Anycubic Kobra Max’. Then click on ‘Add’.
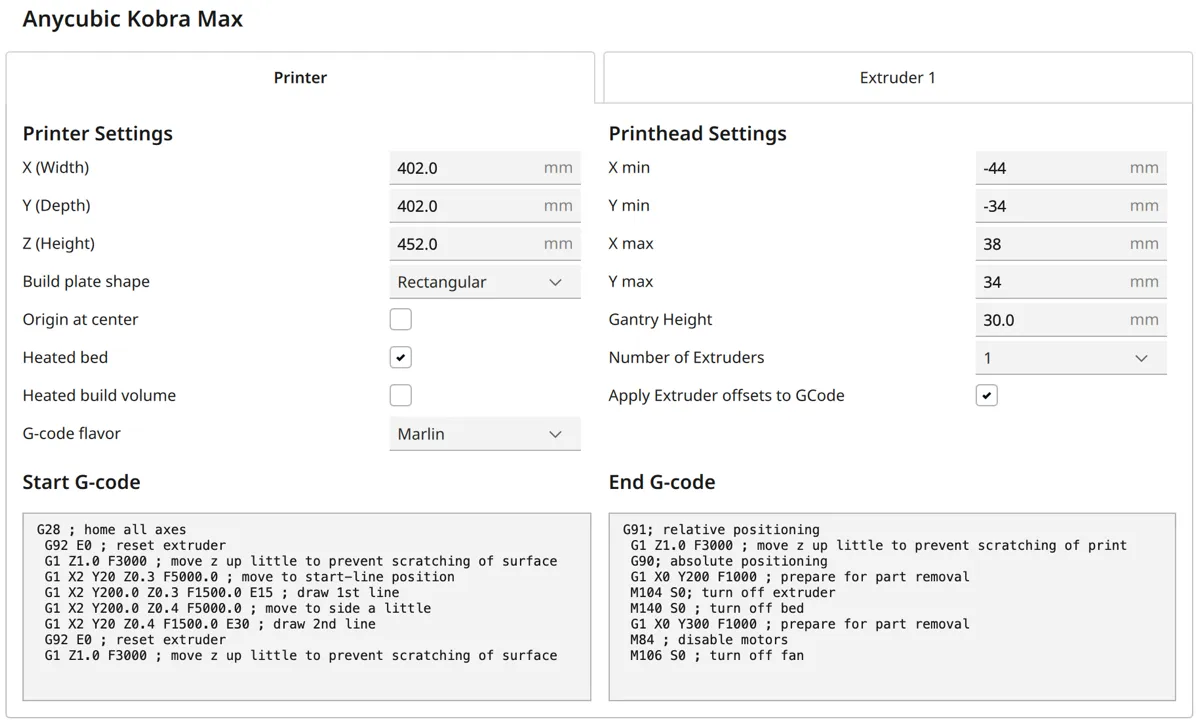
The machine settings are shown in the screenshot above. The G-code snippets are listed again directly after this to make it easier to copy them:
Start G-Code:
- G28 ; home all axes
- G92 E0 ; reset extruder
- G1 Z1.0 F3000 ; move z up little to prevent scratching of surface
- G1 X2 Y20 Z0.3 F5000.0 ; move to start-line position
- G1 X2 Y200.0 Z0.3 F1500.0 E15 ; draw 1st line
- G1 X2 Y200.0 Z0.4 F5000.0 ; move to side a little
- G1 X2 Y20 Z0.4 F1500.0 E30 ; draw 2nd line
- G92 E0 ; reset extruder
- G1 Z1.0 F3000 ; move z up little to prevent scratching of surface
End G-Code:
- G91 ; relative positioning
- G1 Z1.0 F3000 ; move z up little to prevent scratching of print
- G90; absolute positioning
- G1 X0 Y200 F1000 ; prepare for part removal
- M104 S0 ; turn off extruder
- M140 S0 ; turn off bed
- G1 X0 Y300 F1000 ; prepare for part removal
- M84 ; disable motors
- M106 S0 ; turn off fan
After you have created the printer profile, you have to define the print settings. These settings are crucial for the quality of your print result, as they specify the print temperature, bed temperature, print speed and cooling, among other things. Each material has its own optimal settings, which you can adjust individually to achieve the best possible results.
You can find more information on how to create a 3D printer profile in Cura and what you need to pay attention to in this article: How to Create a Custom 3D Printer Profile in Cura
PLA Settings
These are the correct Cura settings for printing PLA filament with the Anycubic Kobra Max:
- Print temperature: 195 °C
- Print bed temperature: 60 °C
- Print speed: 60 mm/s
- Retraction: 6 mm with 40 mm/s
- Cooling: 100 %
The above settings are an excellent starting point. You may find that minor adjustments are needed to customize the results to your specific filament.
In the remaining sections of this article, I will discuss how you can fine-tune or calibrate the most important settings to further optimize print quality.
ABS Settings
These are the correct Cura settings for printing ABS filament with the Anycubic Kobra Max:
- Print temperature: 230 °C
- Print bed temperature: 80 °C
- Print speed: 60 mm/s
- Retraction: 7 mm with 40 mm/s
- Cooling: 0 %
ABS is a strong and durable filament, but it comes with some challenges when printing. One of these challenges with the Anycubic Kobra Max is the lack of an enclosure. Without an enclosure, it can be difficult to maintain the constant and high temperature required for ABS, which can lead to warping or poor layer adhesion.
You can usually achieve good results when printing smaller objects in ABS with the Kobra Max. One way to improve the print quality of larger objects is to use a draft shield in Cura. This creates a kind of barrier around the object and helps to minimize temperature fluctuations and ensure a more even ambient temperature during the printing process.
TPU Settings
These are the correct Cura settings for printing TPU filament with the Anycubic Kobra Max:
- Print temperature: 210 °C
- Print bed temperature: 60 °C
- Print speed: 30 mm/s
- Retraction: 8 mm with 60 mm/s
- Cooling: 100 %
The Anycubic Kobra Max is equipped with a Bowden extruder, which requires some consideration when printing flexible filaments such as TPU. Bowden extruders can make handling flexible materials a little more challenging, as the longer path of the filament from the extruder to the print head requires more precision, especially during retraction.
Nevertheless, the Kobra Max is perfectly capable of processing TPU as long as you pay attention to a few special settings. The print speed is particularly important with TPU. A slower speed helps with the flexibility of the material and ensures better print quality.
Retraction settings are also crucial as they prevent the flexible material from jamming in the Bowden tube and prevent excessive stringing. By adjusting these settings, you can achieve relatively good results with TPU even with a Bowden extruder.
PETG Settings
These are the correct Cura settings for printing PETG filament with the Anycubic Kobra Max:
- Print temperature: 230 °C
- Print bed temperature: 70 °C
- Print speed: 60 mm/s
- Retraction: 7 mm with 50 mm/s
- Cooling: 50-100 %
PETG is an interesting filament that occupies a kind of middle position between PLA and ABS, both in terms of printability and strength. It combines the ease of use of PLA with the strength and heat resistance of ABS.
Unfortunately, a negative characteristic of PETG is its tendency to string, i.e. fine threads between the printed parts.
The retraction settings are particularly important with PETG to minimize this stringing. These settings must be carefully calibrated to find the perfect balance between sufficient retraction and excessive filament retraction.
It is also important to store PETG in a dry place as it is hygroscopic and absorbs moisture from the air, which can lead to printing problems.
The Best Cura Settings for the Anycubic Kobra Max
Print Temperature
The best printing temperatures for the Anycubic Kobra Max in Cura:
- PLA: 195 °C
- ABS: 230 °C
- TPU: 210 °C
- PETG: 230 °C
An incorrectly set printing temperature can cause various problems, such as poor layer adhesion, warping or excessive stringing. The values given in this article are a good starting point and should give good results for most filaments. However, it is important to optimize these temperatures for the particular filament used to achieve perfect results.
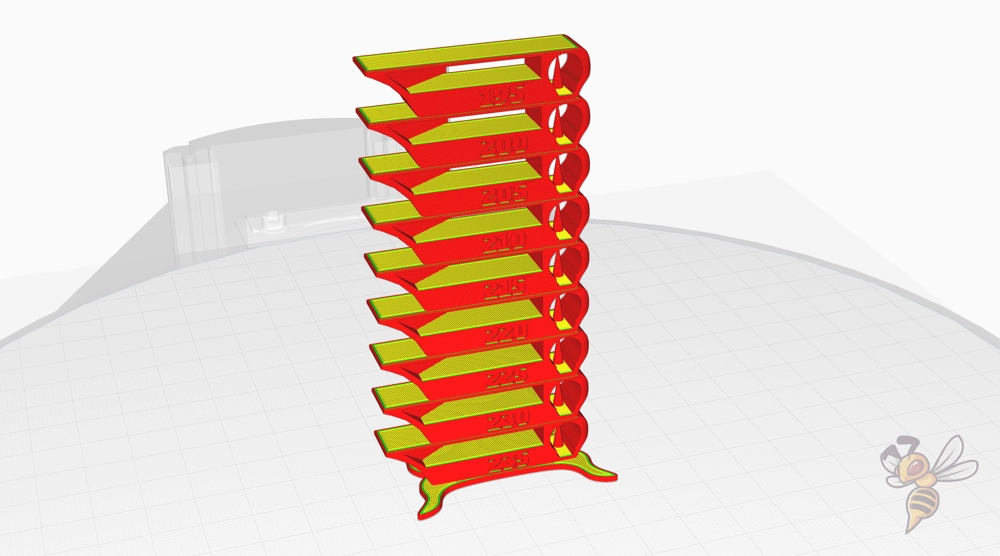
Calibrating the print temperature can be done effectively with a temperature tower. This is a test print that is printed at different heights with different temperatures.
This allows you to visually assess at which temperature your filament delivers the best results. Adjusting the print temperature is a key element in maximizing the quality of your 3D prints.
Print Bed Temperature
The best print bed temperatures for the Anycubic Kobra Max in Cura:
- PLA: 60 °C
- ABS: 80 °C
- TPU: 60 °C
- PETG: 70 °C
The correct print bed temperature is crucial for the first layer of the print, as it influences the adhesion of the material to the print bed.
However, too high a print bed temperature can lead to a so-called elephant foot. This printing defect occurs when the lower layers of the print are heated too much and expand, resulting in a widening at the base of the object. This creates a misshapen, wide base, similar to an elephant’s foot, which affects the accuracy and appearance of the printed object.
The above values should work reliably with the Kobra Max. If you still have problems with print bed adhesion, you can take a look at this article: 3D Print Not Sticking to the Bed: How to Fix it Step-by-Step
Print Speed
The best print speeds for the Anycubic Kobra Max in Cura:
- PLA: 60 mm/s
- ABS: 60 mm/s
- TPU: 30 mm/s
- PETG: 60 mm/s
An incorrectly set print speed can have a significant impact on the quality of your prints. If the speed is too slow, not only will the printing time be unnecessarily extended, resulting in wasted time, but excessive heat exposure may also occur in certain areas.
On the other hand, too high a print speed can lead to printing errors such as ringing and ghosting. Ringing are vibrating lines or waves that appear around sharp corners or letters, while ghosting is a fainter echo of these patterns that appears in subsequent layers.
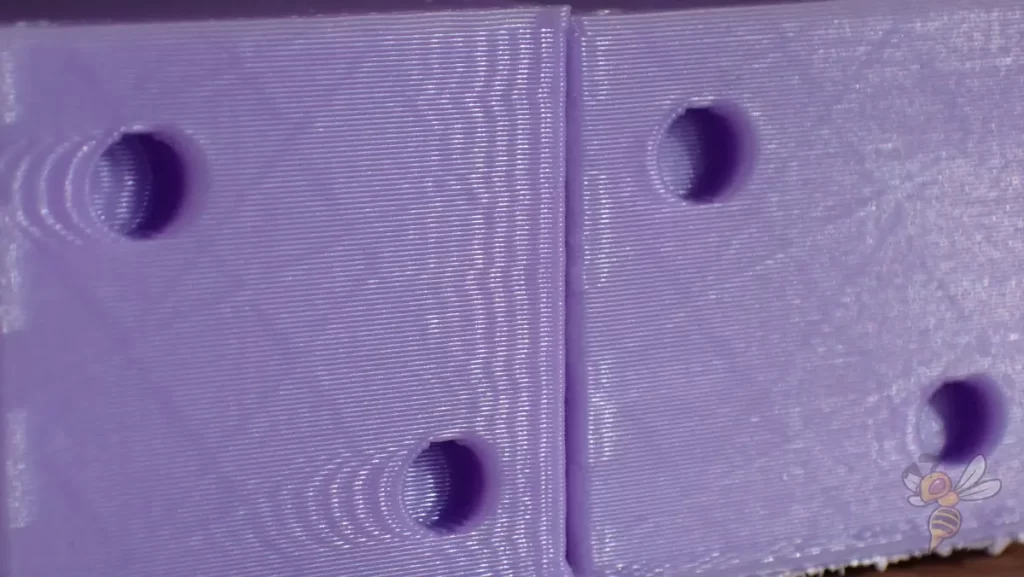
To calibrate the print speed, I recommend using a ringing test. Here you print a specific test pattern, typically containing sharp corners and perhaps text, at different speeds.
Start at the speed you normally use, and then gradually increase the speed for each series of tests. Observe the quality of the prints and pay particular attention to ringing or ghosting. As soon as these errors occur, you have reached the limit of the speed that your printer can still handle. The optimum speed is usually slightly below this value. This allows you to find a balance between efficient print speed and high print quality.
Layer Height
These are the best layer heights for the Anycubic Kobra Max in Cura:
- Decorative objects: 0.1 mm
- Standard: 0.2 mm
- Rough, fast prints: 0.3 mm
The choice of layer height is an important aspect of 3D printing, as it directly influences the print quality and speed. A layer height of 0.1 mm is ideal for finely detailed, decorative objects, as it enables a high resolution and smooth surfaces. However, this increases the printing time.
A layer height of 0.2 mm is the standard for most printing projects. This setting offers a good compromise between print speed and detail. It is well suited for general applications where both quality and efficiency are important.
For rough, fast prints where detail is less important and speed is more important, a layer height of 0.3 mm is a good choice. This setting significantly reduces the overall printing time, but is less suitable for objects where fine details are important.
Flow Rate
These are the best flow rates for the Anycubic Kobra Max in Cura:
- Standard: 100%
- For over-extrusion: 90% to 99%
- For under-extrusion: 101% to 110%
It is advisable to adjust the flow rate only after the print temperature and retraction have been correctly calibrated. These settings have a direct influence on the extrusion of the filament and therefore also on the need to change the flow rate.
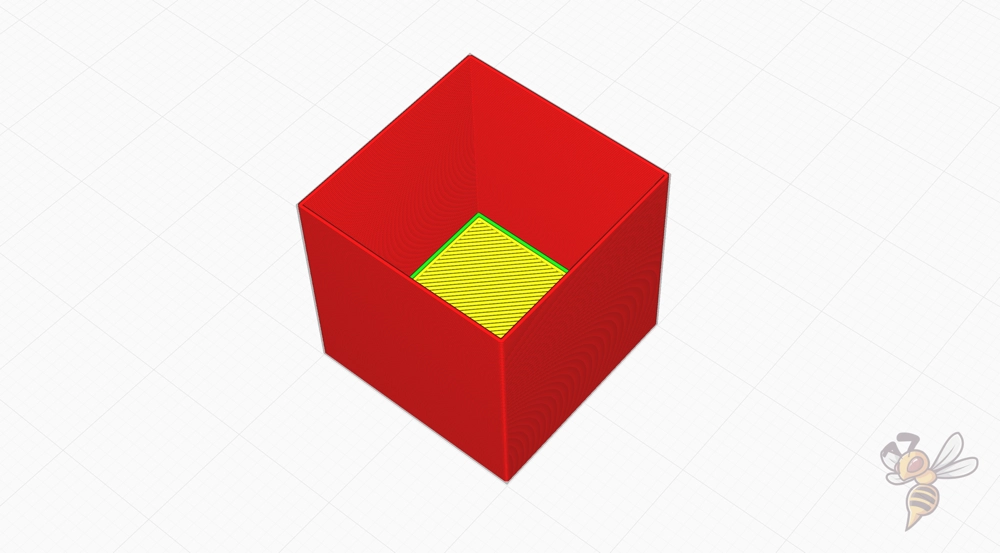
To calibrate the flow rate on a 3D printer, I use a cube without infill or top layers. Due to the absence of these elements, you can easily measure the wall thickness with a caliper after printing.
If the measured wall thickness does not match the wall thickness set in Cura, you will need to adjust the flow rate accordingly. A flow rate that is too high leads to over-extrusion, which can be seen in thicker walls, while a flow rate that is too low causes under-extrusion, which can be seen in thinner walls. Using this method, you can fine-tune the flow rate to improve the accuracy of your prints.
Retraction
The best retraction settings for the Anycubic Kobra Max in Cura:
- PLA: 6 mm at 40 mm/s
- ABS: 7 mm with 40 mm/s
- TPU: 8 mm with 60 mm/s
- PETG: 7 mm at 50 mm/s
An incorrectly set retraction can lead to various printing problems. Too little retraction can cause stringing, which creates thin threads between the parts of the print object. Too much retraction can lead to problems such as under-extrusion at the beginning of each new layer as the filament is pulled back too far.
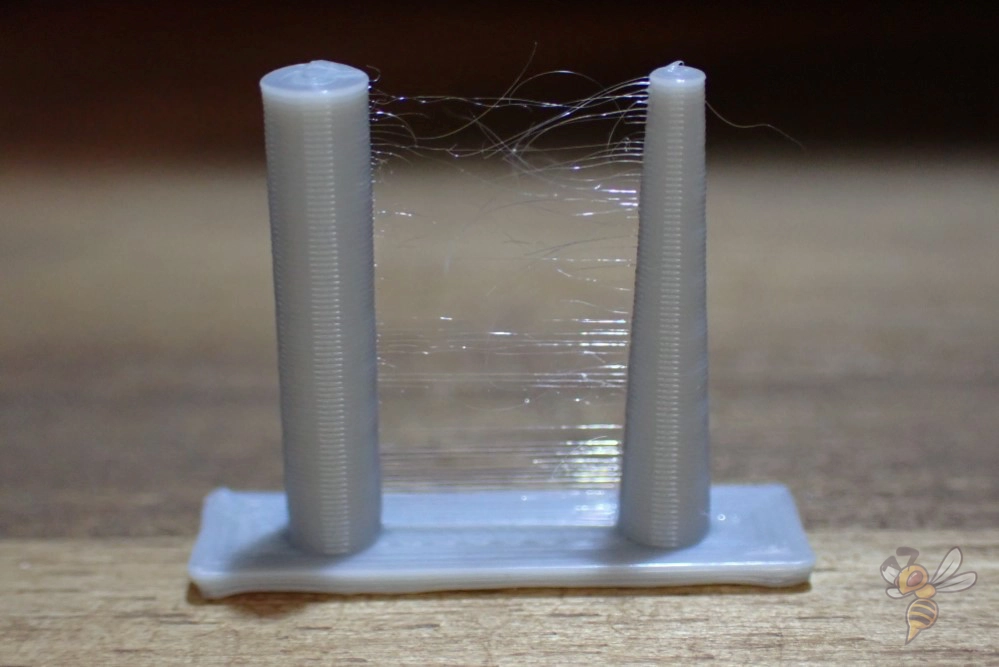
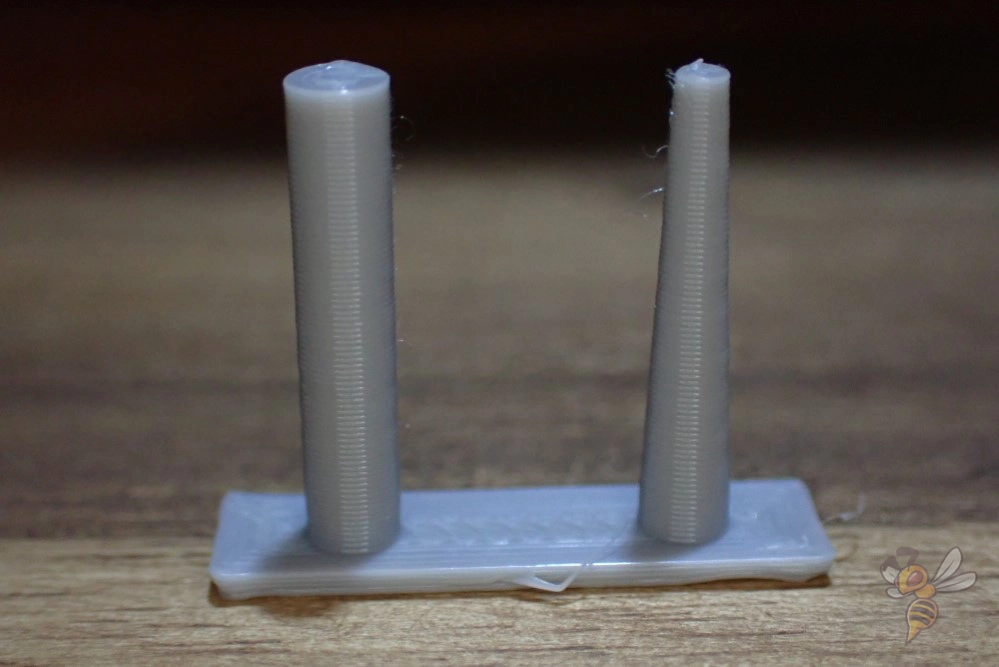
To set the retraction correctly, I use the calibration object from the Calibration Shapes plugin in Cura. I always print it after changing the retraction settings.
The most important settings are of course the retraction distance and the retraction speed. But never change both settings at the same time, because then you don’t know which of the changes led to the new print result.
Don’t be discouraged if the calibration takes a little longer. Sometimes you also have to calibrate the print temperature and the retraction in two successive passes.
Infill
The best infill density for the Anycubic Kobra Max in Cura:
- Decorative objects: 0-15%
- Standard objects: 15-50%
- Stable objects: 50-100%
A low infill density of 0-15% is often sufficient for decorative objects that primarily serve visual purposes and are not under load. This setting saves material and printing time while still providing enough stability to maintain the shape.
For standard objects that have to withstand a moderate load, an infill density of 15-50% is recommended. This range offers a good compromise between strength, material consumption and printing time.
For objects that need to be particularly stable and resilient, such as functional parts or tools, a high infill density of 50-100% is advisable. This increases the material consumption and the printing time, but you benefit from significantly higher strength and stability.
These infill density guidelines generally apply to all types of 3D printers and are not specific to the Anycubic Kobra Max.
First Layer
These are the best Cura settings for the first layer with the Anycubic Kobra Max:
- Layer height: 100%
- Line width: 100%
- Print temperature: Same as the rest.
- Print speed: 10 mm/s
- Raft/Brim/Skirt: Skirt.
The printing speed of the first layer plays a decisive role in adhesion to the print bed. A slower speed is often the most effective method to ensure strong adhesion. By applying the filament more slowly, it has more time to spread evenly and bond effectively to the surface of the print bed.
Another important aspect is the temperature of the filament during the first layer. The longer the filament stays hot, the better the adhesion. This is because the hot filament has more time to bond with the surface of the print bed, resulting in a stronger and more uniform first layer. These factors together contribute significantly to minimizing the risk of warping and peeling of the first layer from the print bed.
Summary
The Anycubic Kobra Max is a great 3D printer that can achieve excellent results with the right Cura settings. The settings shared in this article should serve as a solid foundation for you to optimize your print projects and get the most out of your printer. I hope you find this information helpful and that it improves your printing experience.
For more detailed information on calibration and further tips, I recommend you take a look at the calibration guide and 3D printing course mentioned at the beginning of this article. There you will find additional advice and instructions that can further deepen and refine your 3D printing skills.
Disclosure: This website is the property of Martin Lütkemeyer and is operated by Martin Lütkemeyer. Martin Lütkemeyer is a member of the Amazon Services LLC and other Affiliate Programs. These are affiliate advertising programs designed to enable websites to earn advertising revenue through advertising and linking to Amazon.com and others. Links marked with * are affiliate links.

