
- Wet Filament: Prevention, Symptoms & Drying - July 18, 2024
- Sovol SV08 – Best PrusaSlicer Settings & Profile - June 26, 2024
- Sovol SV08 – Best Orca Slicer Settings & Profile - June 26, 2024
Disclosure: Links marked with * are Affiliate Links. I earn from qualifying purchases if you decide to make a purchase through these links – at no additional cost for you!
The flow rate, i.e. the filament volume that is extruded per second, is a very important value in 3D printing. The flow rate must be calibrated correctly so that the actual line width matches the value in the slicer.
Flow Rate Compensation in Cura changes the flow rate without changing the actual value. This allows flow sensors to be bypassed to perfectly calibrate the flow rate without causing errors or warnings from the sensor.
Where to find these options, what they do and when to use them, you’ll learn in this detailed article.
Table of Contents:
Where do I find the “Flow Rate Compensation” in Cura?
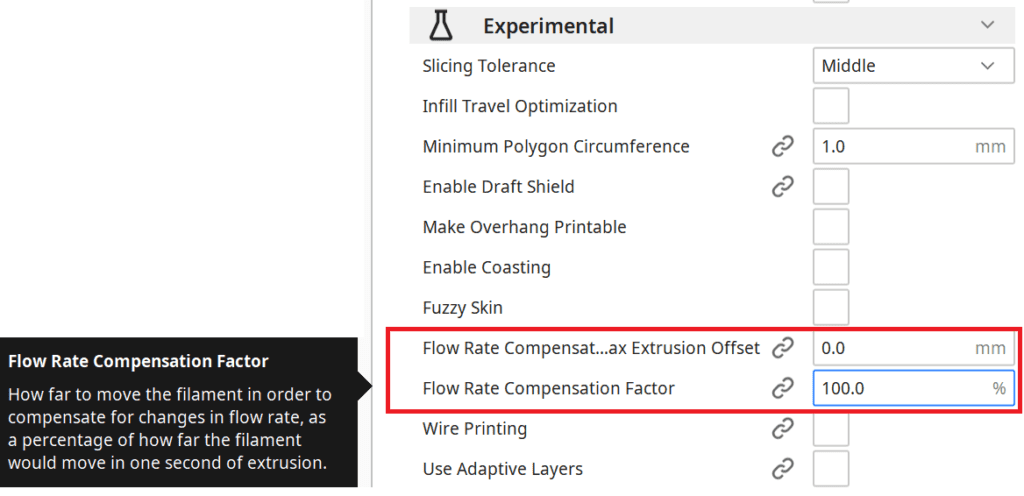
To compensate the flow rate or to activate the flow rate compensation, you have to go to the custom print settings in Cura. You will find the Flow Rate Compensation under the experimental settings.
If you don’t find the settings for the flow rate compensation there, you can change the visibility of individual options in the menu bar of Cura under Settings. By default only the most important settings are visible, many of the experimental settings you will only see when you activate them in the settings.
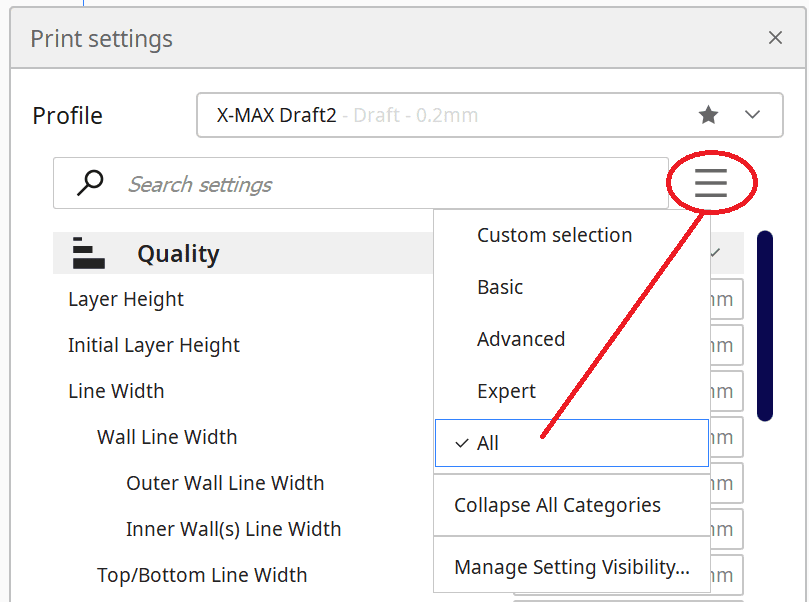
Alternatively, you can click on the three lines next to the search bar in the print settings and change the visibility of the options. You can either choose from predefined profiles or display all options. You can also set individually which options you want to see and which not.
The two options you are looking for are Flow Rate Compensation Max Extrusion Offset and Flow Rate Compensation Factor.
You don’t have to worry about setting the settings incorrectly and then not being able to get back to the original values. As soon as you change something in Cura, an arrow will appear next to the setting that will take you back to the default settings. These are 100% for the compensation factor and 0.0 mm for the compensated distance.
How Does the “Flow Rate Compensation” Work in Cura?
The flow rate can be set in Cura in two different ways. The first and most common way is to set the flow rate itself. Here you calibrate the flow rate, i.e. how much material the extruder should output per time unit for the respective filament used.
Calibrating the flow rate is extremely important to find the right settings for a particular filament. You will learn how to calibrate the flow rate correctly later in this article.
The second way to influence the flow rate is to compensate or balance the flow rate.
Flow Rate Compensation changes the flow rate without adjusting the actual flow rate in the slicer. This is basically a way to trick 3D printers with a flow rate sensor. This way you can change the flow rate without confusing the sensor.
In the experimental settings of Cura you can balance the flow rate by two different options:
- Flow Rate Compensation Factor
- Flow Rate Compensation Max Extrusion Offset
Flow Rate Compensation Factor
The flow rate compensation factor indicates the distance in percent by which the extrusion is compensated (in relation to the normal extrusion distance per second). The factor is multiplied by the flow rate to calculate the real flow rate.
This factor is the most important value when compensating the flow rate. If you set it higher than 100%, more filament will be extruded per second, if the value is below 100%, less filament will be extruded per second.
To calibrate this value and thus the extrusion correctly, you basically follow exactly the same method as for the normal calibration of the flow rate. It is only a bit more complicated if your actual flow rate is not 100%, since you then have to offset the two percentages against each other.
Example:
- Flow rate = 97%
- Flow rate compensation factor = 95%
- Actual flow rate = 97% x 95% = 92.15%
Flow Rate Compensation Max Extrusion Offset
The option “Compensation Flow Rate Max Extrusion Offset” limits the distance by which the extrusion can be compensated. The calculated compensation distance by the compensation factor has this value as maximum.
Some options can lead to unexpected errors if they are fed with too large values. To avoid this with flow rate compensation, there is the option of Flow Rate Compensation Max Extrusion Offset. Here you specify the longest distance the flow rate can be compensated.
Example:
- The compensation factor and the flow rate result in a distance of 0.5 mm.
- You specify 0.3 mm as the max extrusion offset.
- The flow rate is compensated with only 0.3 mm.
When Should I Use Flow Rate Compensation in Cura?
Flow rate compensation only makes sense if a flow rate sensor has to be bypassed to calibrate the extrusion. Some 3D printers with such a sensor will give an error or warning if the flow rate is too high or too low.
If your printer does not have such a sensor, it makes more sense to change the flow rate directly to calibrate the extrusion. The goal is to avoid under- or over-extrusion.
If the line width is 0.4 mm, the end result should also be a line that is actually 0.4 mm wide. If it is thicker, the flow rate must be reduced, if it is thinner, the flow rate must be increased.
If you use only one type of filament from the same manufacturer, you will only need to calibrate the flow rate or the flow rate compensation very rarely or only once at the beginning. The more often you switch between different filament types or manufacturers, the more often you will need to calibrate the flow rate to get accurate results.
How to Calibrate the Flow Rate
Whether you want to calibrate the flow rate itself or the flow rate compensation, the principle remains the same. You print a test model, measure the line width and then adjust the flow rate so that the correct width is printed in the end.
Step 1: Measure Filament Diameter
The flow rate, i.e. how much volume is extruded per second, is also largely determined by the diameter of the filament. High-quality filaments deviate by a maximum of 0.02 mm from their specified diameters. Cheap filaments, however, can deviate much more.
Therefore, you should first measure the diameter of your filament with a caliper gauge and enter the corresponding value in the slicer for the filament diameter.
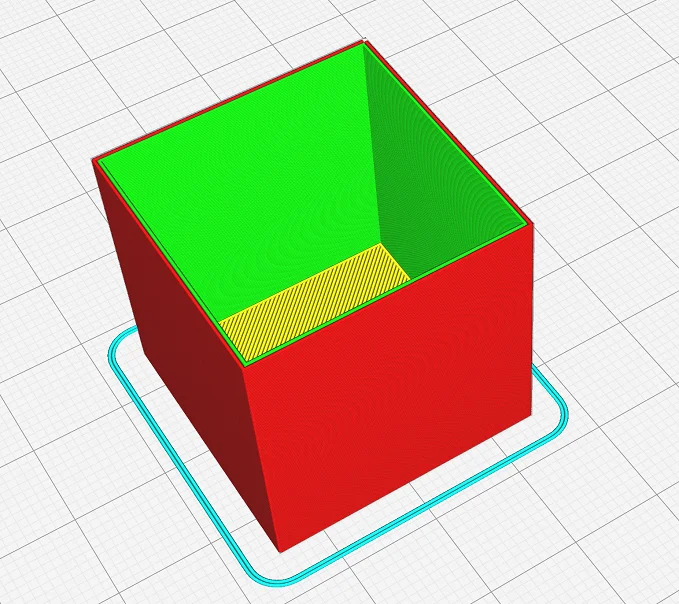
Step 2: Print Hollow Test Cube
Next, you need an object with which you can print a stable line to measure it. The best object for this is a hollow test cube (link to model). You print this cube either in vase mode or with a certain number of walls with the appropriate temperatures for the filament you are using.
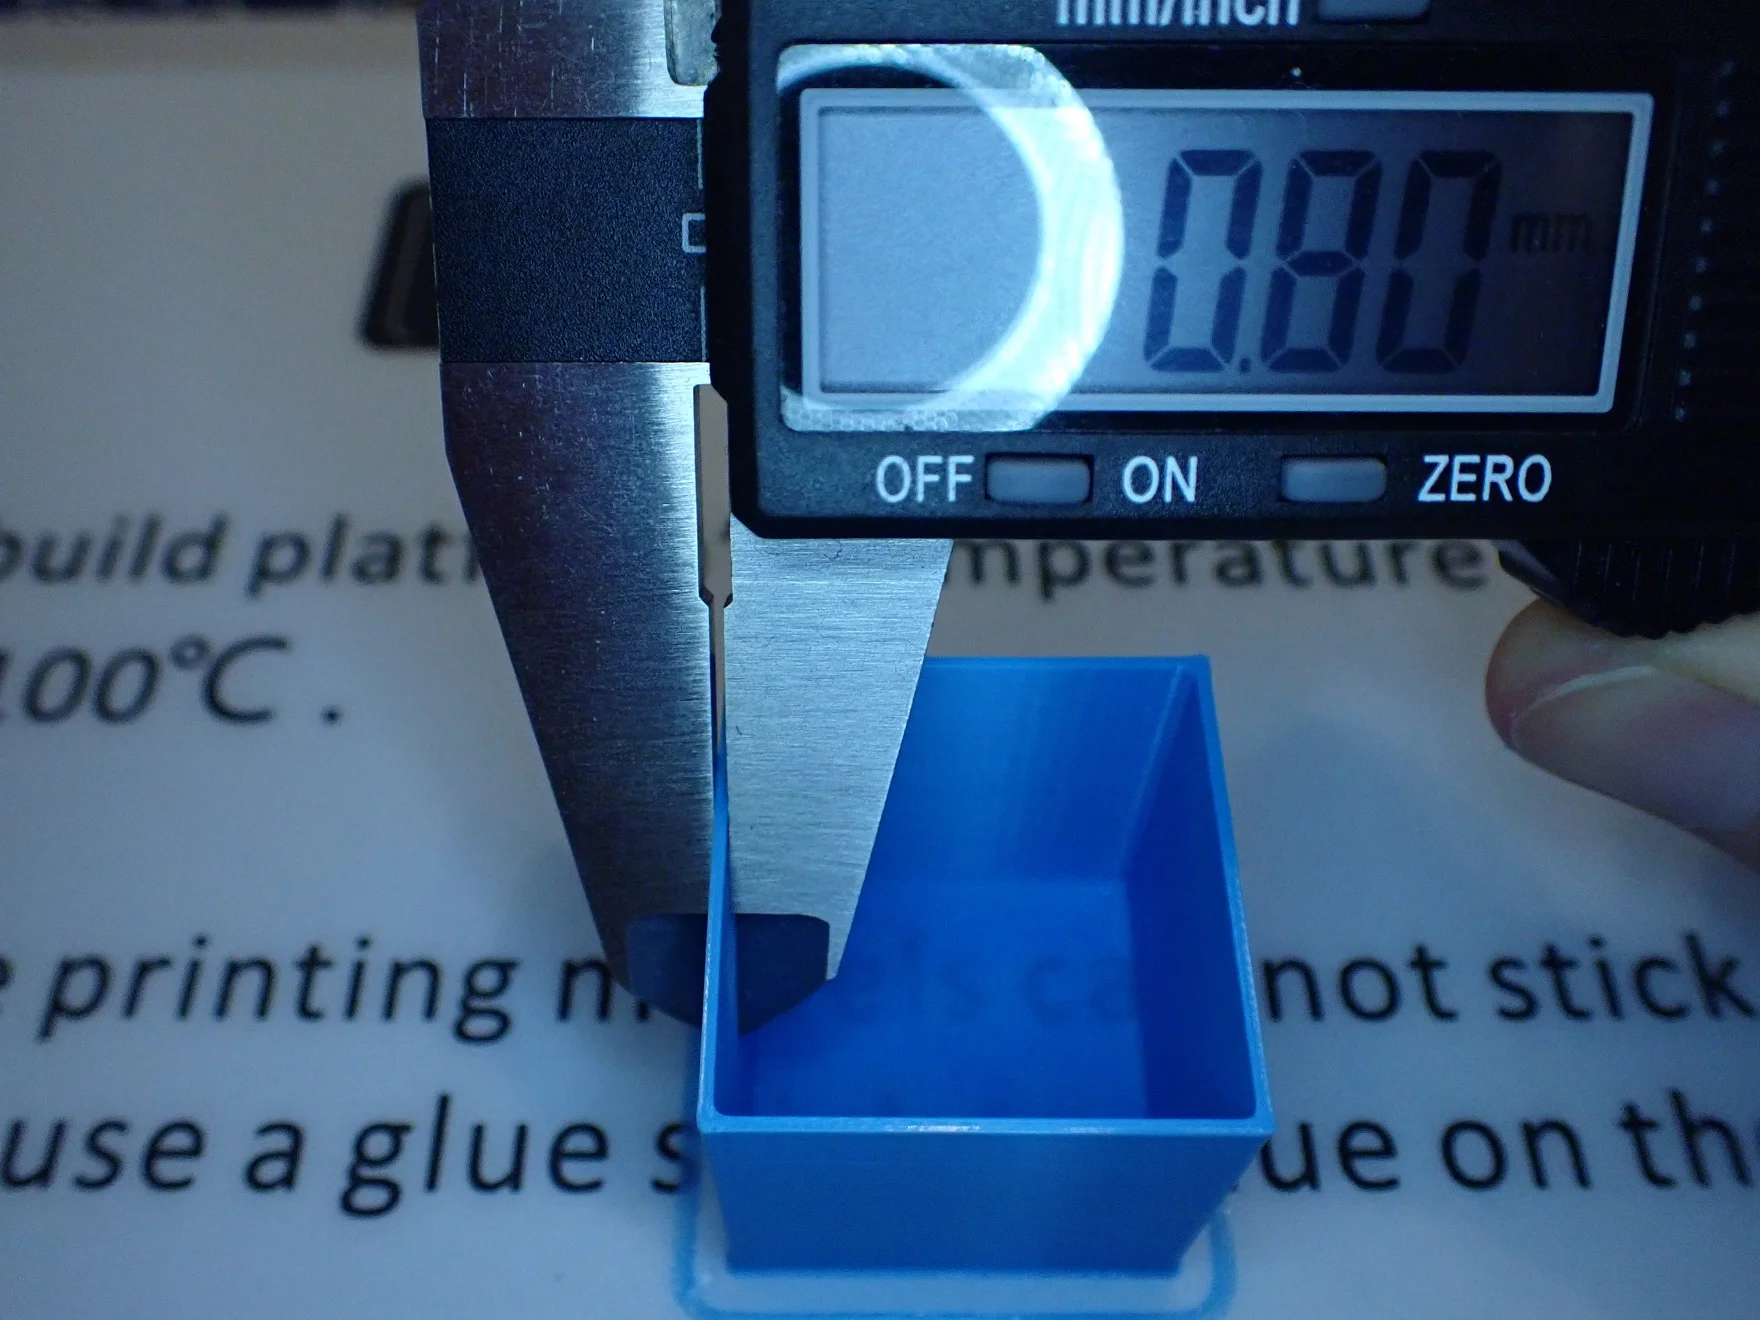
Step 3: Measure Wall Thickness
Next, you need to measure the wall thickness of the cube in several places and calculate the average value. If you have printed only one wall, this is directly the value from which you calculate the flow rate. If you have printed several walls, you have to divide the value by the number of walls.
In this example, I printed two walls with a line width of 0.4 mm, which resulted in a wall thickness of 0.8 mm.
Step 4: Calculate the Flow Rate
From the values determined, you can now calculate the correction for the flow rate. If you get a flow rate of 100% and a line width of 0.4 mm with a wall thickness of only 0.3 mm, this means that the flow rate is 25% too low. If the wall thickness is 0.44 mm instead of 0.4 mm, the flow rate is too high by 10%.
You enter the corresponding new value for the flow rate (90% in the latter example) in the slicer for the flow rate.
Step 5: Check the Result
If you did everything correctly, this step is the last one. Here you print the cube again and measure the wall thickness again. If the measured wall thickness now matches the entered line width, you have calibrated the flow rate correctly. Otherwise, you have to repeat steps 4 and 5.
Disclosure: This website is the property of Martin Lütkemeyer and is operated by Martin Lütkemeyer. Martin Lütkemeyer is a member of the Amazon Services LLC and other Affiliate Programs. These are affiliate advertising programs designed to enable websites to earn advertising revenue through advertising and linking to Amazon.com and others. Links marked with * are affiliate links.
