
- Wet Filament: Prevention, Symptoms & Drying - July 18, 2024
- Sovol SV08 – Best PrusaSlicer Settings & Profile - June 26, 2024
- Sovol SV08 – Best Orca Slicer Settings & Profile - June 26, 2024
Disclosure: Links marked with * are Affiliate Links. I earn from qualifying purchases if you decide to make a purchase through these links – at no additional cost for you!
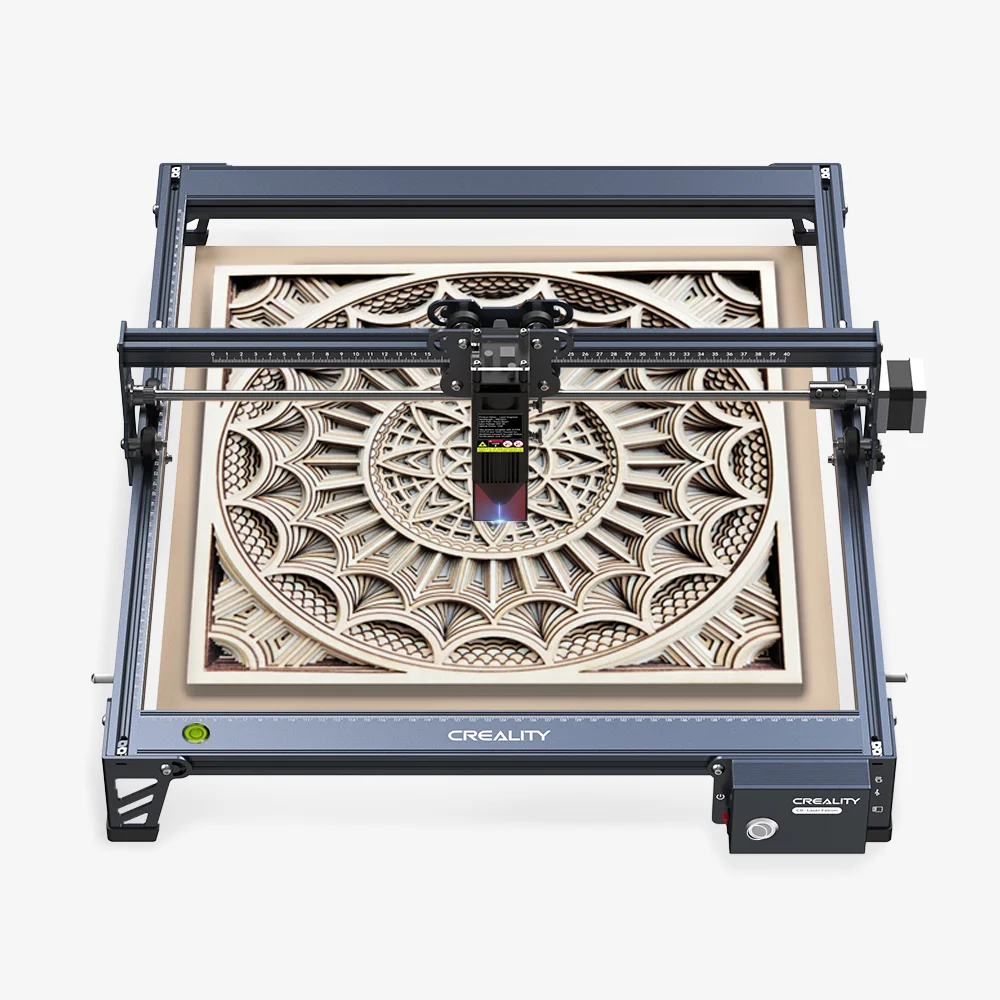
Creality has expanded its product portfolio. In addition to the popular 3D printers such as the Ender 3 V2 or Ender 3 S1, Creality now also offers laser engraving machines.
The CR-Laser Falcon is available with 5 Watt and 10 Watt* laser modules. In this review, the variant with the 10 Watt module is tested and reviewed in detail.
Besides a few test objects, I have also been able to realize larger projects without problems. After a presentation of the most important features of the CR-Laser Falcon, I will show you what results you can expect from this device.
Check Price at:
Table of Contents:
- 1 Key Takeaways
- 2 Who Should Buy the CR Laser Falcon 10W?
- 3 Advantages & Disadvantages
- 4 Technical Specifications
- 5 Scope of Delivery
- 6 Setup
- 7 Features of the CR-Laser Falcon
- 8 Software & Operation
- 9 Engraving Quality: Practical Test
- 10 Cutting Quality: Practical Test
- 11 Cutting & Engraving at the Same Time: Practical Test
- 12 Is the CR-Laser Falcon 10W Worth It?
Key Takeaways
- With the 10W laser module, a wide variety of materials can be engraved and even thicker wood or acrylic sheets can be cut.
- The accuracy is so high that even small details are visible on engraved photos.
- The assembly is done within 15-30 minutes and thanks to the included wooden plates and a test model file on the Micro-SD card, the first test can be started directly.
Who Should Buy the CR Laser Falcon 10W?
The CR-Laser Falcon is worthwhile for anyone who wants to engrave small and large objects or realize projects from cut parts of various materials. Due to the easy operation, it is very suitable for beginners, but due to its high precision and accuracy it is also interesting for professional users and small companies.
Advantages & Disadvantages
PRO:
- High accuracy
- Very quiet
- Simple assembly and operation
- Compatible with LaserGRBL and LightBurn
- Comes with material for testing
- Laser safety goggles included
- Easy focusing
CON:
- No display, only a “one-button” operation
Technical Specifications
- Laser dot diameter: 0.06 mm
- Cutting thickness: 0 to 18 mm
- Optical power: 10 Watt
- Engraving speed: Max. 10000 mm/min
- Engraving depth: 0 to 10 mm
- File format: G-Code
- Software: LaserGRBL, LightBurn
- Laser wavelength: 455 +/- 5 nm
- Accuracy: 254 dpi
- Work surface: 400 × 415 mm
- Materials: cardboard, paper, wood, bamboo, rubber, leather, fabric, acrylic, plastic, metal
Check Price at:
Scope of Delivery
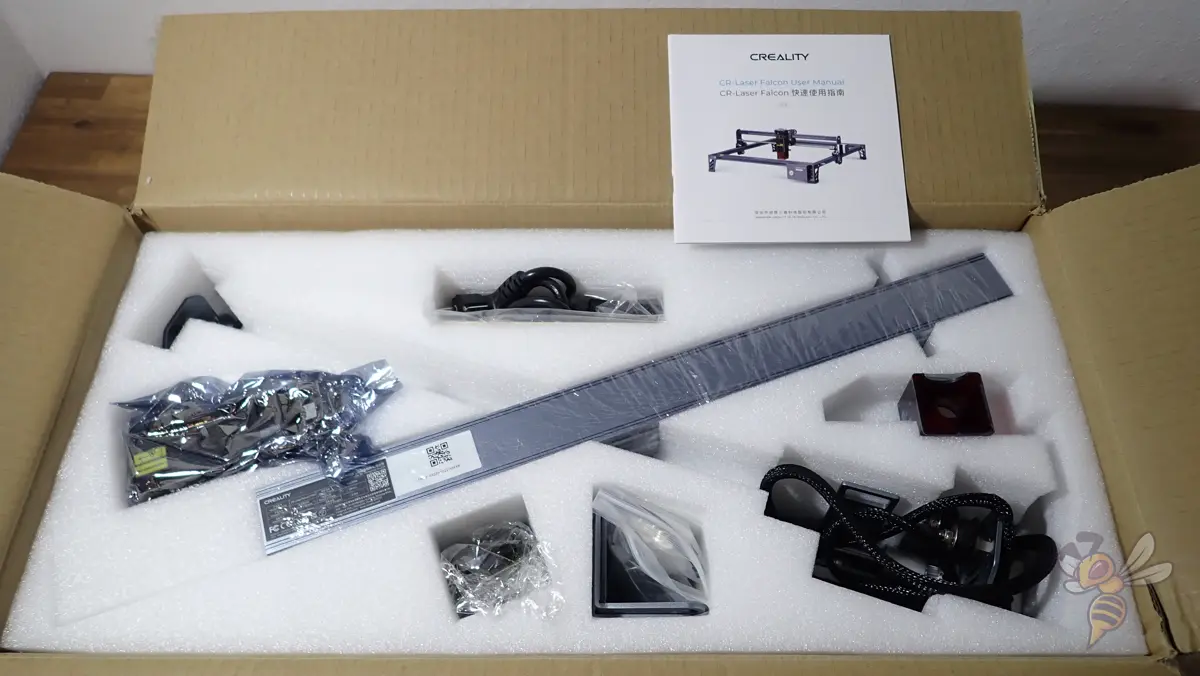

The scope of delivery of the CR-Laser Falcon contains everything to start with the first tests. Besides tools for assembly, laser safety goggles and a micro SD card with helpful videos and instructions, two small wooden boards for engraving or cutting are also included.
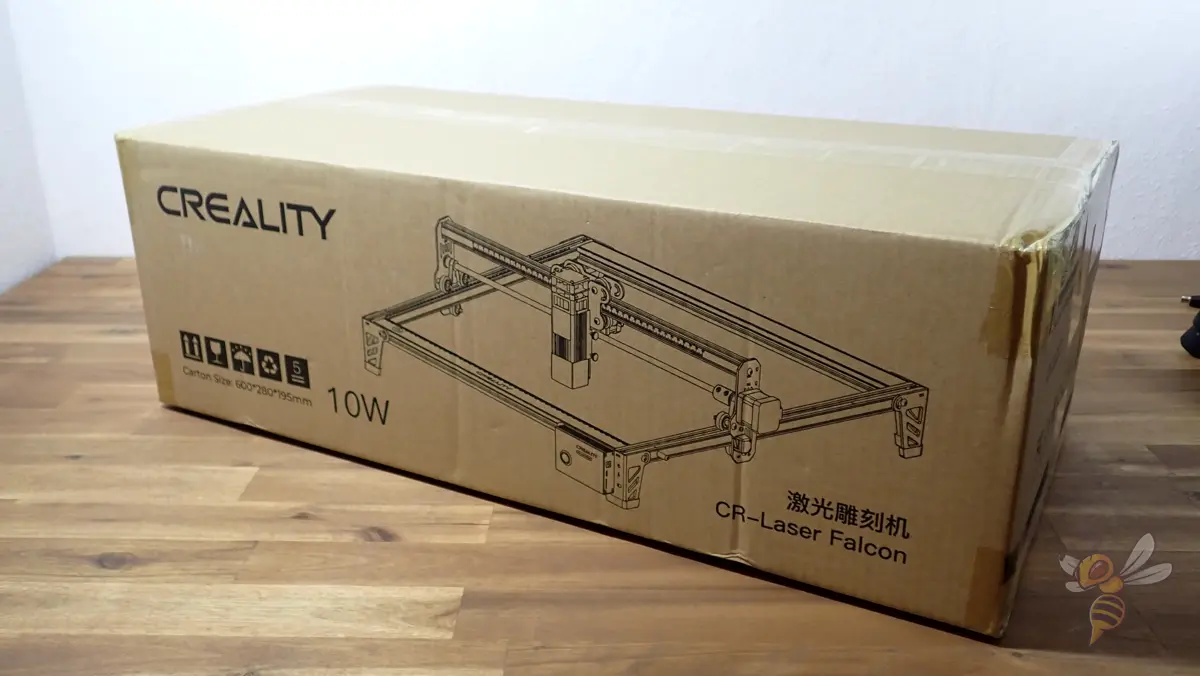
What struck me immediately upon delivery is the light weight and small dimensions of the package. The laser engraver is delivered in individual parts that must be assembled. This saves Creality some assembly costs and allows them to pack it compactly. Since the frame is made of aluminum, the device and therefore also the package is very light.
Just as with Creality’s 3D printers, the company is committed to getting buyers started right away with this laser engraver. That’s why I was pleased to see that laser safety goggles, a microfiber cloth for the laser lens, two small wooden plates and test patterns on the micro SD card are included. So, you don’t have to go to the hardware store or Amazon to get missing parts or protective equipment.
The following items are included in the scope of delivery of the CR-Laser Falcon:
- 4 frame parts
- Pre-assembled X-axis
- Feet
- Laser module
- Power supply and cable
- Two 2 mm wooden plates for testing
- All necessary screws and the appropriate tools for assembly
- Micro SD card with suitable USB adapter
- Laser safety goggles
- Focusing aid
- Cable tie
- Microfiber cloth for the laser lens
- Operating instructions
Especially for those who have never worked with a laser engraver of this type before, the content on the micro SD card is really helpful. Creality has put a very good documentation here, which allows even beginners to start directly with this device.
The Micro SD card, for which there is also a matching USB adapter, contains the following items:
- Digital instruction manual
- Software:
- LaserGRBL (including manual and video)
- LightBurn (including manual, video and configuration file)
- Video explaining the operation of the CR-Laser Falcon
- Test pattern G-Code each for the 5 Watt and 10 Watt laser module
- Video how to focus the laser
- Recommended parameters for 5 and 10 Watt
Setup
The assembly of the CR-Laser Falcon takes between 15 and 30 minutes, depending on how much experience is brought. The manual covers all the necessary steps, but the translation is a bit rough in some places. The illustrations are good, but a bit small.
There are also a few things that are not very well described in the instructions, but which we briefly discuss here. Moreover, it is advisable for the screws to use the included Allen wrench and not a screwdriver. The material of the screws is not very hard and can be accidentally destroyed by a screwdriver.
Tip: I have unfortunately only seen after the assembly that there is a video on the micro SD card that illustrates the assembly very well. If you get stuck with the manual, you can watch this video, in which many details are better to see than in the manual.
Mounting the X-Axis on the Frame
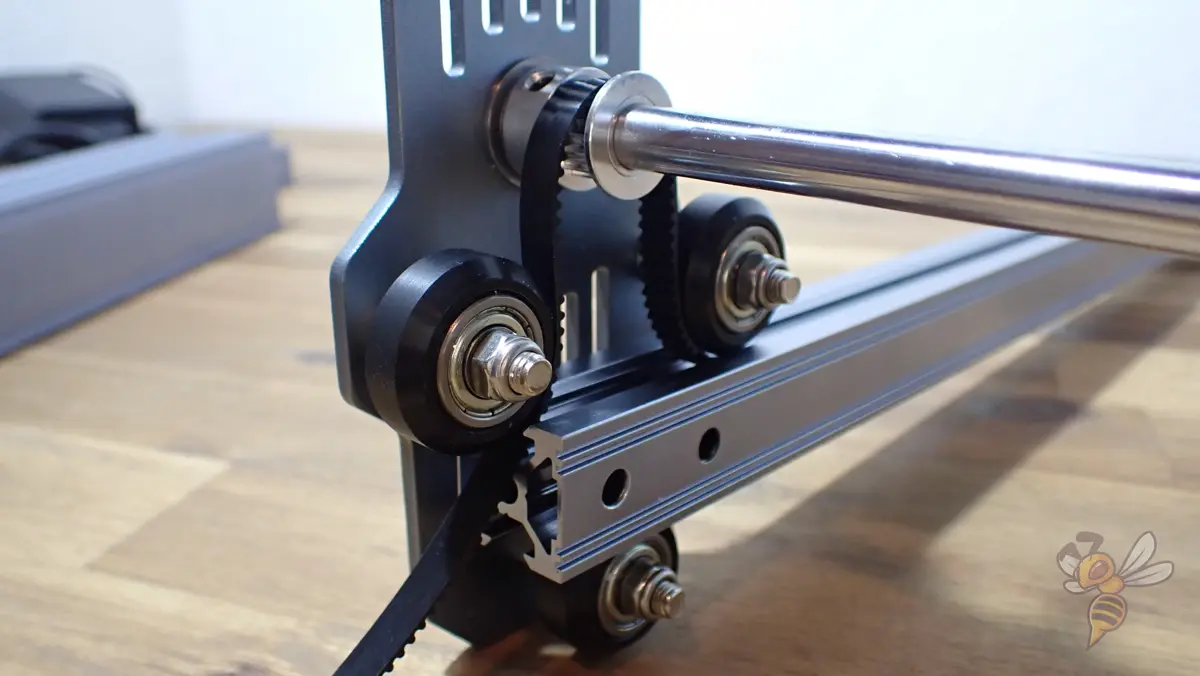
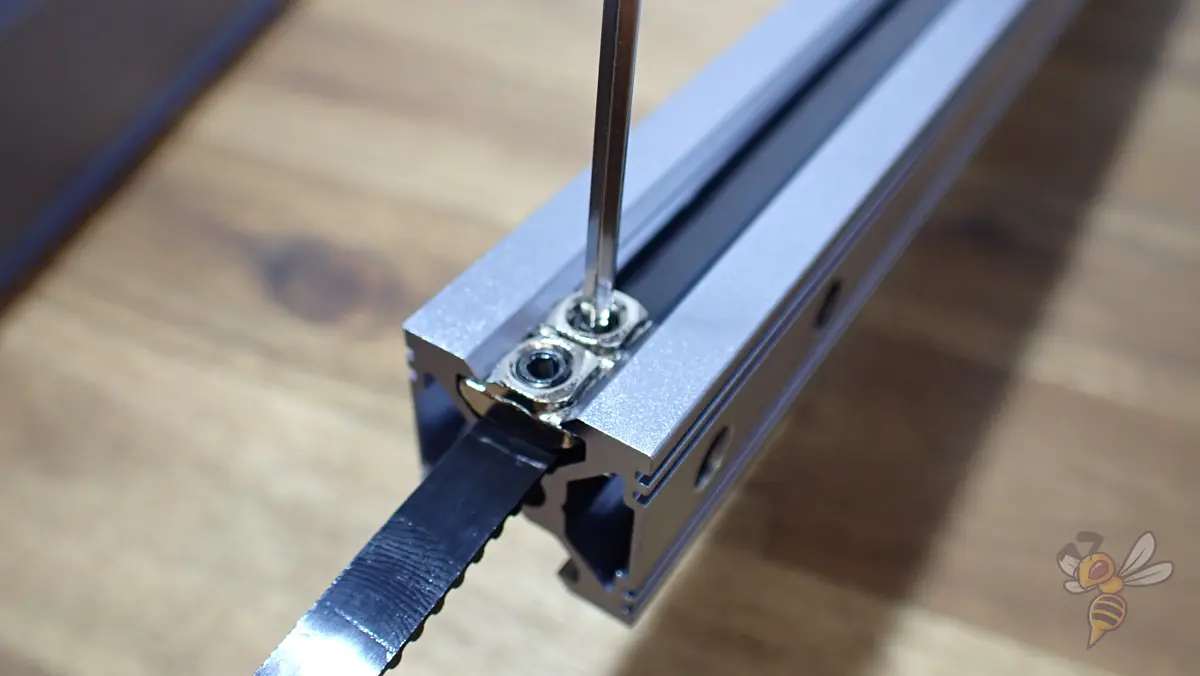
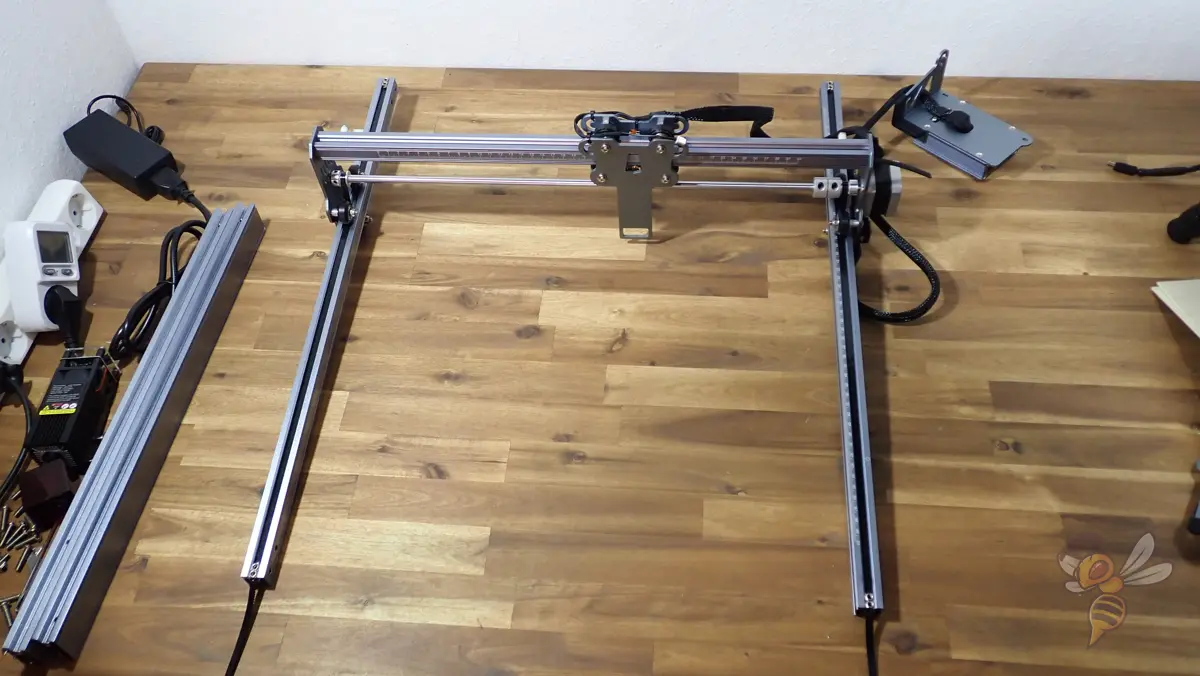
The X-axis with the suspension for the laser module is already pre-assembled. The moving X-axis only needs to be mounted to the two Y-axes. This is in my opinion the most complicated part of the assembly.
The complicated part of this step is to thread and fasten the toothed belts correctly. The axis with the stepper motor on the X-axis has a gear wheel on both sides, over which the toothed belt must be threaded.
The toothed belt is already fixed on one side of the Y-axis profiles. After it has been correctly threaded on the X-axis, it must be fixed on the other side. However, the instructions do not mention that you have to make sure that the X-axis is in the same place on both Y-axes. Otherwise, you can’t finish assembling the frame because the Y-axes are in different positions.
Assemble the Upper and Lower Profiles of the X-Axis
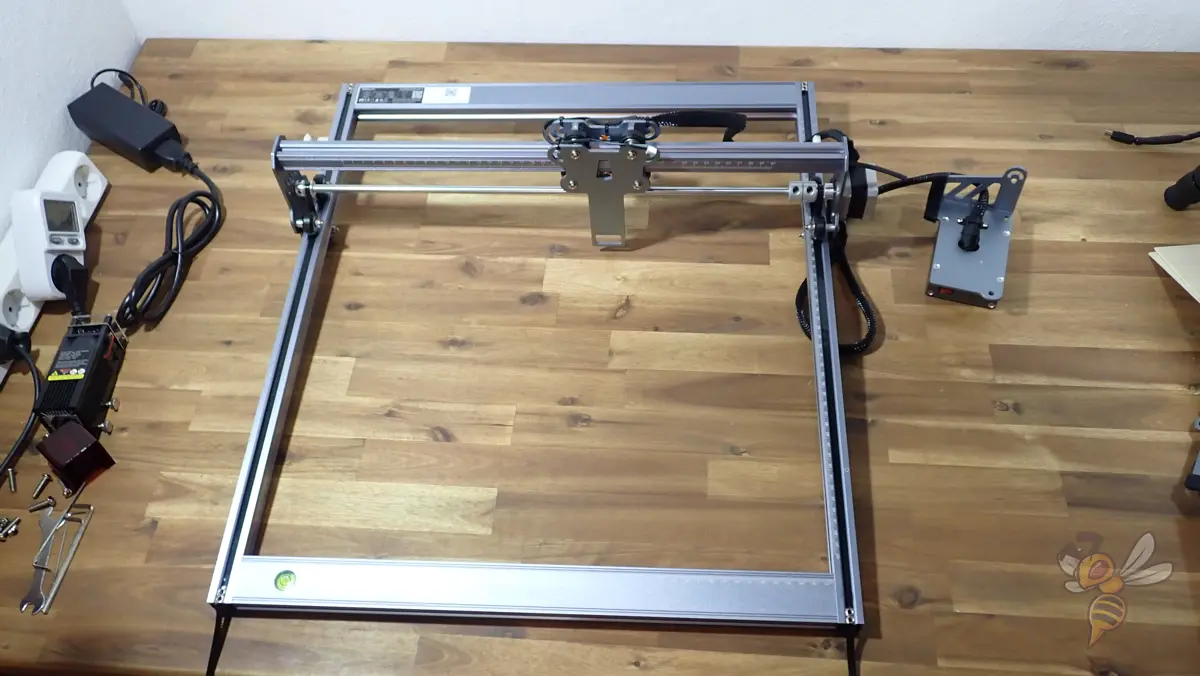
If you have done everything correctly, you can now mount the upper and lower profile of the X-axis and complete the frame with it. There should be a 90-degree angle at all four corners.
When orienting the individual profiles, you have to ensure that the holes for the feet are in the correct places. In the instruction manual, you can look at the next picture for the correct orientation.
Install the Feet
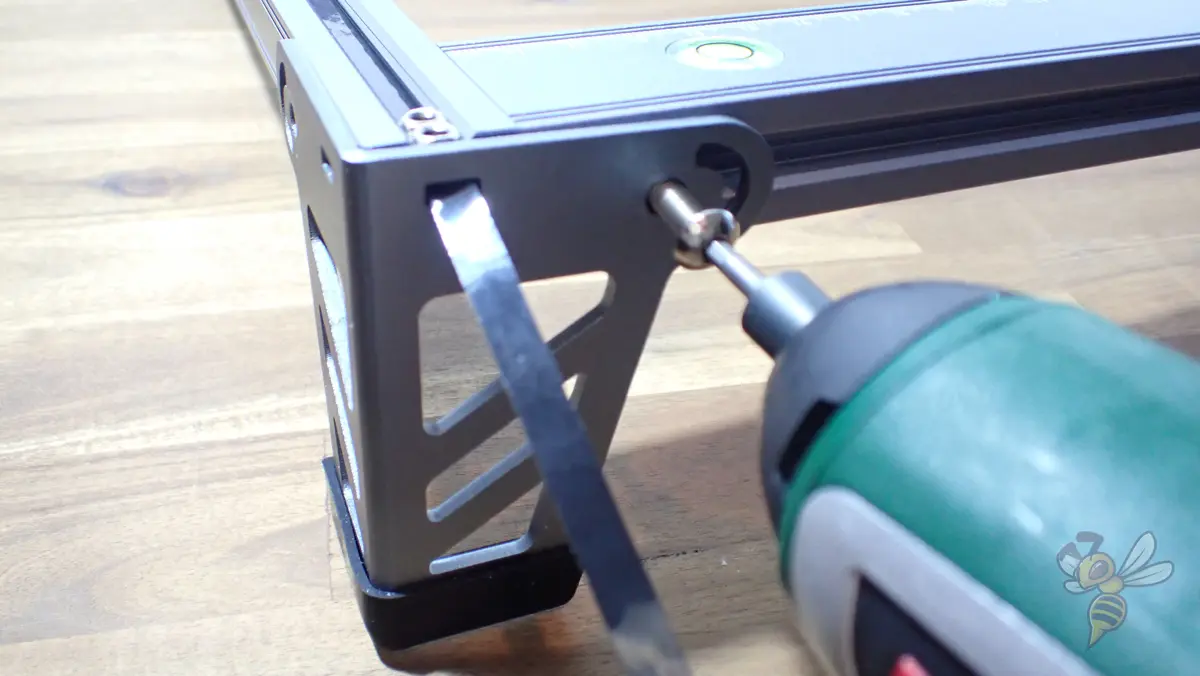
There is a matching foot for all four corners so that the frame does not lie on the floor. The front right foot is already installed in the control module. The feet each have a small slot to be able to thread the protruding rest of the toothed belts through.
Mounting the Laser Module
The manual that comes with the laser includes both laser modules (5 watt and 10 watt). So, some instructions will differ depending on which module you use.
However, the mounting of the modules is identical in both cases. The module is inserted into the suspension on the X-axis and fixed on the side with hand screws. You can optimize the cable management with the included cable ties.
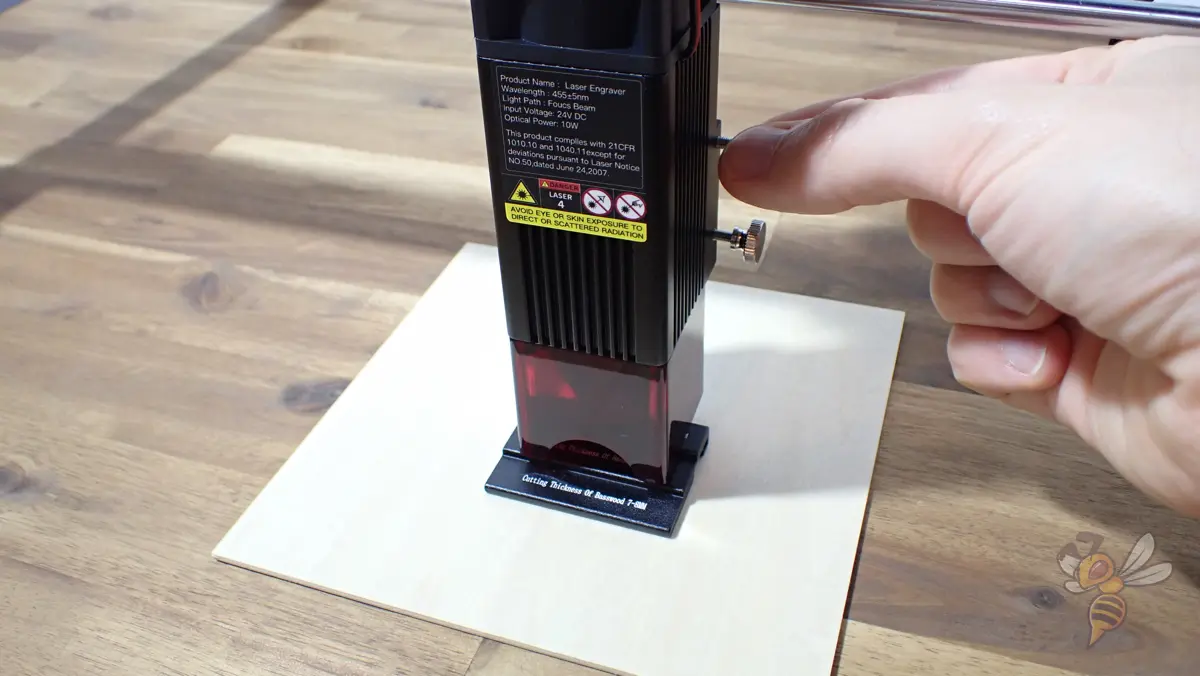
Laser Focusing
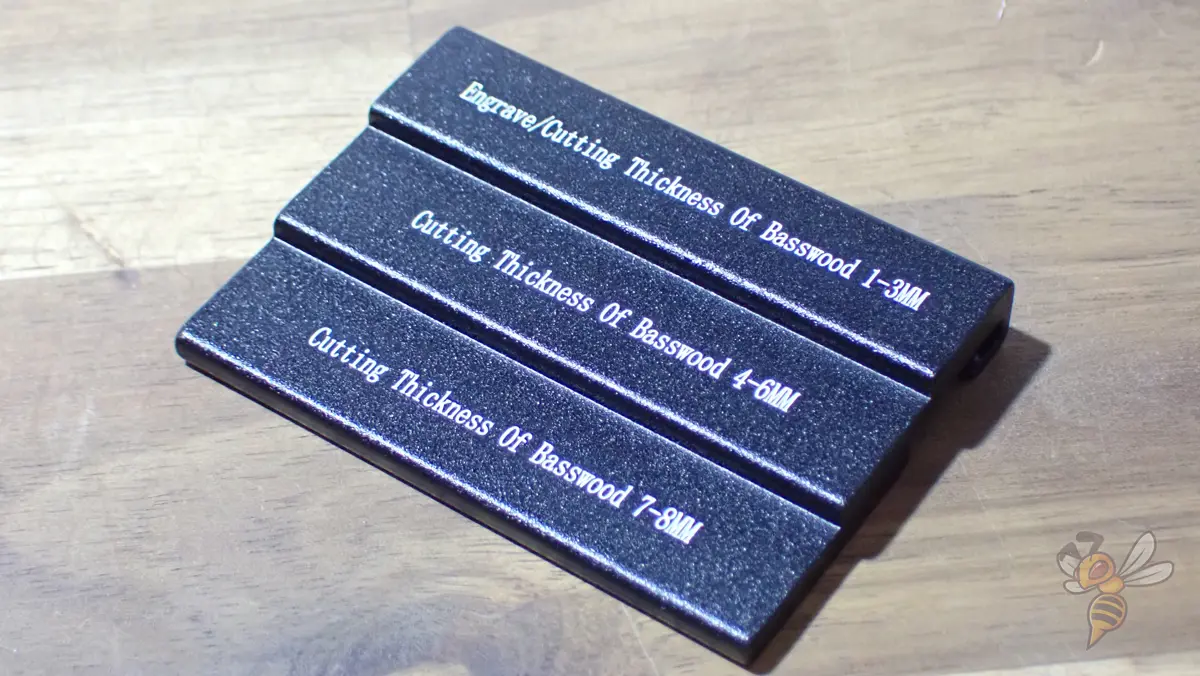
The focusing of the laser is straightforward. A focusing aid is included in the scope of delivery. To adjust the distance of the laser correctly, place this focusing aid between the surface and the laser. Only then do you fix the laser module so that its height cannot change. The distance changes depending on whether you want to engrave or cut and how thick the material is.
Check the Frame Wheels
This step is not mentioned in the instruction manual, but the appropriate tools for it are included. The wheels may sometimes come loose during shipping and wobble. You can tighten them with the appropriate wrench to prevent wobbling during movement.
Not only is this important for 3D printers to increase accuracy, but also for laser engravers, such wobble would directly affect the quality of the resulting object.
First Test Run
If you want to try a first test run after the assembly, a suitable G-code is already available on the micro SD card. To be able to use it, however, you have to save it separately on the micro SD card and cut out the rest and save it somewhere else. Otherwise, the laser engraving device will not find the file.
Check Price at:
Features of the CR-Laser Falcon
The CR-Laser Falcon has all the necessary features to achieve excellent results. Besides a few nice features that simplify operation, the accuracy of the XY positioning and the powerful laser module are the most outstanding features.
Powerful 10W Laser Module
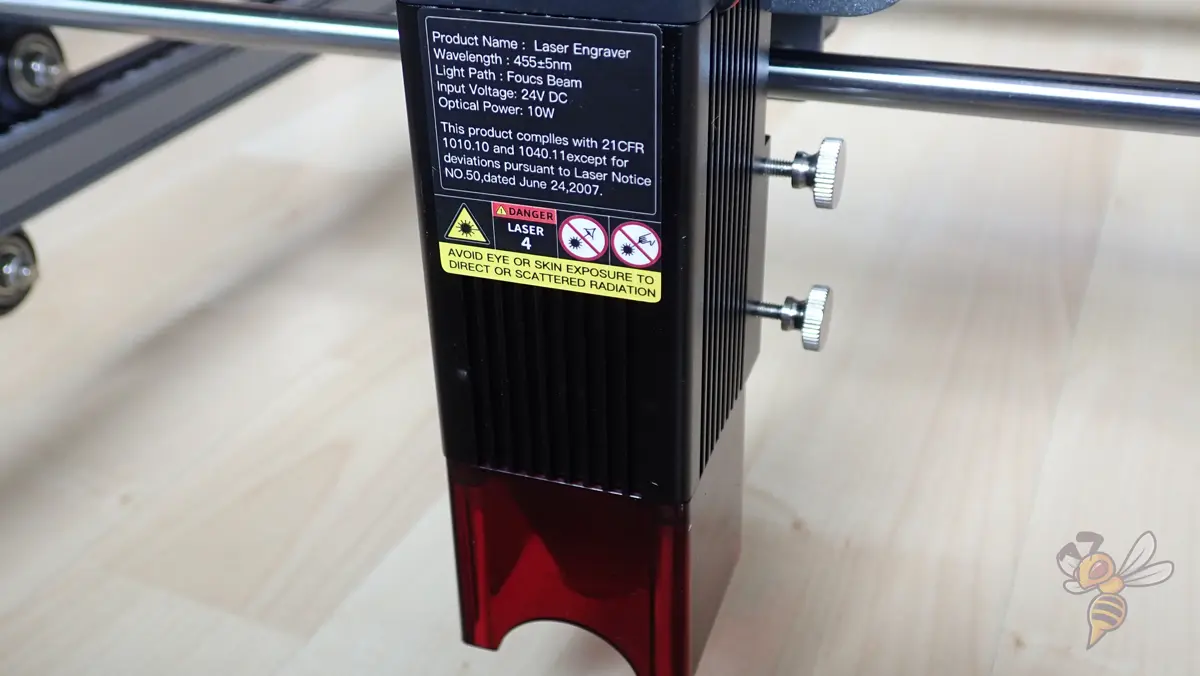
The Creality CR-Laser Falcon is available in a 5W and a 10W version. The only difference between the two models is the laser module. The 5W version has a fixed focus bar and a smoke filter, the 10W version does not. The 10W laser module is much more powerful.
The 10 watt laser module tested in this review can engrave and cut many materials. Here is a selection of the materials that can be processed (hard materials like metals can only be engraved and not cut, softer materials like wood or paper can also be cut):
- Paper
- Fabric
- Leather
- Wood
- Bamboo
- Acrylic
- Ceramics
- Matt stainless-steel surfaces
- Painted metal surfaces
- Anodized metal surfaces
- Dark metal surfaces
Since two wooden plates are included in the scope of delivery, I tested the capabilities of the laser module with these two pieces of wood. And since the performance of the laser is really remarkable, I can imagine very well to engrave metal surfaces with it.
The laser module is easy to mount and can be easily adjusted to the right height thanks to the included focus aid. What I particularly like is the magnetic protective cap, which not only guarantees a minimum distance of the laser to the surface, but can also be easily mounted and removed thanks to the magnets. This makes it easy to clean the laser lens with the microfiber cloth at regular intervals.
The protective cap also provides shielding of the laser. Nevertheless, it is important to wear the laser safety goggles during operation to minimize the risk of eye damage.
The 10 watt laser module does not have smoke filters, unlike the 5 watt laser module. I think this is because the 10 watt laser module produces so much smoke that these small filters could not make it harmless anyway. So, it is especially important with the 10 watt laser module to keep the room well ventilated where the laser is working.
The 10 watt laser module is more powerful and can cut thicker materials. It is better suited for more demanding laser tasks. The 5-watt laser module is better suited if you mainly engrave or cut paper.
Attention: Laser Class 4!
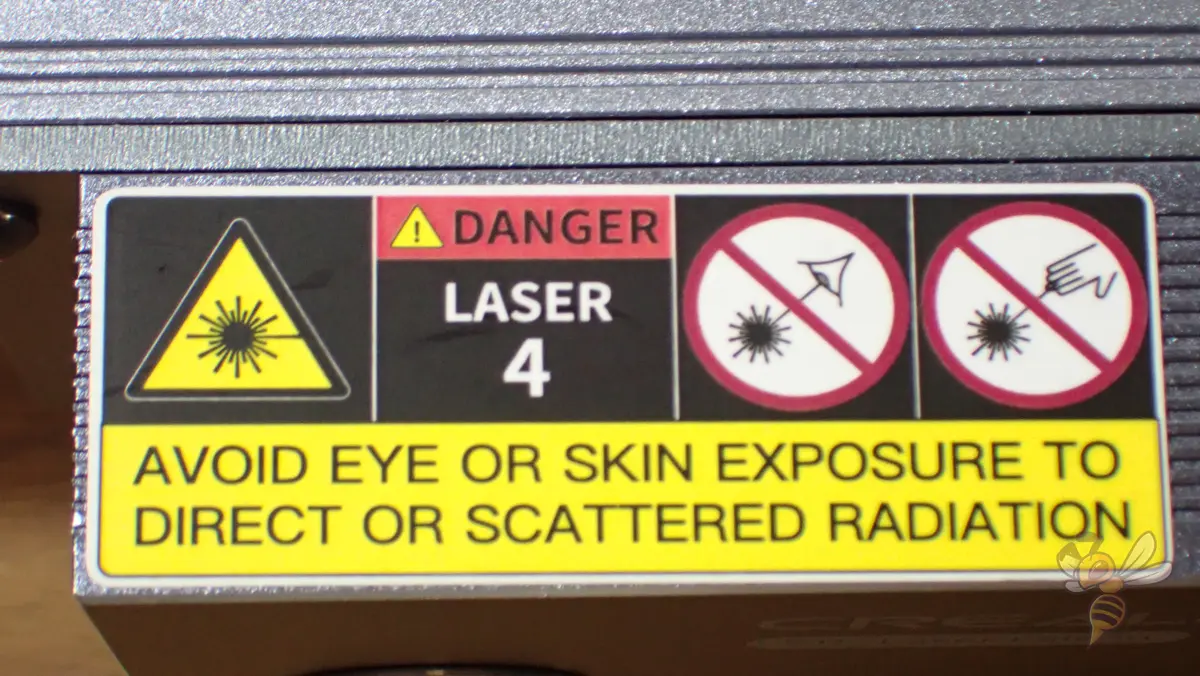
The powerful 10 watt laser module of the CR-Laser Falcon falls into laser class 4, which means that the beams are dangerous to the eyes and even the skin not only when directly irradiated, but also when reflected.
When handling the CR-Laser Falcon, you should therefore always ensure that you have mounted the red guard under the laser, always activate the laser pointing downwards and that everyone in the room wears laser safety goggles. Suitable goggles are included in the scope of delivery.
If you want to set up the device in a workshop where several people are working, either all people must wear such protective goggles while the laser is in operation, or you set it up in a separated area.
However, in addition to the radiation exposure from the laser, there is also the development of harmful fumes and gases to consider. While I only engraved and cut 2 mm thick wood panels in my test, this also produced a significant amount of smoke. Without good ventilation, breathing would be uncomfortable and harmful eventually.
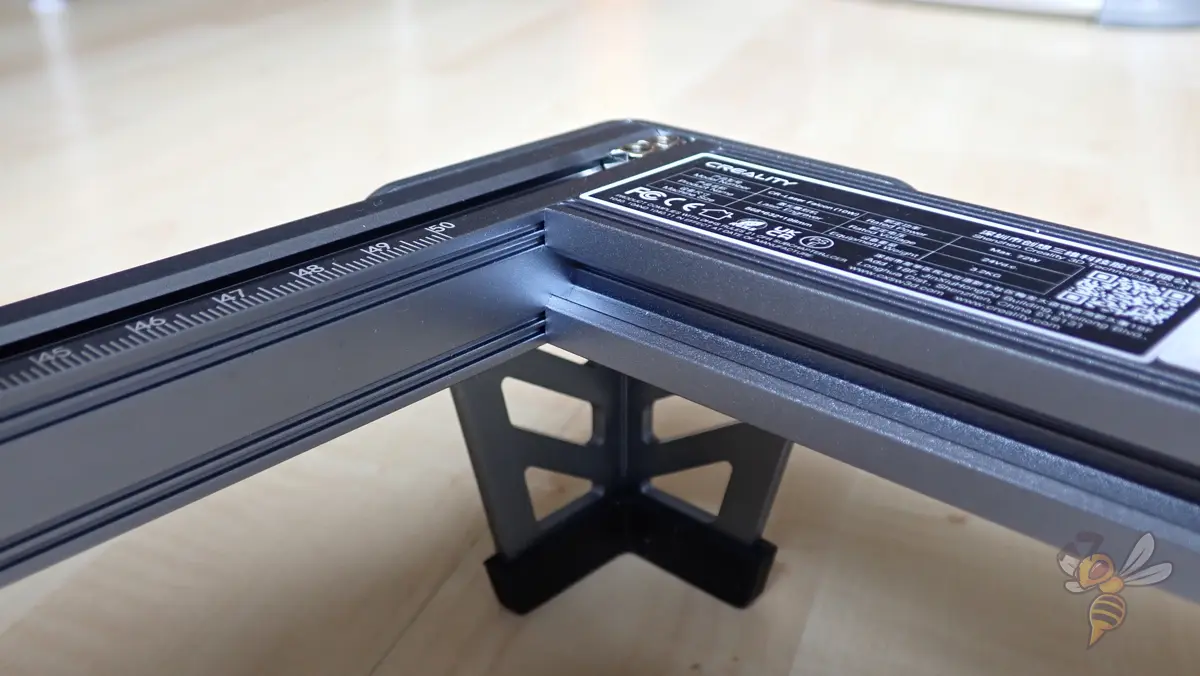
Stable Construction
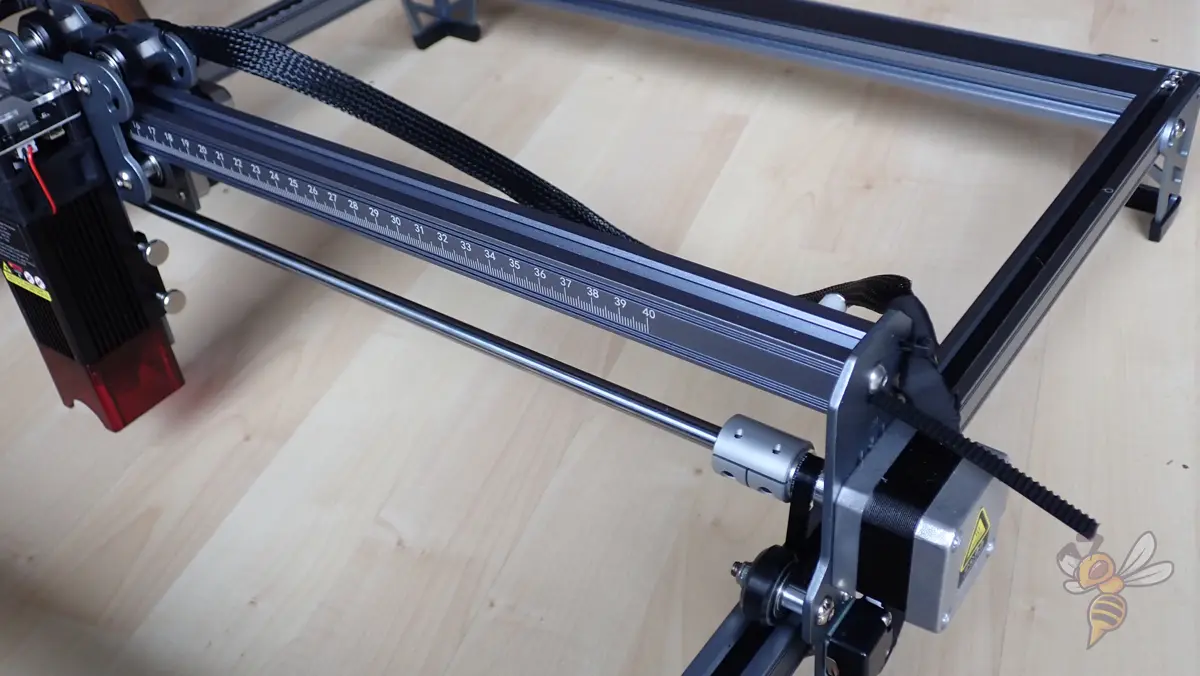
The CR-Laser Falcon has a light and robust aluminum frame. The laser moves smoothly and quietly over its working area in the XY plane using toothed belts and V-wheels.
To enable the high accuracies of the laser, it is necessary that the construction is so stable that no movements or vibrations occur or the frame moves or warps. These sources of error are avoided by the stable construction of the CR-Laser Falcon.
In addition, the surface of the aluminum parts has a high-quality coating that improves the visual design.
Due to the construction, which is additionally reinforced at all four corners by the mounting of the feet, the assembly is easier than with other models. This is because you have to pay very little or no attention to the fact that a 90° angle between the individual frame parts is created. This is mostly done automatically by the design. The entire frame with laser module and control unit weighs so little that you can lift the entire device with one hand.
Spirit Level
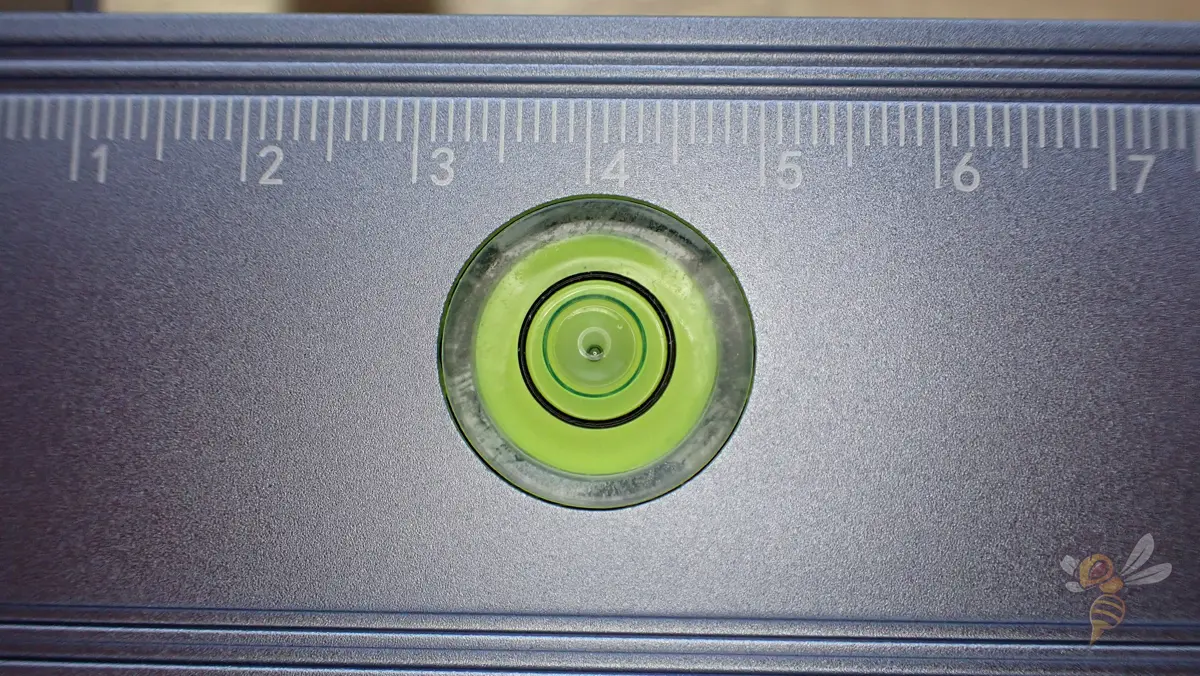
A spirit level is integrated on the frame of the CR-Laser Falcon. This ensures that the laser moves parallel to the surface and that no inaccuracies occur during engraving or cutting.
If the table you’re placing everything on is already crooked, the spirit level won’t be of much use. However, if you are working on a straight surface, you can quickly make sure that everything is parallel to each other. If the laser is not parallel to the surface, the image will be distorted.
Large Work Area
The working area of the CR-Laser Falcon is 400 × 415 mm. This makes it possible, for example, to engrave larger pictures or cut large wooden panels in one piece.
This size of work area is very common among laser engraving machines and provides a sufficiently large work surface for the majority of all users. It is rather rare that such a large working area is not sufficient.
Measuring Scale
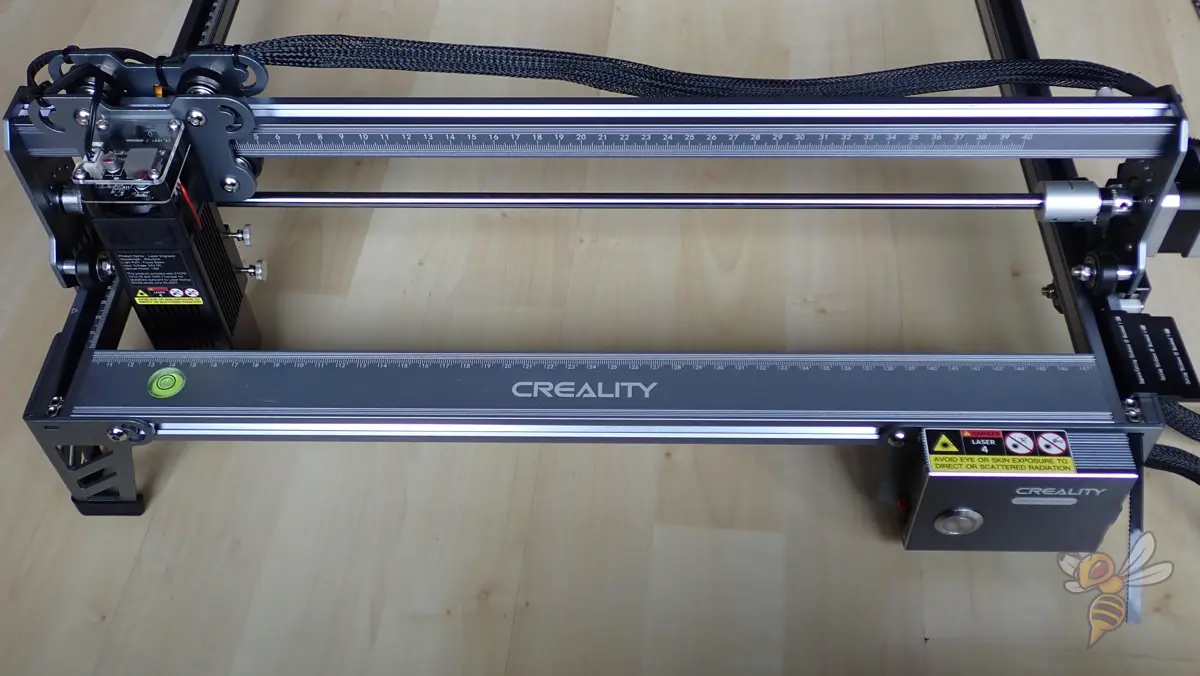
A measuring scale is engraved on the frame of the CR-Laser Falcon. This allows the object to be engraved or cut to be easily aligned and the dimensions can be better estimated.
I find the measuring scale more or less superfluous, since you set the dimensions of the object in the software and see where it is in the working area.
Moreover, aligning the object to be engraved or cut may be a little easier, but in most cases it is also superfluous, as there is the preview mode. In this mode, the laser shows you the outer limits of the area to be processed with very low intensity before it starts its work.
High Speed
The CR-Laser Falcon can engrave most materials at 6000 millimeters per minute. The 10 watt laser module can cut a 2 mm thick wood panel at 350 mm/min.
These high speeds can be achieved by the high power of the laser module, the very precise stepper motors and the stable construction.
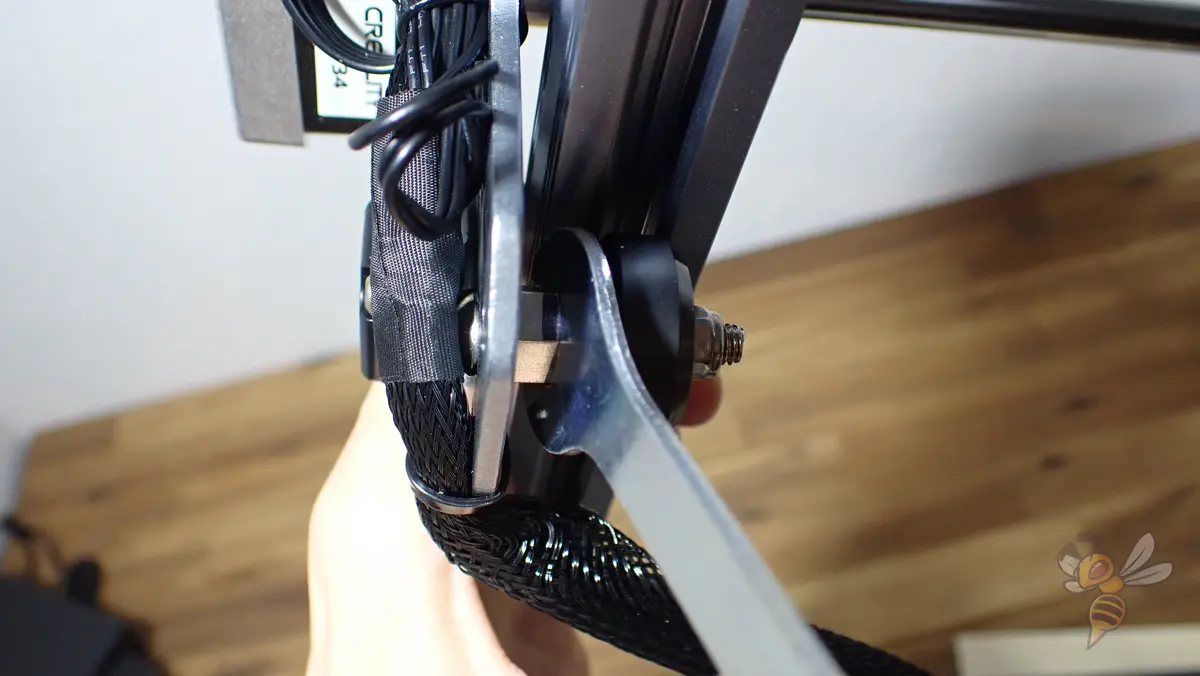
Cable Management
All modules of the CR-Laser Falcon are already wired at delivery. Only a few plugs have to be plugged in during assembly. The individual cables are routed to the operating unit via cable hoses. The cable hoses must be laid sensibly during the assembly itself.
Included in the delivery are a few cable ties with which you can fasten the cable hoses. In my case, this was not necessary at all because the internal tension of the cables makes them stand so high that there is never a danger that they could get into the work area.
You have to eliminate this danger when managing the cable yourself, otherwise it could damage the device or your engraving or cutting project could be accidentally displaced by the cable during the job.
Micro SD & USB-C Ports
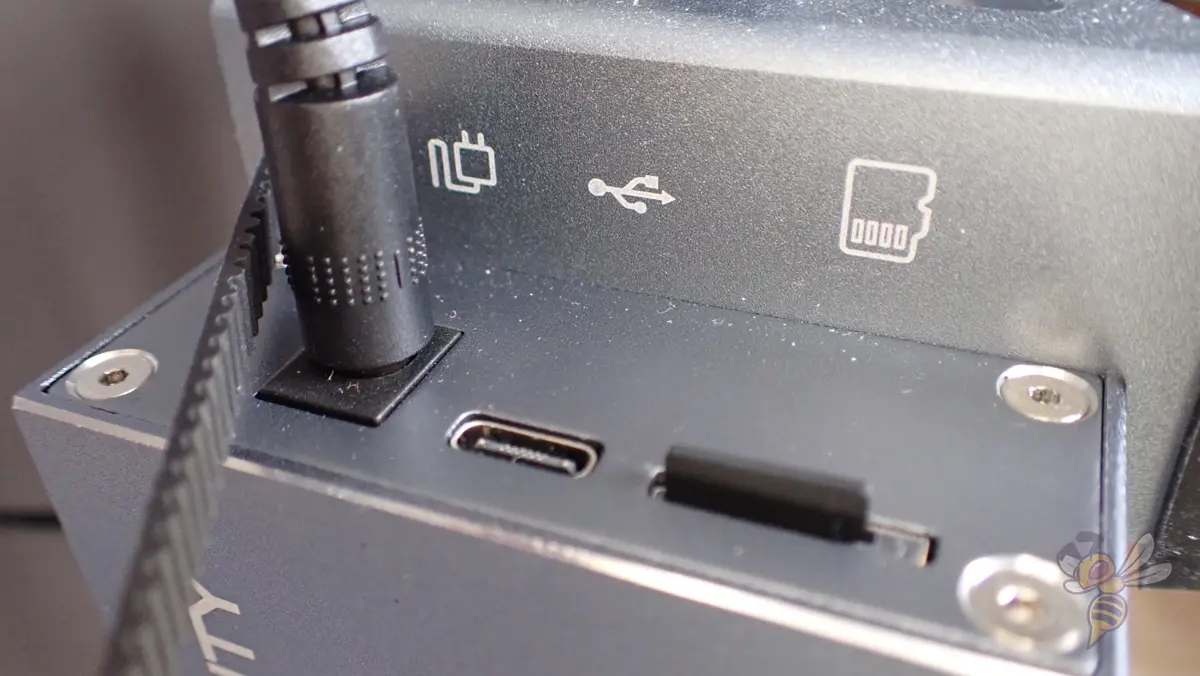
The CR-Laser Falcon can be supplied with data in offline mode via a Micro SD card. It can also be connected to a computer via a USB-C interface.
Unfortunately, there is no Wi-Fi or Bluetooth connectivity. Therefore, you either have the choice to operate it via the computer or via the single button on the control panel and a file on the micro SD card.
Software & Operation
The CR-Laser Falcon can be operated with LaserGRBL and LightBurn. It can be connected to a computer via a USB interface or supplied with files offline via a micro SD card.
Since I already knew LaserGRBL from an earlier review about the Ortur Laser Master 2 Pro, I wanted to try LightBurn this time. Thanks to the parameters and tutorial videos included on the micro SD card, getting started with the software was easy.
I did not make the resulting files available to the CR-Laser Falcon via the USB interface, but via the Micro SD card. It is important that only the G-code file to be used is stored on the micro SD card and nothing else. Otherwise, the laser cannot find the files.
The operation of the device itself takes a bit of getting used to, if you are like me and mainly work with 3D printers that have modern menus on colored touch screens. The CR-Laser Falcon has only one button with an LED light and beeps.
However, once you have figured out how the principle and process works, it is very easy to use.
After initialization, the laser starts the preview mode. In this mode, it scans the outer edges of the file so that you can position the object to be processed correctly. With a further confirmation via the button, it starts to laser.
Theoretically, the entire workflow is then roughly as follows:
- Load/import suitable image file
- Adjust image size
- Optional: edit image to make it more suitable for engraving
- Set parameters to the respective material
- Generate and save G-code
- Switch on laser
- Position object in preview mode
- Start
Engraving Quality: Practical Test
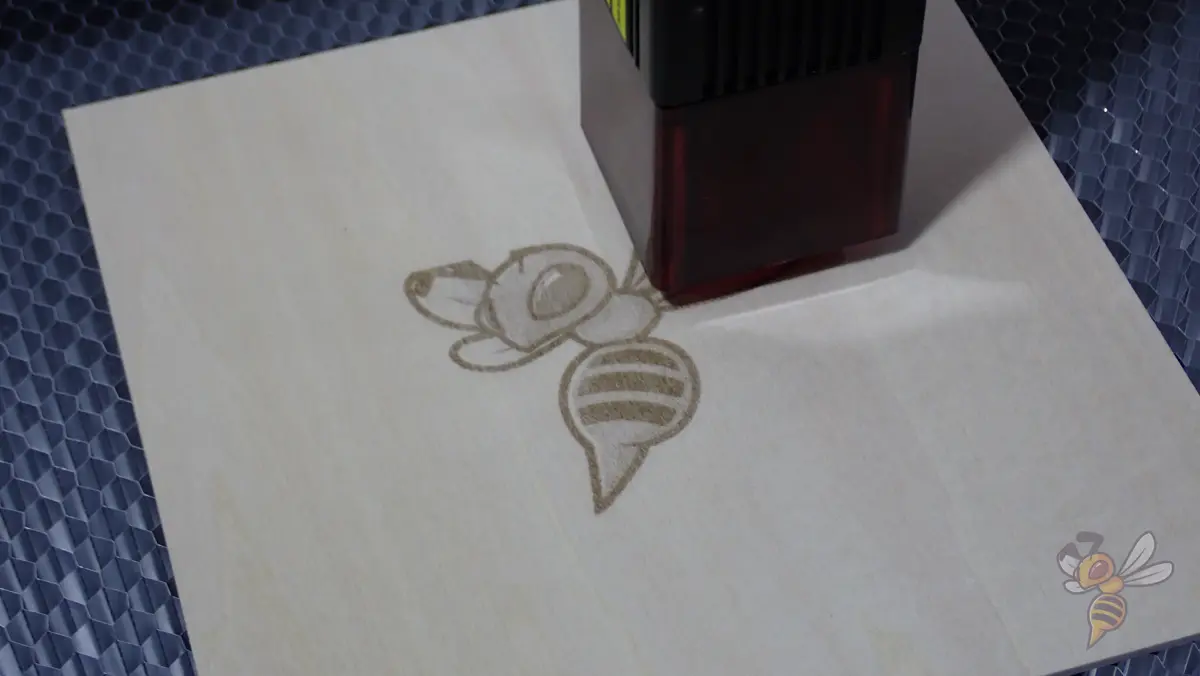
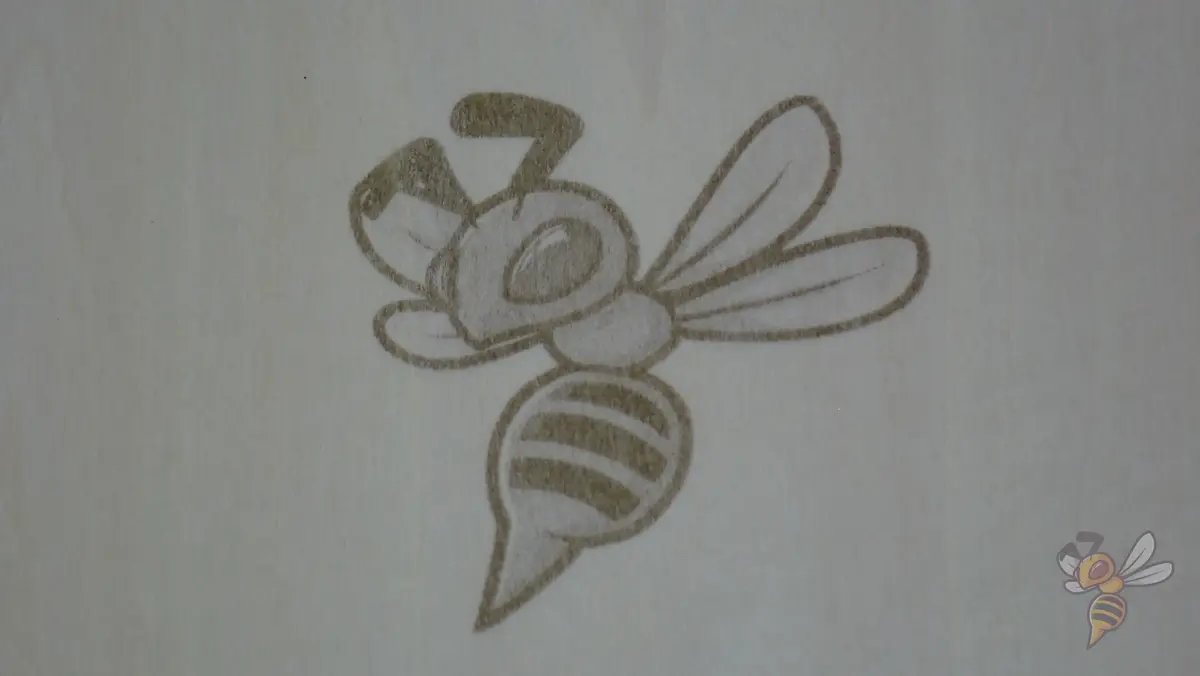
Although a test file is included on the micro SD card, I wanted to try out my own design. First, I engraved the logo of this website, the 3D printer bee. I did not edit the image. I just loaded it, entered the recommended parameters and saved the resulting G-code to the micro SD card.
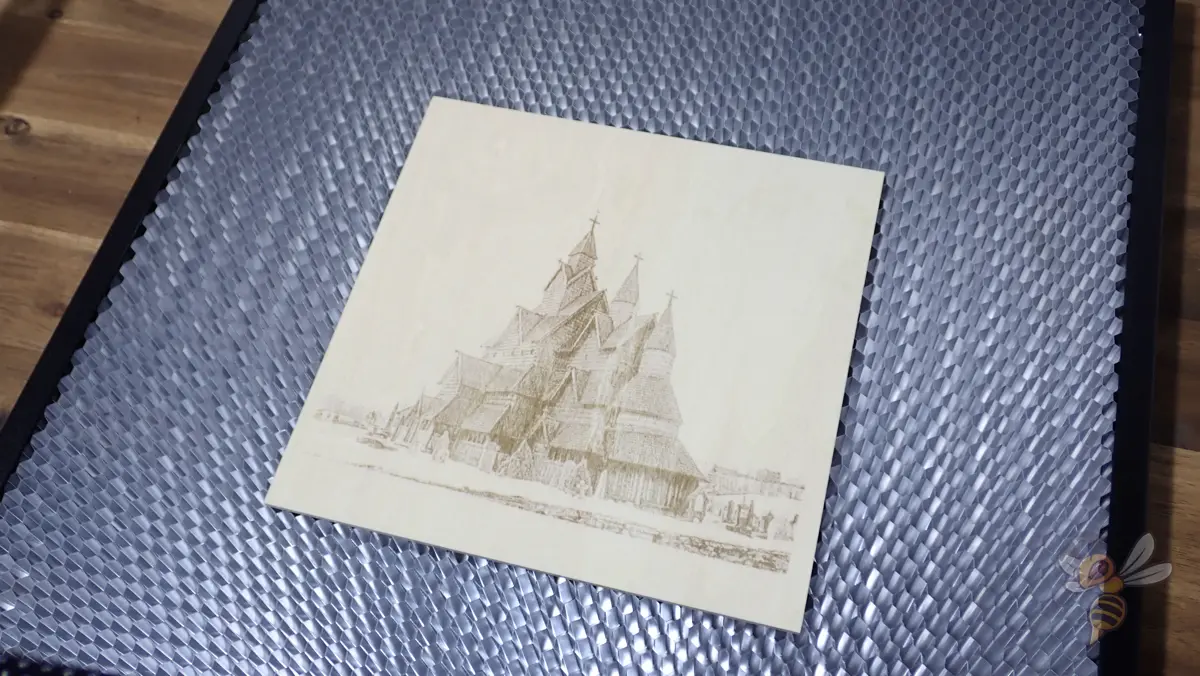
The bee was engraved in an amazingly short time. I was a little surprised by how fast and also how precise the laser works. Therefore, I immediately tackled something more challenging afterwards. The Heddal Stave Church from Norway was the next test (link to image).
The Micro SD card contains a tutorial video that shows the creation process of the test file. The image used there was processed within the software so that the laser can process it well. Most importantly, I also increased the contrast of the Heddal Stave Church and adjusted the exposure settings so that the outlines and details come out clearly.
This motif took significantly longer than the bee. Also, the smoke development was a bit stronger, which forced me to provide good ventilation. But the result is really outstanding. The photo has been extremely well transferred to the piece of wood, even in small details.
Cutting Quality: Practical Test
Next, I wanted to test how well the laser could cut the wood. To switch from engraving to cutting, you need to increase the power of the laser and decrease the speed. This gives the laser more time to cut through the material.
Since the laser cuts the piece of wood and radiates on the underside of the substrate, you need a suitable surface that is immune to the laser. Otherwise, you will cut or engrave your work surface!
The best way to do this is to use the special honeycomb pad. The highly reflective aluminum plate and honeycomb construction diffuse the laser, so it can’t do any more damage.
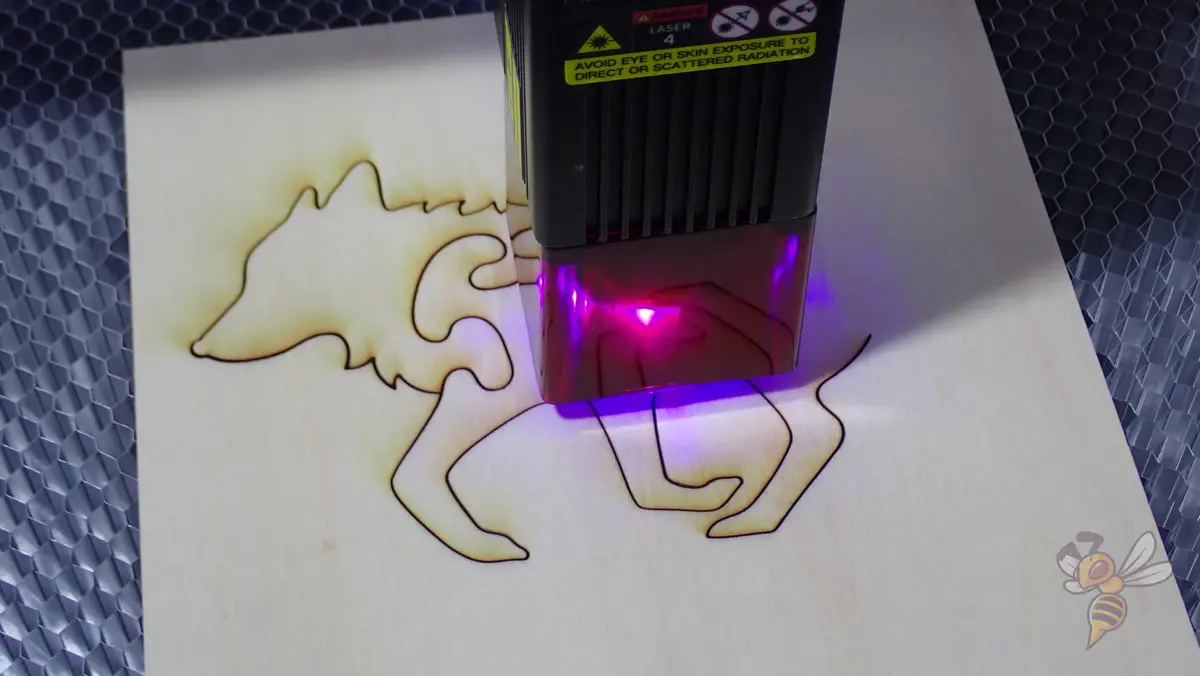
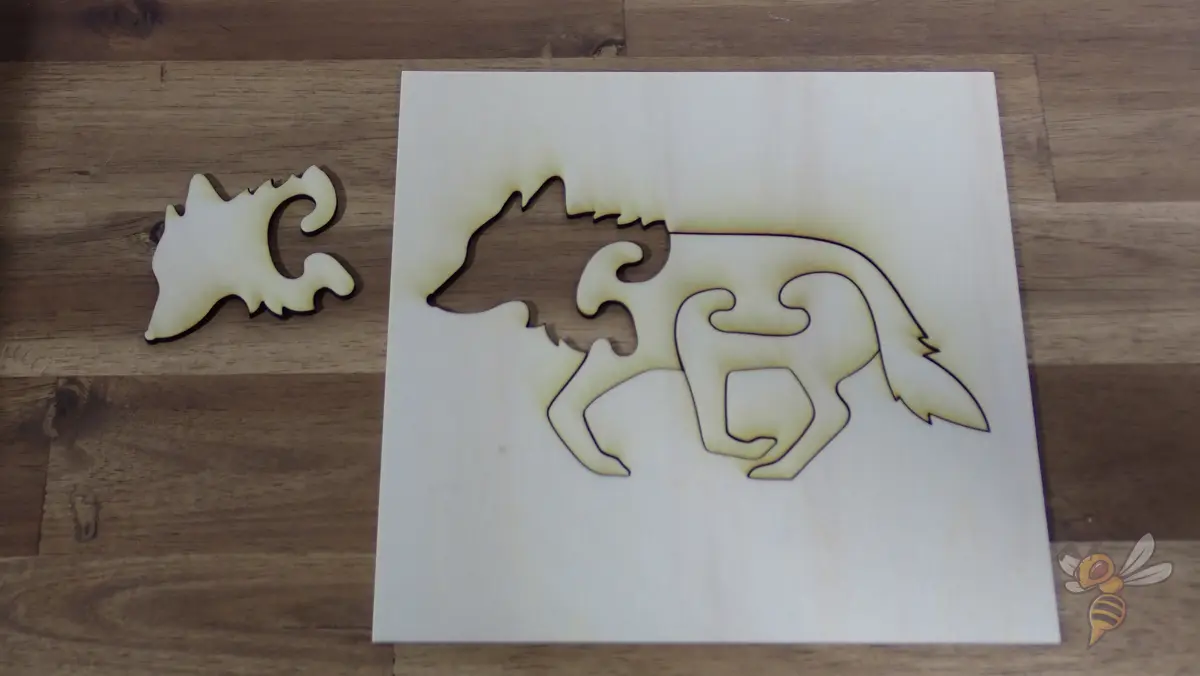
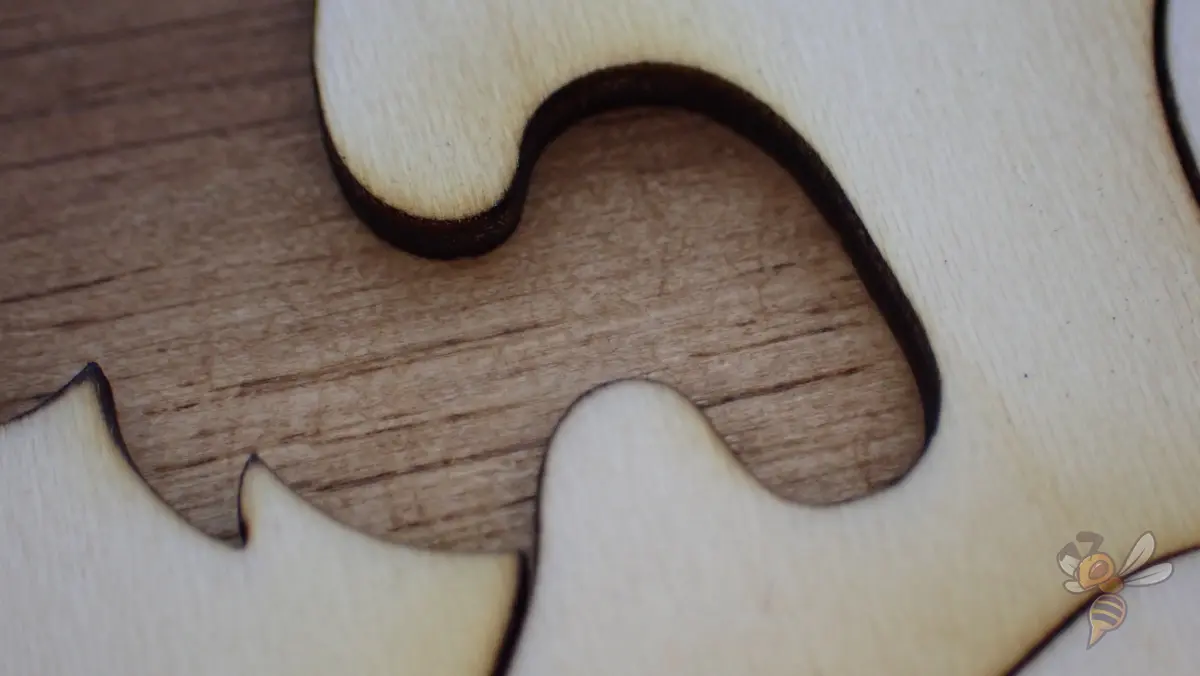
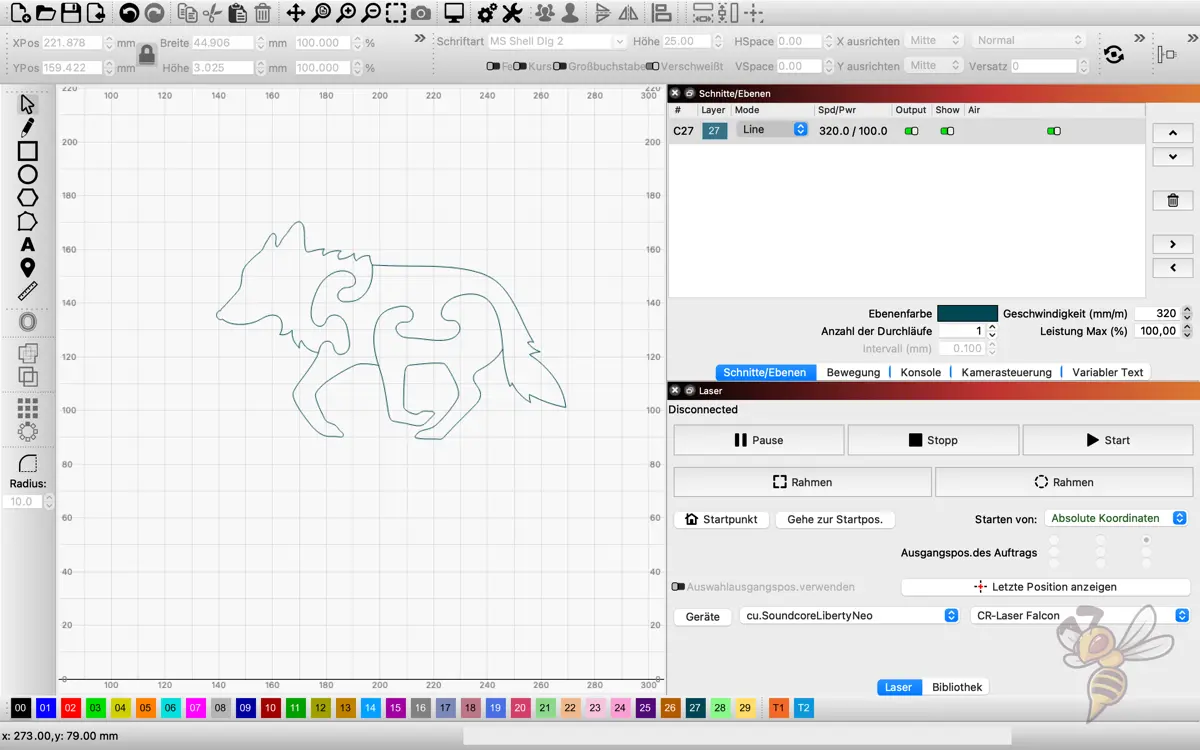
As the first motif, I have chosen a small wooden puzzle with wolf pattern (link to file). Again, the workflow is very simple. The file is simply imported and scaled to the size in which you want to cut the puzzle. Now you have to set the appropriate parameters, which are recommended in a file on the micro SD card.
Since the speed of the laser is significantly lower when cutting than when engraving, it also takes correspondingly longer. Also, the smoke development here is obviously much stronger than with engraving. Smoke traces also appear on the surface – but only on one side. Especially when cutting, it is necessary to ensure good ventilation of the room.
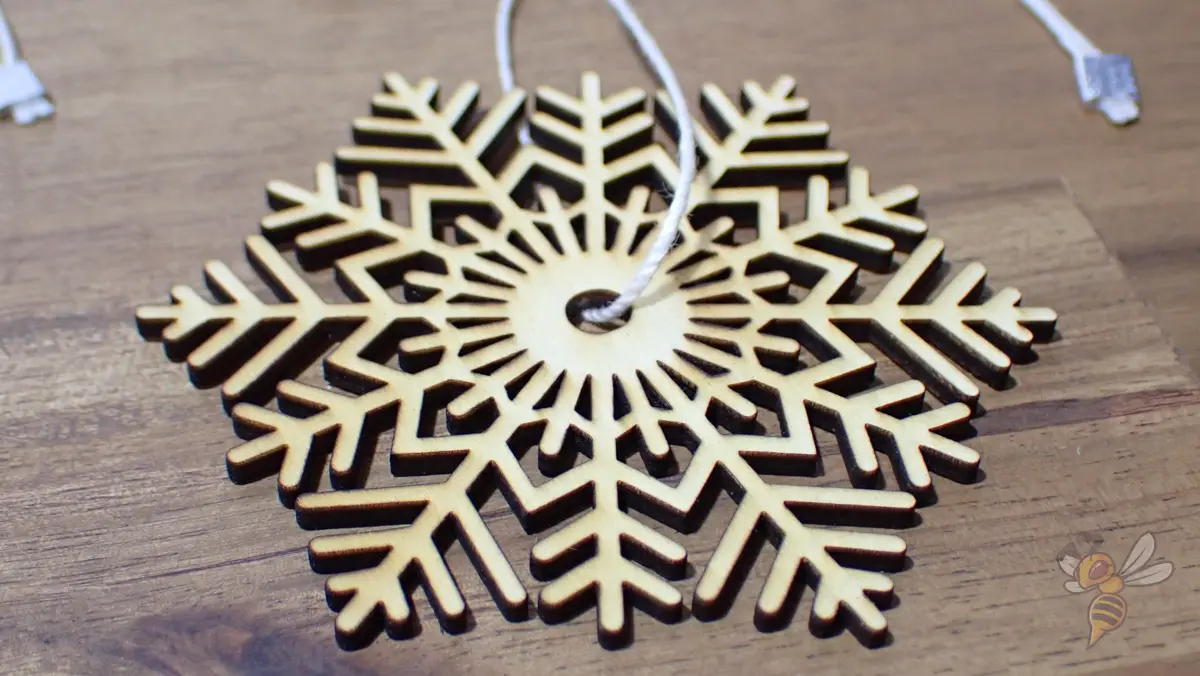
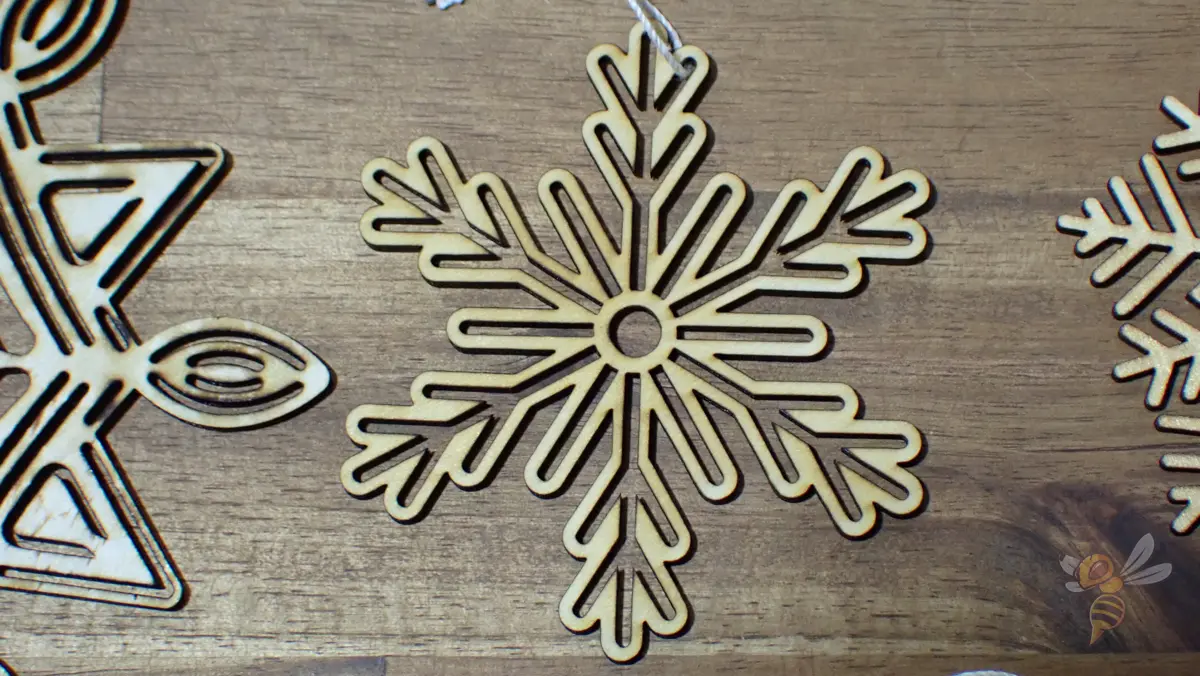
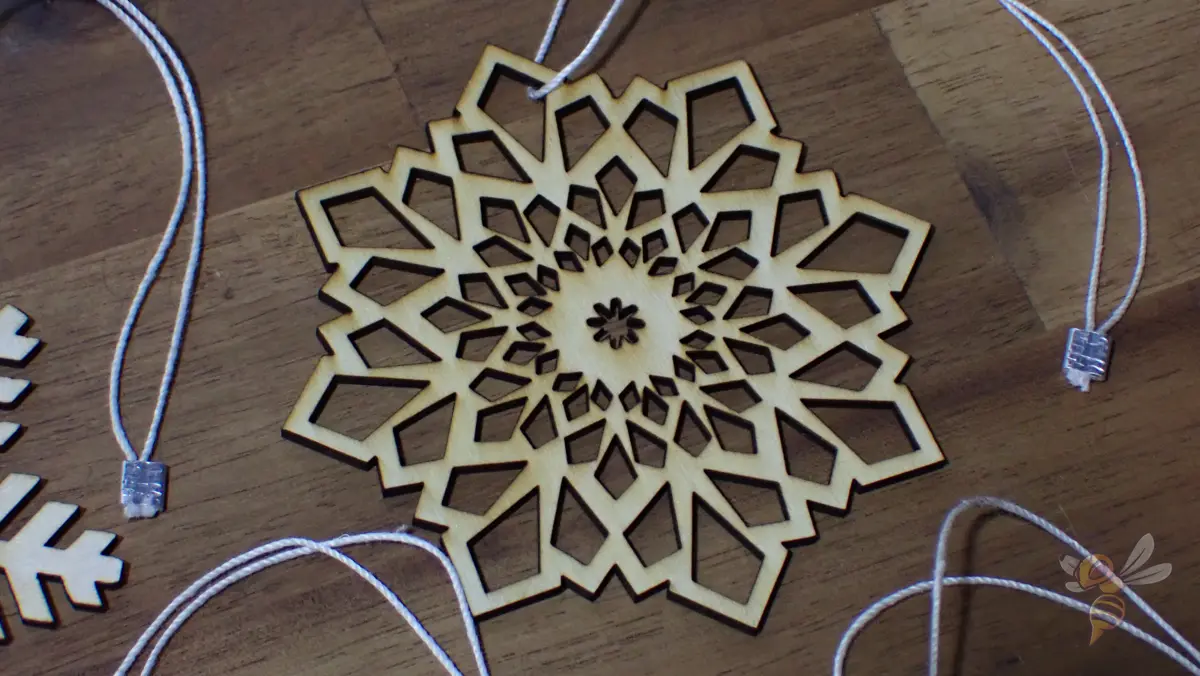
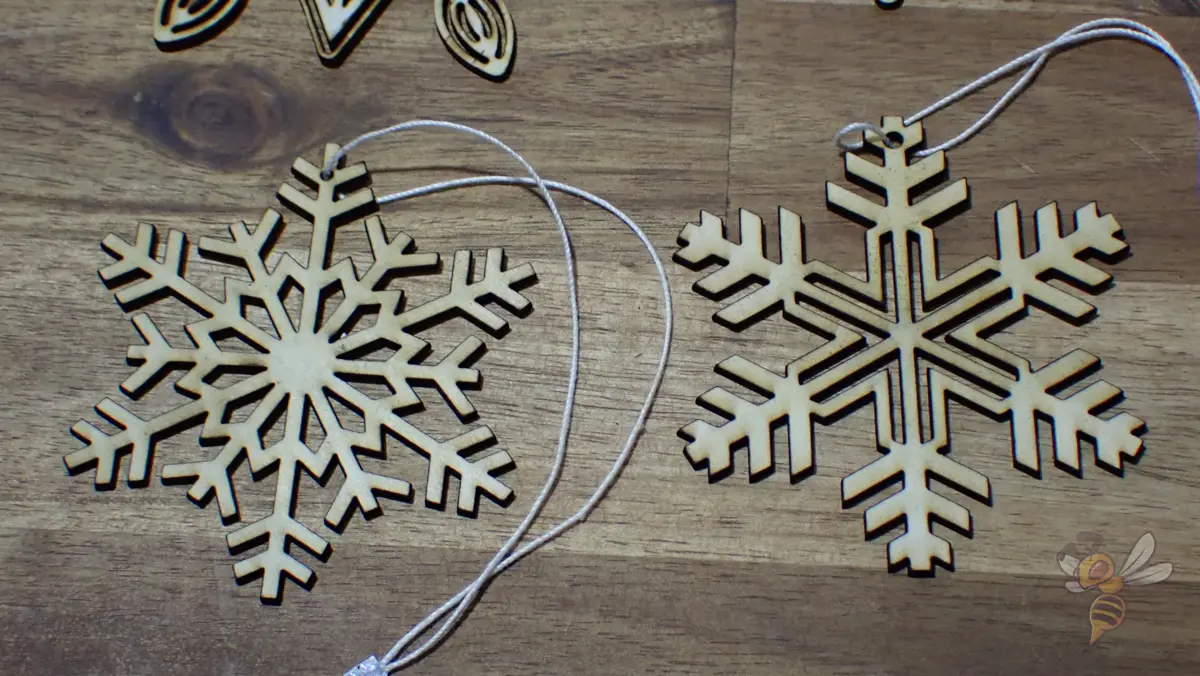
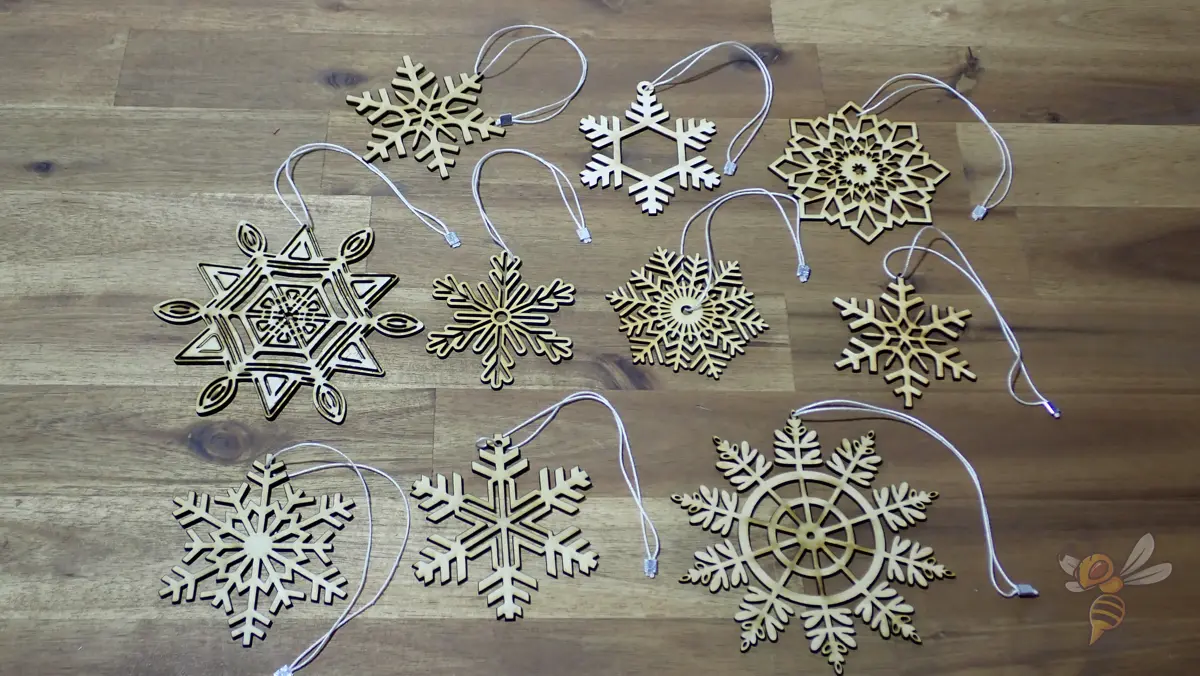
The next step was to test how fine details the laser can cut. For this, I found some Christmas decorations on Etsy (link to file).
After the Wolf Puzzle I was quite confident that this test would succeed, and it did. The quality of the individual snowflakes is really excellent, and even smaller scaled details were cut out perfectly.
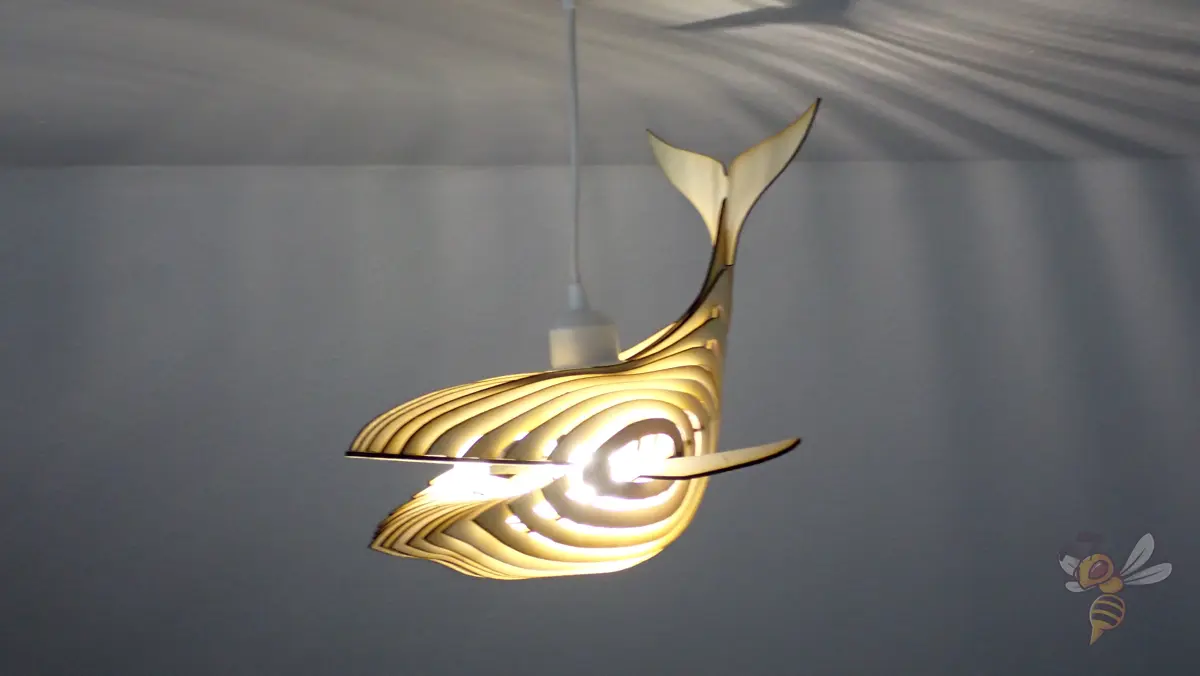
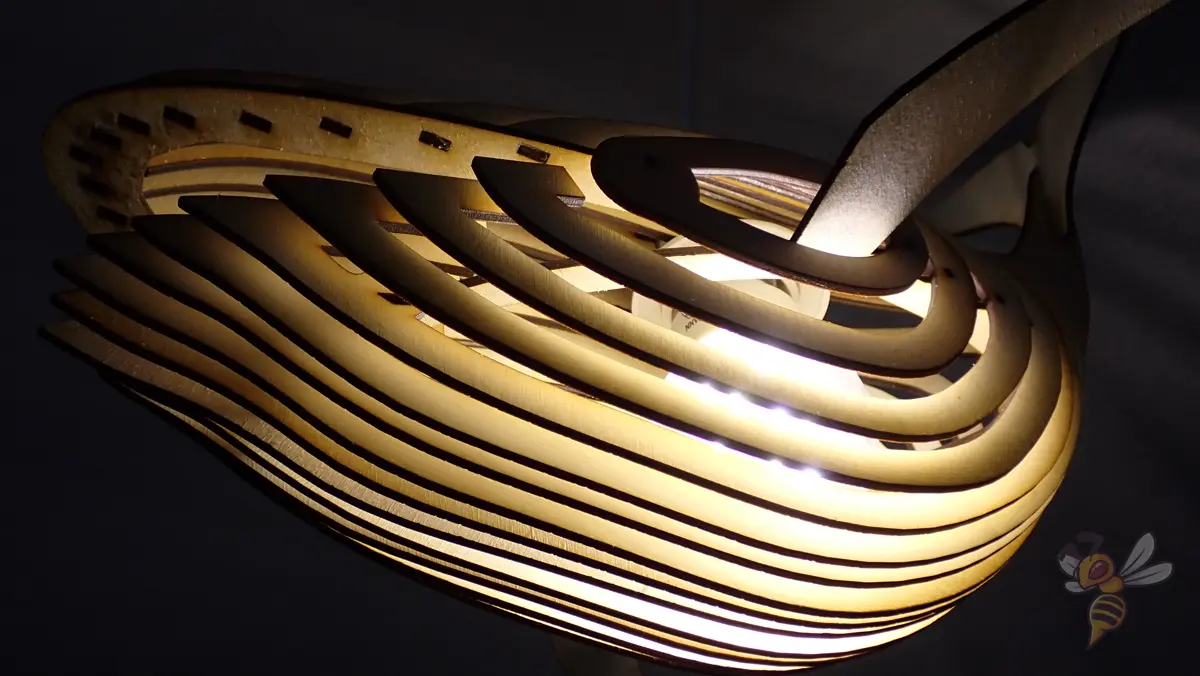
Since I ordered new material right after the device arrived, I jumped into a bigger project after the snowflakes. Since our children’s room still needed a nicer lamp, I decided on this whale lamp (link to file).
After about six passes, all the parts were laser cut and needed to be assembled. During this project, I experimented with the settings and optimized them for the wood I used (3 mm birch plywood).
The result is really great and was a great weekend project. If I had wanted to buy such a lamp, the price would have been several times higher!
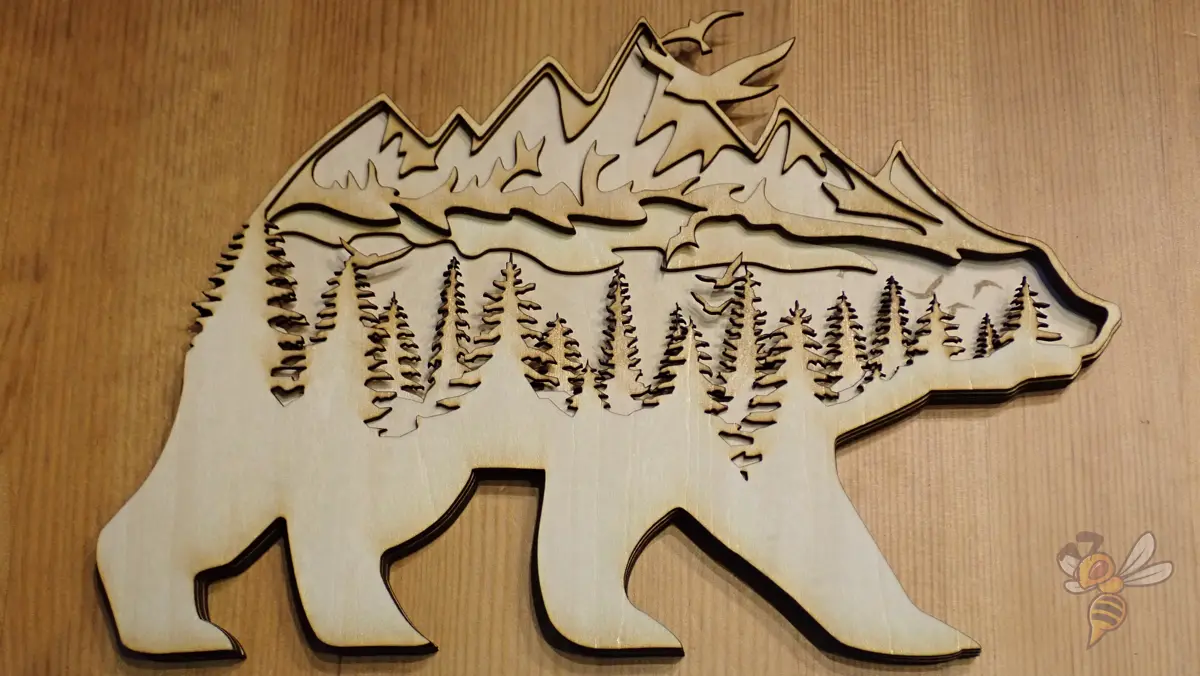

Since I still had some 3 mm boards left, I kept searching until I came across this decorative bear (link to file). It consists of a total of five layers of wood and was cut out in no time. I painted the wood with watercolors.
Cutting & Engraving at the Same Time: Practical Test
Since you can specify different settings for different lines in LightBurn, I had the idea to realize a project where both cutting and engraving is done.
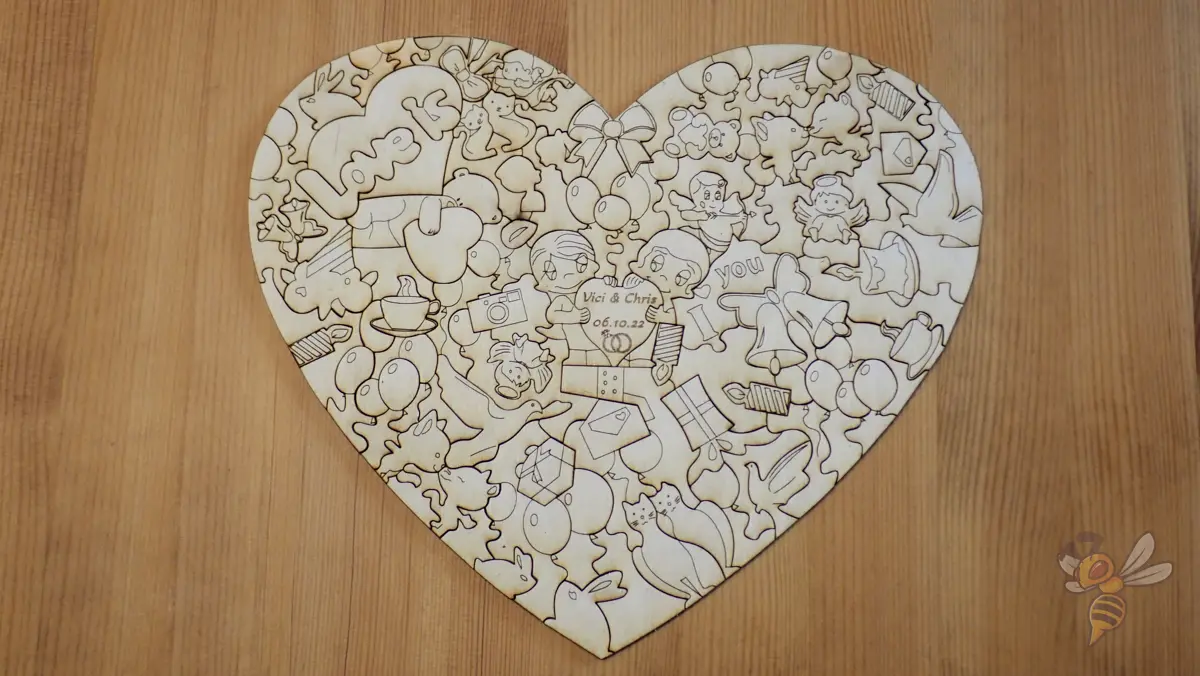
For the wedding of good friends, I cut and engraved a small gift in the form of a puzzle (link to file). Before the individual parts were cut out, the engravings were lasered. The result has become perfect and the individual puzzle pieces can be put together perfectly.
Is the CR-Laser Falcon 10W Worth It?
The Creality CR-Laser Falcon* is a powerful laser engraving machine that comes in two versions: the 5W and the 10W. The only difference between the two models is the laser module; the 5W version has a fixed focus bar and better smoke filtering, while the 10W version is more powerful and has a magnetic attachment that reduces burn marks.
Both models are easy to use and have a variety of features that make them perfect for any engraving project. Whether you want to add a personal touch to your items or create professional quality engravings, the Creality CR-Laser Falcon is the perfect tool for the job.
Although I mainly work with 3D printers, the ease of use and creative possibilities of this machine convinced me that you can also create great items with engraving machines. A definite recommendation for anyone who wants to cut and engrave with a laser!
Check Price at:
Disclosure: This website is the property of Martin Lütkemeyer and is operated by Martin Lütkemeyer. Martin Lütkemeyer is a member of the Amazon Services LLC and other Affiliate Programs. These are affiliate advertising programs designed to enable websites to earn advertising revenue through advertising and linking to Amazon.com and others. Links marked with * are affiliate links.
