- Wet Filament: Prevention, Symptoms & Drying - July 18, 2024
- Sovol SV08 – Best PrusaSlicer Settings & Profile - June 26, 2024
- Sovol SV08 – Best Orca Slicer Settings & Profile - June 26, 2024
Disclosure: Links marked with * are Affiliate Links. I earn from qualifying purchases if you decide to make a purchase through these links – at no additional cost for you!
Among the most popular 3D printers for beginners, besides the Creality Ender 3* is the Anycubic Mega S* right at the top – and rightly so!
This entry-level printer is very easy to set up, you can do almost nothing wrong and you won’t have to wait long for the first print. The level of detail is also surprisingly good for this price range.
In this article, you will learn in detail what you need to consider when setting up the Anycubic Mega S and how to successfully complete your first test print.
Unboxing

The Anycubic Mega S comes really well packed to your home. Inside the box, there are custom-made styrofoam inlays that perfectly protect all components of the 3D printer from shocks and other external impacts.
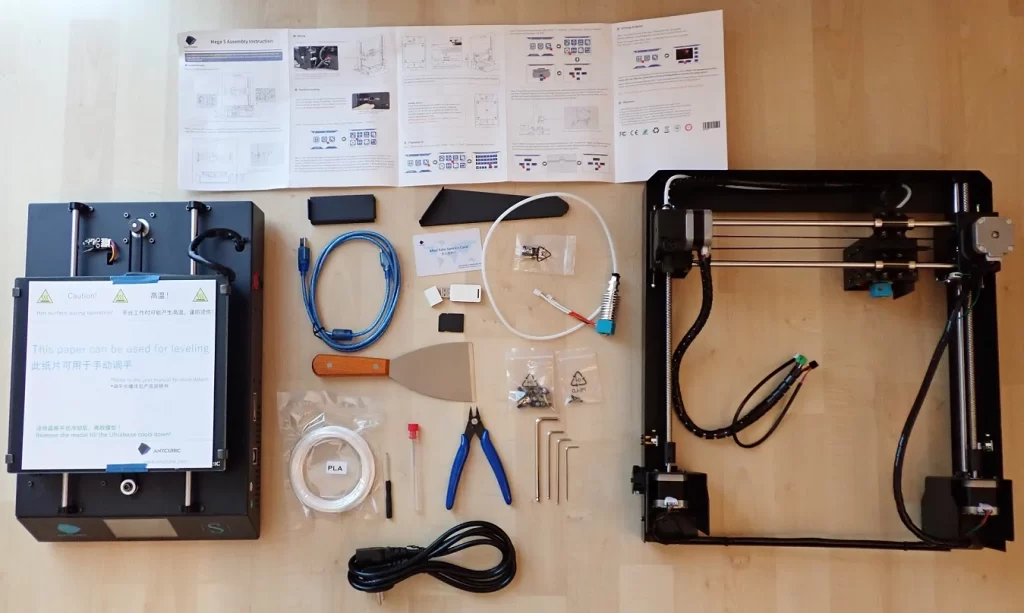
Anycubic has included everything you could need to set up and operate the 3D printer. The only thing I have replaced from the included tools is the screwdriver. The included screwdriver is really very small…
You’ll also need a caliper* or at least a good steel measure* to properly level the print bed – more on that later.
The scope of delivery includes the following things:
- 3D printer base with the already mounted print bed
- Frame with preassembled extruder
- Paper manual
- LAN cable
- Filament holder
- After-Sale Service Card
- Replacement limit switch
- Replacement extruder
- SD-USB adapter
- SD card (contents: detailed instructions in English and Japanese, print file for testing, Cura, driver)
- Side cutter
- Spatula
- All necessary screws
- All the allen wrenches you need
- A mini screwdriver
- A fine needle for cleaning the nozzle
- Vacuum packed PLA filament
- Power cable
However, what is immediately noticeable when unpacking is the stable frame. This allows the 3D printer to achieve high precision despite its low weight.
If you want to change the printer nozzle at some point, you will also need a suitable wrench. Changing the nozzle may sometimes be necessary if it is very dirty or if you want to use a different diameter.
Setup
CAUTION: Before you do anything with the printer, there is one thing you need to be aware of: on the side of the base of the 3D printer, there is a switch for the incoming voltage. The switch can be set to 220V or 110V. Depending on which dealer you get the 3D printer from, this may be preset to one value or the other. If the value does not match your local power grid, you will scrap the device right when you turn it on! You really need to pay attention here.
You can easily adjust the switch with the included mini screwdriver.
Now you can screw the frame to the base. Use the screws provided and tighten them loosely at first and then always opposite each other very tightly.
After the frame you can mount the filament holder.
Next up are the cables. These are color-coded and sized so that they cannot be plugged in incorrectly. This means that you have both color coding and mechanical protection. So it should not be possible at all to connect anything wrong.
If you don’t find the red cable immediately, you only have to look under or behind the stepper motor. There it is usually tucked behind so that it does not get in the way when mounting the frame.
Now all you have to do is plug in the power cord and you can start leveling the print bed!
Print Bed Leveling

When unpacking the 3D printer, you will have noticed that a paper is taped to the printing plate. This not only protects the print bed from scratches or other damage during transport, but it is also a very good aid for leveling the print bed.
One step that many people forget when leveling the print bed is to calibrate/adjust the Z-axis. For this, you need a caliper gauge or at least an accurate ruler. With it, you measure the distance of the stepper motors to a non-moving part. E.g. like in the picture below. Both stepper motors must have the same distance. You can adjust this with the Z stops.
The easiest way to do this is to move to the Z-Home position while the print bed is lowered quite a bit (but not all the way). By using the screws on top of the stepper motor, you can determine when the Z-axis limit switches are triggered. They will make a beeping sound.
This part of the print bed leveling is quite important, but can take quite a long time depending on how well the printer is already preset.
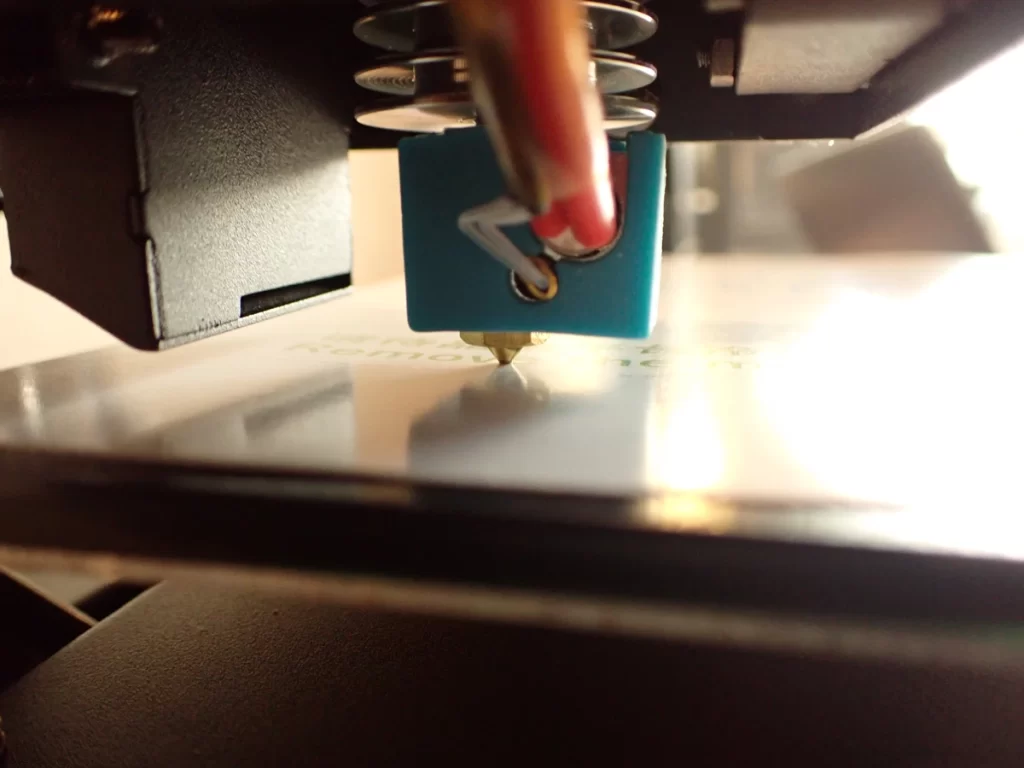
The aim of leveling the print bed is to ensure that all points on the print bed are the same distance from the nozzle. This is exactly what the paper is for. You adjust all four corners of the print bed so that the piece of paper just fits between the nozzle and the print bed. And by “just enough” I mean that the paper doesn’t get stuck between the nozzle and the print bed, but also that it can’t move completely loose underneath. There must be a little friction.
The process of leveling needs to be learned. In the beginning, you may need an hour or more until everything is perfectly adjusted. You have to get a feel for what changes when you turn a screw since all four corners are spring-loaded, the others also change slightly when you turn only one. Once you get the hang of it, leveling is done within a few minutes.
If you really manage to set the distance everywhere with the paper, you will get a good print. If the distance between the nozzle and the print bed is too small, it can rub against it in the worst case. If the distance is too big, the filament may not adhere properly to the printing plate.
So leveling also has a big impact on the print bed adhesion!
Test Print
Now that the printer is set up and the print bed is leveled, you are basically ready to make your first test print. The following steps are necessary:
- Install Cura
- Slice the 3D model
- Save 3D model to SD card as GCode
- Insert SD card into the 3D printer
- Load filament into the 3D printer
- Start printing program
Install Cura
You can either use the files on the SD card to install Cura or get the software directly online (it’s free – link).
After you have installed Cura, you need to select the Anycubic Mega S as your printer. You can do this easily via the menu because the profile for this printer is already available. Just click through the menu “Settings” -> “Printer” -> “Add Printer…” until you can select the Anycubic Mega S. The menu navigation is very self-explanatory.
Slice the 3D Model
On the SD card that is included, a 3D model is already available, the “Owl Pair”. This model is also very suitable for a first print.
You don’t have to worry about the print bed adhesion, e.g. by using a Raft or Brim, because the lowest layers of the model already act like a raft. In addition, you do not need any support structures, so that the model is ready immediately after printing without reworking.
Once you have loaded the model, I would recommend you to go to the custom settings, because there you have many more options. For the beginning, however, it is sufficient that you decide between the preset profiles High, Normal or Draft. Since this is a test print, it is advisable to use the normal setting with 0.2 mm layer height for the time being.
Now all you have to do is press the “Slice” button and Cura will slice the 3D model into individual layers as required by the settings.
After it is done, it spits out an indication of how long the print will take and how much filament is needed where the “Slice” button used to be. You can also save the file to the SD card or preview it.
If the preset size of the model is much too large and Cura calculates a few hours, you can also reduce, enlarge or move the model with the tools on the left side of the screen.
Save 3D model to SD card as GCode
This step is quite self-explanatory. As already mentioned, after slicing you can save the finished model as GCode on the SD card.
Insert SD card into the 3D printer
This step is also fairly self-explanatory, although it should be noted once again that the position of the SD slot in the 3D printer is somewhat impractical. It is located directly behind the filament holder.
When the filament is loaded, it is very difficult to get to the SD card. However, you get used to it and with your index and middle finger together, you can eventually get the SD card out and in just as well as you normally would.
Load filament into the 3D printer
The first step in loading the filament is to place the filament on the filament holder so that the filament comes from the bottom of the spool. Then you push it through the filament sensor into the extruder. To do this you have to pull the lever on the extruder backward and push the filament in at the same time.
Do this until you can see through the white transparent tube that you have come to the nozzle and it goes no further.
To push the filament through the nozzle, it must be warm. To do this, go to “Tools” in the main menu and then to “Filament“. There you can let the filament slide in or out. The printer automatically checks whether the temperature is sufficient for this and regulates it accordingly if it is still too low.
As soon as the first ‘sausage’ comes out of the nozzle, you can press Stop.
Start print program
Now the moment has finally come when you can start the program! All you have to do is go to “Print” in the main menu and select your file (in this case it’s the pair of owls) and press “Print” again.
The printer will now start printing your model and show its progress on the display.
Result
If nothing went wrong, the model should print without any problems. For the first print without changing other settings in Cura, the result is not bad – you can build on that!
(By the way, if you’re wondering what that line is around the outside of the model, it’s a Skirt to test the filament flow before the actual printing).
Related Questions
Are there also 3D printers that automatically level the bed?
There are many 3D printers that level the print bed at the touch of a button. They are either equipped with it from the start or have been upgraded with a print bed sensor such as the BLTouch.
What do I do if PLA does not adhere to the print bed?
Poor print bed adhesion with PLA is a common phenomenon. There are many remedies for this, such as other print bed materials (for the Anycubic Mega S, I can only recommend the BuildTak surface*!), changing the temperatures or cleaning the print bed. There are also auxiliary prints such as the Raft or the Brim, which can significantly improve adhesion.

Related Post:
PLA 3D Print Does Not Stick to the Bed? – Try This!
Conclusion
The Anycubic Mega S is an excellent printer for beginners. However, you will have to tinker here and there. For example, manual leveling of the print bed takes some getting used to at first.
The complete setup, the settings and the first test print can be done within a few hours. Sometimes it is also much faster if the printer is delivered already well adjusted – but that is a matter of luck.
For the price, the print results are pretty good! If you print in fine mode with a layer height of 0.1 mm and have the print bed adhesion under control, you can print really highly detailed models!
Disclosure: This website is the property of Martin Lütkemeyer and is operated by Martin Lütkemeyer. Martin Lütkemeyer is a member of the Amazon Services LLC and other Affiliate Programs. These are affiliate advertising programs designed to enable websites to earn advertising revenue through advertising and linking to Amazon.com and others. Links marked with * are affiliate links.

