
- Wet Filament: Prevention, Symptoms & Drying - July 18, 2024
- Sovol SV08 – Best PrusaSlicer Settings & Profile - June 26, 2024
- Sovol SV08 – Best Orca Slicer Settings & Profile - June 26, 2024
Disclosure: Links marked with * are Affiliate Links. I earn from qualifying purchases if you decide to make a purchase through these links – at no additional cost for you!
Leveling the print bed on the Anycubic Mega-S* takes some getting used to at first. After you have followed the steps in this guide once, leveling should be routine the next time.
A well-leveled print bed leads to beautiful print results. If the print bed is not properly leveled, all kinds of printing errors and even damage to the 3D printer can occur.
The best way to level the print bed of the Anycubic Mega-S is to use the paper method. To do this, you have to adjust the distance between the nozzle and the print bed so that you can still push a sheet of paper with some friction between the nozzle and the print bed.
How exactly you do that, you will learn step by step in this post.
Table of Contents:
Preparation: Nozzle & Print Bed Cleaning
Before you do anything, the nozzle and print bed must be clean. There must be no foreign objects or filament residue between the print bed and the nozzle.
Leveling the print bed is mainly a matter of adjusting the distance between the nozzle and the print bed.
If there are foreign bodies between these two parts, this is not possible.
If you have used the nozzle before, filament residue will have accumulated there. You can carefully remove this with a side cutter. Another method would be to heat up the nozzle and wipe it with a tissue.
How to clean your nozzle in detail is explained in our article on nozzle cleaning.
Make sure that there are no filament residues left on the underside of the nozzle.
Cleaning the print bed depends on what you have done with the print bed so far. In this detailed guide to print bed cleaning you will find all methods explained in detail.
Leveling
Step 1: Screw the print bed all the way down

The first step is usually not necessary if you have just assembled the 3D printer. However, to prevent the nozzle from colliding with the bed, you should screw the print bed all the way down.
However, you do not have to try to tighten the screws completely by force. Just turn them down roughly is enough.
Step 2: Nozzle on Z-Home
Now you can move the Nozzle to Z-Home via the menu. You will have to use this button a few times during leveling:
Tools -> Home -> Home Z
Step 3: Set the distance between the Z-stepper motors
Depending on how well your 3D printer is already set up, you may need to adjust the Z-axis stepper motors before leveling.
The goal is to get an equal distance between the stepper motor and the 3D printer base on both sides.
If the distances left and right are not equal, the Z-axis will be crooked. Leveling will then be much more difficult or not possible at all and printing errors may occur.
Therefore, you need to match these distances.
You set these distances via the two screws on the stepper motors. They are placed a bit awkwardly, but you can reach them easily with a long screwdriver.
The further you screw them in, the further the lower ends look out from under the stepper motors. And the deeper the screw is, the earlier the Z-stop is triggered.
As soon as the Z stop is triggered, the stepper motor stops immediately and you hear a short beep.
Each time you adjust a screw, you have to move the Z-axis up a few millimeters (Menu -> Tools -> Move Axis -> 10 at +Z) and then move back to Z-Home and measure the distances again.
To give you a better idea of what happens when these screws are not set exactly and the distances between the two stepper motors on the Z-axis are not equal, I have created the following illustration.
If the distances are not equal and you approach Home Z, the Z-axis will be skewed:
Step 4: Roughly adjust the print bed to nozzle height
Next, you can roughly adjust the print bed to the height of the nozzle. For now, you can use your eye as a measure.
You turn the print bed upwards on all four sides until there is only a small gap between the print bed and the nozzle.
You can move the print head by hand and check the distances at all four corners and in the center.
Always move the printhead very slowly and carefully. If the print bed is crooked and you move the print head too fast, the nozzle could collide with the print bed! This can easily cause scratches and worse damage.
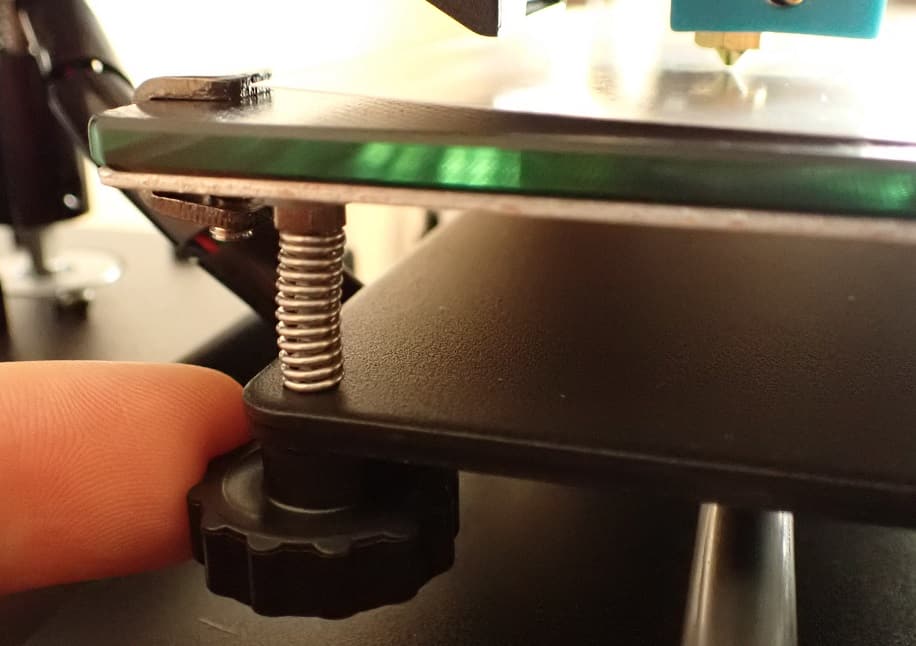
Step 5: Leveling with the paper method
Now we come to the most important step in leveling the print bed on the Anycubic Mega-S.
The paper method is not only useful for the Mega S. It is used for almost all other 3D printers without automatic print bed leveling.
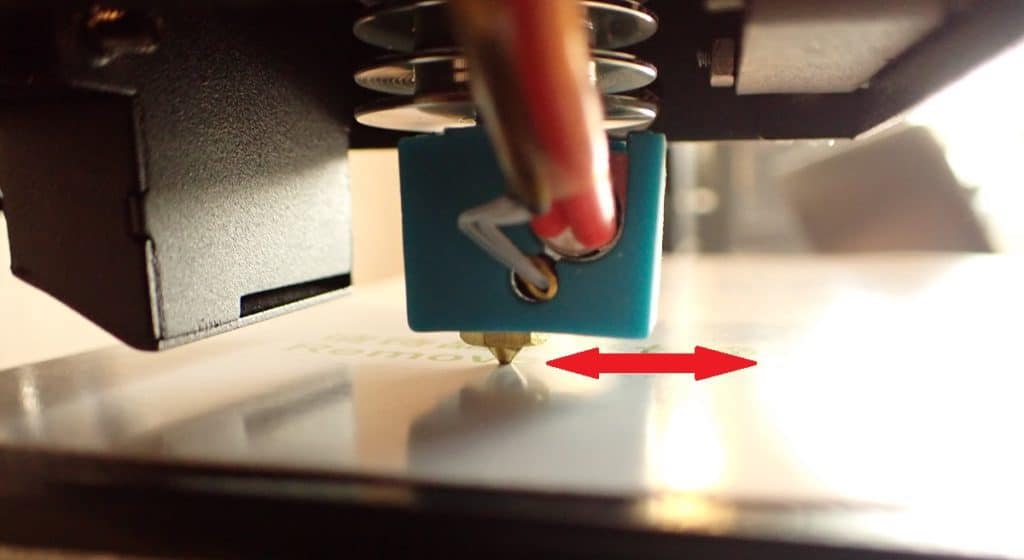
Roughly speaking, the goal of the paper method is to adjust the distance between the print bed and the nozzle so that a piece of paper “just barely” fits between them.
And the “just barely” is quite important: You have to squeeze the paper slightly between the nozzle and the print bed via the rotary screws on the print bed. But only so far that you can push it back and forth with a little resistance.
- If the distance is too small, you will not be able to move the paper.
- If the distance is too big, you can move the paper without resistance.
In order to set the same distance everywhere, it is therefore important that you feel approximately the same resistance when moving the paper.
The supplied paper is ideal for this. If you no longer have this paper, you can also use another piece of paper. If you have a caliper gauge*, you can also measure the piece of paper – it should be about 0.1 mm thick.
If you want to be really professional, feeler gauges are of course ideal for this! This one here on Amazon* has the right thickness. With it, you could also get even closer.
Step 6: Check everything again
Once you have everything set, you should again check each corner and the center of the print bed with the paper.
Since the leveling screws are spring-loaded, the other three corners also change slightly when you turn a screw. This can easily lead to frustration because you feel like you’re always starting over.
So it is normal if you have to do the leveling process two or three times until you are satisfied with the result.

Some print beds warp under the influence of temperature. It is therefore a good idea to check the leveling again with a hot print bed.
If your print bed warps significantly under the influence of temperature, you should rerun the print bed leveling if you are using a different filament that requires different print bed temperatures.
Step 7: Test print
As long as you have followed all the steps in this guide, test printing should not be necessary.
But if you want to be on the safe side and perfect your accuracy, a test print makes sense. There are numerous test objects that you can print (e.g. this one on Thingiverse).
With such a test print, you can measure the result at the end and know where there might be weaknesses in your print bed leveling of your Anycubic Mega S. This way, you can approach the perfect print result.
Common Problems
One corner is always too low / too high
I actually had this problem when leveling my Anycubic Mega-S. After what felt like 20 leveling restarts and a complete deconstruction of the print bed, I noticed that one srew could not be screwed far enough.
As a result, there was always one corner too deep.
The solutions that helped were to use washers under a spring to artificially lengthen the spring. This allowed me to push the corner up and still adjust it through the screw so that I could level the print bed exactly.

Print bed is crooked / uneven
It may happen that the print bed is uneven.
Then the steps in this guide will not help you to level the print bed. If the print bed is warped or uneven, leveling is not possible at all.
As soon as you suspect that your print bed might not be completely flat, you should check this. The best way to do this is with an exactly straight object – e.g. a ruler that you place on its edge on the print bed.
If your print bed is really uneven, the only solution is to replace it with a new print bed. You can have these delivered quickly via Amazon*, for example.
Silicone Damper
Upgrades play a big role in the 3D printer community. Especially with such inexpensive 3D printers like the Anycubic Mega-S, it can pay off to invest in an upgrade here and there.
Such worthwhile upgrades include these silicone dampers for the print bed.
Here is the link to the silicone dampers I use*.
These shock absorbers are very elastic and replace the supplied springs under the printing plate.
They are much more stable, absorb vibrations better and make leveling easier. However, the biggest advantage is that you no longer have to perform manual leveling so often!
In fact, since I have this upgrade, I only readjust the print bed during regular maintenance and care of the 3D printer. Otherwise, the print bed stays exactly where you set it after you install these silicone dampers.
The only downside to this upgrade is that the print bed is no longer cushioned as well if you accidentally drive the nozzle into it.
So before you install this upgrade, I recommend screwing down the print bed before each new leveling to avoid an accidental collision at the beginning.
Related Questions
Why leveling?
If you do not level your print bed properly, the movements of the nozzle in the X and Y directions will not be parallel to the print bed. As a result, the filament will not be applied evenly everywhere.
In extreme cases, the nozzle can even drive into the print bed and cause damage. In order to achieve a beautiful print image, it is therefore extremely important to level the print bed correctly.
How Exactly Do I Have to Level?
The accuracy of the leveling should match your accuracy requirements. The more evenly the distance between the nozzle and the print bed is set, the better the result will be.
The paper method is very accurate in itself. If you want it to be even more accurate, you can use a feeler gauge*.
As for the distance you set, 0.1 millimeters from the paper is a good guide. I have used various nozzles with diameters from 0.2 to 1.0 mm with this distance without any problems.
This value is particularly ideal for the standard 0.4 mm nozzle.
Can I use a BLTouch with the Mega S?
If you don’t like the manual leveling of the print bed at all and want to automate this step a bit, you can also use a BLTouch. In this guide on Thingiverse you will find all the necessary info.
Disclosure: This website is the property of Martin Lütkemeyer and is operated by Martin Lütkemeyer. Martin Lütkemeyer is a member of the Amazon Services LLC and other Affiliate Programs. These are affiliate advertising programs designed to enable websites to earn advertising revenue through advertising and linking to Amazon.com and others. Links marked with * are affiliate links.
