
- Wet Filament: Prevention, Symptoms & Drying - July 18, 2024
- Sovol SV08 – Best PrusaSlicer Settings & Profile - June 26, 2024
- Sovol SV08 – Best Orca Slicer Settings & Profile - June 26, 2024
Disclosure: Links marked with * are Affiliate Links. I earn from qualifying purchases if you decide to make a purchase through these links – at no additional cost for you!
The Voxelab Proxima 6.0* is not a noname product. Voxelab is a subsidiary of Flashforge, a well-known manufacturer of high-quality 3D printers. Even though Voxelab is still very young, there is a lot of know-how and experience in their 3D printers. And you can see that in the Proxima 6.0!
The Voxelab Proxima 6.0 is an ideal entry-level device and can also be recommended for experienced users. With its very low price and the high accuracy of 50 µm in the XY direction and 25 µm in the Z direction, it can also keep up with more expensive models.
After a short overview, you will learn everything important about this 3D printer in this review. We will cover the scope of delivery, the print quality with examples, its features and the technical specifications. At the end you will find similar 3D printers.
Table of Contents:
- 1 Key Takeaways
- 2 Who Should Buy the Proxima 6.0?
- 3 Pros & Cons Voxelab Proxima 6.0
- 4 Scope of Delivery Voxelab Proxima 6.0
- 5 Print Quality Voxelab Proxima 6.0
- 6 Features Voxelab Proxima 6.0
- 6.1 6-inch Monochrome Screen
- 6.2 2K Resolution & 0.025 mm Layer Thickness
- 6.3 1.6-Liter Print Volume
- 6.4 Supports Various Slicers
- 6.5 Simple Manual Print Bed Leveling
- 6.6 Resin Tank with Marking for Max. Fill height
- 6.7 Compatible Resins
- 6.8 Easy Replacement of the FEP Film
- 6.9 Single Linear Rail
- 6.10 Easy Operation via Touchscreen
- 7 Technical Specifications Voxelab Proxima 6.0
Key Takeaways
- high accuracy for a very reasonable price
- operation is suitable for beginners
- compatible with all common resins (405 nm)
- 130 x 82 x 155 mm print volume
Who Should Buy the Proxima 6.0?
The Proxima 6.0* is intended for hobby use and is especially recommended for beginners. The accuracy is good enough to print miniatures, decorative objects and fan articles. The accuracy is also sufficient for mechanical applications.
At the low price, you’re taking little risk and getting a device with which you can print high-quality objects for many years.
Pros & Cons
Voxelab Proxima 6.0
PRO:
- low price
- very good price-performance ratio
- sturdy packaging
- high-quality tools included
- easy Quick Start Guide
- very good print quality:
- 6-inch screen with 2K resolution = 50 µm pixel size
- minimum layer thickness of 25 µm
- easy operation
- sturdy construction
- easy leveling
- supports different slicers
- perfect introduction to resin 3D printing
CONTRA:
- medium noise during operation (fan + Z-axis)
- test objects on USB stick still need to be sliced
- annoying signal tone (you should switch it off)
Scope of Delivery
Voxelab Proxima 6.0
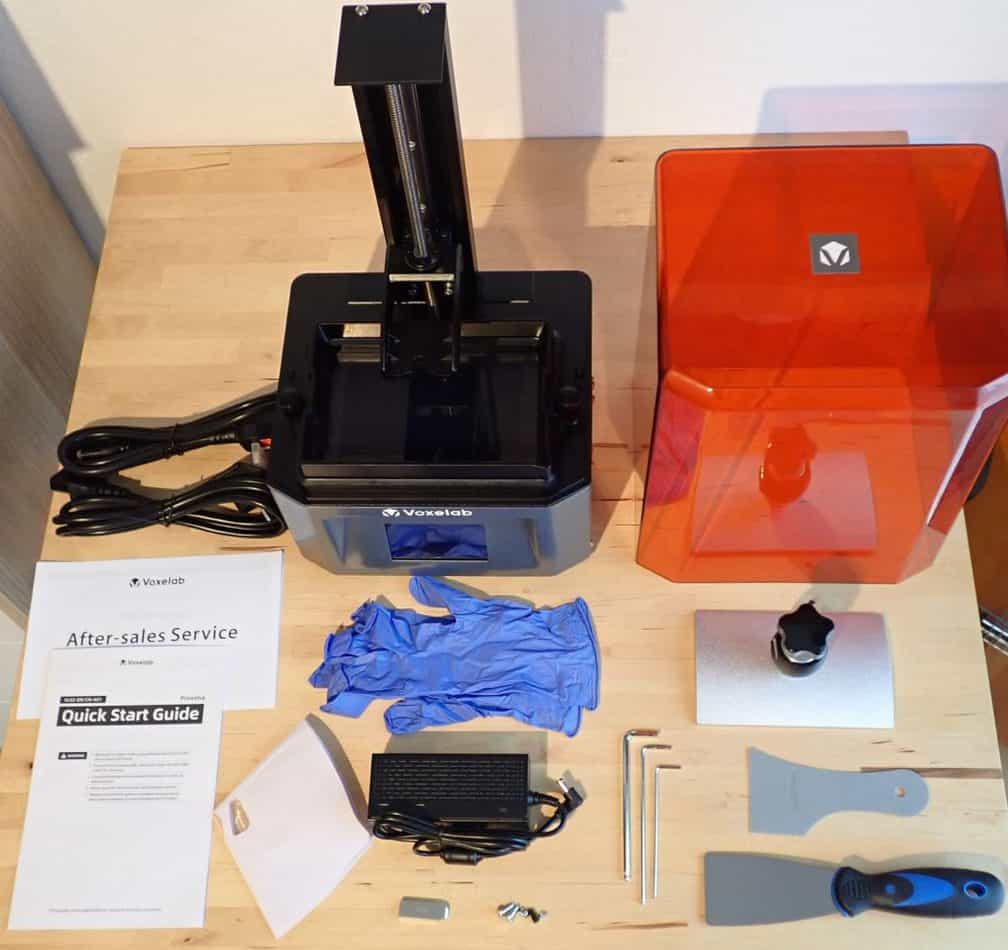
The Voxelab Proxima 6.0 comes with extensive equipment. Almost all the things you need for your first print are included. The following things are included in the scope of delivery:
- printer with resin tank
- UV light protective hood
- power cable
- Quick Start Guide / manual
- After Sales Card
- USB stick with slicer and test objects
- built plate
- disposable gloves
- allen keys
- spare screws
- metal scraper to release the print object from the built plate
- plastic scraper to remove resin residues from the resin tank
- disposable resin filter
If this is your first resin 3D printer, though, here’s what you’ll need additionally:
- 405 nm resin (link to my favorite resin*)
- isopropanol* for washing the printing parts, the resin tank and the tools
- more gloves*
- a lot of paper towels!
- FFP2 mask*
- reusable resin filter (this one is perfect* – note: always clean thoroughly with isopropyl alcohol to prevent cured resin from clogging the filter).
- PTFE lubricant* for the FEP film (so that the print does not adhere to the FEP film of the resin tank, but to the build plate)
Print Quality
Voxelab Proxima 6.0
If the Proxima 6.0 is your first resin printer, you’ll be thrilled with the print quality. Especially if you’ve only worked with filament printers before.
If you are already familiar with resin 3D printers, the print quality of the Proxima 6.0 is comparable to other hobby 3D printers – the standard pixel size is 0.05 mm or 50 µm (X/Y direction) and the minimum layer thickness is 0.025 mm or 25 µm (Z direction). In relation to the price, the print quality is really very good and, above all, reproducible.
I have printed several models with this printer and each time the part has succeeded and the quality is flawless! Even with devices that cost double or triple, this is not always guaranteed.
Test Print
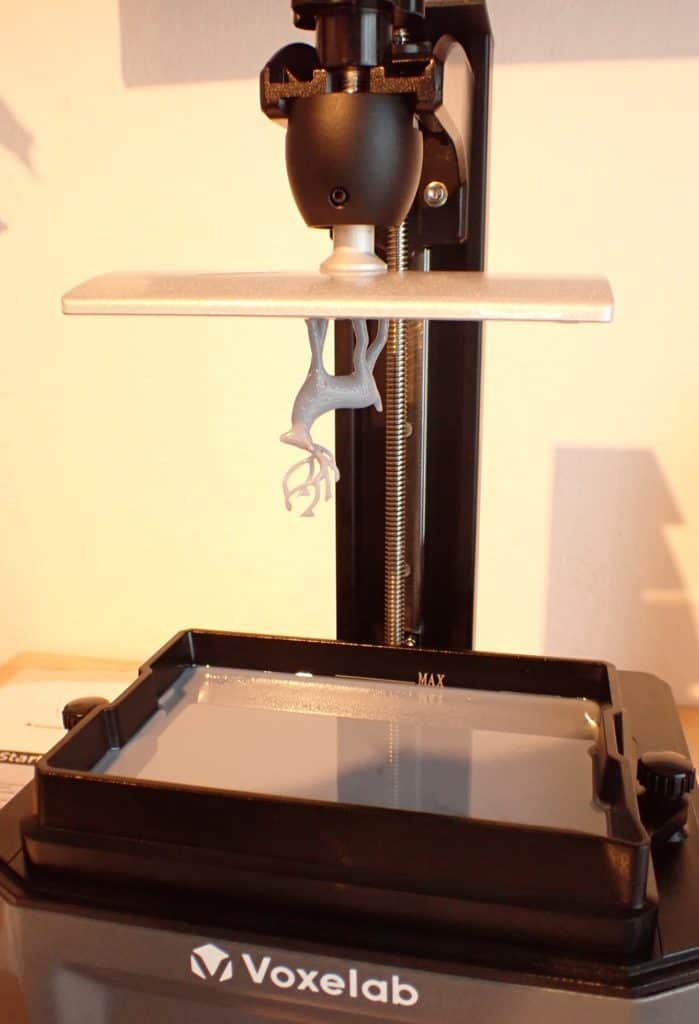
On the included USB stick is a test print from Voxelab – a stag made of organic structures that works without support. This stag is designed so that you don’t have to change much in the slicer to make your first print.
I have now used the Proxima 6.0 very often and only had a problem with the very first test print. The print object did not adhere to the build plate but to the FEP film of the resin tank. This of course made the print unusable. I noticed it only when the print bed without object came out of the resin…
This problem is very common with resin printers. I have had it in principle with each of my resin printers in the beginning. But there is a very simple solution: PTFE lubricant*.
You apply this lubricant in very small amounts (one drop is enough for the entire FEP film) to the dry and cleaned FEP film and spread evenly. One can of this lubricant will last for years because you really only need one drop for the entire FEP film.
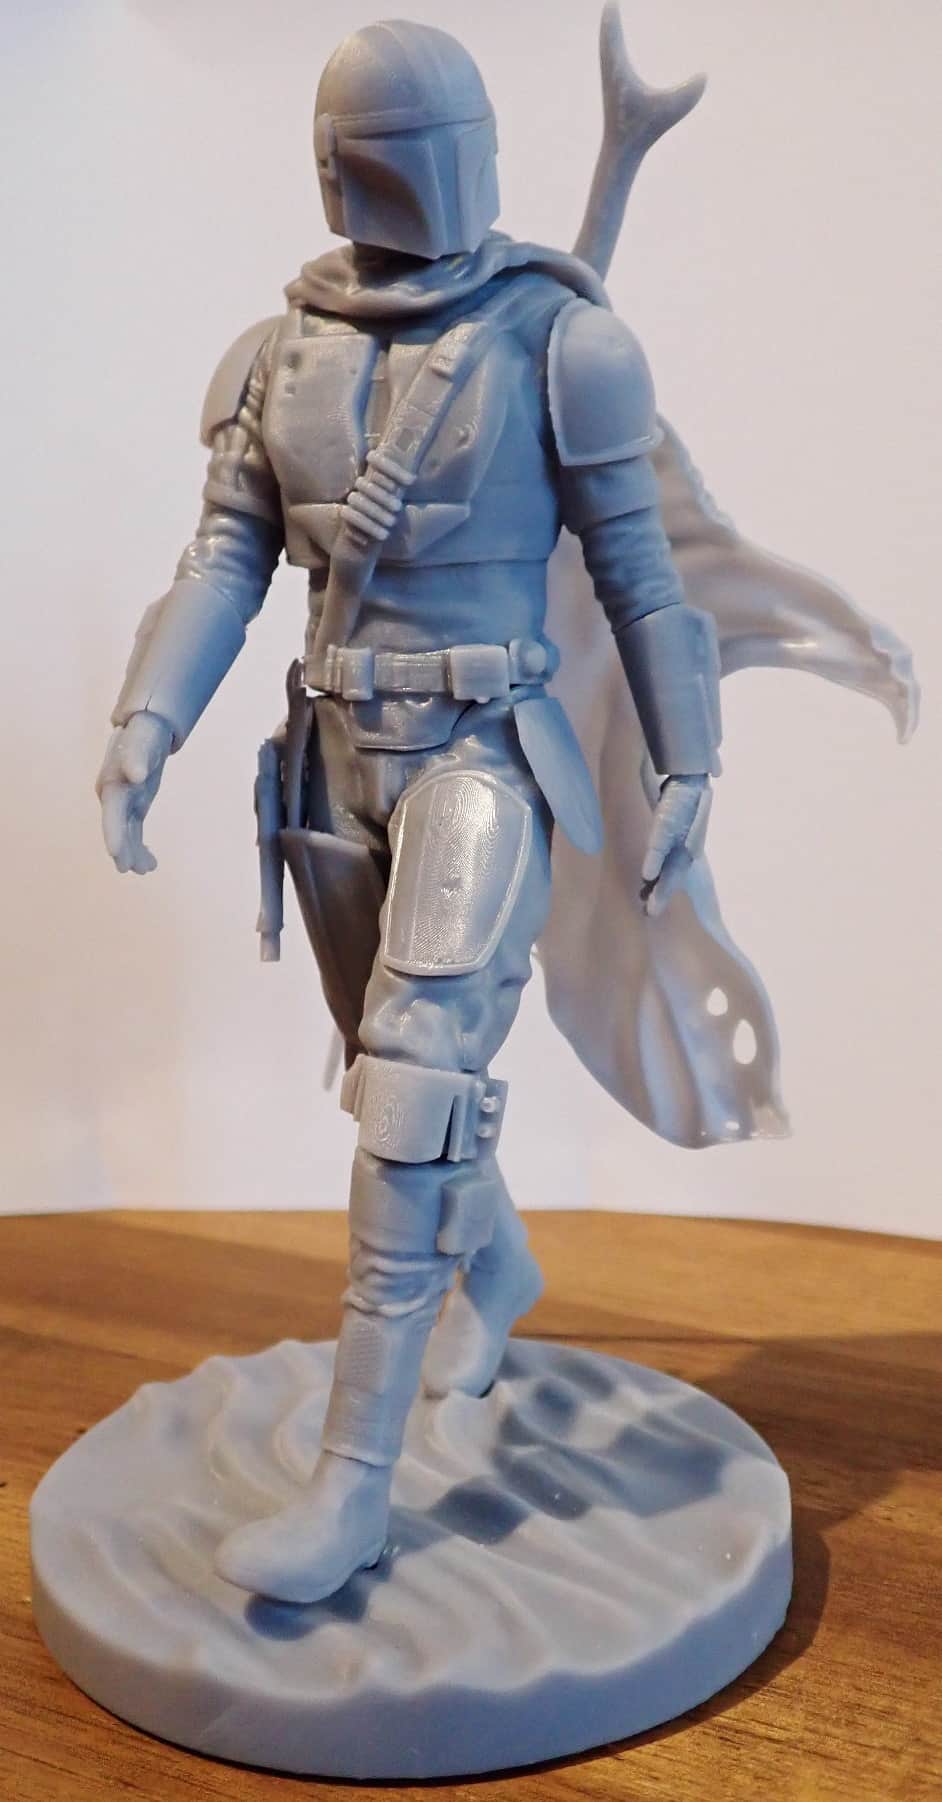
Right after that, my next project was The Mandalorian from Star Wars to test the printer extensively. Those were the goals of the project:
- On which objects can you see the layer resolution?
- Is it possible to print several objects at the same time without any problems?
- Does the printer manage to print extremely thin objects without supports (the cape)?
Results to Question 1: You can really only see the layers on sections of the object that have a certain orientation. I have chosen the orientation during printing in such a way that you can see the layer resolution well. For example, I printed the breastplate parallel to the printing plate so that the individual layers on it are clearly visible. You can actually see them, but they disappear almost completely after the first layer of spray paint. If you orient the objects so that they have their smooth surfaces perpendicular to the printing plate, you get a perfectly smooth surface.
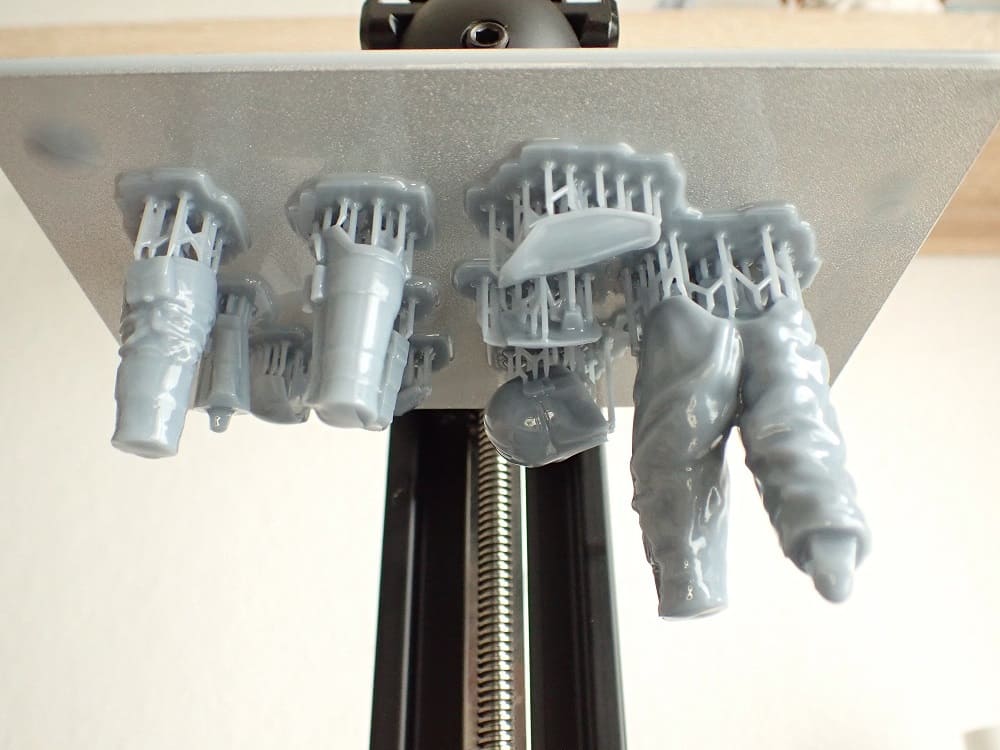
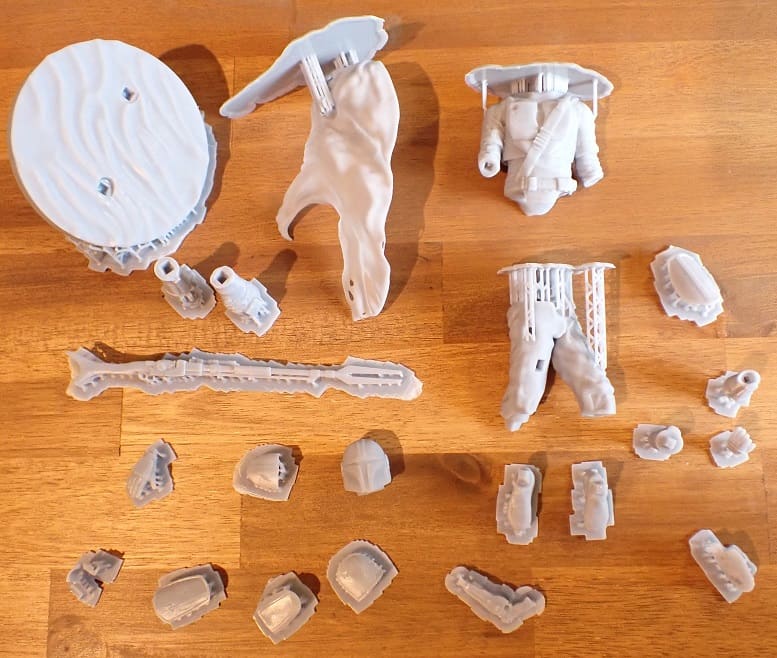
Results to Question 2: The Mandalorian consists of a lot of individual parts. Printing each part individually would have been a total waste of time. I only needed 3 prints in total because I printed many objects at the same time. You can easily arrange them in the slicer so that they fit on the printing plate.
Results to Question 3: I printed the cape vertically. It is really very thin in many places and I had my doubts that the print would succeed flawlessly. But here, too, the Proximo 6.0 shone – the very first print was a success!
Features
Voxelab Proxima 6.0
6-inch Monochrome Screen
Monochrome screens have now replaced the old RGB screens. The Voxel Proxima 6.0 also has such a monochrome screen and benefits from these advantages:
- 4 times longer lifespan (up to 2,000 hours)
- faster curing with 1-5 seconds per layer (depending on the resin you use)
- low price
With these advantages, it’s no wonder that monochrome screens have become the standard.
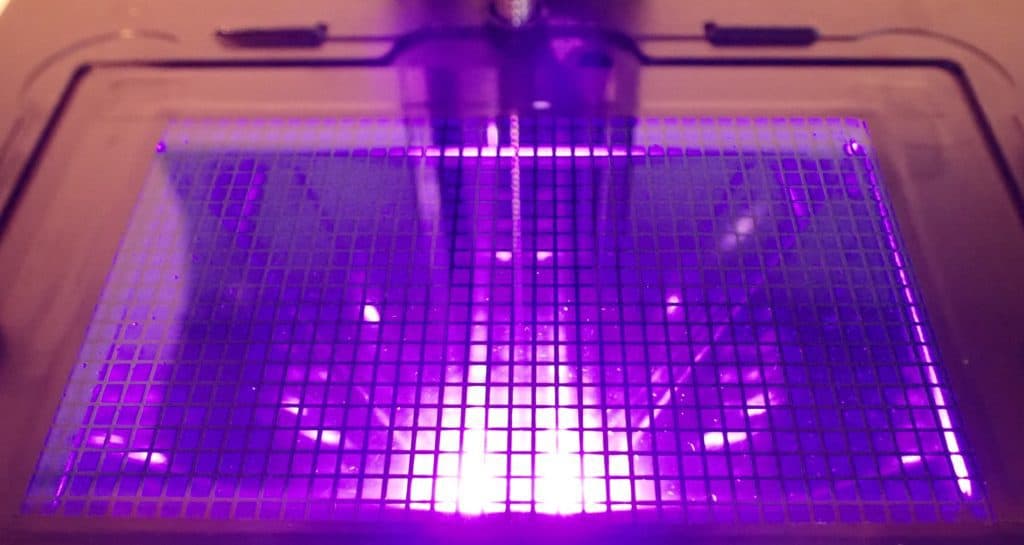
A special feature of the Proxima 6.0’s monochrome screen is the even illumination of the entire screen. Where older printers still had problems ensuring homogeneous accuracy across the entire area, the print quality is the same across the entire screen of the Proxima 6.0.
I was able to confirm this in my test prints. Even at the very outside corners, the quality does not differ from objects printed in the center.
The UV LEDs are arranged in a matrix which contributes to the homogeneous curing of the resin.
2K Resolution & 0.025 mm Layer Thickness
The 2K resolution of the 6-inch screen of the Proxima 6.0 is 2560 x 1620 pixels. With this resolution, you get a pixel size of 50 µm or 0.05 mm. The minimum layer thickness is 0.025 mm.
This resolution is currently standard and comparable to most other hobby resin printers. Only resin printers that have a larger screen and are therefore usually twice as expensive (such as the Anycubic Photon Mono X*) offer a higher resolution on 4K. Keep in mind, however, that accuracy depends on the relationship between resolution and screen size! A larger screen at 4K may print just as accurately as a 2K screen that is smaller. It sort of comes down to pixel density (pixels per area) or pixel size here. And as far as that goes, the Proxima 6.0 can keep up with most other resin printers in the hobby sector.
1.6-Liter Print Volume
The print volume of the Proxima 6.0 is 130 x 82 x 150 mm, which corresponds to about 1.6 liters.
With this volume, you can print medium-sized objects and multi-part large objects. The volume corresponds to that of similar 3D printers in this price segment.
Supports Various Slicers
The Voxelab Proxima 6.0 is compatible with many different slicers. Among them are at least the following:
- VoxelPrint
- ChiTuBox
- Lychee slicer
There are also standard profiles for all slicers for the Proxima 6.0, so you only have to choose the specific settings for your resin (exposure times) and set supports or have them generated automatically.
VoxelPrint is Voxelab’s own slicer and is based on FlashPrint. In principle, there is nothing wrong with individual slicers from various companies, but I like to use one slicer for all my printers. I used the Proxima 6.0 with ChiTuBox and there were no problems at all.
Simple Manual Print Bed Leveling
Leveling the print bed of the Proxima 6.0 is very easy and happens manually. You don’t have to level the print bed every time you start the next print.
Once you have leveled, it will last a very long time until you notice that the print bed is crooked or the object is not adhering to the print bed.
With these simple steps you can level the print bed of the Proxima 6.0:
- Mounting the build plate
The print plate is mounted to the Z-axis with a large clamping knob. - Loosen leveling screws
There are two screws on the build plate with which you can fix or loosen the ball joint. - Removing the resin container
The resin container can be easily removed from the UV screen with two turn screws. - Use paper for the distance
As with FDM printers, the paper method is the fastest and easiest way to create an even gap between the print bed and the screen. - Lower build plate
With three clicks you can lower the build plate via the menu. - Tighten the leveling screws
This is the most important step. You press the print bed evenly onto the paper with your hand and then tighten the two screws of the ball joint. - Adjusting the height with paper
Adjust the zero point position until the paper can only be moved with a little resistance between the printing plate and the screen. - Set zero point
Once you have found the perfect height, you can set Z-zero via the menu and you are done with leveling.
That’s quite a few steps at first glance, but it’s really very simple and you can do very little wrong. If you want to know more, you can take a look at this complete guide to leveling the print bed of the Proxima 6.0.
Resin Tank with Marking for Max. Fill height
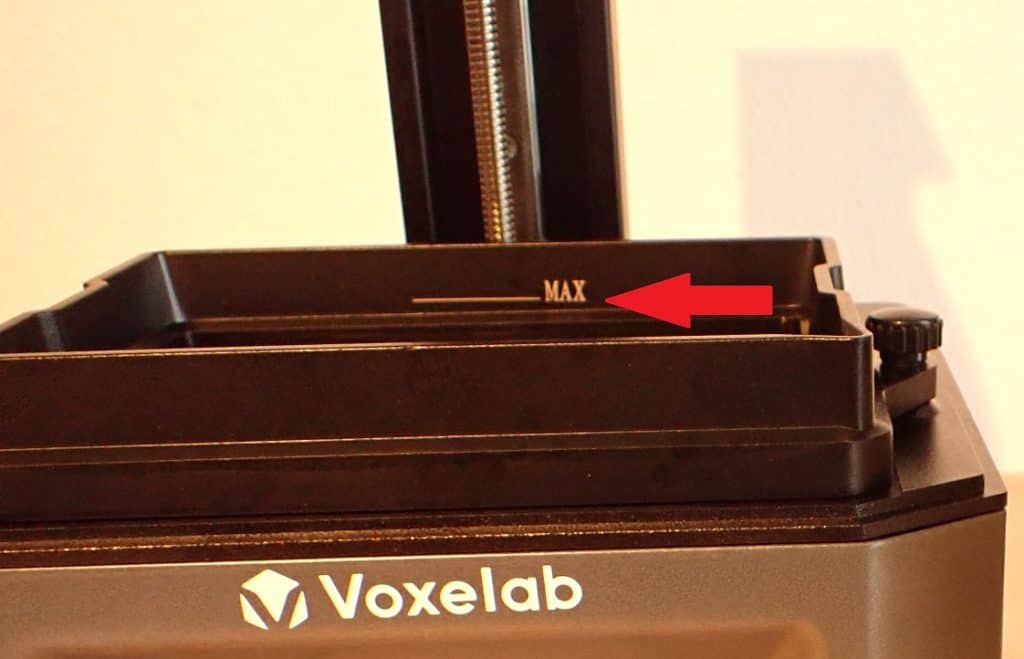
The resin tank is designed to be easy to assemble and easy to clean. It has a corner at the front that is shaped so that you can simply pour off the excess resin after printing.
There is also a line etched into the metal at the back edge where you can see the maximum amount of resin you can pour in. You should not exceed this line as spilling the resin over the edge would result in a huge cleanup.
Compatible Resins
The Voxelab Proxima 6.0 is equipped with 405 nm UV LEDs. Most printing resins support this wavelength.
I used the ECO Resin from Anycubic*. It is non-toxic and compatible with the wavelength of monochrome UV LEDs and is much more pleasant to work with than regular resin. The only drawback to this resin is its price. But it pays off with the peace of mind that you won’t harm your health or pollute the environment!
Easy Replacement of the FEP Film
The FEP film on the bottom of the resin tank will last about 20 to 30 prints until it needs to be replaced. You can also get away with it for much longer if you handle it with care.
The FEP film is quite strong by nature, but it will quickly get dents and scratches if you are not careful enough with the plastic scraper.
Replacing the FEP film is very easy with this resin tank. On the bottom of the tank are 12 screws that tighten the FEP film. You have to loosen them, take out the old FEP foil, put in a new one and tighten the screws again. All this is a job of a few minutes.
I always recommend having an FEP film for replacement always in stock because it can actually come to an accident quickly and you have to replace it. Then you don’t have to wait for annoying delivery times and can continue printing directly. This one* fits the Proxima 6.0 perfectly.
Single Linear Rail
The number of linear rails in a resin printer depends on its size. The Proxima 6.0 gets by with a single linear rail, which is reflected in the price.
However, the single linear rail is absolutely sufficient to keep the printing plate steady during operation. The complete construction around it is also very stable and thus contributes to an error-free printing result.
Easy Operation via Touchscreen
The operation via the touchscreen is super simple and intuitive. The touchscreen is very responsive and reacts exactly to your touch. The menu navigation is pretty self-explanatory and gives you all the options you need.
The only criticism is the printer’s shrill and very loud warning tone. Unfortunately, you can’t turn it down, but you can turn it off completely. And that’s exactly what I did before the first print!
Technical Specifications
Voxelab Proxima 6.0
DEVICE
- Technology: LCD, SLA printer
- Size: 230 x 200 x 410 mm
- Weight: 6.8 kg
- Touchscreen: 3.5-inch
- Assembly: delivered fully assembled
- Power supply: 12V, 5A
- Languages: Chinese, English
- Wavelength: 405 nm
- Compatible with resins from other manufacturers: Yes
- Layer thickness: 25 – 100 µm
- Pixel size: 50 µm
- Print volume: 130 x 82 x 155 mm
- LCD screen: 6-inch 2K monochrome
- Resolution: 2560 x 1620 pixels
SOFTWARE
- Slicer: VoxelPrint, ChiTuBox, Lychee Slicer
- File format: stl
- Connectivity: USB
Disclosure: This website is the property of Martin Lütkemeyer and is operated by Martin Lütkemeyer. Martin Lütkemeyer is a member of the Amazon Services LLC and other Affiliate Programs. These are affiliate advertising programs designed to enable websites to earn advertising revenue through advertising and linking to Amazon.com and others. Links marked with * are affiliate links.
