
- Wet Filament: Prevention, Symptoms & Drying - July 18, 2024
- Sovol SV08 – Best PrusaSlicer Settings & Profile - June 26, 2024
- Sovol SV08 – Best Orca Slicer Settings & Profile - June 26, 2024
Disclosure: Links marked with * are Affiliate Links. I earn from qualifying purchases if you decide to make a purchase through these links – at no additional cost for you!
Looking to fine-tune your Ender-3 V3 SE prints? This article dives straight into the essential Cura settings to elevate your 3D printing results with your Ender-3 V3 SE. Discover the initial setup, best settings for all standard filaments, and receive expert advice to resolve common printing issues.
Whether you’re working with PLA, PETG, or flexible materials, our focused guide ensures your Ender-3 V3 SE and Cura are perfectly in sync for outstanding results.

Calibrated Cura Profile
For optimal print quality with minimal effort, you can download my calibrated Cura profile for this 3D printer and import it directly into Cura. All settings are perfectly adapted to this printer, e.g. the accelerations, jerk, supports and the first layer.
| PLA | PETG | TPU | |
|---|---|---|---|
| Retraction Distance | 0.8 mm | 1.2 mm | 1.6 mm |
| Retraction Speed | 40 mm/s | 40 mm/s | 40 mm/s |
| Bed Temperature | 60 °C | 70 °C | 70 °C |
| Nozzle Temperature | 205 °C | 230 °C | 205 °C |
| Printing Speed | 180 mm/s | 120 mm/s | 50 mm/s |
| Fan Speed | 100% | 50% | 100% |
Table of Contents:
Setting Up Cura for Ender-3 V3 SE
Before delving into the specific filament settings, we have to create the printer profile and adjust the machine settings. But don’t worry, we’ve got you covered with a step-by-step guide!
Adding the Printer Profile
Adding the Creality print profile is your first step in the journey towards high-quality prints. This process is a breeze with Cura’s user-friendly interface. Here’s how to do it:
- Navigate to ‘Settings > Printer > Add Printer’.
- Select ‘Add a non-networked printer’.
- Find the ‘Ender-3 V3 SE’ under the Creality3D Tab.
- Click ‘Add‘.
Adjusting Machine Settings

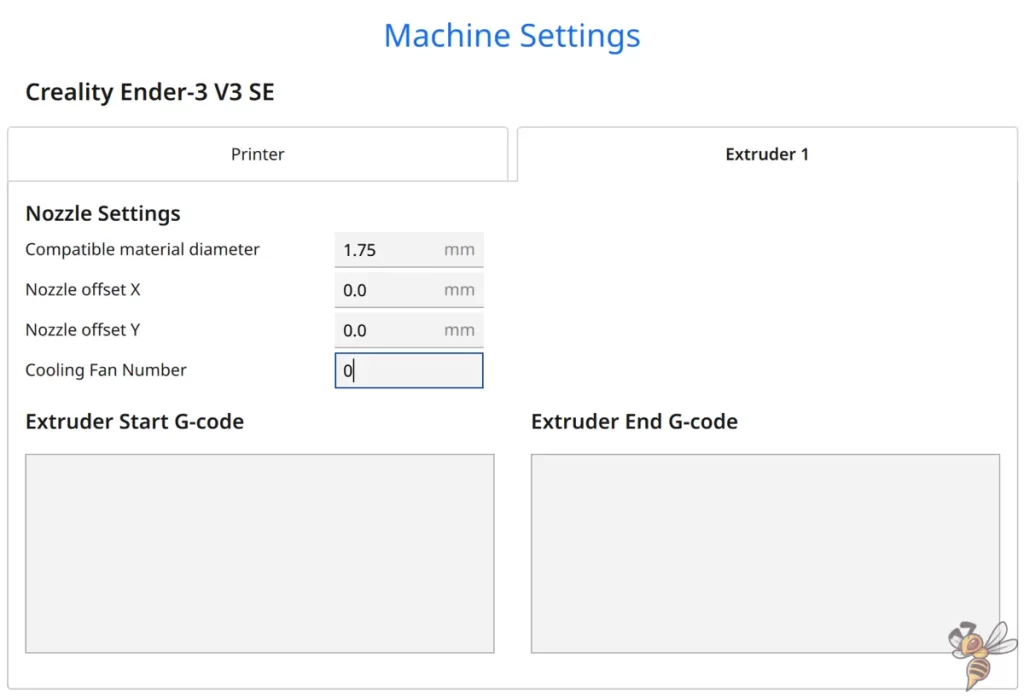
The predefined machine settings for the Ender-3 V3 SE in Cura do not have to be adjusted.
After adjusting the machine settings, it’s essential to optimize your print settings. While the default settings provide a good starting point, they might not be perfect for every print. Therefore, it’s crucial to fine-tune these settings based on your specific printing needs to ensure the best possible results.
You can find more information on how to create a 3D printer profile in Cura and what you need to pay attention to in this article: How to Create a Custom 3D Printer Profile in Cura
Optimal Cura Settings for Different Filaments
Given that each filament type possesses unique properties and requirements, a one-size-fits-all approach to Cura settings is unworkable. Therefore, it’s important to customize the settings based on the filament you’re using.
We’ll take you through the optimal settings for the following filaments, so you can achieve the highest quality prints irrespective of the material you choose:
- PLA
- TPU
- PETG
PLA Settings
- Print temperature: 205 °C
- Print bed temperature: 60 °C
- Print speed: 180 mm/s
- Retraction: 0.8 mm at 40 mm/s
- Kühlung: 100%
PLA, or polylactic acid, is a popular choice among 3D printing enthusiasts due to its easy printability and minimal warping. However, to get the best out of PLA, you need a good starting point for your settings.
For instance, the recommended temperature settings for PLA range from 190-210 °C. I got the best results with 205 °C with various PLA filaments. This ensures optimal extrusion and prevents heat-related issues.
Another critical aspect is the retraction settings. A retraction distance of 0.8 mm and a retraction speed of 40 mm/s are recommended for PLA on the Ender-3 V3 SE. This helps to minimize stringing and ensure a cleaner print.
Further down in this article, we’ll go into detail on how to calibrate the most important settings. Each filament is different and the settings need to be adjusted slightly to prevent print errors.
TPU Settings
- Print temperature: 205 °C
- Print bed temperature: 70 °C
- Print speed: 50 mm/s
- Retraction: 1.6 mm at 40 mm/s
- Kühlung: 100%
Thermoplastic Polyurethane, or TPU, is a flexible and durable material that’s great for making parts that need to bend or flex during use. However, printing with TPU can be challenging.
The Ender-3 V3 SE is equipped with a direct drive extruder, which is a game-changer when it comes to printing with TPU. This flexible and durable material can be a bit challenging to print with on printers that have a Bowden tube extruder due to the distance between the motor and the hot end.
However, a direct drive extruder, like the one on the Ender-3 V3 SE, eliminates this issue by placing the motor directly above the hot end. This significantly reduces the distance the filament has to travel, which in turn minimizes the likelihood of filament buckling, a common issue when printing with flexible materials like TPU.
In addition, the direct drive extruder provides better control over the filament, allowing for more precise extrusion and retraction. This results in higher quality prints with fewer issues like stringing and oozing, which are often encountered when printing with TPU.
PETG Settings
- Print temperature: 230 °C
- Print bed temperature: 70 °C
- Print speed: 120 mm/s
- Retraction: 1.2 mm at 40 mm/s
- Kühlung: 50%
Polyethylene Terephthalate Glycol, or PETG, is a popular material known for its durability, flexibility, and high-impact resistance. However, it can be a bit tricky to print with, particularly when it comes to stringing. Here’s how you can overcome these challenges!
When using PETG, it is advisable to set the bed temperature between 65 °C and 75 °C to prevent warping, while achieving optimal adhesion. The printing temperature should be maintained within the range of 220°C to 240°C.
But especially for PETG, it is important to calibrate the print temperature and retraction!
Fine-Tuning Retraction and Temperature Settings
Having discussed the optimal settings for different filament types, let’s now examine how to refine your retraction and temperature settings. These settings are crucial as they can significantly impact the quality of your prints. So, let’s take a closer look!
Calibrating Print Temperature
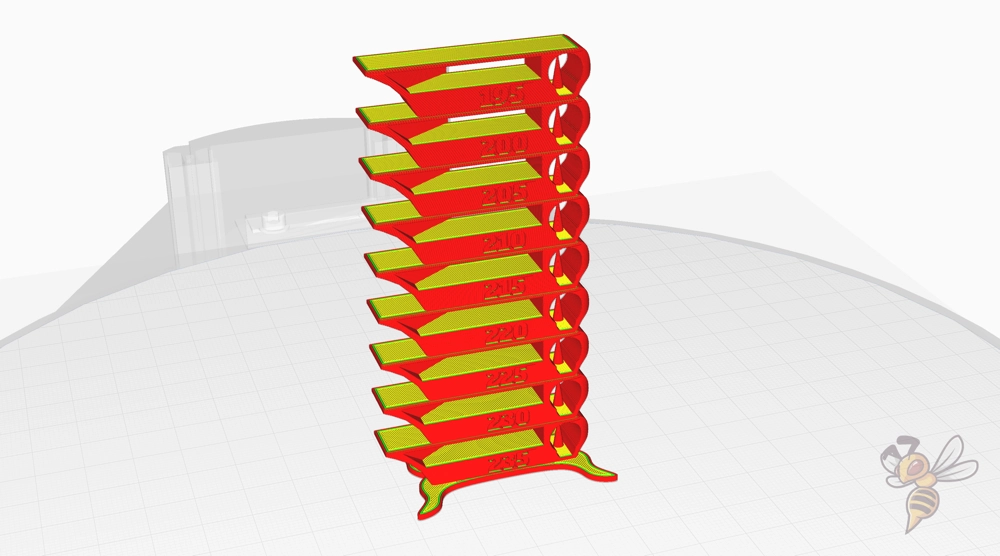
Proper calibration of the print temperature is vital in ensuring correct fusion of filament layers and safeguarding against issues like stringing.
You can utilize a temperature tower to calibrate your print temperature. This involves printing a model with different temperature settings for each section, and observing the quality of each section to determine the optimal temperature.
If you want to know more about calibrating the print temperature, read this guide: 3D Printer Calibration: Step-by-Step to Perfect Results
Calibrating Retraction Settings
Retraction settings are vital in averting stringing and oozing, issues that can undermine the quality of your prints. If you’re experiencing these issues, reducing the retraction distance can help.
Start with the recommended retraction distances shown above and reduce them in small steps.
Remember, every printer and filament may require different retraction settings. So, it’s always a good idea to experiment and find what works best for your specific configuration. With the right retraction settings, you’ll be well on your way to achieving cleaner, high-quality prints.
Infill Density, Layer Height, and Speed Adjustments
Beyond filament type and temperature settings, the quality of your prints is also significantly influenced by infill density, layer height, and speed adjustments. So, let’s explore how you can adjust these settings for different types of objects and print quality requirements.
Infill Density
Infill density refers to the amount of material used within the print. A higher infill density means more plastic inside the print, which results in a stronger but heavier object. The recommended infill density varies depending on the type of object you’re printing. Here are the recommended infill densities for different types of prints:
- For decorative objects: 0-15% infill density is usually sufficient.
- For standard prints: 15-50% infill density is recommended.
- For prints that require high strength and durability: 50-100% infill density might be necessary.
However, keep in mind that a higher infill density will use more filament and increase the print time. So, it’s always a good idea to strike a balance between strength and efficiency. After all, 3D printing is as much an art as it is a science!
Layer Height
Layer height plays a crucial role in determining the quality of your prints. A smaller layer height will yield more detailed prints but will increase the print time. On the other hand, a larger layer height will give you faster prints but with less detail.
For the Ender-3 V3 SE, it’s recommended to set the layer height in multiples of 0.04 mm, such as 0.16 mm, 0.2 mm, 0.24 mm. The minimum achievable layer height is 0.1 mm. Again, the best layer height for your print will depend on the level of detail you need and how much time you’re willing to spend on the print.
Speed Adjustments
The speed at which your printer lays down the filament can have a significant impact on the quality of your prints. A lower print speed can lead to smoother and more detailed prints, while a higher print speed may compromise surface quality.
However, it’s not always as simple as just lowering the print speed. Different filaments and print requirements may necessitate different speed settings. For instance, PLA typically prints well at speeds of 180-250 mm/s, while TPU may require a slower speed of 50 mm/s.
Troubleshooting Common Printing Issues
Despite having the best settings, you may still come across familiar printing problems. But don’t worry, we’ve got you covered! In this section, we’ll address some of the most common printing issues with the Ender-3 V3 SE such as bed adhesion problems and stringing.
Bed Adhesion Problems
One of the most common issues you might face while 3D printing are bed adhesion problems. These can manifest in different ways, such as the print not sticking to the bed or the corners of the print lifting off the bed.
The Ender-3 V3 SE has a PC coated spring steel print bed. It provides a good adhesion for most filament types but is not as perfect as a PEI coated print bed.
If you have trouble with bed adhesion, try the steps in this guide before upgrading to a PEI print bed: 3D Print Not Sticking to the Bed: How to Fix it Step-by-Step
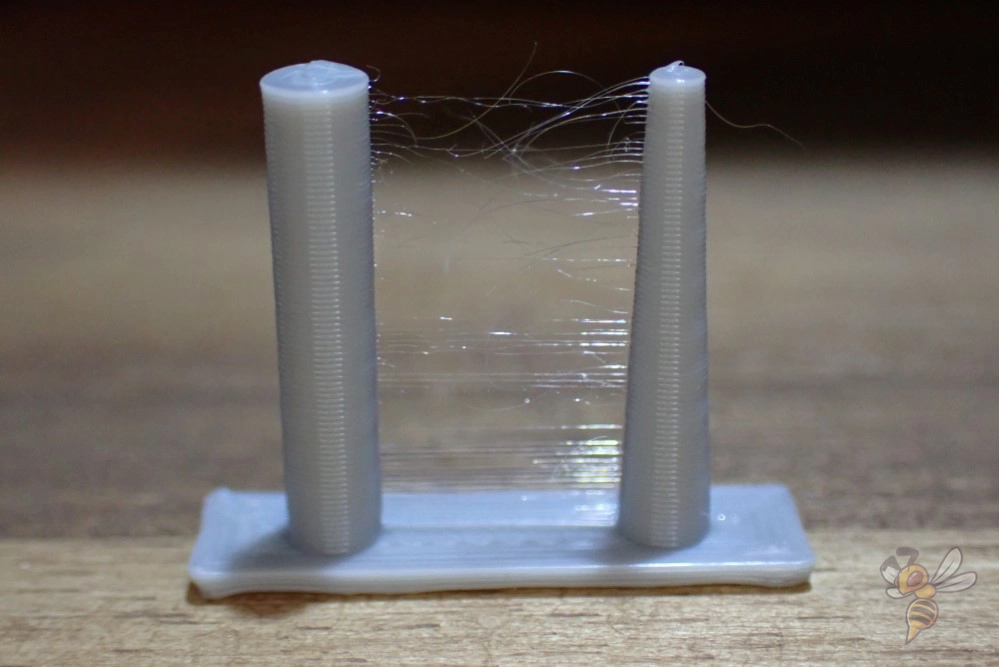
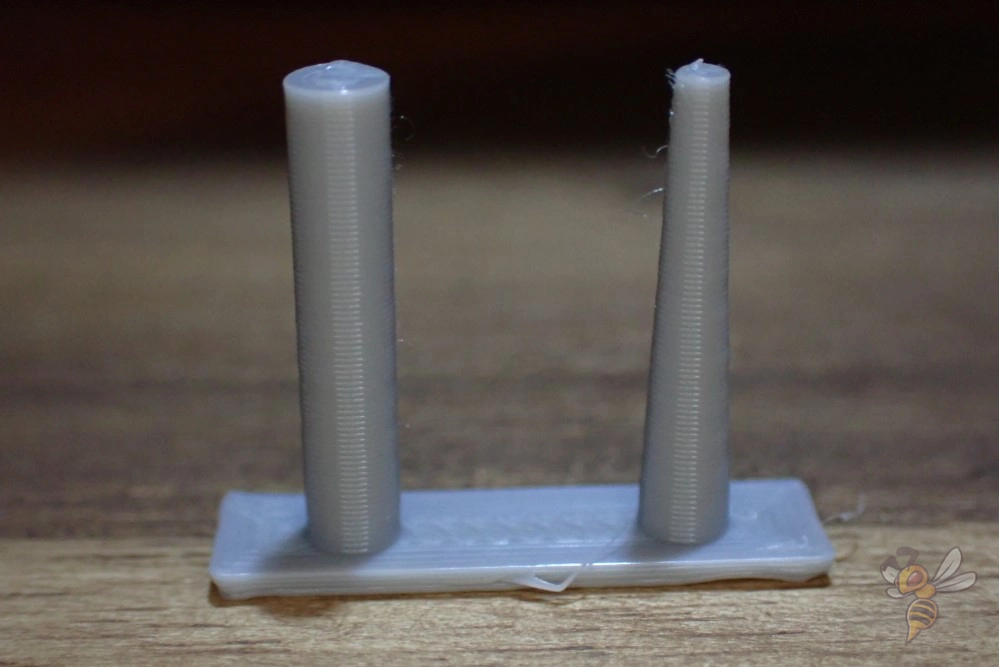
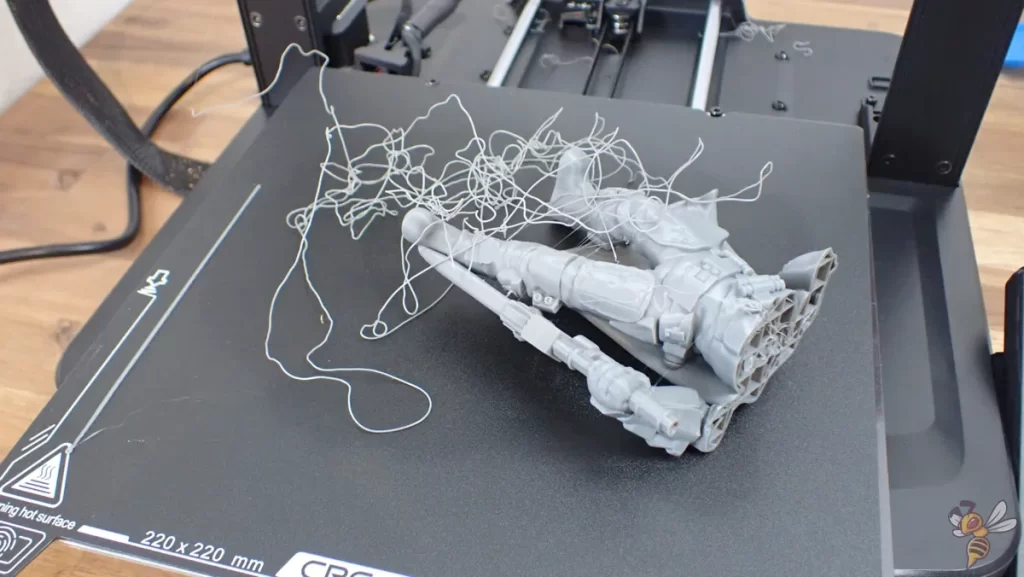
Stringing and Oozing
Stringing and oozing are other common issues that you might encounter while 3D printing. Stringing occurs when small strings of filament are left behind as the print head moves across open spaces, while oozing refers to excess filament that seeps out of the nozzle when the print head is moving but not extruding.
To minimize stringing and oozing, you can lower the nozzle temperature, adjust the retraction settings, and experiment with print speed.
Over-Extrusion and Under-Extrusion
Over-extrusion and under-extrusion are two other common issues that can affect the quality of your prints. Over-extrusion occurs when too much filament is extruded, which can lead to rough, blobby prints. On the other hand, under-extrusion happens when not enough filament is extruded, leading to weak, incomplete prints.
To address over-extrusion, you can adjust the extrusion multiplier settings, lower the printing temperature, and calibrate the extruder steps. For under-extrusion, start by cleaning or replacing the printer’s nozzle. Also, make sure your filament is free of tangles and moisture.
Tips for Achieving High-Quality Prints with the Ender-3 V3 SE
Having discussed the optimal Cura settings and common print issues of the Ender-3 V3 SE, we’ll conclude with some other tips to attain high-quality prints.
First Layer Settings
The first layer of your print lays the groundwork for the rest of your print, and thus its accuracy is vital. Some key factors that contribute to a successful first layer include:
- Bed leveling
- First layer speed
- Temperature settings
- Initial layer height
To ensure proper adhesion and a strong foundation, you might need to decrease the first layer speed to around 5-10 mm/s, fine-tune the temperature settings, and adjust the initial layer height. Remember, the key to a successful print lies in the details, and getting the first layer right is a significant part of that!
Cooling and Fan Settings
The quality of your prints is significantly influenced by the cooling and fan settings. For instance, PLA prints benefit from the fans running at full speed, while PETG prints should be cooled a bit slower as it can negatively impact their quality.
Disclosure: This website is the property of Martin Lütkemeyer and is operated by Martin Lütkemeyer. Martin Lütkemeyer is a member of the Amazon Services LLC and other Affiliate Programs. These are affiliate advertising programs designed to enable websites to earn advertising revenue through advertising and linking to Amazon.com and others. Links marked with * are affiliate links.
