
- Wet Filament: Prevention, Symptoms & Drying - July 18, 2024
- Sovol SV08 – Best PrusaSlicer Settings & Profile - June 26, 2024
- Sovol SV08 – Best Orca Slicer Settings & Profile - June 26, 2024
Disclosure: Links marked with * are Affiliate Links. I earn from qualifying purchases if you decide to make a purchase through these links – at no additional cost for you!
The standard slicer for the Creality K1 Max is Creality Print, but it can also be operated with Cura. Compared to Creality Print, Cura offers greater flexibility and customizability in the settings. And since Creality Print is based on Cura, you always have the latest features when using Cura.
Therefore, during my detailed testing of this 3D printer, I optimized the settings in Cura for the K1 Max. In this article, I’ll share them with you and also show you how to create a new profile for this 3D printer.
Tip: The values shown here will deliver good results, but you will only achieve perfect results after calibration.
You can find out how to calibrate the K1 Max in this article. For an even more comprehensive understanding, here is the link to my 3D printing course, which covers the topic of calibration in more detail.
| PLA | ABS | TPU | PETG | |
|---|---|---|---|---|
| Printing temperature | 230 °C | 260 °C | 220 °C | 250 °C |
| Print bed temperature | 55 °C | 100 °C | 70 °C | 80 °C |
| Printing speed | 300 mm/s | 300 mm/s | 80 mm/s | 200-300 mm/s |
| Retraction | 0.5 mm with 40 mm/s | 0.5 mm with 40 mm/s | 0.5-1.0 mm with 30-40 mm/s | 0.5-1.0 mm with 30-40 mm/s |
| Cooling | 60-100 % | 50-70% | 100 % | 50-100 % |
| Hood | Open | Closed | Open | Open |
Table of Contents:
How to Create a Cura Profile for the Creality K1 Max
The Cura profile is divided into two main areas: the machine settings, which define the physical and technical specifications of the 3D printer, and the print settings, which define specific parameters such as print speed, layer height and temperature.
First, we need to define the machine settings correctly, for which Cura provides an empty profile as a starting point.
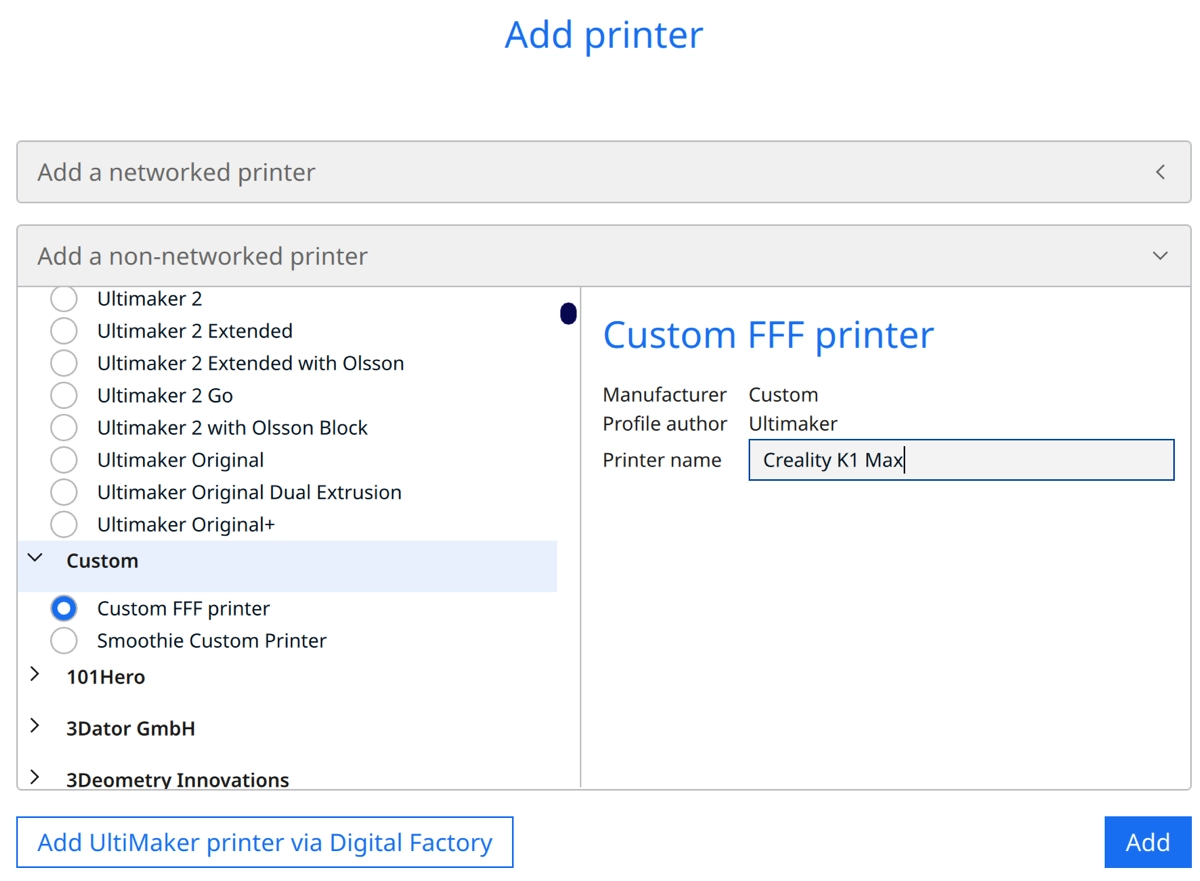
To add a 3D printer in Cura, follow these steps:
- Click on ‘Settings’, then on ‘Printers’, and select ‘Add printer’.
- Click on ‘Non-networked printer’.
- Select ‘Custom’ from the list and then ‘Custom FFF printer’.
- Enter the name of your printer.
- Finally, click on ‘Add’ to integrate the printer into Cura.
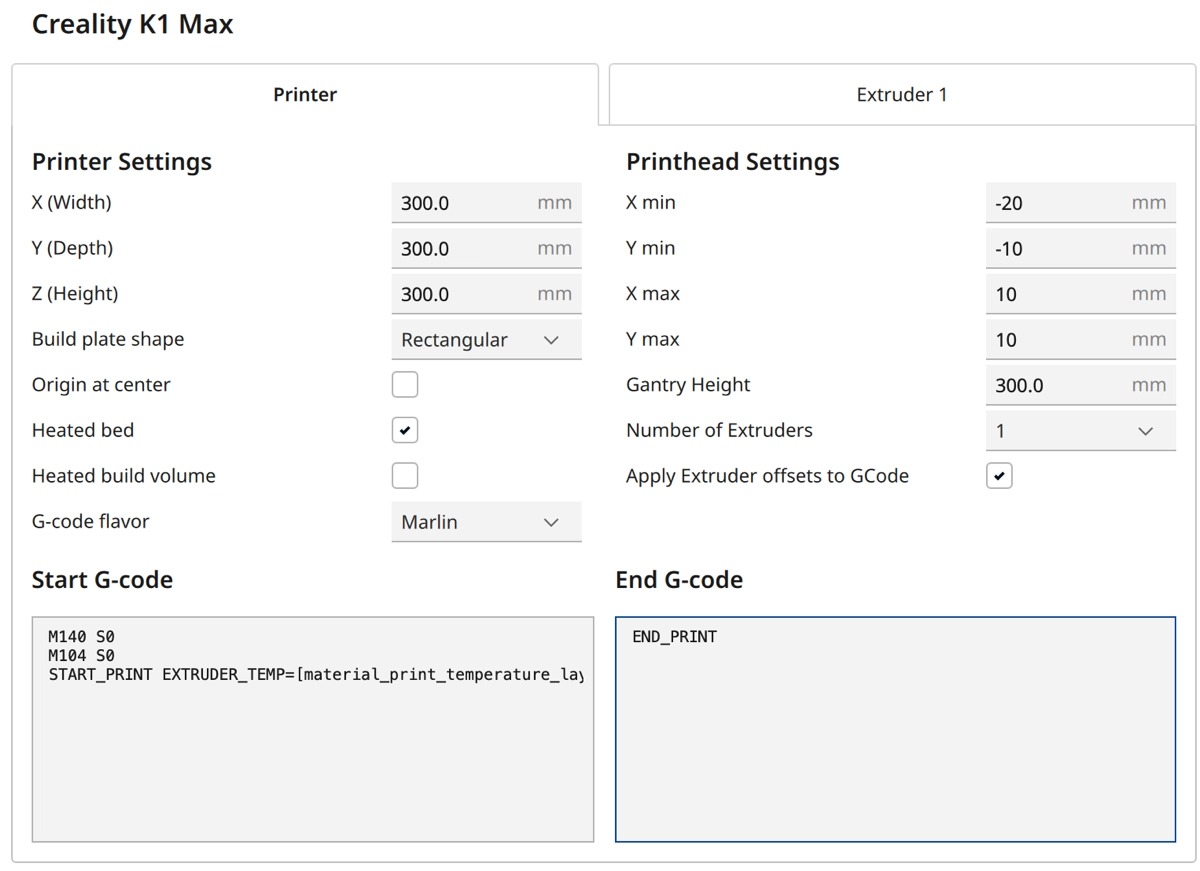
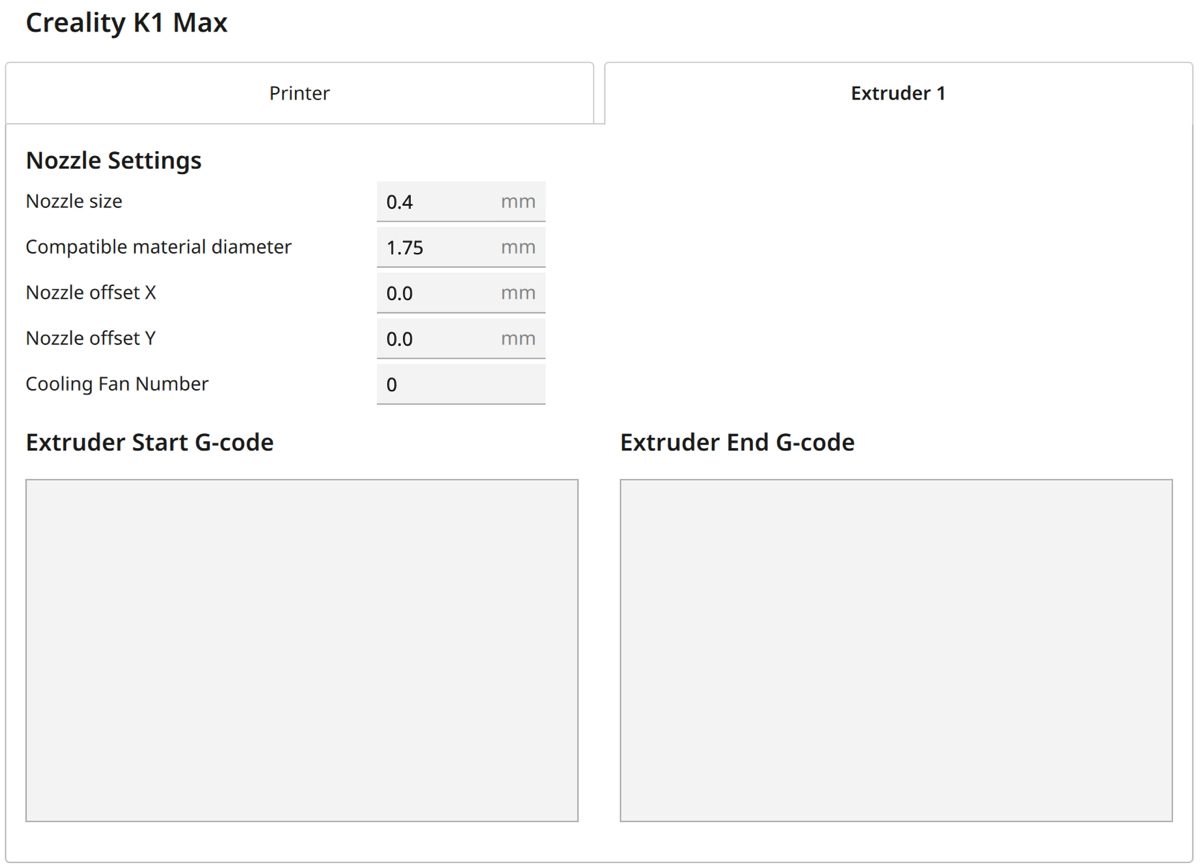
The machine settings for your K1-Max are shown in the screenshot above so that you can easily adopt them. You will find the G-code snippets listed again directly below so that you can copy them more easily:
Start G-Code:
- M140 S0
- M104 S0
- START_PRINT EXTRUDER_TEMP=[material_print_temperature_layer_0] BED_TEMP=[material_bed_temperature_layer_0]
End G-Code:
- END_PRINT
Once you have created the printer profile in Cura, the next step is to define the print settings. These settings include important parameters such as layer height, infill pattern, print temperature and speed.
You can find more information on how to create a 3D printer profile in Cura and what you need to pay attention to in this article: How to Create a Custom 3D Printer Profile in Cura
The Cest Cura Settings for the K1 Max
Now that I have introduced the machine settings for the Creality K1 Max, let’s focus on the specific print settings and how to calibrate them optimally to achieve excellent print results.
Print Temperature
The best printing temperatures for the K1 Max in Cura:
- PLA: 230 °C
- ABS: 260 °C
- TPU: 220 °C
- PETG: 250 °C
Incorrect printing temperatures for 3D printers can lead to a number of problems:
- Too low a temperature can lead to the filament not melting properly, resulting in poor adhesion between the layers and therefore a weak structure of the printed object.
- However, too high a temperature can cause the filament to overheat and become too liquid, leading to deformation and stringing.
It is therefore crucial to determine and set the correct printing temperature for the specific filament.
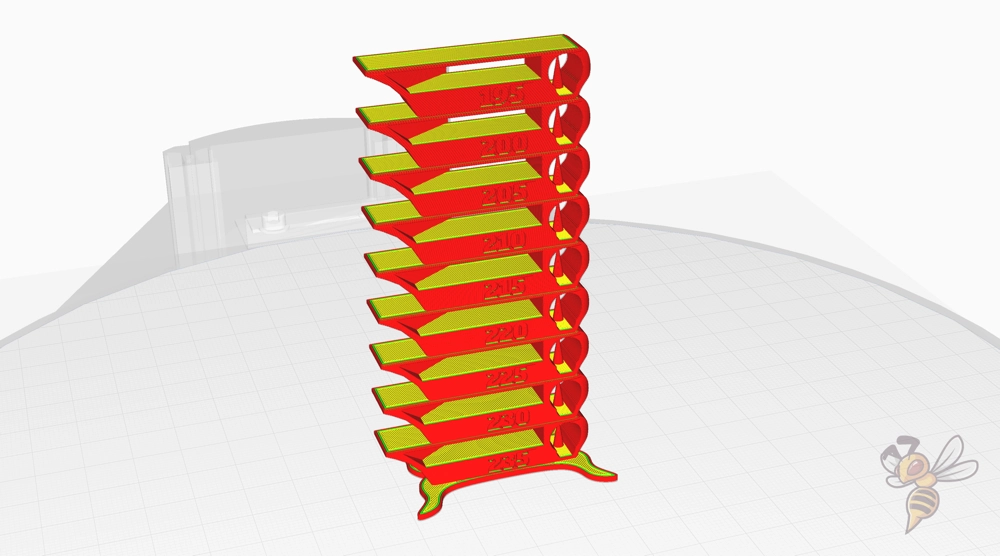
To calibrate the printing temperature of your FDM 3D printer, using a temperature tower is an effective method. A temperature tower is a specially designed 3D model that is printed at different temperature levels.
Start printing at the highest temperature at the bottom of the tower and gradually reduce the temperature with each segment as you move upwards. By observing at which temperature the best results are achieved, you can determine the ideal printing temperature for your specific filament.
It’s a simple and accurate approach to optimizing print quality and avoiding problems caused by inaccurate temperature settings.
Print Bed Temperature
The best print bed temperatures for the K1 Max in Cura:
- PLA: 55 °C
- ABS: 100 °C
- TPU: 70 °C
- PETG: 80 °C
The PEI coating on the print bed of the K1 Max provides excellent adhesion, making it easier to find the right temperature. The above temperature values should work reliably in most cases.
The heating of the print bed should be switched on five to ten minutes before printing with ABS filament so that a homogeneously warm temperature environment is present in the closed print volume as soon as printing is started.
Print Speed
The best printing speeds for the K1 Max in Cura:
- PLA: 300 mm/s
- ABS: 300 mm/s
- TPU: 80 mm/s
- PETG: 200-300 mm/s
The K1 Max is characterized by an impressive printing speed, which is achieved by the integrated vibration compensation. This technology enables the printer to work quickly without compromising the quality of the print result.
Despite the high theoretical print speed of the K1 Max, I found that the above values worked most reliably for my projects.
Accelerations & Print Jerk
The best acceleration and print jerk settings for the K1 Max in Cura:
- Infill & Travel accelerations: 12000 mm/s²
- All other accelerations: 5000 mm/s²
- Travel Jerk: 30 mm/s
- All other Jerk values: 8 mm/s
The acceleration values in Cura play a decisive role in controlling the movements of the 3D printer. They determine the speed at which the printer starts and ends its movements, which has a direct influence on the print quality.
High acceleration values can lead to faster printing times, but also to more vibrations and potential printing errors. Lower acceleration values, on the other hand, lead to smoother movements, which can improve print quality but reduce print speed.
Print Jerk in Cura is another important factor that controls the movements of the 3D printer. It determines the maximum speed at which the printer can change its movement in a new direction without stopping. The right balance is also crucial here, as values that are too high can lead to vibrations and printing errors, while values that are too low unnecessarily extend the printing time.
The values given above are recommended by Creality and I have had good results with them.
Retraction
The best retraction settings for the K1 Max in Cura:
- PLA: 0.5 mm at 40 mm/s
- ABS: 0.5 mm at 40 mm/s
- TPU: 0.5-1.0 mm at 30-40 mm/s
- PETG: 0.5-1.0 mm at 30-40 mm/s
Incorrect retraction settings can lead to printing errors, such as so-called “stringing”. Thin threads of molten filament appear between the parts of the print object, which affects the surface quality of the print result.
The above values are a good starting point for setting the retraction, but do not guarantee perfect printing results. Careful calibration of the 3D printer is necessary for optimum results. Every printer and every filament behaves differently, so individual adjustments and tests are essential to achieve the best possible print quality.
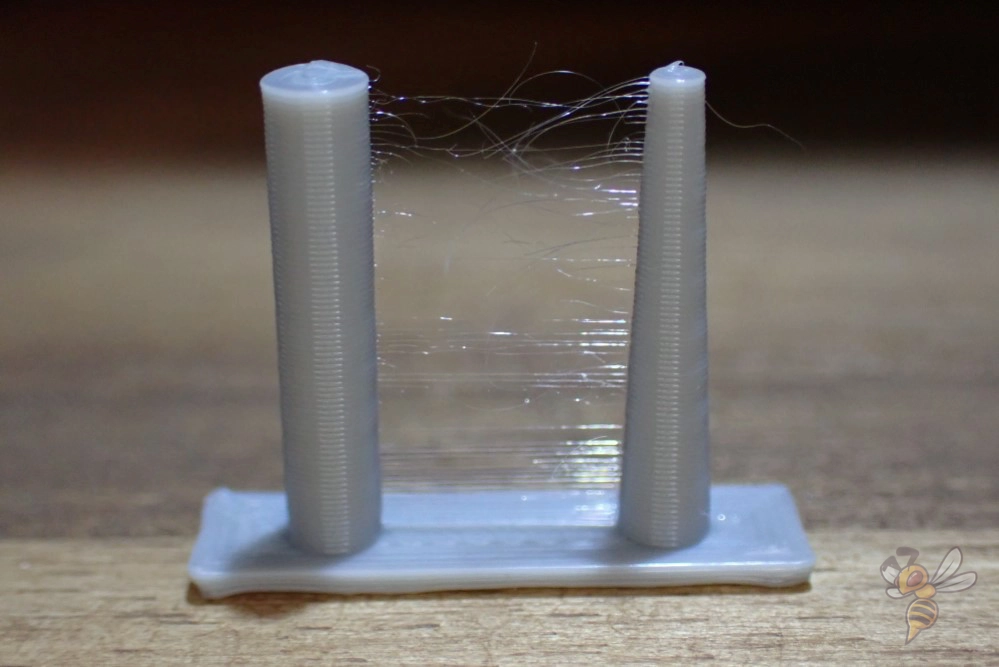
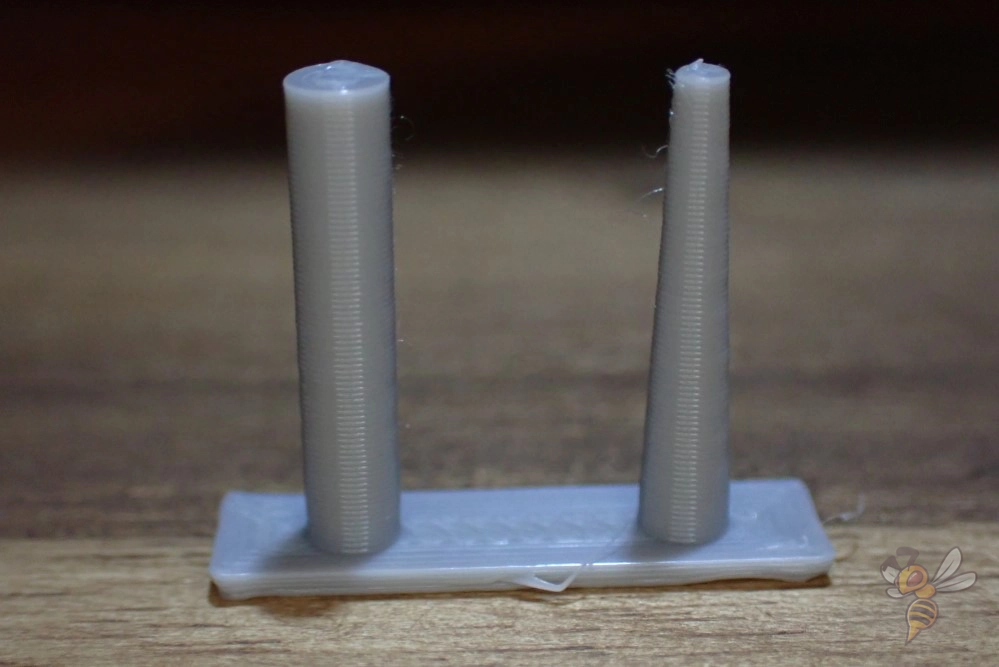
Calibrating the retraction is an essential step in achieving optimal printing results. A simple test object such as two columns can be used to gradually adjust and improve the settings.
Start by calibrating the retraction distance. Observe the print result closely and adjust the retraction distance if you notice stringing. Gradually increase the distance until stringing no longer occurs.
You can then calibrate the retraction speed. Repeat the print, this time with the optimal retraction distance, and adjust the speed. If the retraction is too slow, dripping/oozing could occur, while too fast a retraction can damage the material. Gradually increase the speed until you achieve the best possible print quality.
Repeat this process iteratively until you have found the perfect balance between speed and retraction distance. Keep in mind that any change in filament type or brand will likely require a recalibration.
Infill
The best infill density for the K1 Max in Cura:
- Decorative objects: 0-15%
- Standard objects: 15-50%
- Stable objects: 50-100%
The infill density has a significant influence on the stability and weight of the printed objects. When selecting the correct density, it is important to consider the intended use of the object. Decorative objects that do not require high stability can be printed with a low infill density of 0-15%, which saves material and speeds up the printing process.
For standard objects that require moderate stability, a density of 15-50% is recommended. For objects that have to withstand high forces or need to be structurally stable, an infill density of 50-100% should be selected. It should be noted that a higher infill density will result in a heavier object and a longer printing process, but will significantly improve the structural integrity and durability of the object.
First Layer
These are the best Cura settings for the first layer with the K1 Max:
- Layer height: 100-200%
- Line width : 100-200%
- Print temperature: Same as the rest of the object or 5-10 °C higher to achieve better adhesion to the print bed.
- Print speed: 10 to 20 mm/s
- Raft/Brim/Skirt: Skirt as standard, Brim/Raft only if you have problems with adhesion.
A warmer filament has more time to bond to the print bed. This is an important factor in achieving a stable first layer and therefore a successful print result. The above settings aim to extend the time the filament remains liquid.
By increasing the printing temperature and decreasing the printing speed, the time the filament is hot on the print bed is maximized, resulting in better adhesion and a higher quality first layer.
The first in this series of measures is to reduce the print speed to the values indicated above. It is by far the most effective measure against poor print bed adhesion.
If you have problems with print bed adhesion, you should take another look at this article: 3D Print Not Sticking to the Bed: How to Fix it Step-by-Step
Conclusion
The K1 Max is an ingenious 3D printer. However, it can only deliver perfect results if it is fed with the right slicer settings.
I hope that the values in this article will help you. And if not, the calibration article linked above or my course should help you! Have fun with your K1 Max!
Disclosure: This website is the property of Martin Lütkemeyer and is operated by Martin Lütkemeyer. Martin Lütkemeyer is a member of the Amazon Services LLC and other Affiliate Programs. These are affiliate advertising programs designed to enable websites to earn advertising revenue through advertising and linking to Amazon.com and others. Links marked with * are affiliate links.
