
- Wet Filament: Prevention, Symptoms & Drying - July 18, 2024
- Sovol SV08 – Best PrusaSlicer Settings & Profile - June 26, 2024
- Sovol SV08 – Best Orca Slicer Settings & Profile - June 26, 2024
Disclosure: Links marked with * are Affiliate Links. I earn from qualifying purchases if you decide to make a purchase through these links – at no additional cost for you!
With filament and SLA printers, you can print almost any designed models easily and uncomplicated yourself. The disadvantage of these printing techniques, however, is that the individual print layers are more or less visible on the finished print.
In this guide, you’ll learn which methods you can use to smooth your filament and UV resin 3D prints and achieve a perfect surface without visible layers.
Table of Contents:
Advantages
Smoothing the surfaces of your 3D prints doesn’t just make them look better. Smoothing, if you plan for it in advance, has several benefits.
You can save time with filament printing if you print large models with large areas with the thickest possible layers. The thick layers, which are clearly visible compared to finer layers, can be smoothed out so that they are no longer visible.
In addition, you can print with other, more conservative parameters and provide more support structures. By smoothing afterwards, you will no longer see the starting points of these structures.
Another advantage is that you can work with higher temperatures and thus avoid filament jams.
An increase in mechanical strength is also possible depending on the smoothing method.
Preparation
Before you start smoothing the surfaces of your 3D printers, you should carefully prepare your models. Careful preparation will make smoothing easier and the results will be visibly better.
The first step is to remove the support structures. For this, it is best to use a very sharp scalpel or, in the case of prints made of UV resin, a fine pair of sharp pliers. Be careful not to cut into the surface.
It is better not to cut the support structures too close and to leave a little material. You can sand off the protruding material afterwards or remove it with a file.

If you are printing larger models, you may need to print these models in multiple pieces and then glue the pieces together. Before smoothing glued-together prints, be sure to test whether the materials used for smoothing are compatible with the adhesive.
If the materials are not compatible, cracks and bubbles can form. The best thing to do is to test the compatibility. To do this, put a drop of glue on a piece of paper or wood and let it dry. When the glue has dried, you can spray it with your chosen paint or plastic primer.
Then you can quickly see whether both materials are compatible. On the other hand, it is also possible that chemical agents that you use for smoothing will dissolve the glue again and the models will fall apart. You should also try this out before smoothing your models.
Dents and other larger, clearly visible defects that occur during printing should be filled before the entire model is smoothed. Be sure to use a special plastic filler or a so-called 2K filler, which is used for body repairs. This filler adheres to the plastic.
I have already had very good experiences with this spray filler*.
Wood putty or putties for plasterboard are not suitable. Depending on how deep the defect is, you should apply several thin layers of filler so that no cracks form. Smooth the last layer of filler with a suitable putty knife to minimise the amount of sanding required.
To reduce the effort of smoothing models made of UV resin, you should print these prints with the thinnest possible layers.
Sandpaper
Smoothing 3D prints with sandpaper is cheap, but also time-consuming. To get the result you want, you should consider several points when smoothing your prints with sandpaper. Both filament and resin models can be smoothed with sandpaper. This method is suitable for all print materials.
The most obvious solution would be to treat the surfaces of your prints with a not too coarse sandpaper. However, you will certainly not be satisfied with the result. If you dry sand your prints, the surface will be very rough afterwards and often shows deep grooves that you have to remove again with a lot of effort. Much better suited for smoothing 3D prints is wet sandpaper*.
Wet sandpaper is a waterproof sandpaper. When sanding, you repeatedly immerse the sandpaper in water while working. The water rinses away the sanded plastic particles and at the same time prevents the fine particles from sticking to the sandpaper.
Solidified sanding particles ensure that the sanding effect quickly wears off and they create grooves on your models. Another advantage of using wet sandpaper is that the water cools your model during sanding.
Even if you sand by hand, you will quickly generate a lot of heat that can soften, melt and smear the surface of your model. The result is very unattractive. In addition, you do not need to wear a respirator when working with wet sandpaper, as the sanding dust is bound in the water.
When wet sanding large prints, make sure that the sandpaper also covers a large area. For flat surfaces, you can place the sandpaper around a stable block made of cork, for example. A large contact surface distributes the pressure when sanding and the result is better.
In general, you should always sand in circular motions. If you only sand back and forth or back and forth, deep grooves will quickly form. You can prevent scoring relatively easily with circular sanding movements.
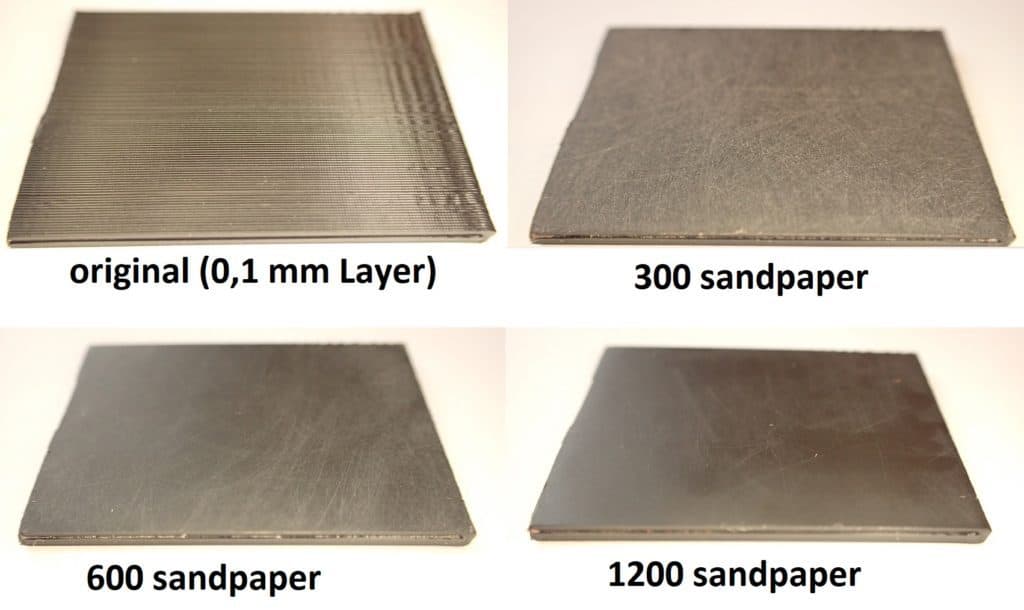
When wet sanding your models, start with a relatively coarse wet sandpaper, for example with a 200 grit. The sandpaper should not be much coarser. For the second pass, use a finer sandpaper with a 400 grit. Depending on how the surface of your model looks afterwards, you have two options.
After sanding, the surfaces are smooth, but dull due to the very fine grooves. To make the surfaces shiny, you can use fine wet sandpaper with a 2000 grit and sand the entire surface again.
Depending on the result, you may need to finish by sanding over the surfaces again with a very fine 4000 grit wet sandpaper to bring out a nice shine.
Sanding Resin
If you want to smooth models from an SLA printer with sandpaper, you can usually start with fine sandpaper. The individual layers are much finer on SLA printers and the depressions between the layers are correspondingly smaller.
Often it is enough to sand the model once wet with a 400 grit sandpaper and then polish it to achieve a very nice surface. Also that UV resin without additives is much harder than most prints from filament, you benefit when smoothing. The removal is much faster.
Polishing
One way to achieve a shiny finish is to give your model a final polish with a special polishing compound for plastic*.
Polishing pastes contain very fine abrasive particles, which in principle remove nothing more from the surface. Polishing pastes draw the remaining very fine depressions with laterally protruding material. They practically smear the material to form a surface.
The result is a very smooth and shiny surface. You should also not apply much pressure when polishing your models. Use a soft cloth, for example made of cotton, for polishing by hand. With a cotton cloth you can apply the polishing paste evenly with feeling and smooth the surfaces.
You can polish large surfaces on your model relatively quickly if you use a polishing wheel for your drill or a cordless screwdriver, for example. However, the speed should not be very high, as heat can also be generated when polishing with a machine.
You can also polish the surfaces of resin models more easily than the surfaces of filament prints because of the higher hardness of the materials. PLA, ABS and various other filaments are much softer than cured UV resin.
File
However, you will not be able to reach and work on recesses, edges and small openings on your prints with inflexible wet sandpaper. For these areas of your model, however, you can use so-called diamond files*. These are small files with different shapes.
Diamond files are available with round, half-round, square, wedge-shaped or flat cross-sections. These files are studded with chips of industrial diamonds. So they are not very expensive. You can use diamond files for wet sanding. You can avoid the formation of grooves as far as possible.
For sanding large models, there are other ways you can make your job easier.
Nail file for resin
The surfaces of 3D prints from an SLA printer are usually not very large. Sandpaper or a power tool are usually too coarse and too large for smoothing for these prints. There are nail files that are specifically designed to work on artificial nails.
Artificial nails are also made of a hard plastic. These files are available in different grit sizes. The handling is very easy and most of them are even waterproof, so you can use them for wet sanding.
There are also special polishing files* for a perfect finish. These are either white or pink. The sanding surfaces are very fine and smooth. With these files, you can polish outwardly curved surfaces and flat surfaces to a high gloss after sanding. You do not need polishing paste.
Delta Sander
You can use a delta sander* to smooth 3D prints made of filament and UV resin. However, this method is better suited for models with large surfaces than for small UV prints. You have to keep in mind that a delta sander performs very fast vibrations.
You must therefore work very carefully and with a low pressure. The advantage, however, is that the triangular shape of the sanding surface allows you to work on edges and corners that you cannot reach when sanding by hand.
It is not possible to use wet sandpaper on an electrically operated delta sander because of the risk of short circuits.
If you want to sand wet, then you need a compressed air delta sander. The advantage of these sanders is that you can adjust the vibration rate via the air pressure. In addition, since there is no electric motor nearby, you can also use wet sandpaper.
Hand Sander
Electric hand sanders* can only be used to a limited extent for sanding your 3D prints. The minimum speed of these devices is too high for many types of plastic.
You can use these devices if you want to smooth relatively hard materials such as PETG or models made of UV resin by sanding. Due to the high speed, the plastic surface of soft plastics such as ABS softens quickly and smears.
The advantage of these devices is that you can work on small breakthroughs, edges and depressions with a suitable sanding attachment. For polishing your prints, these devices are basically very well suited. For hand sanders, there are small round polishing wheels made of felt.
The speed is not as critical for polishing as it is for sanding. What is critical is the pressure you are working with. If you have a compressor with sufficient air capacity, then you can also use an air-powered hand sander. The advantage of these devices is, as with compressed air delta sanders, that you can regulate the speed via the air pressure.
Spray Varnish
If you have created your 3D prints with very thin layers, then you can save yourself the intermediate step with a spray filler or a primer spray. You can smooth and color fine surfaces directly with spray varnish*.
Spray varnish is available in all possible colors as 1- and 2-component paint in DIY stores or car accessory shops. It is also important when smoothing with spray varnish that your print is free of grease and dust. You can also use acetone to degrease your model. However, the surface must dry completely after degreasing.
Incidentally, this method is practically no different from smoothing with primer spray or spray filler. The spray can must be shaken for some time according to the manufacturer’s instructions so that all paint components are thoroughly mixed. Good mixing can be recognized by the loud clacking of the mixing balls in the can.
Likewise, when smoothing with spray varnish, you must maintain a certain distance from your print so that the surface is smooth and even and no noses form. As when working with spray filler, you move the spray jet continuously over your object.
you start spraying next to your model, spray over it and finish when the spray hits next to the model again. The effect with spray varnish is the same as with a primer spray. The surface tension of the paint causes it to contract in the grooves between the varnish layers and fills them.
Depending on whether you use a matt varnish or a glossy varnish, each layer of varnish has to dry for a different amount of time before you can apply a second layer or continue working on your print. Matt varnish dries much faster than glossy varnish.
With most matt varnishes, you have to wait about three to four hours before you can sand your model, for example. It is not uncommon for a gloss varnish to take 24 hours to dry.
When smoothing your 3D prints with spray filler, primer spray or varnish spray, keep in mind that the fine mist from all three sprays will spread throughout the room. You should therefore work on a worksheet where this is not a problem or cover everything around with a foil.
Canned Varnish
You can also smooth 3D prints with varnish from a can* just as well as with a spray varnish. You must first stir the contents of the can well. The different components of the varnish also settle from each other in the can.
You can then apply the varnishes with a normal brush or with a foam brush on your objects. Matte varnish also dries much faster than glossy varnish. Always observe the drying time specified by the manufacturer before you continue to work on your model.
With can varnish, you must be careful not to use different varnishes that may not be compatible with each other. You can apply an acrylic varnish on top of a completely dried synthetic resin varnish. This is not a problem.
The other way round, however, you will probably have problems, as the synthetic resin varnish can dissolve the acrylic varnish. If you always use the same type of varnish, i.e. acrylic varnish or synthetic resin varnish, then you can also use varnishes from different manufacturers for one and the same model.
Water-soluble acrylic paints are generally recommended. These paints usually do not contain solvents and you can simply clean the equipment with warm water after work. For synthetic resin paints, you usually need a solvent to clean the brushes thoroughly.
Spray Filler
Spray filler* is available in spray cans. Spray filler forms a relatively thick layer after spraying, which is ideal for smoothing 3D prints. This method is especially recommended for larger models made of filament.
Spray filler consists of several components that can separate from each other if left in the can for a long time. It is therefore important that you shake the can very well according to the manufacturer’s instructions before applying the filler for the first time.
Depending on how fine or how coarse the surface of your prints is structured, a single coat of spray filler is often sufficient. It is important that you allow the applied layer to harden completely. How long this takes varies from manufacturer to manufacturer. Please also follow the manufacturer’s instructions.
One advantage of spray filler is that you can sand the surfaces very easily. Sanding with wet sandpaper is also possible. Prints smoothed with spray filler do not have to be painted if you do not want to. However, the filler is a very good bonding agent between the varnish and the model. Subsequent varnishing, for example with varnish from the spray can, adheres correspondingly well.
Before you smooth your model with spray filler, you must ensure that the surface is free of grease and dust. In particular, there must be no grease left on the surface so that the spray filler can adhere properly. You can use acetone to degrease the surface. Smoothing with a primer spray is just as easy as smoothing with spray filler.
Primer Spray
Primer sprays* are great for smoothing out your filament or UV resin prints.
It is important that you buy a primer spray that is suitable for plastics. Primers for metal or wood usually do not adhere very well to plastic surfaces. Sprays suitable for plastics are often called plastic primers.
If possible, you should make sure that you choose a different colored spray depending on the color of your print. Then you can see very well where the model is not yet perfectly smoothed. However, many of these sprays are colorless.
Even with a primer spray, it is important that you shake the can before use according to the manufacturer’s instructions. Often two to three minutes of vigorous shaking is required to thoroughly mix all the ingredients of the spray.
When working with these primers, make sure that the print object is free of dust and grease. Also, ensure that your workplace is well ventilated. The correct spraying distance is also important.
The distance must not be too small, otherwise, blobs can form when the primer runs together. If the distance is too large, the surface becomes relatively rough, because the fine particles already dry on the way from the spray can to the print. If this is the case, then the spray will not adhere properly either. Most manufacturers specify about 20 to 25 cm as the perfect distance.
When you apply the primer, you should always move the spray can or your model. You should also not start flushing in the middle of the print. Always start next to the print, spray at an even speed over the print, and stop spraying next to the model. The result is an evenly sprayed surface.
Smoothing with primer spray has the advantage that these primers dry very quickly. Usually, a drying time of 20 to 30 minutes is sufficient, then you can apply another layer. If you want to sand your model in between, you should wait a little longer so that the primer layer can harden completely.
However, depending on the fineness of the surface of your print, one layer is often enough. Due to the surface tension, the liquid primer retreats into the depressions between the layers after hitting the surface. Hardly any material remains on the tips.
This will fill the depressions faster and you can see where you may need to sand a little more. It is possible to use a primer spray to smooth out your print to the point where no layers are visible.
However, you must bear in mind that the very thick primer layer will blur the fine contours and make the edges much rounder. It is better to sand your model after one or two coats and then paint it.
Epoxy Resin
Smoothing 3D prints with epoxy resin* is also relatively easy. With this method, you can achieve perfectly smooth and shiny surfaces. For this method, you need an epoxy resin that you can buy for example in hardware stores, craft stores or online shops.
Before smoothing your models with epoxy resin, you should ensure your own safety. Always wear gloves and safety glasses when working. Work in a well-ventilated area. Especially the hardeners for these resins are very harmful to health.
When you have mixed resin and hardener, you should close the containers immediately. And you should always keep these materials out of reach of children. When you leave your workplace, you should either place the containers of resin and hardener high enough or lock them in a cupboard so that children cannot reach them.
Epoxy resin consists of the resin and a special hardener. You must mix both components very precisely in the ratio specified by the manufacturer. For some resins, you need a precision scale. Others are relatively uncomplicated.
Here it is sufficient to measure out the corresponding quantities in milliliters. You should use an absolutely clean vessel to mix the two components. Dirt or dust that you mix into the resin will be seen later on the surface of your prints.
You can apply the ready-mixed resin relatively easily with a soft brush. The layer thicknesses are relatively large, so that fine grooves are covered very quickly. However, you should always try to apply the thinnest possible layers.
Depending on the viscosity of the epoxy, you can also use a plastic spatula for larger surfaces. Before applying more coats or sanding the surfaces to paint them, each coat should be fully cured.
When smoothing with epoxy resin, you should always start with the fine details. Use an appropriately fine brush. Only then follow the larger areas. One advantage of the epoxy resin coating is that your prints will be a little more stable.
It is recommended, so that the resin adheres better to your print, to lightly sand the surfaces beforehand. The grooves disappear after the resin application and are no longer visible. A disadvantage, however, is that heat is generated when the resin hardens.
This heat development can sometimes be so strong that the model becomes soft. This is often the case, especially with fine structures. If you notice that your model or parts of your print, for example thin arms or other thin parts, become soft, then you should turn your model until the resin begins to solidify.
If you want to smooth small prints with epoxy, then you should attach the models to a stick so that you can turn them in all directions without having to touch them yourself. For example, you can use a wooden stick or handle, and attach your print to it with double-sided tape or Bostik Blu-Tack adhesive. When you’re done, you can remove your model very easily.
Instead of epoxy resin, you can also use polyester resin*. Polyester resin hardens like epoxy resin and is suitable for smoothing your prints. Polyester resin is also available at craft stores and online shops.
If you want to paint your prints after smoothing them with epoxy resin, you should sand the surfaces finely. Paint will always adhere better to sanded surfaces. If possible, you should also use wet sandpaper for this to avoid deep grooves.
Fine sandpaper with 400 or 600 grit is perfectly sufficient to create an ideal base for painting.
If the resin you are using is too thin and runs off the model before it sets, you can thicken virtually any epoxy resin with a thixotropic agent. Thixotropic agents are available in small quantities from your local dealer. Simply mix the white powder into the resin in the specified quantity and then add the hardener.
XTC-3D
In the meantime, there are various special coating agents for 3D printing. These are usually also epoxy resin. One of them is XTC-3D from Smooth On*. The manufacturer states that this coating agent has been specially developed for smoothing 3D prints.
XTC-3D comes in a set with a bottle of resin, a smaller bottle of hardener, a mixing cup, a wooden spatula and a foam brush. As with epoxy resin from the craft store, you need to mix the two components resin and hardener in the specified ratio.
After mixing, apply the resin to your print with a foam brush or other brush. The processing time is about 10 minutes before the resin sets. Smooth On says that you can use XTC-3D on all kinds of materials such as EPS, EPDM, ABS as well as wood, cardboard or paper.
Resin Pro 3D Finish
Another special agent for smoothing 3D prints is Resin Pro 3D Finish. This is also a resin that needs to be mixed with a hardener and then cures. You can apply this finish with a simple brush. The processing time is about 20 minutes at 20 degrees room temperature.
All epoxy resins, including the resins of XTC-3D and Resin Pro 3D-Finish, can be dyed with pigments that are suitable for resins. By adding pigments you can vary the colors. However, you must keep in mind that you will practically never achieve completely opaque colors. The epoxy finish is almost always somewhat translucent, even with pigments.
After applying each layer, you should clean brushes or foam brushes with acetone. If you want to save yourself this work, you can also use cheap brushes as disposable brushes. The disadvantage of these cheap brushes, which are available in many hardware stores, is that the bristles quickly loosen and stick to the surface of your prints.
One disadvantage of the special resins offered by various manufacturers for smoothing 3D printers is the high price. For the same money, you can get much more equally usable epoxy resin at a craft store or hardware store.
Heat gun
Smoothing with a heat gun* is particularly suitable for large-area and solid prints. For small and fine structures, the plastic melts too quickly and the print is destroyed. With this method, slowly approach the optimal temperature and the correct distance.
For example, start with a heat output of 300 degrees initially. Always move the heat gun over your model and do not hold the hot air jet on one spot for long. As soon as you see that the plastic is getting soft, you should not apply any more heat. Observe what happens first.
When smoothing with a heat gun, do not hold your models in your hand. Place them on a suitable surface. Also, do not touch a freshly smoothed print with your fingers. Firstly, the model is still very hot and you will leave fingerprints.
Fire
Many larger plastic objects that are produced by rotational molding, for example, are smoothed by the manufacturer with open flames. This method, just like smoothing with a heat gun, requires a little dexterity and experience.
You can use a blowtorch* to smooth smaller models. The hot flame heats the surface very quickly, so you should be even more careful than with a heat gun. Small and fine structures will melt very quickly.
A flambé burner has the advantage over a gas cartridge-powered blowtorch that you don’t always need a separate ignition source to light the flame.
Sandblasting
Under certain conditions, you can also use sandblasting to smooth your models. However, the abrasive must be relatively hard because of the soft plastic materials. Aluminum oxide or silicon oxide are the most suitable blasting media.
With coarser surfaces, however, you will not achieve a satisfactory result with this method. Surfaces of SLA prints, on the other hand, are much finer. With UV resin prints you can use sandblasting, for example, to roughen the surfaces for subsequent varnishing. Depending on how fine you sandblast the surfaces, you can also create a very attractive, uniformly matt surface that requires no further finishing.
Solvents
In addition to the methods of smoothing your 3D prints by sanding, with paint or epoxy resin, there is also the possibility of chemical smoothing. This method uses different solvents depending on the material. The best known method in this category is the smoothing of 3D prints made of ABS with acetone.
Acetone
Smoothing ABS filament 3D prints with acetone is very effective and gives good results. Before using this method, you should take a few safety precautions.
Above all, you should avoid direct contact with this solvent and inhalation of the vapors that are produced even at room temperature. This means that you should always wear gloves, safety goggles and ideally a suitable respirator when working with acetone.
Make sure that the workplace is well ventilated. The solvent can enter your body through the skin. However, the vapors, in particular, are harmful to health. They can cause breathing difficulties and dizziness and can even lead to unconsciousness.
You can get acetone at any hardware store. The solvent is relatively inexpensive. The colorless chemical is used to degrease paints and varnishes. Acetone is also often contained in nail polish remover.
Acetone also has the property of dissolving certain plastics such as ABS and ASA. You can therefore also glue these materials with acetone.
Both materials can be smoothed very well with acetone. For a good result, the correct application is crucial.
As with other solvents, you have several options for smoothing your models with acetone. The most common and easiest method is to smooth with acetone vapors.
Theoretically, smoothing can be done by applying a brush or dipping the model in acetone. However, the results are usually not satisfactory. In particular, dipping in acetone is not recommended for hollow models.
If the solvent runs into the model, this can lead to severe damage to the print. Another problem, however, is the exposure time. Since the solvent comes into massive contact with the surface during immersion, it dissolves the plastic very quickly.
Your model is then most likely ruined. For smoothing with acetone vapors you need in principle only three parts to make a suitable apparatus yourself. You need a large glass jar in which your model will fit. For example, a jar or a glass bell jar from the laboratory.
You will also need a porcelain plate and an absorbent material, such as cotton cloth or kitchen paper.
Plastic containers are often not suitable, as acetone quickly attacks and dissolves many plastics. Also, you can better observe the progress through the glass and take the printed object out again in time. You can also use a container made of PP (polypropylene). PP is resistant to acetone, but not fully transparent.
To smooth your model with acetone, place the cloth on the plate and place your model on a base made of stainless steel or aluminum, for example, on the cloth. The base is important so that your model does not come into direct contact with the acetone.
The base also allows you to place the model in another location to flash off after smoothing without having to touch the model. When you have placed your print correctly, soak the cloth with acetone and put the glass over it.
Through the glass, you can observe the smoothing progress. Depending on the size and shape of your print, you should expect an exposure time of about 15 to 20 minutes. It’s best to set the timer on your smartphone to the appropriate time.
As soon as the model has reached the desired surface quality, lift off the glass and remove the model with base from the plate. You should not touch the model with your fingers, as the surface must first harden again.
If you touch the model directly with your fingers, you will see fingerprints. Place the plate with the cloth and your print in a well-ventilated place so that the acetone can evaporate. It will take up to several hours before the model is dry again.
Another method for polishing with acetone is to use a plastic box or a stainless steel pot. For this you can use a box made of PP.
The box or pot should be high enough to fit the model standing on a base and you can put the lid on. Place the model in the box, pour in acetone to a height of 2 to 3 mm and place the lid loosely.
For this method, however, you need some experience so that you don’t have to lift the lid every 30 seconds to see how far the smoothing has progressed. When the model is smooth, you can remove it with the base and let it dry in a well-ventilated place. You should not choose a box that is too big so that you do not use too much acetone.
Warm Acetone
The method just described for smoothing an ABS 3D print with acetone is also called cold smoothing. One way to speed up the process is to use warm acetone.
However, you should never heat the acetone on the stove top. Since the formation of steam is much stronger when heating, you should make sure that there is good ventilation. To heat the acetone, you can use the heated print bed of your 3D printer, for example.
Take a resistant plastic key or a thin-walled cooking pot. Place the container on the print bed and place your print on a pedestal inside. Then pour 2 to 3 mm of acetone into the container and turn on the heater.
The temperature should be no more than 70-80 degrees. Then put the lid on the container. Do not close the lid tightly, otherwise the pressure in the container can rise sharply. The reaction time is considerably shorter with warm acetone. After five to ten minutes at the latest, you should check how far the model has been smoothed.
Isopropyl Alcohol
3D prints made of PVB and a special PLA filament from PolyMaker* can be smoothed with Isopropyl Alcohol*, i.e. with alcohol. You can place your PVB prints in a container and let the alcohol vapor soak in, just like when smoothing with acetone.
However, this can take up to several hours. This process can be accelerated somewhat if you apply the alcohol with a brush or briefly dip your print into the alcohol. However, it takes some skill and experience to achieve an optimal result with this method.
The Polysmooth PLA from PolyMaker* can also be smoothed with alcohol. For this purpose PolyMaker has developed a special device, the so-called Polysher*. With a size of about 230 x 300 x 370 mm, the Polysher is large enough for small and medium-sized 3D prints.
The device consists of a base in which the alcohol is vaporized and a transparent cover. For smoothing you put the model into the device, fill the alcohol into the base and put on the cover. The alcohol is vaporized after switching on.
The alcohol vapour is applied to the model so that the plastic surface is loosened and smoothed. As with acetone smoothing, the surface of your models will be very sticky for a long time after the alcohol vapor bath. Unfortunately, this method only works with 3D prints made of Polysmooth PLA and PVB.
Other Solvents
In addition to acetone and alcohol, there are several other chemicals that you can use to smooth 3D prints made from certain materials. These are also solvents and alkalis. For example, NaOH (sodium hydroxide). Dichloromethane, chloroform or d-limonene. 3D printers made of PETG or HIPS can be chemically smoothed with these agents.
However, these chemicals are very aggressive, hazardous to health and not recommended for home use. In addition, you can’t just buy these chemicals. You usually have to prove to the dealer or the manufacturer that you can handle these agents properly.
Related Questions
Can I smooth 3D prints made of ABS with Isopropyl Alcohol?
Smoothing 3D prints made of ABS is not possible with isopropyl alcohol. ABS is also resistant to pure isopropyl alcohol. ABS can be smoothed with acetone vapors or by sanding and applying a coat of paint.
Can I color epoxy resin for smoothing 3D prints?
You can color epoxy resin with commercially available artificial and natural color pigments or metal effect powders from an artists’ supplies store or a craft shop. It is important that the pigments are dry.
Can I smooth 3D models made of UV resin with acetone?
Cured UV resin is resistant to acetone and other chemicals. Therefore, smoothing with acetone will not work for these 3D prints. The best method for smoothing resin prints is sanding or varnishing.
Conclusion
There are several methods you can use to smooth your 3D models. Sanding, spray filler or varnish to achieve smooth surfaces is possible with virtually all materials and is not very difficult.
If you want to smooth 3D prints made of ASA or ABS with acetone, you should only do so if you have taken the appropriate safety precautions. All in all, smoothing 3D prints is not magic. The more routine and experience you gain over time, the better the results will be.
Disclosure: This website is the property of Martin Lütkemeyer and is operated by Martin Lütkemeyer. Martin Lütkemeyer is a member of the Amazon Services LLC and other Affiliate Programs. These are affiliate advertising programs designed to enable websites to earn advertising revenue through advertising and linking to Amazon.com and others. Links marked with * are affiliate links.
