
- Wet Filament: Prevention, Symptoms & Drying - July 18, 2024
- Sovol SV08 – Best PrusaSlicer Settings & Profile - June 26, 2024
- Sovol SV08 – Best Orca Slicer Settings & Profile - June 26, 2024
Disclosure: Links marked with * are Affiliate Links. I earn from qualifying purchases if you decide to make a purchase through these links – at no additional cost for you!
Elegoo has released with the Saturn 3* a large format resin 3D printer with a small XY pixel size, previously only found on smaller devices. It mainly has the 12K LCD screen to thank for this.
I tested the Ultra version* of the 3D printer from the perspective of a tabletop gamer who wants to paint detailed miniatures printed with a resin printer. Since I belong to this target group myself, I can rank the printing results well. Since the smallest details are important for these miniatures, the test results are of course also transferable to other applications, such as the production of jewelry.
After a brief overview of the Elegoo Saturn 3, I’ll show you how it’s delivered and set up. After leveling the print bed, I go into detail about its features. At the end, I’ll show you my print results and compare it to similar 3D printers.
Who should buy the Elegoo Saturn 3?
The Elegoo Saturn 3 is ideal for applications where high accuracy is important and the large print volume is beneficial. With the large print volume, large objects can be printed in one piece or many small ones can be printed at once.
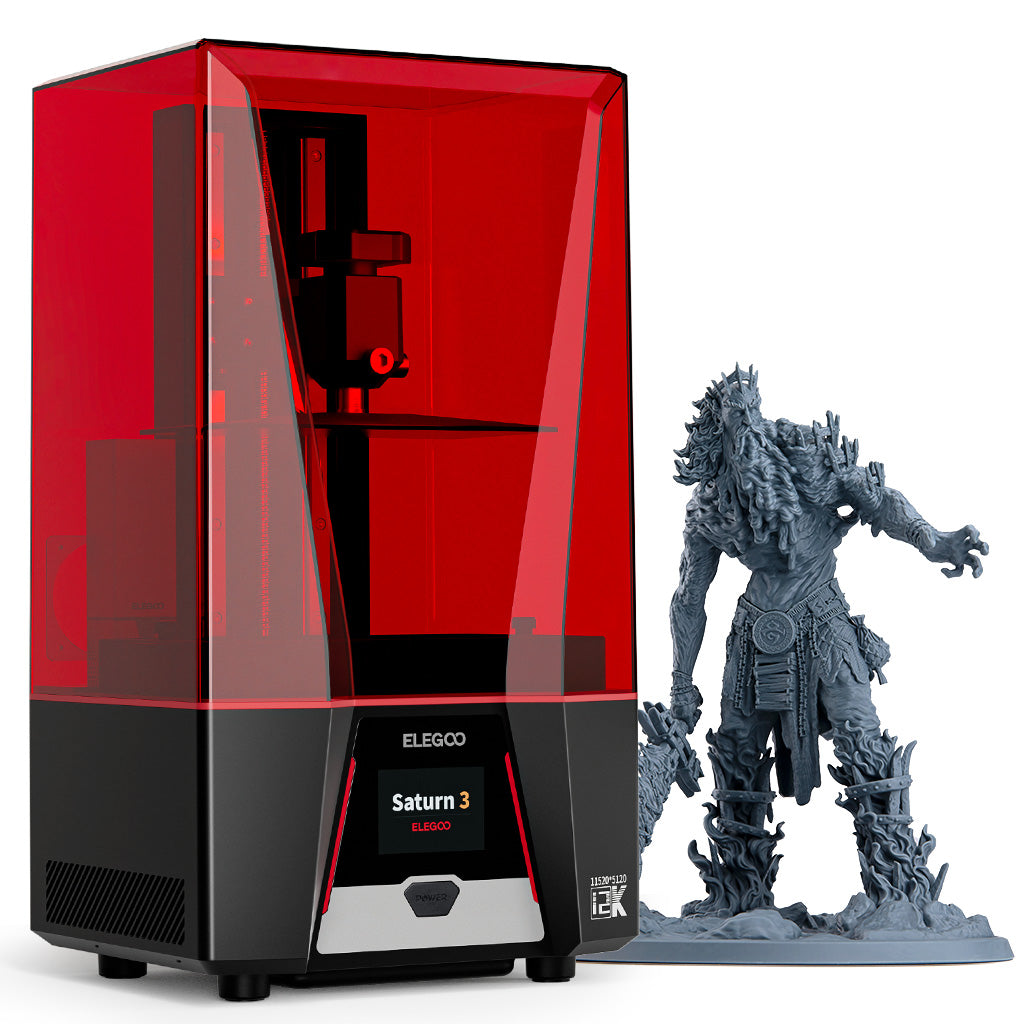
The Saturn 3 from Elegoo has a 12K resolution. This allows it to achieve accuracies that are ideal for the smallest details – and that with a large print volume!
LCD Resolution: 12K (11520 × 5120)
LCD Size: 10”
XY Pixel Size: 19 × 24 μm
Layer Height: minimal 0.01 mm
Build Volume: 219 × 123 × 250 mm³
Speed: up to 70 mm/h
Pros:
✓ Super accurate
✓ Large print volume
✓ Air filter
Cons:
× No Wi-Fi
× No 4-screw mount of the print bed
× No automatic leveling

The Saturn 3 Ultra from Elegoo has a 12K resolution. It is perfect for small and big objects with small details. The Ultra version has some nice features that improve the results and overall ease of use.
LCD Resolution: 12K (11520 × 5120)
LCD Size: 10”
XY Pixel Size: 19 × 24 μm
Layer Height: minimal 0.01 mm
Build Volume: 219 × 123 × 260 mm³
Speed: up to 70 mm/h (150 mm/h with Elegoo speed resin)
Pros:
✓ Super accurate
✓ Large print volume
✓ Air filter
✓ Wi-Fi
✓ 4-screw mount of the print bed
Cons:
× No automatic leveling
× No resin feeding system
Review Copy Disclosure
Elegoo provided me with the printer for testing. I did not promise Elegoo anything more than that. Money did not flow and my opinion of the printer was not influenced. Elegoo did not read this article until after it was published.
Table of Contents:
- 1 A brief overview of the Elegoo Saturn 3
- 2 Packaging and scope of delivery of the Elegoo Saturn 3
- 3 How to assemble the Elegoo Saturn 3
- 4 Print bed of the Elegoo Saturn 3 and leveling
- 5 Print volume of the Elegoo Saturn 3
- 6 Touchscreen of the Saturn 3 and its menu
- 7 Resin tank of the Elegoo Saturn 3 with snap-in function
- 8 Light source of the Elegoo Saturn 3 and its resolution
- 9 Connection options of the Elegoo Saturn 3
- 10 Linear guide of the Elegoo Saturn 3 and z-axis stability
- 11 UV protective hood of the Elegoo Saturn 3
- 12 Slicers compatible with the Elegoo Saturn 3
- 13 Test prints and calibration of the Elegoo Saturn 3
- 14 Smell of the Elegoo Saturn 3
- 15 Volume of the Elegoo Saturn 3 during printing
- 16 Print speed of the Saturn 3
- 17 Print quality of the Elegoo Saturn 3 (pictures of 3D prints)
- 18 Operating the Elegoo Saturn 3 & Ease of Use Features
- 19 When will the Elegoo Saturn 3 become outdated?
- 20 Is the Elegoo Saturn 3 the right 3D printer for you?
- 21 Elegoo Saturn 3 vs. Saturn 3 Ultra
- 22 Elegoo Saturn 3 vs. Anycubic Photon Mono M5
- 23 Important accessories for a resin 3D printer
A brief overview of the Elegoo Saturn 3
The Elegoo Saturn 3 has a resolution of 12K, an XY pixel size of 19 × 24 μm, and a print volume of 219 × 123 × 250 mm³. The Saturn 3 Ultra is 10 mm taller in the z-direction, can be connected via Wi-Fi, and has a better print bed mount. Both versions have an air filter.
The highlight of the Saturn 3 is, of course, the 10-inch 12K mono LCD screen with a resolution of 11520 × 5120. The Saturn 3 is one of the first 12K resin 3D printers. Before that, smaller devices with an 8K screen like the Mini 8K or 8K S could get to similar XY pixel sizes.
Before any confusion arises, here’s a little explanation of how the accuracy of a resin 3D printer comes about. The accuracy is given once for the Z-direction and for the XY-direction. In the Z-direction, the linear guide of the z-axis determines how accurately it can print. Most resin 3D printers achieve a minimum layer height of 0.01 mm.
The accuracy in the XY direction results from the size of the LCD screen and its resolution. The larger the LCD screen becomes while the resolution remains the same, the smaller the XY pixel size becomes. Therefore, a small 8K resin 3D printer can get to the same or better accuracies as the Elegoo Saturn 3.
- X resolution = 219 mm / 11520 = 19 μm
- Y-resolution = 123 mm / 5120 = 24 μm
The smaller these values are, the fewer steps you will see in the XY direction on the finished object and even the smallest details will be well represented and not blurred.
As you will see below in my print results, no more steps are visible. The print quality resembles injection molded parts!
The large LCD screen also results in the large print volume. On the basic version of the Saturn 3, it is 219 × 123 × 250 mm³. For the Ultra version, it is 219 × 123 × 260 mm³, which is 1 cm higher in the z-direction.
The large print volume of the Elegoo Saturn 3 allows printing of large objects in one piece or mass production of many small objects at once.
So from a tabletop gamer’s or miniature painter’s perspective, it could be used to directly print several small miniatures at once. Post-processing with resin 3D printers is relatively expensive, making the large print area worthwhile even for small objects. Then you only have to wash and cure the objects once, and also clean the 3D printer and the tools used only once.
The third highlight (at least for me) is that an air filter is included. And that’s with both versions. It is placed directly inside the print volume and already neutralizes much of the stink there – but more on that later.
My brief assessment of the Elegoo Saturn 3 is as follows:
For many users, the Elegoo Saturn 3* or Elegoo Saturn 3 Ultra* is precisely the resin 3D printer they’ve been waiting for. For years, my Mini 8K was my default 3D printer for detailed objects. The Saturn 3 has now officially replaced it, offering about the same accuracy with a much larger print volume.
As far as its competition goes, the Saturn 3 is relatively alone at the top right now. At the time of this review, the Anycubic Photon Mono M5* is available for pre-order. It has the same XY pixel size and print area, but a lower print height. Price-wise, however, it is pricier at this point, making the Saturn 3 more attractive. Another big advantage the Saturn 3 has over the Photon Mono M5 is that it comes with an air filter as standard. You’ll find a comparison of these two 3D printers at the end of this review.
But now, let’s finally take a closer look at the Elegoo Saturn 3!
Packaging and scope of delivery of the Elegoo Saturn 3
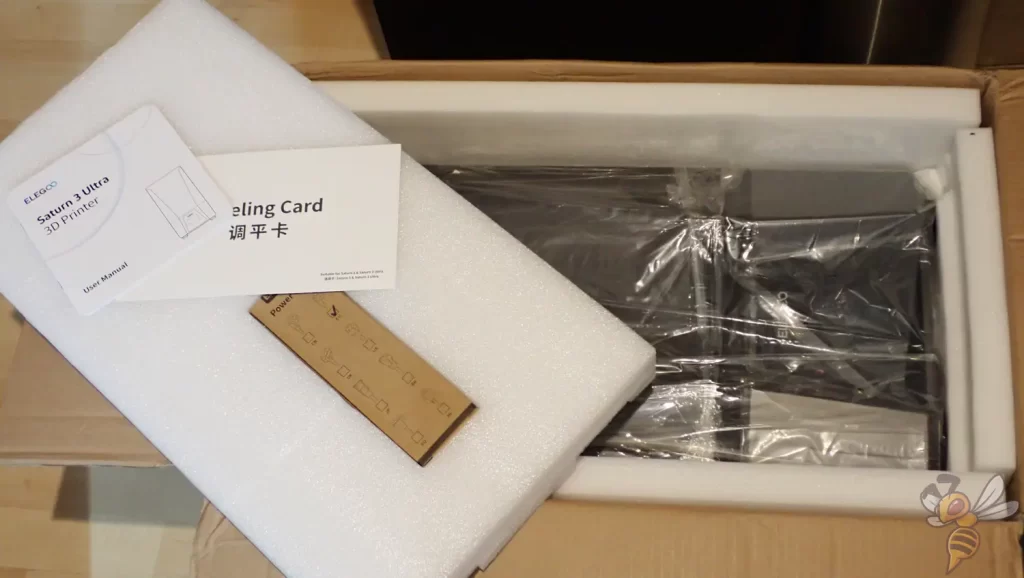
The Elegoo Saturn 3 and Saturn 3 Ultra are shipped optimally packaged and all parts are nested inside each other to save space, making the packages not much larger than the 3D printers themselves.
Some useful accessories are also included in the scope of delivery. Definitely necessary are, of course, the tools for assembly and the air filter.
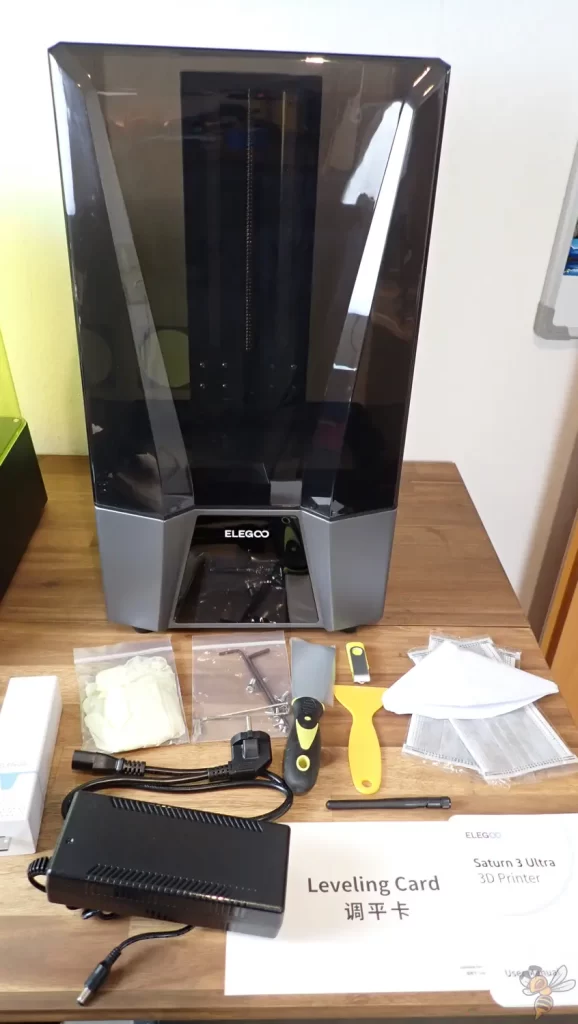
However, you should directly dispose of the included masks. For the toxic gases of the liquid resin you need a stronger protection for your airways. I use this mask* with a proper seal and effective filters. When handling liquid resin, it is not enough to ventilate the room well. As long as the fumes are still in the air, you need such a mask to protect yourself.
So if you are planning to get a resin 3D printer, such a mask should definitely be in your shopping cart!
Another useless accessory is the metal spatula. The print bed of both variants of the Saturn 3 has excellent adhesion, thanks to the special surface. However, you should not remove the finished objects from it with a metal spatula, as you will leave scratches that can worsen the print bed adhesion in the long run. The plastic spatula provided should be sufficient for this purpose.
How to assemble the Elegoo Saturn 3
Assembling the Saturn 3 is as quick as it is for most other resin 3D printers. Basically, assembly just consists of mounting the print bed to the z-axis and plugging the air filter into the USB slot inside the enclosure.
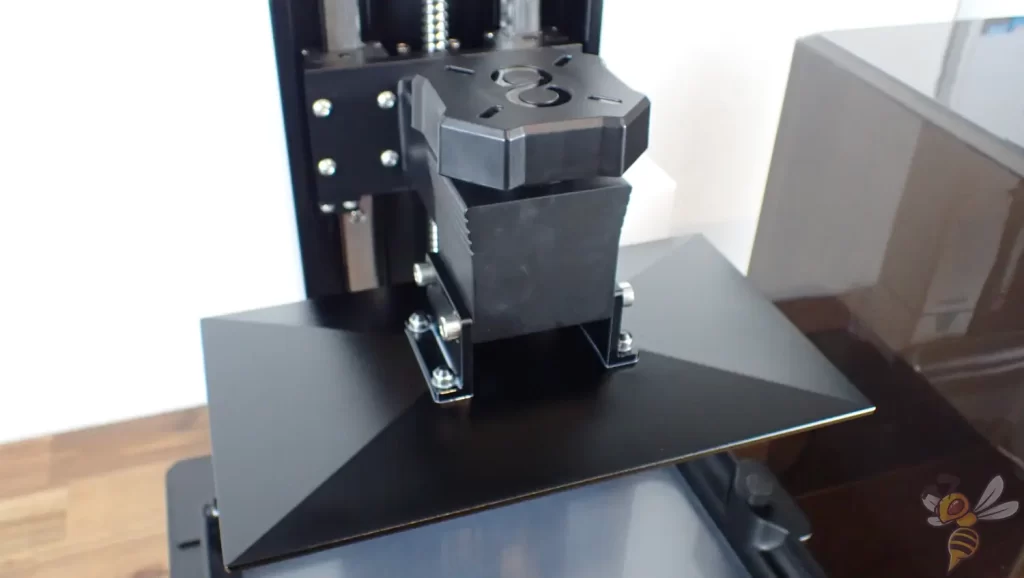
Print bed of the Elegoo Saturn 3 and leveling
The print bed of the Elegoo Saturn 3 has a very fine and rough surface. This allows the first layers of the object to adhere to it perfectly. In the past, I roughened the print beds of my resin 3D printers a bit with fine sandpaper. This is not necessary with the print bed of the Saturn 3. I have not had any problems with print bed adhesion.
As mentioned above, you should not use a metal spatula on the print bed. The inevitable scratches on the print bed could reduce adhesion to it.

The leveling of the print bed differs between the basic version and the Ultra version of the Saturn 3. In the basic version, the print bed is supported by a ball joint and is locked in place by two screws. In the Saturn 3 Ultra, four screws fix the print bed.
By fastening the print bed with four screws on the Elegoo Saturn 3 Ultra, leveling lasts longer and needs to be repeated less frequently.
Another small advantage of this attachment is that it saves some space in the Z direction. As a result, the print volume of the Saturn 3 Ultra is 10 mm higher than the print volume of the basic version.
The print bed leveling itself is basically the same as most other resin 3D printers:
- A piece of paper is placed between the LCD screen and the print bed.
- The print bed is released so that it can move freely on the suspension.
- The z-axis is moved to the zero position.
- While one hand pushes the print bed down, the other hand tightens the screws.
- The z-offset is adjusted via the menu so that there is some friction at all points of the print bed with the paper when the paper is moved.
This process causes the print bed to align perfectly parallel to the LCD screen. If you’ve never leveled a resin 3D printer before, it may take you two or three passes before the print bed is truly parallel to the LCD screen. However, at least with the Saturn 3 Ultra, you almost never if ever have to repeat the leveling process.
Unfortunately, the Saturn 3 does not have automatic print bed leveling like the Anycubic Photon Mono M5s*, for example. However it rarely needs leveling, so that automatic leveling is a luxury feature in my opinion. This increases the price a lot, just to save you maybe 5 minutes of your life.
Print volume of the Elegoo Saturn 3
The print volume of the Elegoo Saturn 3 is 219 × 123 × 250 mm³ and that of the Saturn 3 Ultra is 219 × 123 × 260 mm³.
With the large print volume, it is possible to print large objects in one piece or several small ones at once.
For people like me who need the highest possible accuracy for their miniatures, only resin 3D printers with smaller print volumes have been of interest. With the Saturn 3, I can finally print larger objects or directly ten minis at a time.
I prefer to paint small miniatures or medium-sized busts. But since I don’t want to use the resin 3D printer every few days because of the time-consuming post-processing, it’s very nice to have such a large print volume. This means the printer has to run much less often and post-processing is no longer such a big deterrent.
One disadvantage of a large print volume is that if something should ever go wrong, more time and resin was wasted than with a smaller 3D printer. However, in my experience, such catastrophic printing errors almost never occur with resin 3D printers.
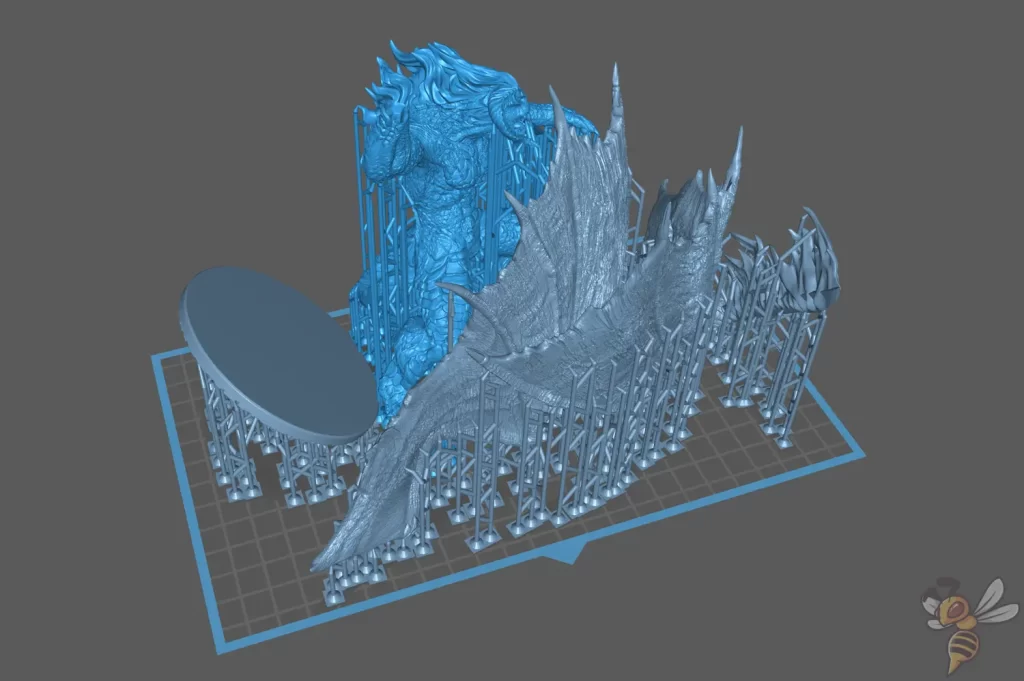
The large print bed inspired me to model a relatively large bust with a height of 7 cm. As illustrated by the picture above, the bust still has a lot of wiggle room on the print bed. On my old Mini 8K, it wouldn’t have fit on the print bed and I would have had to scale it down.
If you want to print huge objects that use a lot of resin, it may be necessary to add resin during printing. The Elegoo Saturn 3 does not have an automatic resin refill system in either the basic or ultra version. The slicer will give you a rough resin consumption that you can compare to the resin in the resin tank. Depending on the ratio of these values, you can set an alarm to add resin during printing.
The print volume of the Saturn 3 is just at the limit where such a resin refill system would make sense. However, most users rarely if ever print objects large enough to need to refill resin. Therefore, it might make sense for the future to develop an upgrade module that could be plugged into the USB slot that is still available. That way, the price wouldn’t be unnecessarily increased for most users.
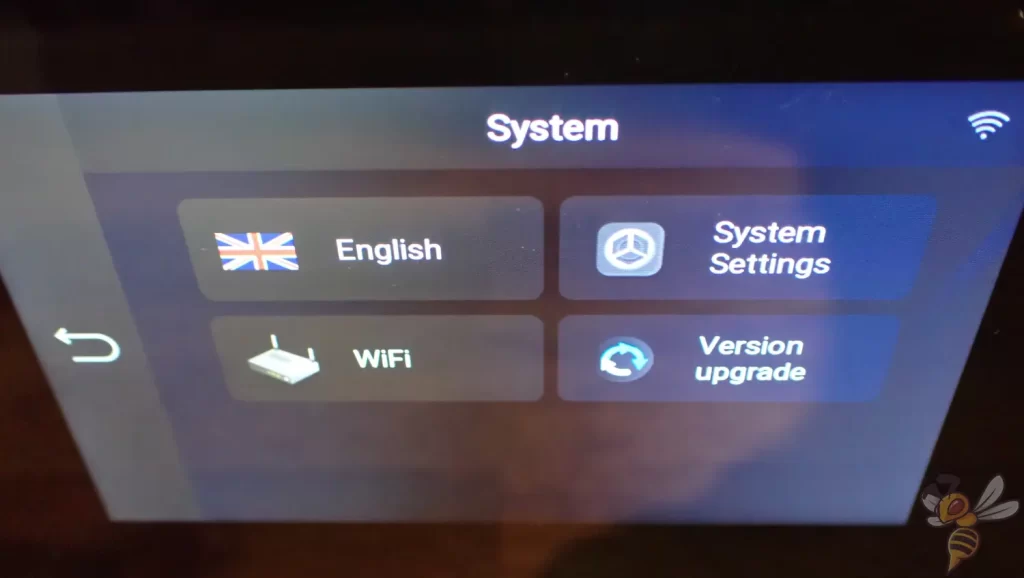
The touchscreen is 3.5 inches, colorful and easy to use. It does exactly what it is supposed to and for you to quickly get to the important menus of the 3D printer.
From the menu, you can level the print bed, start resin tank cleaning, or connect the Saturn 3 Ultra to your Wi-Fi.
Resin tank of the Elegoo Saturn 3 with snap-in function
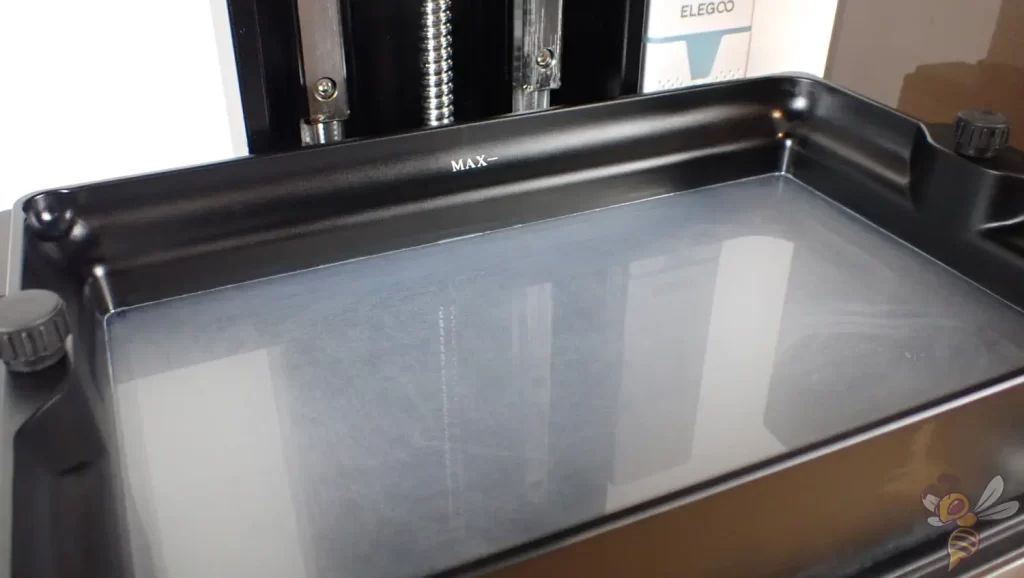
The large resin tank of the Elegoo Saturn 3 has a relatively large capacity, so you don’t have to add resin in between, even for slightly larger objects.
The resin tank is attached to the base of the 3D printer on both sides with screws. Some users would like to see snap locks replace the screws so that the resin tank can be inserted and removed more quickly. However, it is questionable whether this variant will hold the print bed in place as reliably as with the screws.
In the Ultra version, the resin tank has an ACF release liner film. The film is not completely transparent as in the basic version, but somewhat milky. This does an even better job of preventing the layers from sticking to the film and not the print bed or the already finished layers. In addition, this film allows printing at very high speeds of up to 150 mm/s.
At one of the four corners of the resin tank, there is a place for pouring out the leftover resin. Since the resin tank is so large, you’ll also need both hands to do this.
In my eyes, this is one of the biggest drawbacks of a large print volume. When reworking, you have to pour the excess resin back into the bottle through a filter. With smaller resin tanks, you can hold the filter with one hand and the resin tank with the other. So, a sturdy filter that won’t easily tip over or slip is very helpful. I use this one:

A stable, reusable resin filter saves you having to buy paper filters and sits firmly on the resin bottle. This means you don’t have to support the filter with one hand when you pour resin into it.

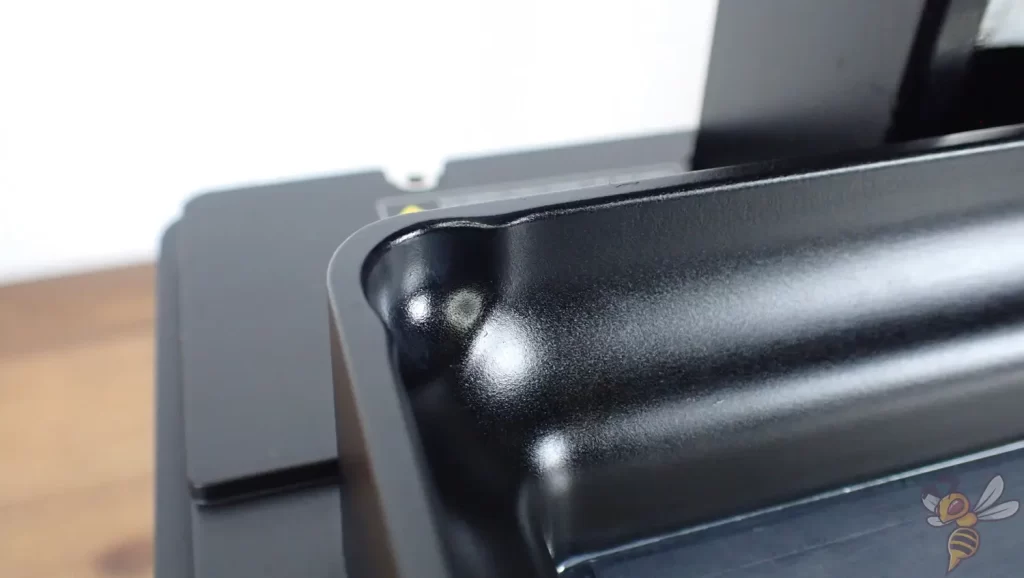
Another handy detail about the resin tank is that it has screws on the bottom at the four corners. This allows it to be placed on a flat surface without scratching the FEP film. There are corresponding holes in the base of the 3D printer where the screws fit in. This also helps with positioning so you don’t have to spend a lot of time looking for the hole with the screws.
Light source of the Elegoo Saturn 3 and its resolution
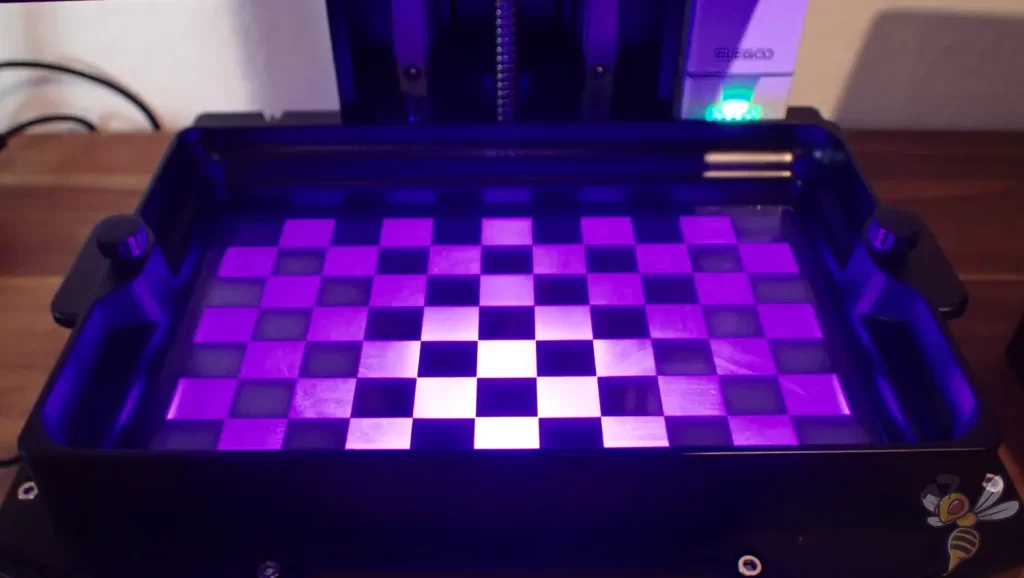

The light source of the Elegoo Saturn 3 has a wavelength of 405 nm, which makes it compatible with all common resins. To check if it is damaged after delivery, the LCD screen can be tested via the menu.
The powerful light source provides a resolution of 11520 × 5120 on the LCD screen, which is almost 60 million pixels!
The Saturn 3 is one of the first large format 3D printers with a 12K resolution.
Connection options of the Elegoo Saturn 3
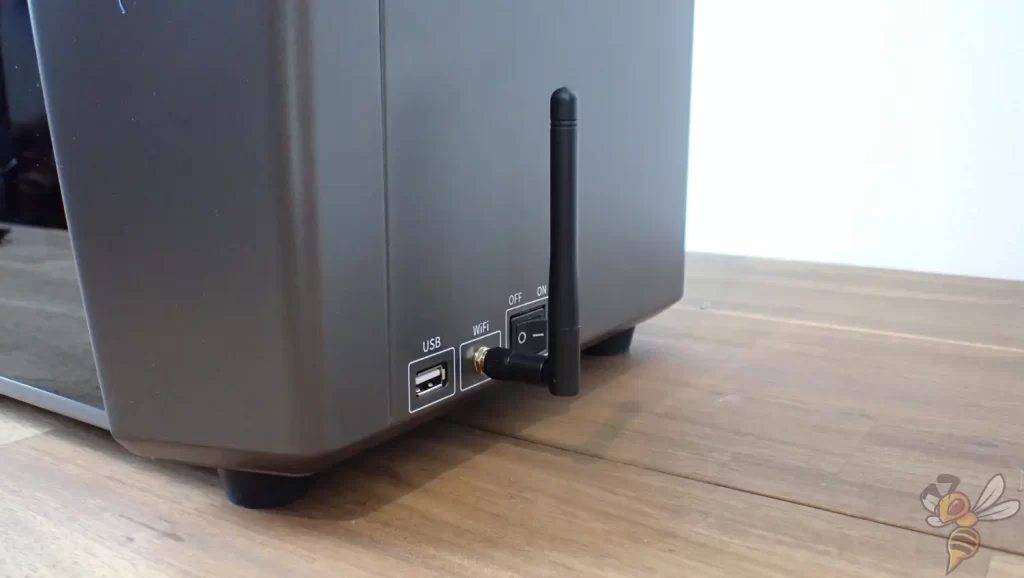
When it comes to connectivity, the two versions of the Elegoo Saturn 3 differ from each other. The Saturn 3 can only be supplied with print files via USB, while the Saturn 3 Ultra can also be connected to your Wi-Fi with the included antenna.
I find the connection option via Wi-Fi very practical, as it is so fast that I wouldn’t be any faster with manual data transfer via a USB stick.
On both versions, the ports are on the right side of the device. While I understand that from a design standpoint, having the ports on the side of the 3D printer is more aesthetically pleasing as it doesn’t clutter up the front, it is relatively impractical. If there is little space on the left and right of the 3D printer, it can be awkward to plug in a USB stick there. It would be more practical if the Wi-Fi antenna was at the back and the on/off button and USB slot were at the front.
Linear guide of the Elegoo Saturn 3 and z-axis stability

The higher the print volume and the heavier the print bed, the more stable the z-axis needs to be. So for large format resin 3D printers, a double z-axis is mandatory to be able to print with small accuracies.
The z-axis of the Elegoo Saturn 3 has such a double design, with two linear guides with a turning screw in the middle. I have not yet printed any objects with the Saturn 3 that use the entire print volume in the z direction, but I have done this with its predecessor, the Saturn 2. And at least there, there were no problems even at the upper end of the print volume.
The stepper motors of the z-axis, together with the mechanical setup, can achieve a minimum layer height of 0.01 mm. (0.01 mm corresponds to 10 μm.)
UV protective hood of the Elegoo Saturn 3
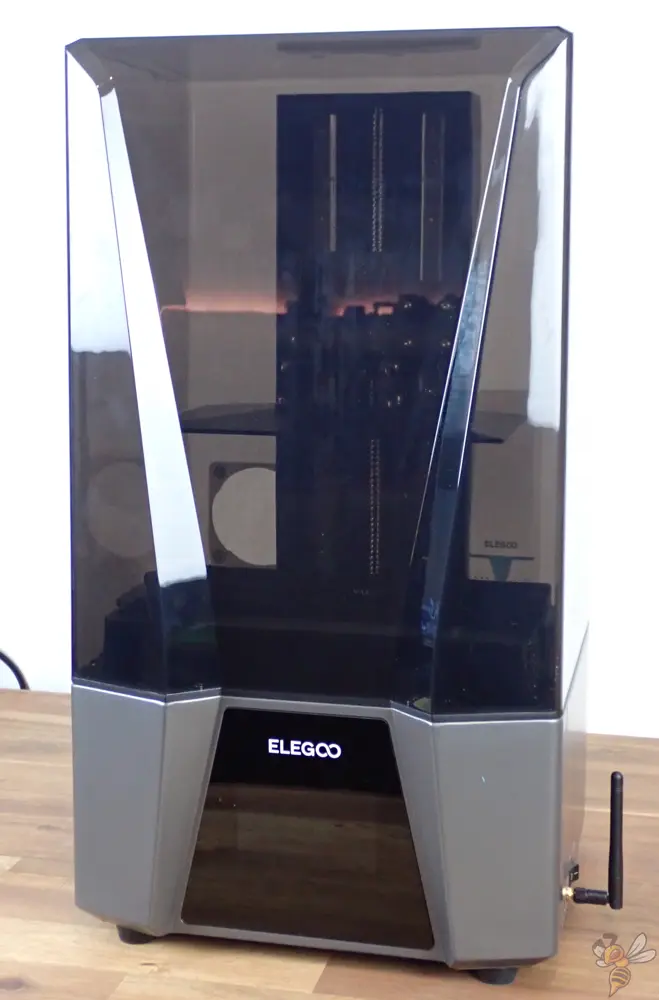
The UV protective hood of the Elegoo Saturn 3 is made of a single casting and is very light. It is red in the basic version of the Saturn 3 and black in the Saturn 3 Ultra.
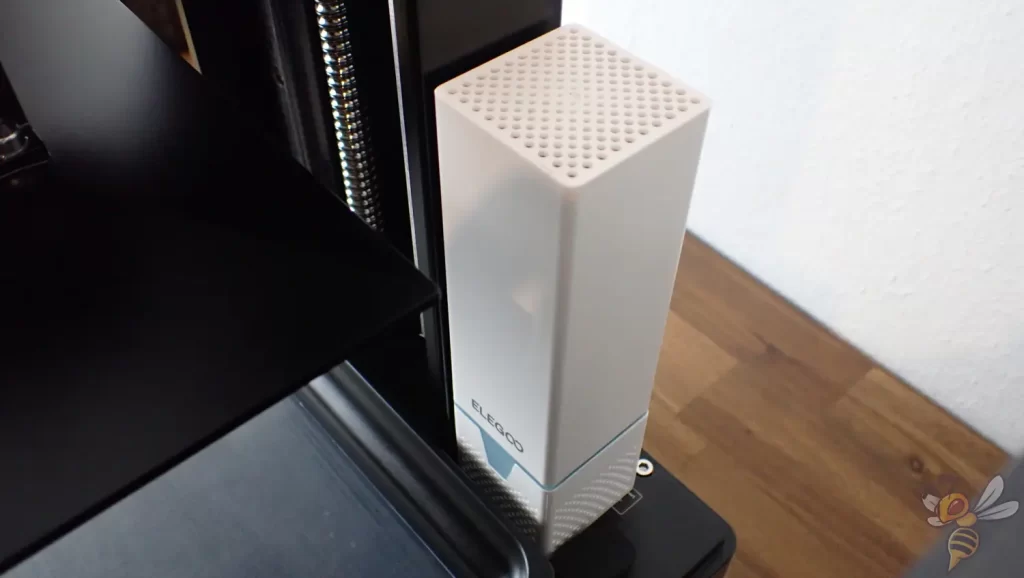
There is a hole on the back of the protective hood that can be closed via four screws. You can connect the Mars Mate* here.

The gases from liquid resin are toxic. Apart from the right mask, an air filter is useful. The Mars Mate neutralizes almost all odors and is connected directly to the print volume with a tube.
Nevertheless, you should ventilate the room well after printing, even with such a powerful air filter. However, there is almost no smell anymore and it does not settle on all objects as it would if you did not use an air filter at all. Without the air filter, the stench in the room remains for several days.
Slicers compatible with the Elegoo Saturn 3
I used the Saturn 3 Ultra with ChiTuBox. However, it is of course compatible with the other common slicers for resin 3D printers.
ChiTuBox is only a little complicated to use at first glance. Once you clicked your way through every menu, it’s relatively self-explanatory. Here are a few tips to help you get started:
- Hollow out your objects to save resin.
- Punch a hole in the bottom to allow the resin inside to drain.
- Rotate the object so that no or only a few supports need to be placed in critical areas like the face.
- You can manually adjust the automatically generated supports. Individual supports can be added or removed.
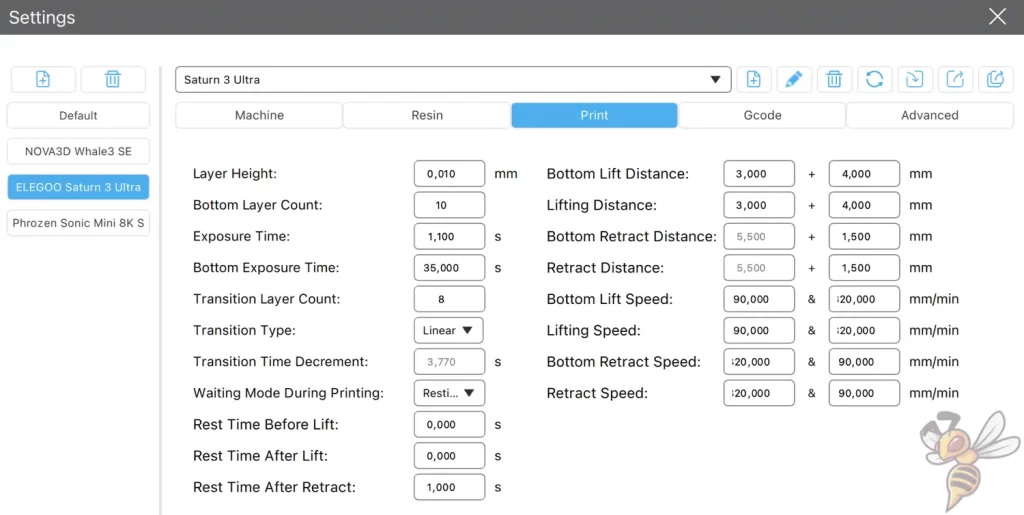
Since I was one of the first to test and use the Elegoo Saturn 3 or the Saturn 3 Ultra, there was no default profile in the normal version of ChiTuBox yet. Therefore, I got a special beta version from Elegoo. There, the most important settings were already preset.
Therefore, I didn’t need to adjust certain settings like the print volume or the print bed speeds to start the first prints. I only calibrated the exposure time so that the resin would not be overexposed or underexposed and no details would be swallowed.
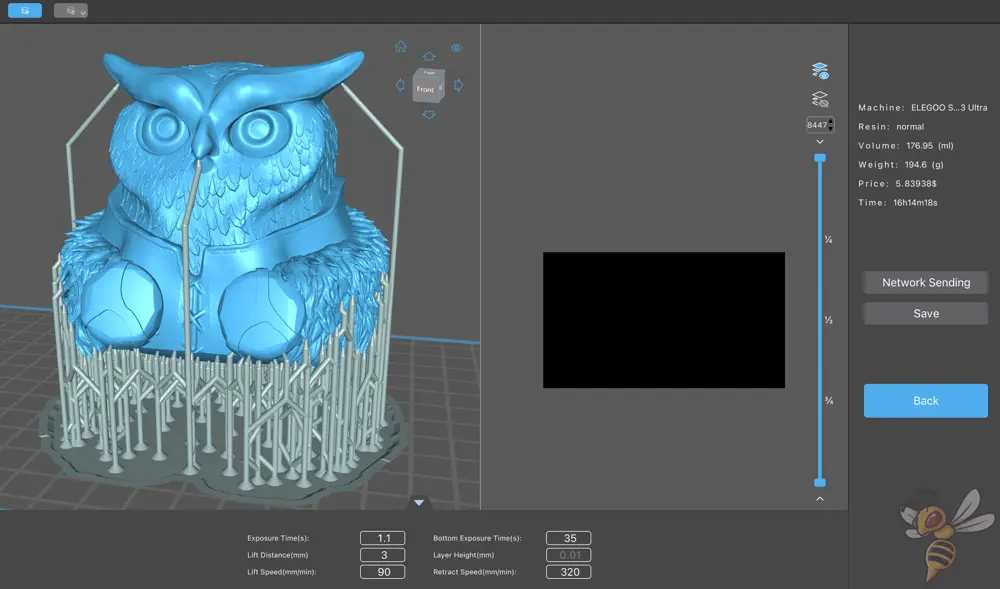
Test prints and calibration of the Elegoo Saturn 3
Before I started the first real print, I calibrated the Elegoo Saturn 3 Ultra, of course. When calibrating resin 3D printers, it mainly depends on how long the exposure time is. The longer the exposure time, the more resin is cured. This can result in small details being swallowed up. However, if the exposure time is too low, the details will not be formed properly.
So finding the right balance of too long and too short an exposure is important and depends on the resin used, the 3D printer, and the environmental conditions.
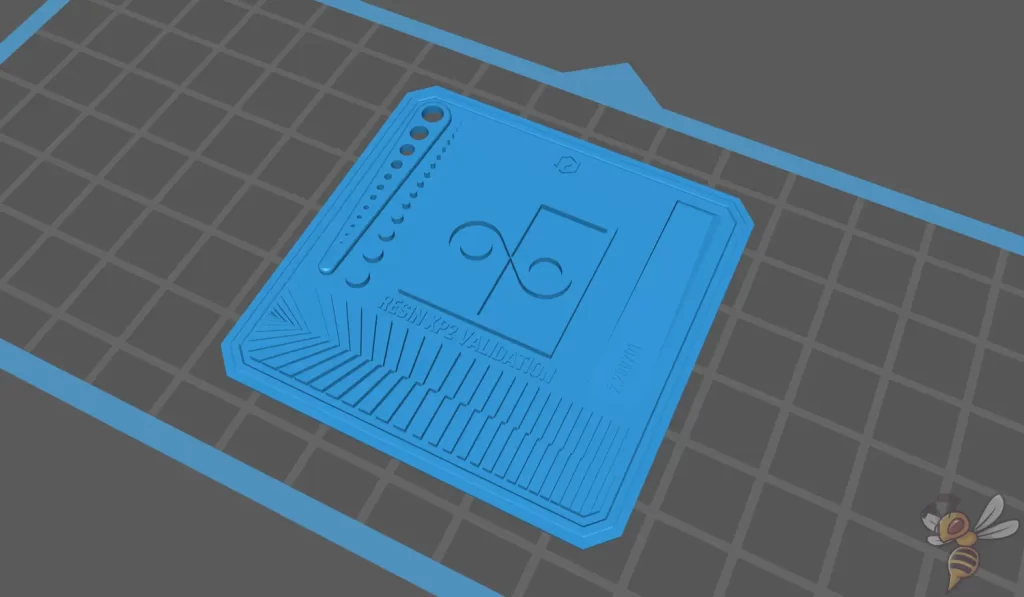
To find the right exposure time, I used the Resin Test Matrix (here is the link to the model). This calibration object has various features by which you can recognize the correct exposure time.
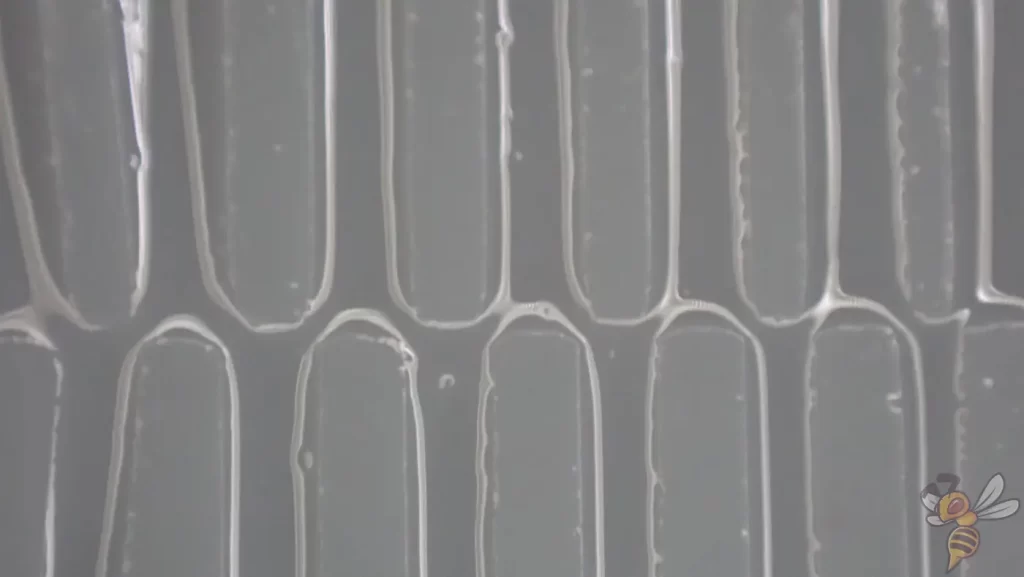
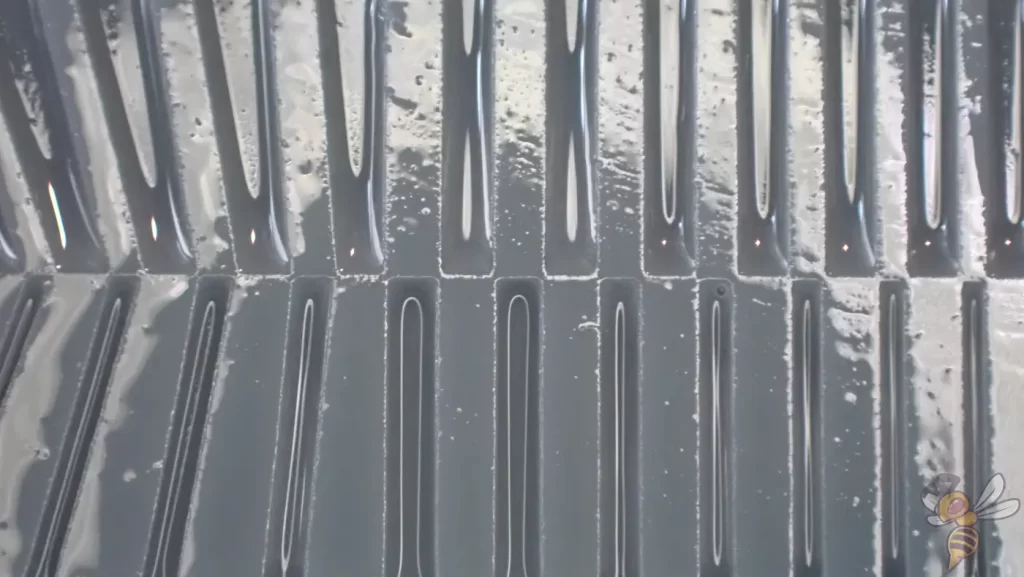
In the lower area of the Resin Test Matrix, there are several squares that touch each other at the corners. If the exposure time is too high, the corners will blur together. If the exposure time is too low, they do not touch. If the corners just touch, the exposure time is set correctly.
On my Saturn 3 Ultra, the exposure time was set too low at first. After two or three adjustments, I was able to find the right exposure time and started my first real print.
The fastest way to find the right exposure time for a resin 3D printer is to use the resin manufacturer’s and 3D printer manufacturer’s guide values as a starting point. From there, adjust the exposure time in small steps in one direction or the other until the correct value is found in two to three calibrations.
After calibrating the exposure time, you can also calibrate the print bed speeds. This can save you time. I usually leave the settings at the default values, since you can only reduce the print time by 5 to 20% with a calibration. The effort involved is usually not worth it (except in a professional context, of course).
When calibrating the speeds, you try to increase them in small increments without causing print errors. If the speeds are too high, the layers might tear off or the resin might flow too fast under the print bed, tearing off small details or the supports.
Another setting worth tweaking is edge smoothing (antialiasing). If you don’t set any edge smoothing at all, you can see (if you look closely) the small steps of each layer. With the high accuracy of the Saturn 3, you only need to set the least amount of antialiasing to make these steps invisible. In my experience, this swallows up virtually no detail at all.
Smell of the Elegoo Saturn 3
One of the best features, after the large print volume and high accuracy of course, are the USB slots inside the enclosure. You can plug Elegoo’s air filters into these USB slots.
The Elegoo Saturn 3 comes with an air filter as standard. In my opinion, air filters are a must when printing with resin. They trap a lot of the gases and filter them out with the activated carbon inside.
While this doesn’t mean you can go without a mask, the smell inside the room will stay much shorter than without an air filter. The better you can protect yourself from the gassing of the resin, the better.
Of course, it would be best to use the Mars Mate* for this purpose. This is connected to the back of the enclosure and filters the air even more effectively.
Volume of the Elegoo Saturn 3 during printing
Resin 3D printers are definitely quieter than FDM 3D printers. Even the Saturn 3 only comes to small values of 30 to 40 decibels. This is comparable to a refrigerator.
Print speed of the Saturn 3
The print speed of a resin 3D printer depends on the light source, the resin, and the print bed speeds. The Saturn 3’s light source is powerful, which allows it to print a normal resin at a speed of 70 mm/hr with the default print bed speeds settings. The Saturn 3 Ultra will be able to get up to 150 mm/hr with special resin from Elegoo.
However, these specifications are relatively confusing, in my opinion, as they were certainly calculated using the biggest possible layer height. But if you want to print accurate objects, you obviously use a layer height of 0.01 or 0.02 mm. With this, the speed, which is specified in mm/h, will of course be much lower. What is important, however, is the duration per layer. And this is much shorter with the Saturn 3 than with other resin 3D printers due to the powerful light source.
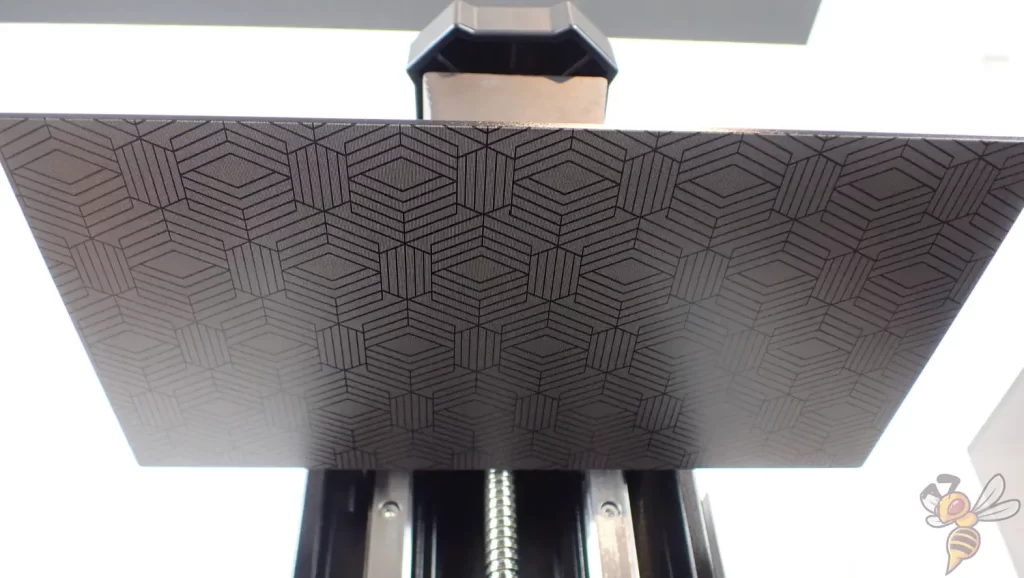
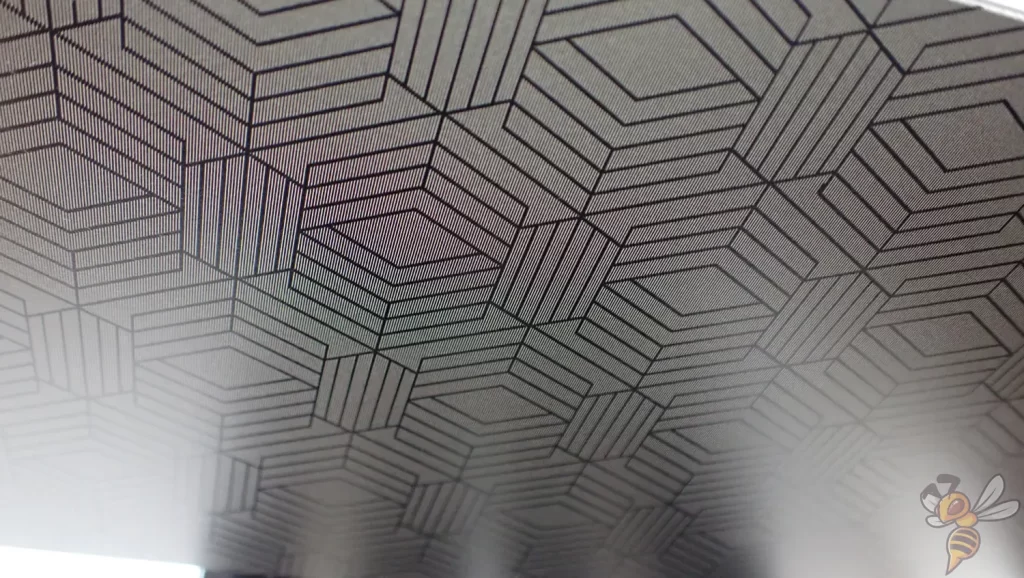
Print quality of the Elegoo Saturn 3 (pictures of 3D prints)
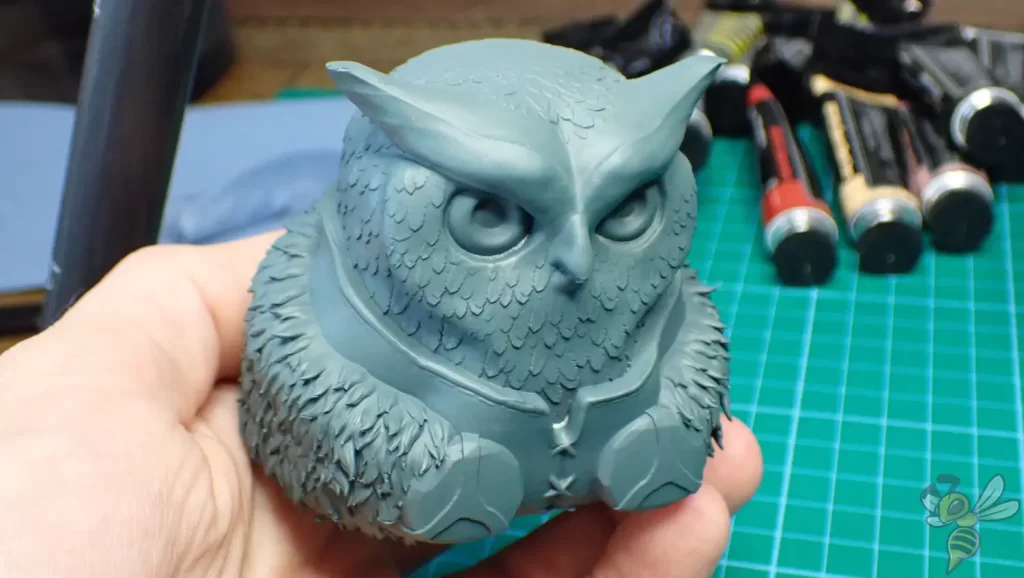
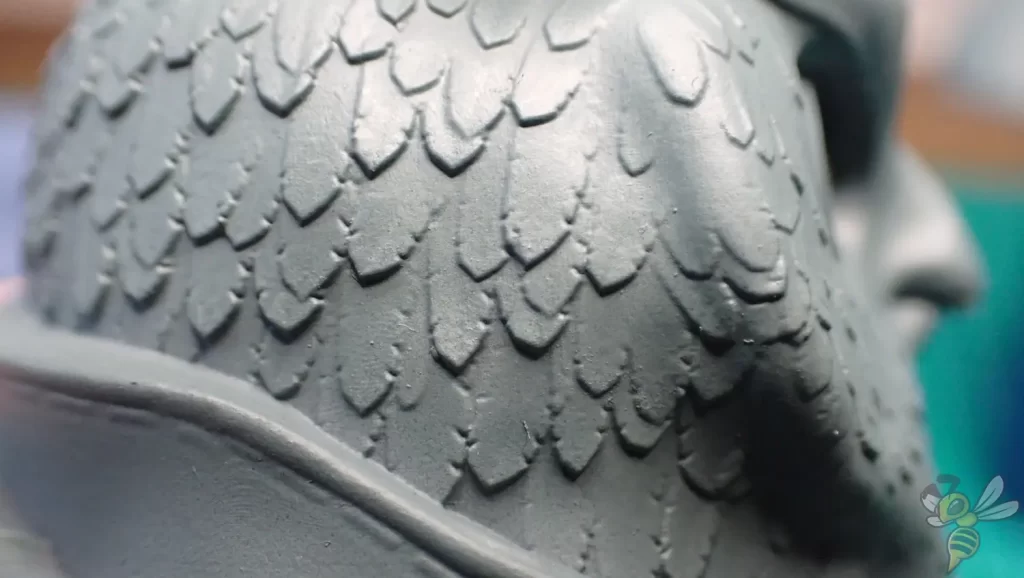
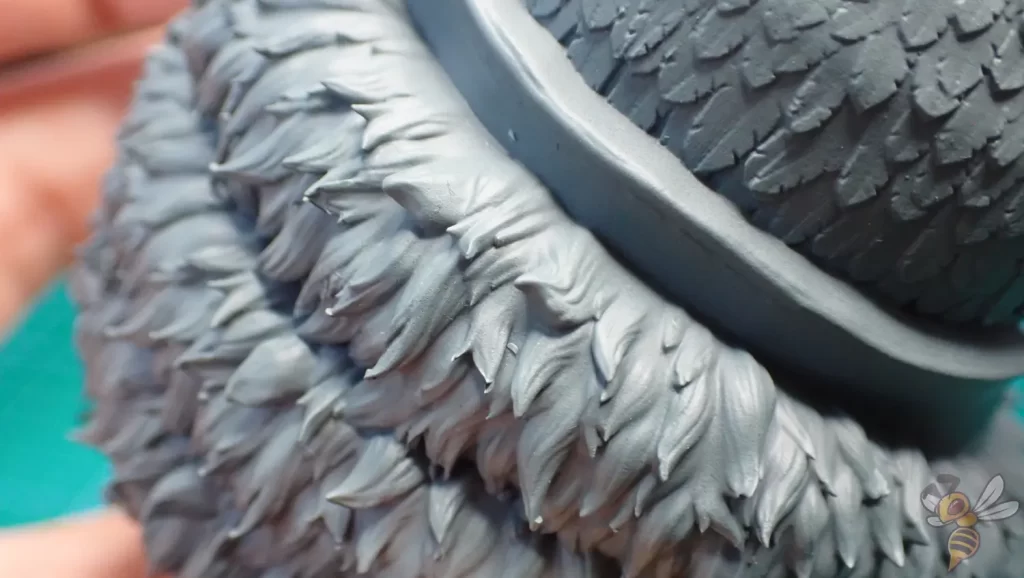
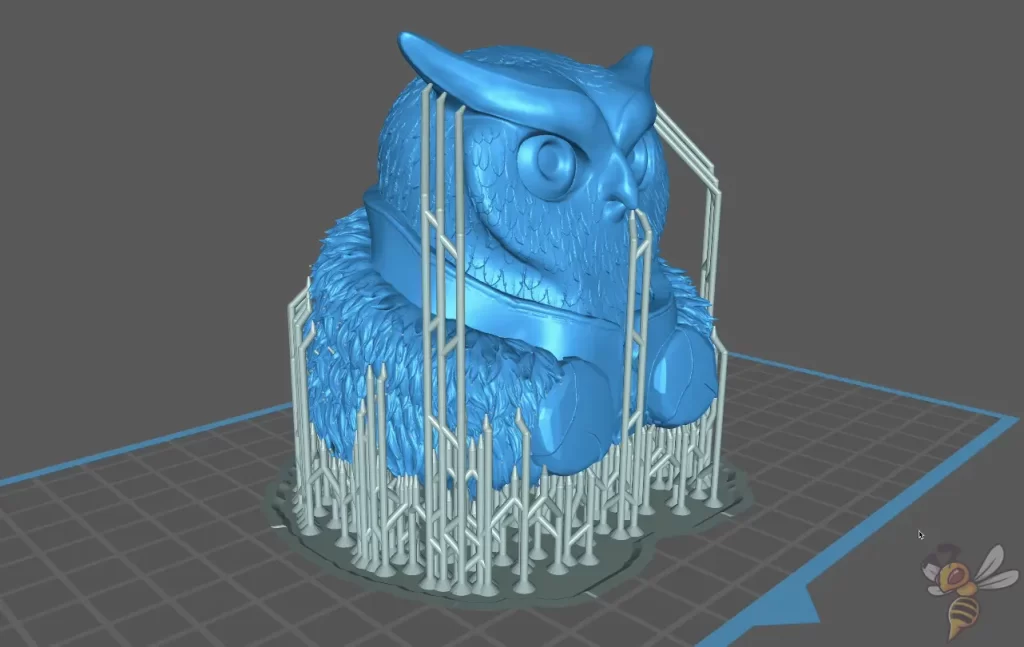
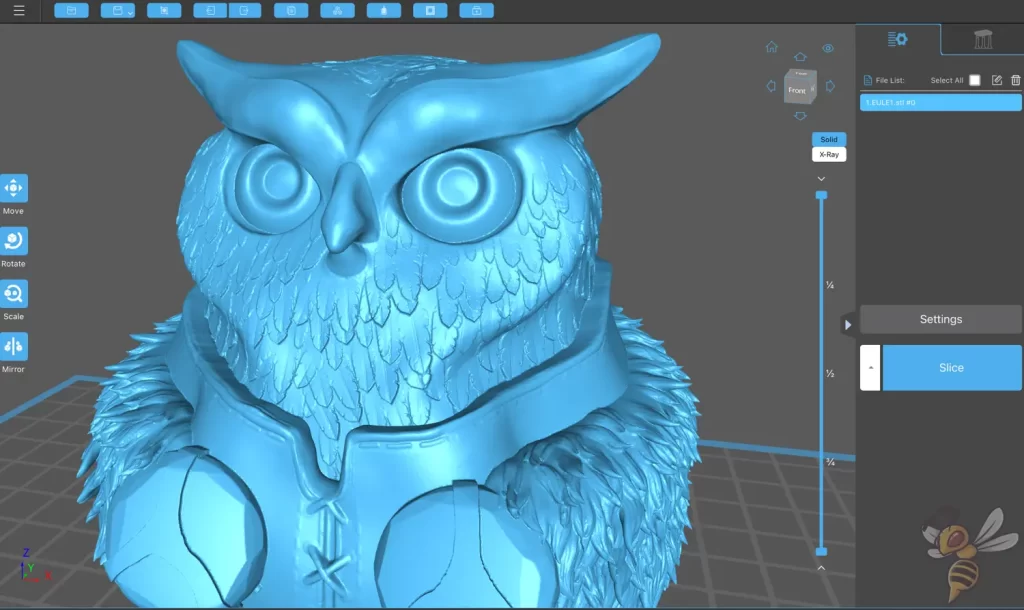
I chose my self-modeled owl bust as a test print. There are countless small details on this model that test the accuracy of the 3D printer.
As you can see, even the smallest details on the feathers and fur edge of the cape are perfectly pronounced. In some places, I still need to remove some residues of the supports, but I am absolutely satisfied with the print result.
If I had bought a comparable bust online, it would have cost me between $20 and $50. With the Elegoo Saturn 3, the accuracy of self-printed objects is at least as good as that of purchased miniatures or other objects. So inevitably, the Saturn 3 definitely pays for itself.
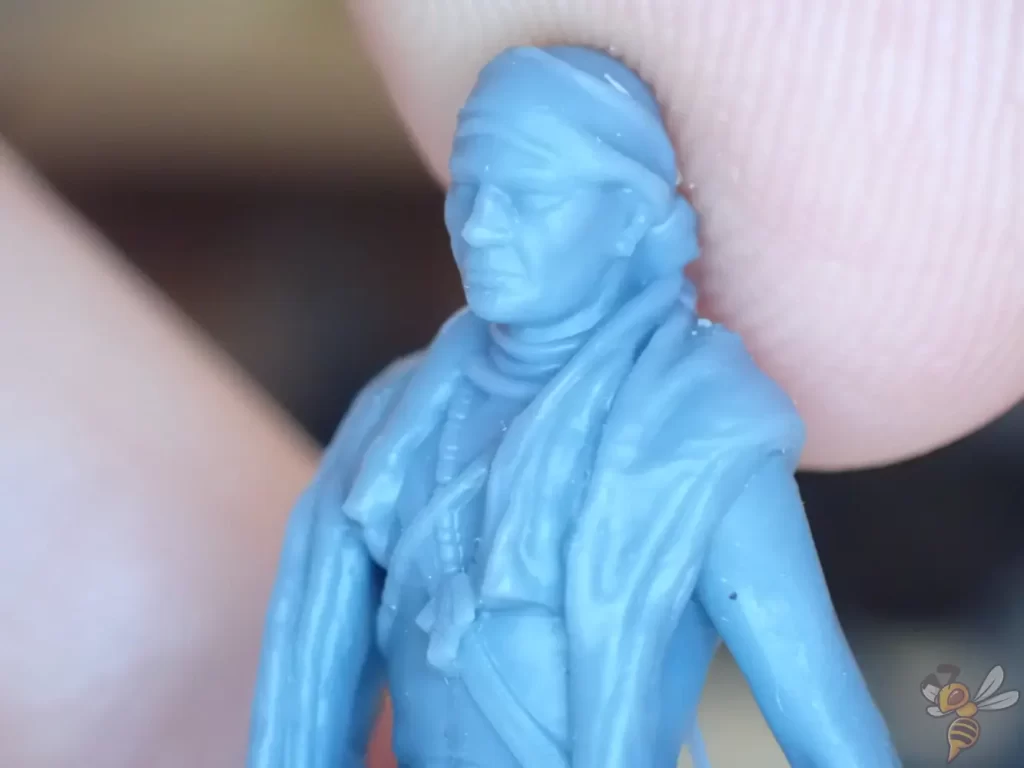
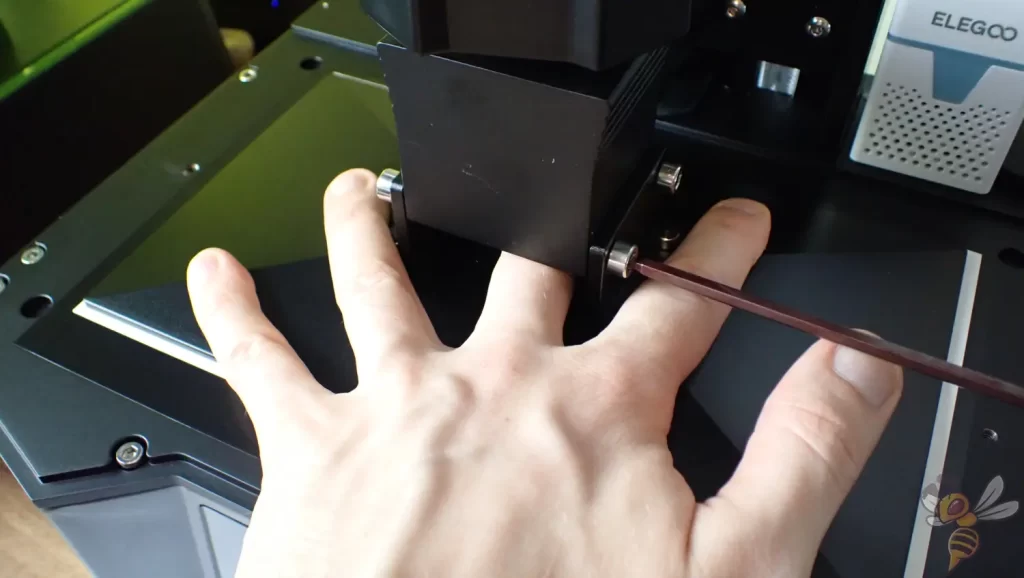
To test the tiny XY pixel size, I printed the leader of the Sinoceratops caravan. As you can see in the image above, the miniature is tiny (note the lines of my fingerprint).
Again, all the details were rendered exactly as they are in the 3D file. This opens up so many possibilities!
With the large print bed of the Saturn 3 and this small accuracy, you could also fill the whole print bed full of miniatures and print them directly all at once. So you can make figures in one print that would cost a small fortune from manufacturers like Games Workshop.
The Saturn 3 doesn’t specialize in one thing. It can print highly accurate small objects, as well as huge objects with a fast print speed. This makes it very interesting for a whole range of applications.
Operating the Elegoo Saturn 3 & Ease of Use Features
The Saturn 3 is easy to use. It offers various features that make it easier to use. Still, it’s not overloaded with features that sound great, but are mainly expensive.
- The print bed can be easily leveled, but not automatically.
- The Saturn 3 Ultra can also be supplied with print files via a Wi-Fi connection.
- Both versions have a cleaning function for the resin tank.
- An air filter is also included with both versions of the Saturn 3.
- The menu is straightforward to use and the menu is structured so that you can quickly find all the important settings with just a few clicks.
- The user manual explains the operation of the 3D printer in simple language and with illustrations.
All in all, the Saturn 3 contains all the important features so that it is easy to use even for beginners. Nevertheless, the Saturn 3 Ultra is still a bit ahead, since it needs to be leveled even less often and can be controlled via Wi-Fi.
When will the Elegoo Saturn 3 become outdated?
When it comes to 3D printers, there’s often the question of when a particular model will become obsolete or whether it’s worth waiting for the next version.
If you’re only concerned with accuracy and print volume, there’s little room for improvement with the Saturn 3. Of course, there will inevitably be 3D printers with even better resolutions, but even lower resolutions won’t provide any real advantage for most applications. Therefore, the most you could do is wait for a 3D printer with even better features. These would perhaps include automatic print bed leveling or a front-opening hood.
Currently, there are no resin 3D printers with similar accuracies and print volumes, with a better price/performance ratio. So in my eyes, it doesn’t make sense to wait for the next better printer and delay projects in the hobby or profession.
For most applications, the Saturn 3 will not become obsolete. While there will eventually be cheaper 3D printers with better features than the Saturn 3 on the market, there isn’t much to tweak with the combination of accuracy and print volume. Only applications where an even larger print volume with the same pixel size would be important will certainly see corresponding 3D printers in the future.
Is the Elegoo Saturn 3 the right 3D printer for you?
What I really liked about the Saturn 3:
✓ The tiny XY pixel size allows me to print even tiny objects with all the details.
✓ But the large print volume also allows me to print many small objects or a very large one at a time.
✓ The integrated air filter should also become standard on all other resin 3D printers.
The disadvantages of the Saturn 3:
× It could be explained more clearly for beginners how to find the right settings for exposure time.
× Automatic print bed leveling would be nice, but only if it doesn’t increase the price too much.
× For very large objects that use a lot of resin, it might be necessary to add some resin during printing.
I really like the Elegoo Saturn 3* and it is now my new standard resin 3D printer! There is room for improvement, of course, but the main features are perfect for most applications.
So if you’re looking for a great resin 3D printer that is still very accurate, look no further than the Elegoo Saturn 3. Especially in its Ultra version, it is easy to use and offers many useful features.
The Saturn 3 from Elegoo has a 12K resolution. This allows it to achieve accuracies that are ideal for the smallest details – and that with a large print volume!
LCD Resolution: 12K (11520 × 5120)
LCD Size: 10”
XY Pixel Size: 19 × 24 μm
Layer Height: minimal 0.01 mm
Build Volume: 219 × 123 × 250 mm³
Speed: up to 70 mm/h
Pros:
✓ Super accurate
✓ Large print volume
✓ Air filter
Cons:
× No Wi-Fi
× No 4-screw mount of the print bed
× No automatic leveling
The Saturn 3 Ultra from Elegoo has a 12K resolution. It is perfect for small and big objects with small details. The Ultra version has some nice features that improve the results and overall ease of use.
LCD Resolution: 12K (11520 × 5120)
LCD Size: 10”
XY Pixel Size: 19 × 24 μm
Layer Height: minimal 0.01 mm
Build Volume: 219 × 123 × 260 mm³
Speed: up to 70 mm/h (150 mm/h with Elegoo speed resin)
Pros:
✓ Super accurate
✓ Large print volume
✓ Air filter
✓ Wi-Fi
✓ 4-screw mount of the print bed
Cons:
× No automatic leveling
× No resin feeding system
Elegoo Saturn 3 vs. Saturn 3 Ultra
The first difference between the Saturn 3 and the Saturn 3 Ultra is in the design. The regular Saturn 3 is in the typical colors of this series, while the Saturn 3 Ultra is completely black. Also, the base of the Saturn 3 Ultra is made of metal and not plastic. Apart from the fact that it looks better, however, I’m not sure what the metal is for. There probably isn’t a performance advantage to this (unless it makes it much heavier, which may avoid the vibrations).
However, the Saturn 3 Ultra does have a few features that make perfect sense and make it easier to use:
- Wi-Fi antenna: This antenna allows you to connect the Saturn 3 Ultra to your network and transfer print files without having to manually carry a USB stick from point A to point B.
- 4-screw print bed mount: The regular Saturn 3 has a ball joint with two screws that hold the print bed in place. On the Ultra version, this is realized via 4 screws that hold the print bed even tighter. This means that the print bed almost never needs to be re-leveled.
- ACF release liner film: This improved film in the resin tank prevents the cured resin from sticking to the film even better. It is also said to enable the very high speeds of 150 mm/s.
In my opinion, the advantages of the Ultra version of the Saturn 3 are worth the higher price, but are not absolutely necessary to achieve the same print quality. So splitting these features into two versions makes perfect sense.
Elegoo Saturn 3 vs. Anycubic Photon Mono M5

The Anycubic Photon Mono M5 is one of the first resin 3D printers with a 12K resolution and a large print volume. The M5s version* also has automatic print bed leveling.
LCD Resolution: 12K (11520 × 5120)
LCD Size: 10”
XY Pixel Size: 19 × 24 μm
Layer Height: minimal 0.01 mm (10 μm)
Build Volume: 218 × 123 × 200 mm³
Speed: 20-50 mm/h
Pros:
✓ Super accurate
✓ Large print volume
✓ Wi-Fi
✓ 4-screw mount of the print bed
Cons:
× No air filter
× No automatic leveling (only in the s-version)
× No resin feeding system
One of the few, if I may even say the only real competitor to the Elegoo Saturn 3 is the Anycubic Photon Mono M5*. It also comes in a regular and a premium version called the M5s*.
In terms of XY pixel size, the Saturn 3 and the M5 do not differ. They have the same size LCD screen with the same resolution. However, there is a big difference in the print volume. In the z-direction, the Saturn 3 is 50 mm taller than the M5. This allows you to print taller objects in one piece.
In addition, the Saturn 3 can achieve a higher print speed. It is specified with a maximum of 70 mm/h, whereas the M5 only reaches a maximum of 50 mm/h. In the Ultra version, the Saturn 3 even reaches a maximum of 150 mm/h with special resin from Elegoo.
In terms of “ease-of-use features“, the Saturn 3 has an integrated included air filter compared to the M5. On the other hand, the M5 also has Wi-Fi in its basic version. The two premium versions of the devices also differ somewhat in their features. While the M5s also doesn’t have an air filter, it does have automatic print bed leveling. The Saturn 3 Ultra does not have this.
The M5s’ automatic print bed leveling, while very handy, is relatively superfluous when compared to the Saturn 3 Ultra’s print bed, which requires infrequent to one-time leveling. A higher price to save you five minutes of your life is wasted in my eyes.
If I were to choose between the two without considering price, I would still lean towards the Saturn 3 Ultra. The much higher print volume gives even more options and the integrated air filter saves additional costs.
Important accessories for a resin 3D printer

When dealing with liquid resin, you will use a lot of gloves. A 100-pack of nitrile gloves is definitely a must-have when buying a resin 3D printer.

You must protect yourself from the gases of liquid resin with a respirator. OP masks do not protect you and FFP2 masks only poorly.

To clean your printed objects and the 3D printer, you need isopropyl alcohol. It is best to order in bulk!

The finished printed objects have to be cleaned of excess resin and cured. A Wash & Cure Station does the work for you and guarantees a perfect result.
Disclosure: This website is the property of Martin Lütkemeyer and is operated by Martin Lütkemeyer. Martin Lütkemeyer is a member of the Amazon Services LLC and other Affiliate Programs. These are affiliate advertising programs designed to enable websites to earn advertising revenue through advertising and linking to Amazon.com and others. Links marked with * are affiliate links.
