- Wet Filament: Prevention, Symptoms & Drying - July 18, 2024
- Sovol SV08 – Best PrusaSlicer Settings & Profile - June 26, 2024
- Sovol SV08 – Best Orca Slicer Settings & Profile - June 26, 2024
Disclosure: Links marked with * are Affiliate Links. I earn from qualifying purchases if you decide to make a purchase through these links – at no additional cost for you!
The Easythreed K7 3D Printer does not produce top-notch print quality right out of the box. Nevertheless, it can be used with Cura as a slicer and can be fine-tuned to achieve print quality comparable to that of more expensive 3D printers.
It’s important to note that achieving decent print quality requires careful adjustment/calibration of slicer settings. I’ve meticulously fine-tuned each setting to reach a decent print quality you’ll be pleased with.
In this article, you’ll find a detailed guide showcasing these settings and how to tweak them for your filament.
If you’re looking for more detailed information on how to calibrate these slicer settings, you can refer to this post for a comprehensive calibration guide. Also, for an even deeper dive into the world of 3D printing, check out my 3D Printing Course. It’s designed to provide you with all the insights you need to get perfect prints every time!
Table of Contents:
How to Create a Profile for the Easythreed K7 in Cura
You’ll notice that there’s a pre-made Cura print settings profile located on the TF card. This acts as your starting point, providing initial guidelines for your adjustments.
However, before importing this pre-made profile, you’re first required to add a new blank printer profile with the machine settings. This process is crucial as it defines important settings such as the build volume.
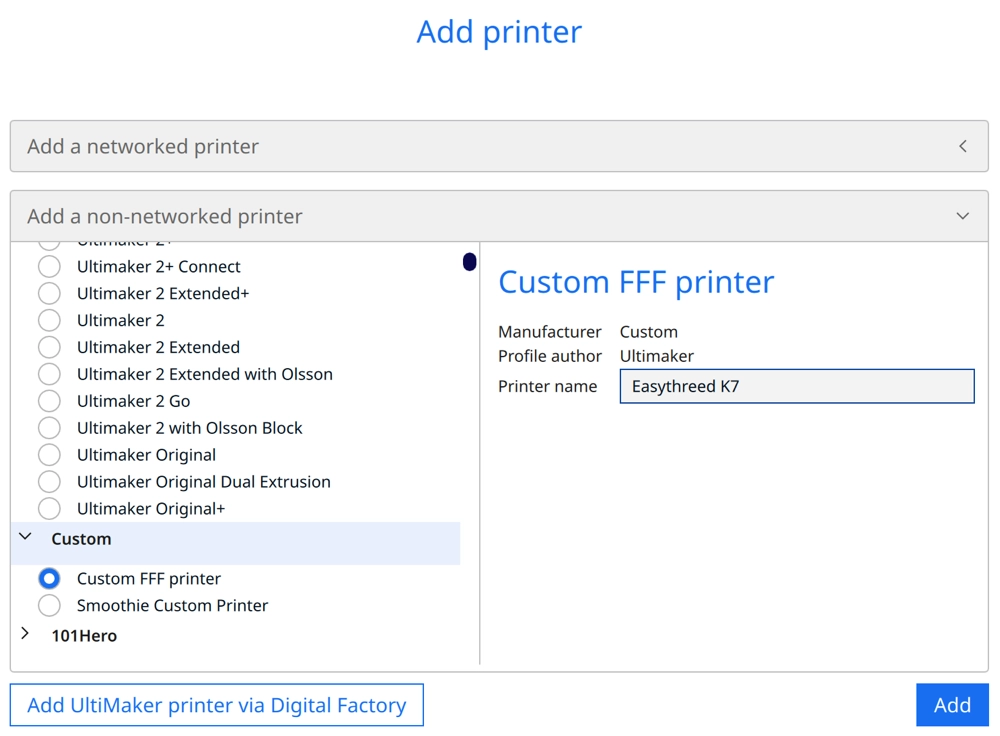
To add a 3D printer in Cura, follow these instructions. First, click on ‘Settings’, which is typically found in the upper toolbar of the software. Next, from the dropdown menu, select ‘Printer’. Within this option, you’ll see ‘Add Printer’. Click on it.
After doing so, you’ll have two options: ‘Networked printer’ or ‘non-networked printer’. Opt for the ‘non-networked printer’. Then, proceed by selecting ‘Custom’ and finally ‘Custom FFF printer’.
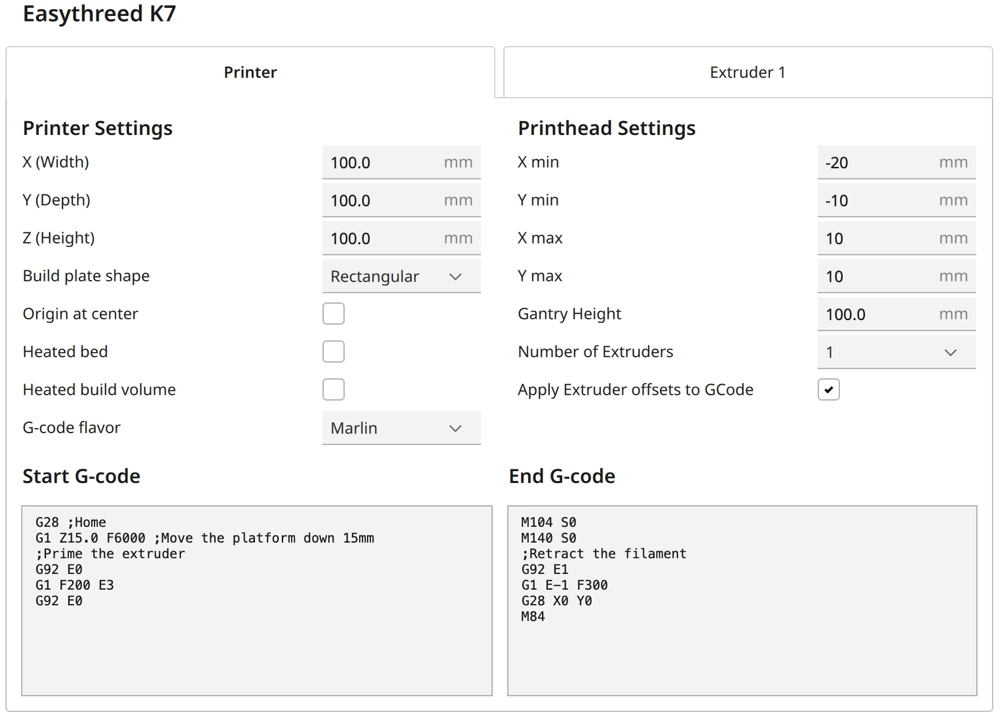
In the ‘Machine Settings’ of Cura, you’ll find options to specify your 3D printer’s parameters. This includes defining the printer’s build volume (width, depth, and height), specifying the shape of the build plate, and inputting the number of extruders.
This section also allows you to modify settings for the nozzle and heated bed. Remember, it’s important to input these specifications accurately.
Once the printer profile has been successfully created, the next crucial step is to import the print settings from the TF card.
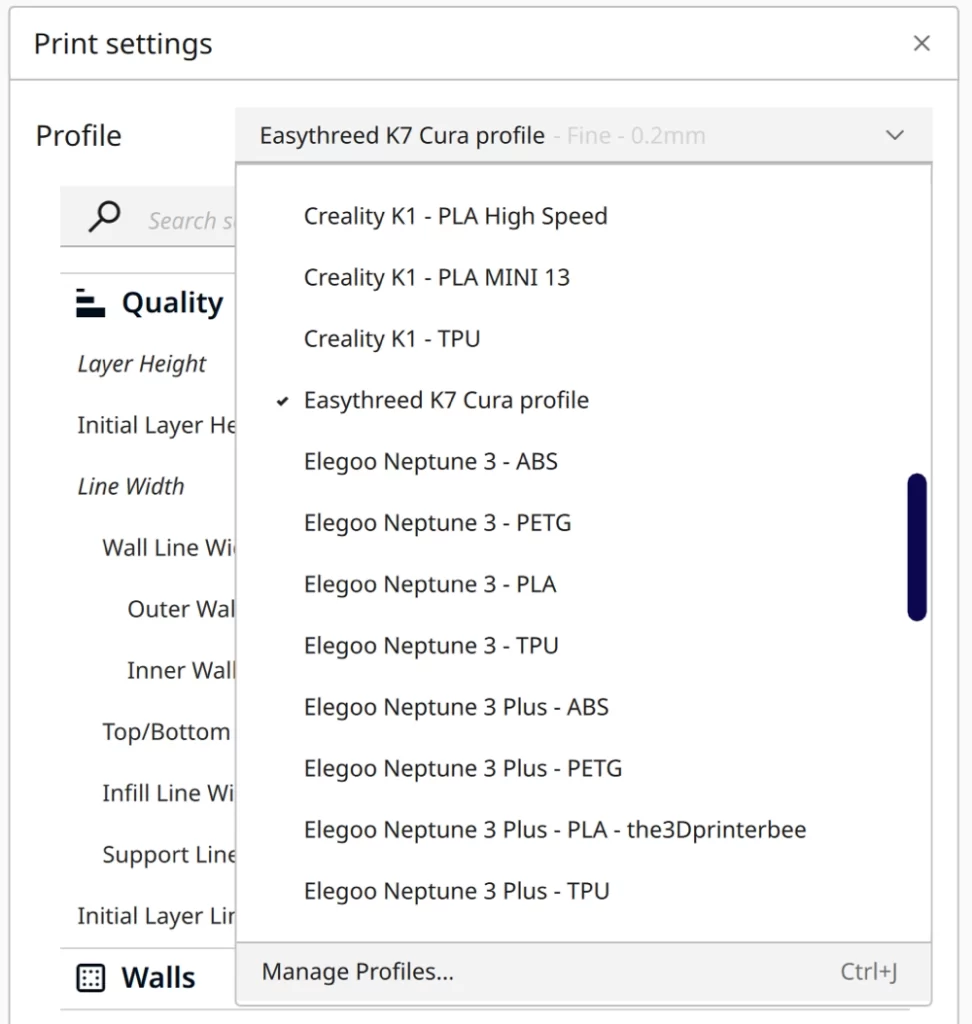
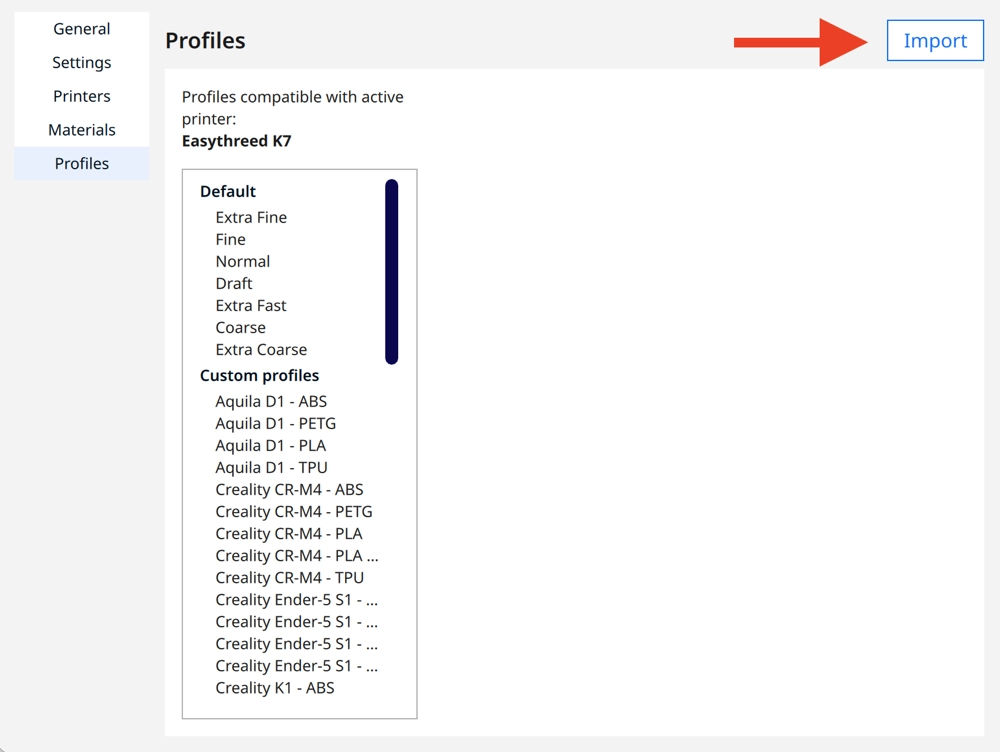
The print settings in the print profile are a good start but may require further adjustments to achieve the desired print quality.
This includes settings such as layer height, infill density and pattern, support structure, retraction distance and speed, print temperature, and cooling options.
In the rest of this guide, I’ll show you which parameters are more effective than the provided ones and how you can further calibrate them for improved print quality.
You can find more information on how to create a 3D printer profile in Cura and what you need to pay attention to in this article: How to Create a Custom 3D Printer Profile in Cura
Best Cura Settings for the Easythreed K7
Print Temperature
The best printing temperatures for PLA with the Easythreed K7 is 200 to 210 °C.
Maintaining the correct print temperature is vital for achieving high-quality 3D prints. If the temperature is set too high, above 210 °C, you may experience issues with stringing and oozing. This happens because the plastic becomes too liquid and tends to drip from the nozzle.
On the contrary, if the temperature is set too low, under 200 °C, it can cause gaps and generally weak layer adhesion. The plastic doesn’t melt enough to properly adhere to the previous layer, leading to a fragile, unusable model. These temperature guidelines apply specifically to printing with PLA using the Easythreed K7.
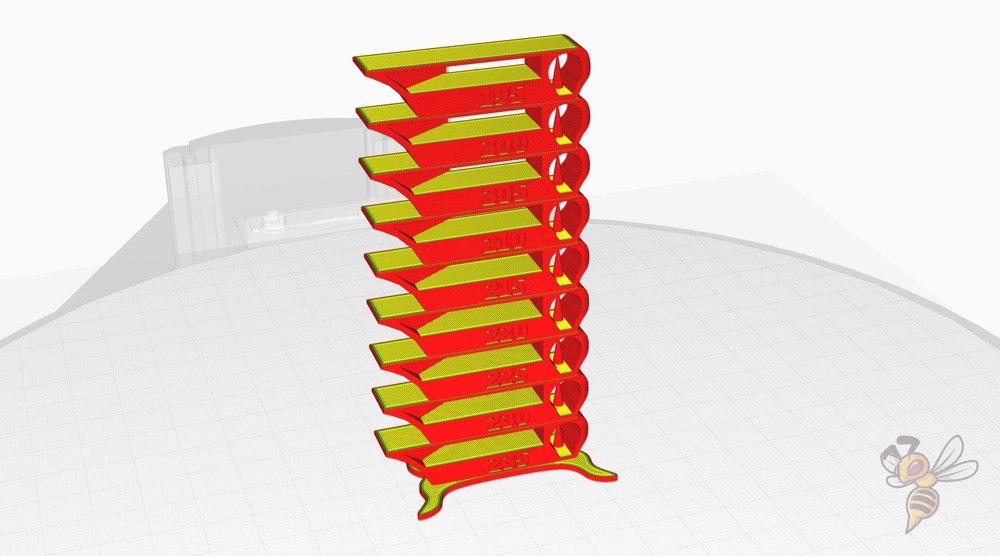
To calibrate the print temperature for the Easythreed K7 or any FDM 3D printer, a temperature tower is a handy tool. Simply put, a temperature tower is a 3D model specifically designed to test the optimal print temperature for your specific filament.
To start, search for a temperature tower model online and download it – many variants are available for free. Import this model into your slicing software. The tower typically has varying sections each intended to be printed at different temperatures.
Adjust the settings in your slicing software to modify the temperature for each section of the tower. This is done by inserting temperature change commands (usually in the form of G-code or a script) at the heights corresponding to each test segment of the tower. For example, you might start at 230 °C at the base, decreasing by 5 °C every couple of layers as you move up the tower.
After slicing, 3D print the temperature tower. As it prints, each segment will be printed at a different temperature, allowing you to visualize the impact of temperature on print quality.
Once the print is complete, examine the tower closely. You’re looking for the section with the best combination of detail, overhang performance, and minimal stringing. The temperature used for that segment is likely your optimal print temperature for that specific filament.
Remember, the optimal temperature may vary between different brands or colors of filament, so it’s a good idea to repeat this process for each new PLA brand you use.
Print Speed
The best print speed for the Easythreed K7 in Cura is 20 to 30 mm/s.
In my experience with the Easythreed K7, pushing the print speed to 40 mm/s resulted in noticeable ringing and ghosting on the print.
However, upon reducing the speed to 20 mm/s, the quality dramatically improved. The ringing and ghosting issues significantly diminished, resulting in a much cleaner and more precise print. Therefore, I recommend a print speed of 20 mm/s for optimal results, max. 30 mm/s.
Layer Height
The best layer heights for the Easythreed K7 in Cura:
- Decorative objects: 0.1 mm
- Standard: 0.2 mm
- Coarse, fast prints: 0.3 mm and higher
The layer height you choose is heavily dependent on the nozzle size of your 3D printer. For the Easythreed K7, a 0.4 mm nozzle is used. This nozzle size is quite standard and versatile, allowing for a broad range of layer heights.
With a 0.4 mm nozzle, a layer height of 0.1 mm is great for decorative objects, producing high detail and smooth surfaces. A height of 0.2 mm is the standard choice for everyday printing, balancing quality with print speed. For coarse, fast prints, you might opt for a layer height of 0.3 mm or higher.
Remember, though, that while larger layer heights print faster, they also result in less detail and a rougher surface finish. Always consider the purpose of your print when selecting your layer height.
Flow Rate
The best flow rate for the Easythreed K7 in Cura:
- Default value: 100%
- For over-extrusion: 90% to 99%
- For under-extrusion: 101% to 110%
The flow rate is an important setting to manage the amount of filament your 3D printer uses. The default value for the Easythreed K7 is set at 100%. However, you might need to adjust this based on the filament and the print quality.
Over-extrusion, the condition where too much filament is pushed through the nozzle, can cause blobbing and stringing. To mitigate this, reduce the flow rate to somewhere between 90% and 99%.
On the other hand, under-extrusion, where not enough filament is extruded, can lead to weak, brittle prints with gaps in the layers. Increasing the flow rate to between 101% and 110% can help in these situations.
After calibrating the printing temperature and the retraction, only then should you consider adjusting the flow rate. Remember not to jump directly to flow rate adjustments. Proper calibration of both the printing temperature and the retraction settings should always come first.
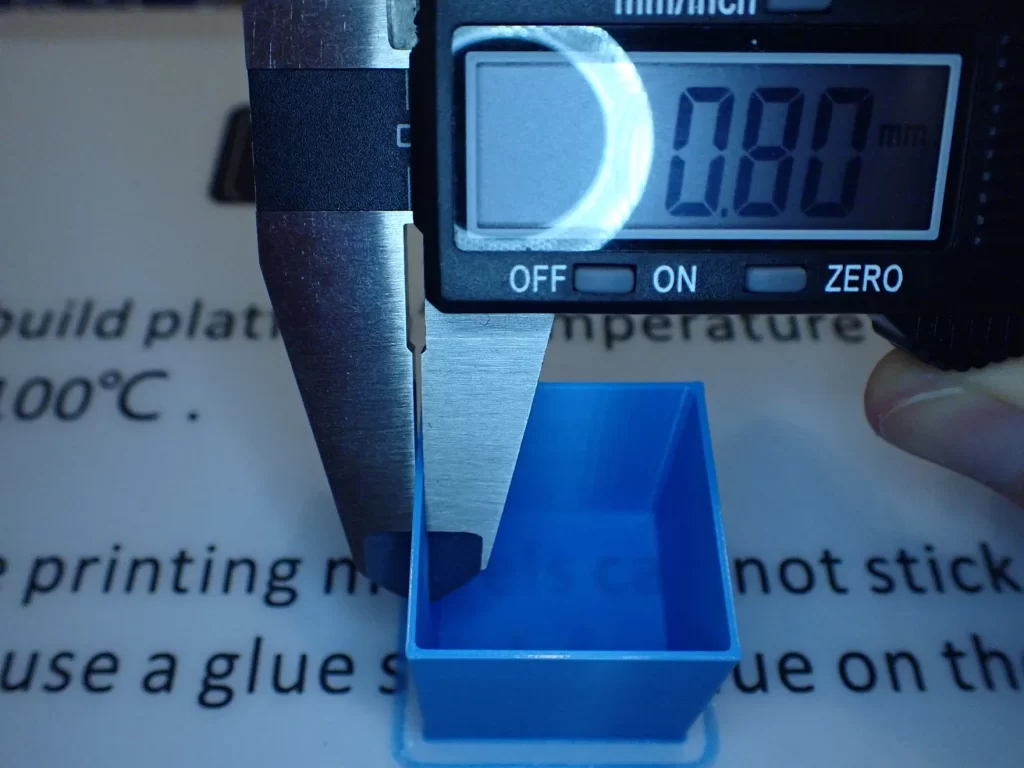
To calibrate the flow rate, print a hollow cube with only two walls (no infill or top layers). Use your slicer to set the wall thickness. Once the print is complete, measure the actual wall thickness of the print using a caliper.
Here are the steps:
- Set your slicer to print a 20 mm cube with a wall thickness of 0.8 mm (two layers of 0.4 mm).
- Print the cube.
- When the print is finished, measure the wall thickness of the cube with a caliper in several places.
- Note the average measurement, divide it by two and compare this value with the slicer’s set wall thickness.
If the measured value is more than what is set in the slicer, your printer is over-extruding. In this case, you should decrease the flow rate. If it’s less, your printer is under-extruding and you should increase the flow rate. Make the necessary adjustment in your slicer’s settings and print another cube to test until you achieve the desired precision.
Retraction
The best retraction settings for the Easythreed K7 in Cura are 6.5 mm at 25 mm/s.
Retraction settings play a vital role in the quality of your 3D print. When incorrectly set, it can lead to an issue known as stringing, where thin threads of plastic are left between parts of your model.
This is caused by the extruder continuing to ooze filament when it’s moving between points. While the values mentioned above provide a good starting point, for optimal results, proper calibration is critical.
Each printer has its own characteristics, and even the type of filament can influence the ideal retraction settings. Thus, it’s important to experiment and refine these settings according to your specific setup to achieve flawless prints.
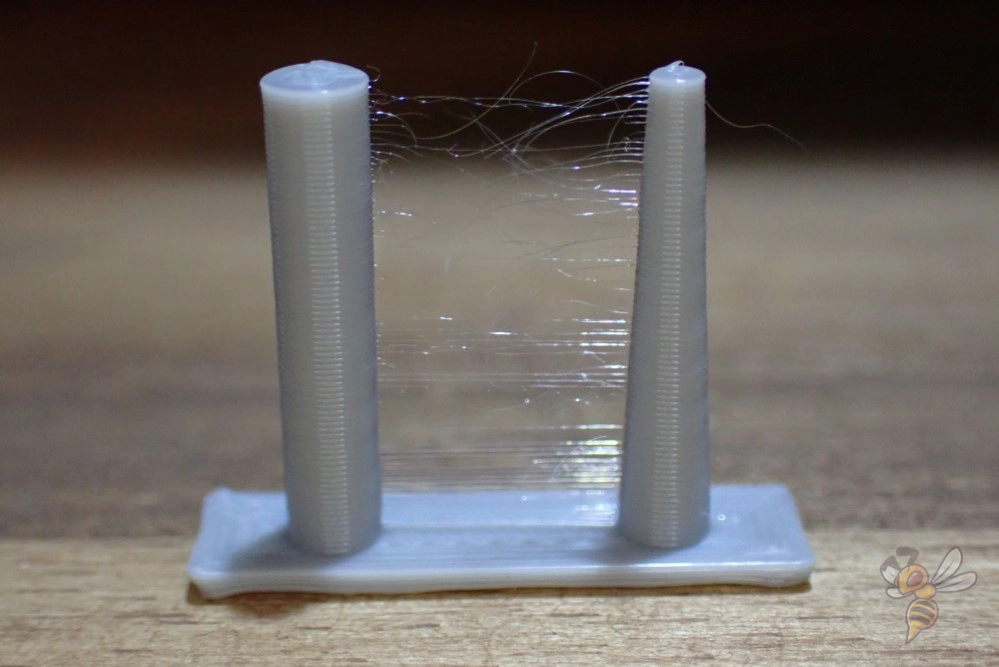
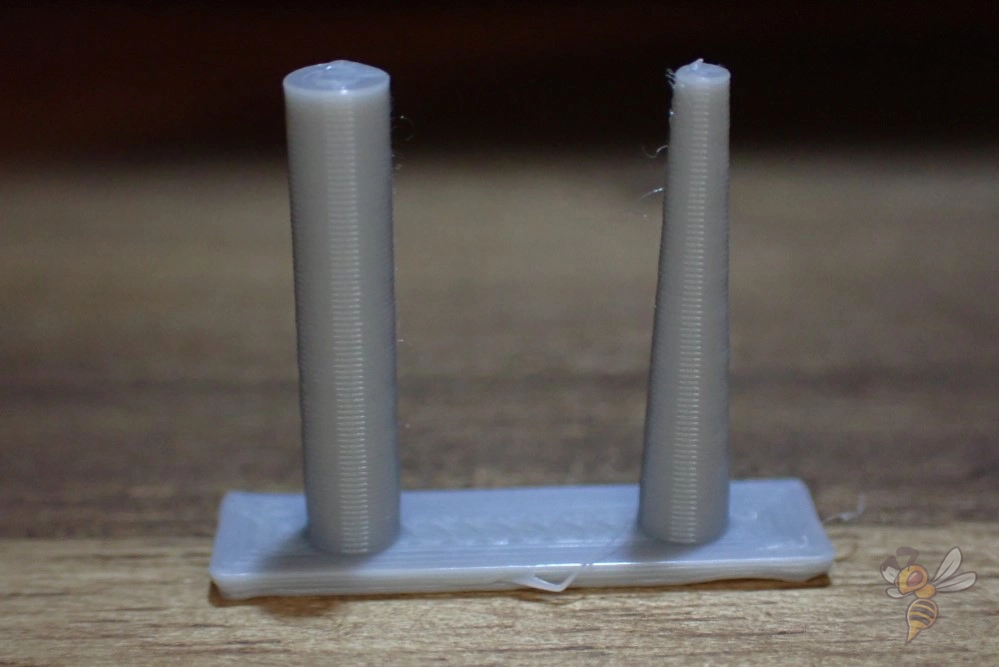
Calibrating the retraction settings for your 3D printer is a step-by-step procedure.
- First, ensure that your 3D printer’s initial retraction settings are set to the recommended values above.
- Now, print a calibration object. Examine the print for any stringing.
- If you notice stringing, increase the retraction distance by 0.5 mm and print the object again. Continue this process until the stringing is minimized.
- Once you’ve achieved satisfactory results with the retraction distance, maintain this setting and apply the same iterative process for the retraction speed. Start by reducing the speed by 5 mm/s each time and print the object again.
- Repeat this process until you’ve minimized stringing in your print.
Remember, each 3D printer and filament type is unique, and it may take several iterations to find the perfect retraction settings. The key is to adjust one setting at a time to better understand its impact on the final print.
Infill
The best infill density for the Easythreed K7 in Cura:
- Decorative objects: 0-15%
- Standard objects: 15-50%
- Stable objects: 50-100%
Infill density plays a significant role in determining the strength and weight of 3D-printed objects. For decorative objects that do not require high strength, a low infill density of 0-15% is sufficient. This reduces material usage and print time, making it a cost-effective solution for aesthetic pieces.
On the other hand, for standard objects and items used daily, an infill density of 15-50% is beneficial. It offers a balance between strength, weight, and material usage. For objects that need to withstand substantial pressure or weight, a high infill density of 50-100% is recommended. It ensures the object’s durability and strength, albeit at the expense of increased material consumption and print time.
First Layer
These are the best Cura settings for the first layer with the Easythreed K7:
- Layer height: 100-200% of normal layer height (higher values to increase print bed adhesion)
- Line width: 100-200% of normal line width (higher values to increase print bed adhesion)
- Print temperature: Same as the rest of the object, or 5-10 °C higher for better print bed adhesion.
- Print speed: 50% of normal print speed (i.e. 25 mm/s for a normal print speed of 50 mm/s) or 5-10 mm/s for high print bed adhesion
- Flow rate: 100-110% (higher values in case of poor print bed adhesion)
- Raft/Brim/Skirt: Skirt as standard, Brim/Raft only if you have problems with adhesion.
The goal of each first layer setting above is to extend the time the filament remains in a viscous state. This is crucial as a warmer filament has more time to bond with the print bed, enhancing the adhesion and ultimately, the success of the 3D print.
Conclusion
I hope the values outlined in this article have proven beneficial in optimizing your experiences with the Easythreed K7. If you’re still encountering difficulties, remember the course I mentioned at the beginning of this post. It’s an excellent resource, crafted to provide everything you need to know about 3D printing.
Disclosure: This website is the property of Martin Lütkemeyer and is operated by Martin Lütkemeyer. Martin Lütkemeyer is a member of the Amazon Services LLC and other Affiliate Programs. These are affiliate advertising programs designed to enable websites to earn advertising revenue through advertising and linking to Amazon.com and others. Links marked with * are affiliate links.

