
- Wet Filament: Prevention, Symptoms & Drying - July 18, 2024
- Sovol SV08 – Best PrusaSlicer Settings & Profile - June 26, 2024
- Sovol SV08 – Best Orca Slicer Settings & Profile - June 26, 2024
Disclosure: Links marked with * are Affiliate Links. I earn from qualifying purchases if you decide to make a purchase through these links – at no additional cost for you!
In this hands-on review, I’ll introduce you to the Atomstack X7 Pro* in detail and show you what cutting and engraving quality you can expect.

Check Price at:
Table of Contents:
Key Takeaways
- The 10W laser module can cut and engrave many materials.
- Cutting up to 20 mm thick wood and 15 mm black Plexiglas.
- Operation is either via a direct connection via USB cable or offline with a touch screen and MicroSD card.
- Easy assembly and comprehensive operating instructions.
- Compatible with Lightburn and LaserGRBL.
Who Should Buy the Atomstack X7 Pro?
The Atomstack X7 Pro is ideal for anyone looking for a powerful laser for little money. However, the device is by no means an inferior low-budget product, but offers many premium and safety features.
Advantages & Disadvantages
PRO:
- Powerful 10 watt laser
- Offline operation
- High speeds
- Compatible with many materials
- Sturdy anodized aluminum profile
- Emergency stop button and gyroscope with automatic shutdown if the device tips over.
- Many upgrades available
CON:
- Touchscreen partly a bit stiff (can also only be due to the tested model)
Check Price at:
Scope of Delivery

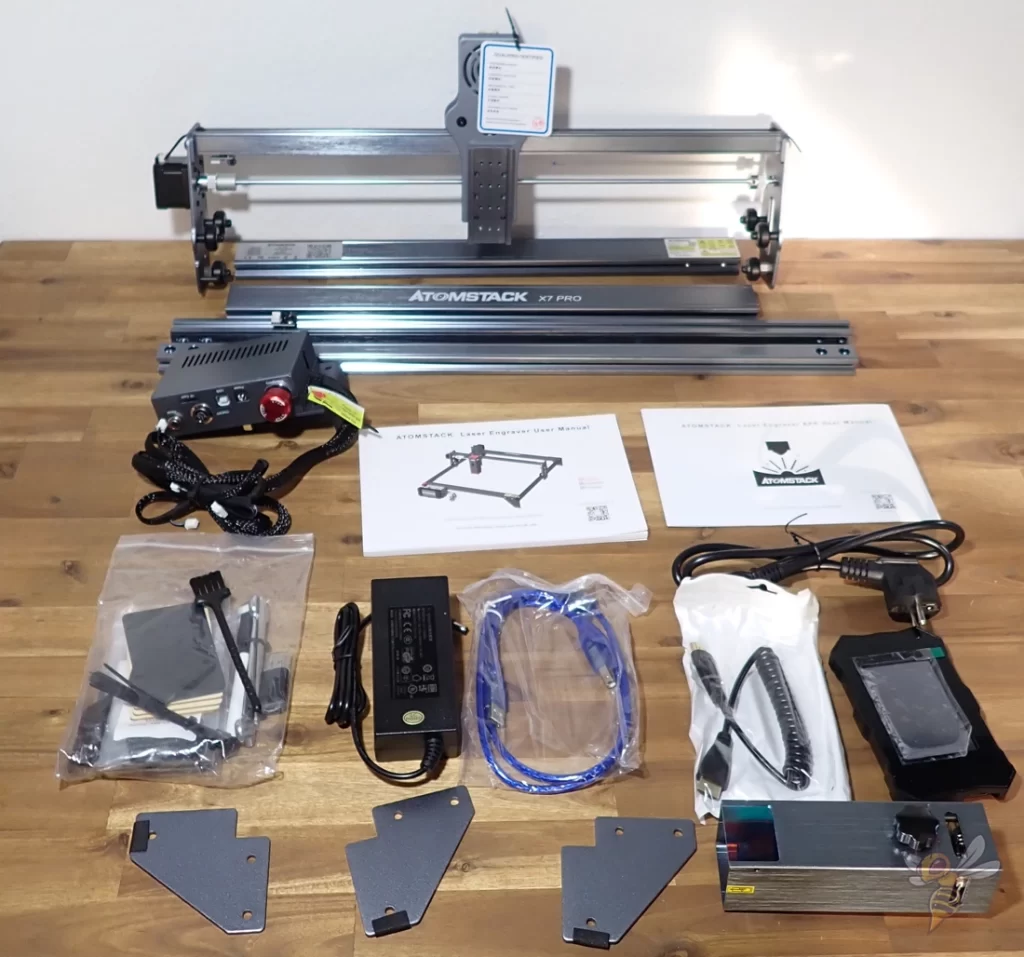
The Atomstack X7 Pro comes with almost everything you need to start testing right away. All tools for the assembly are included and a few test materials. The only thing missing is a pair of laser safety goggles.
This is what comes with the Atomstack X7 Pro:
- Partially pre-assembled individual parts of the laser
- Laser module
- Touchscreen with matching cable
- USB cable
- Tools for assembly
- Cleaning kit for the laser
- Operating instructions
- MicroSD card with test files and the digital manual
- MicroSD-USB adapter
If you decide to use the Atomstack X7 Pro, I recommend you to get suitable material as well as laser safety goggles (here you can find suitable models*). The laser module has a relatively effective shield against stray beams, but even this cannot guarantee that a deflected beam will get into your eye.
Since the device is delivered only partially pre-assembled, the package in which it comes is very compact. Unlike closed models like the xTool M1, the compact design is super practical while maintaining a large working area.
Setup

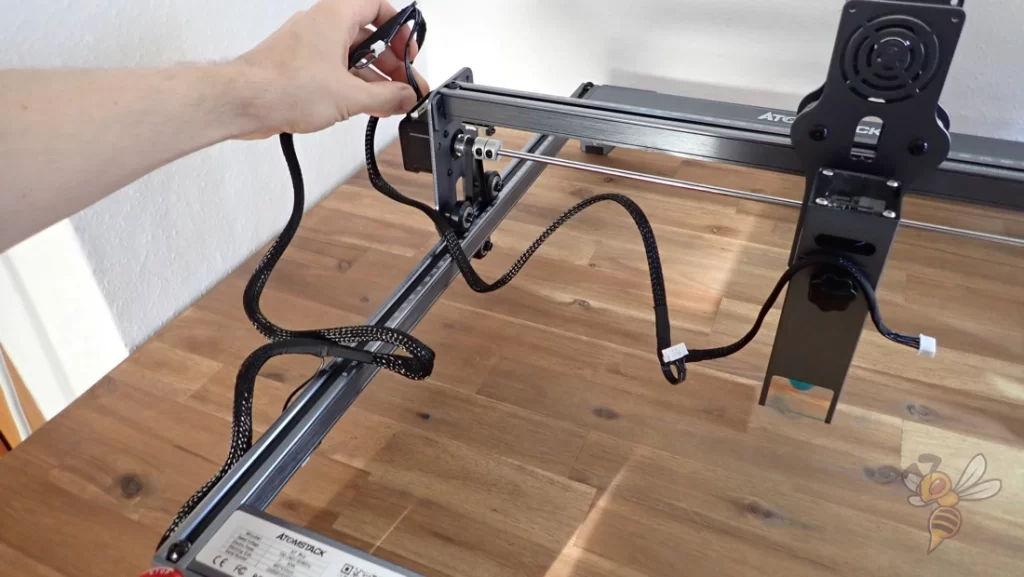

The assembly of the Atomstack X7 Pro is done within 10 to 20 minutes. Only the pre-assembled modules have to be connected. The most difficult part of the assembly is the threading of the toothed belts on both Y-axes.
The instruction manual explains all the steps in great detail and uses illustrations for demonstration. Admittedly, I did not read through the written instructions and did the entire assembly using only the excellent illustrations.
On a positive note, it is also described that the eccentric nuts of the individual guide wheels should be tightened with a wrench. If these wheels ride too loosely on the rails, the positioning accuracy suffers.
In addition to assembly, the manual also describes how to focus the laser and how to install and use the appropriate software. If you haven’t used a laser cutting and engraving machine before, this is really helpful.
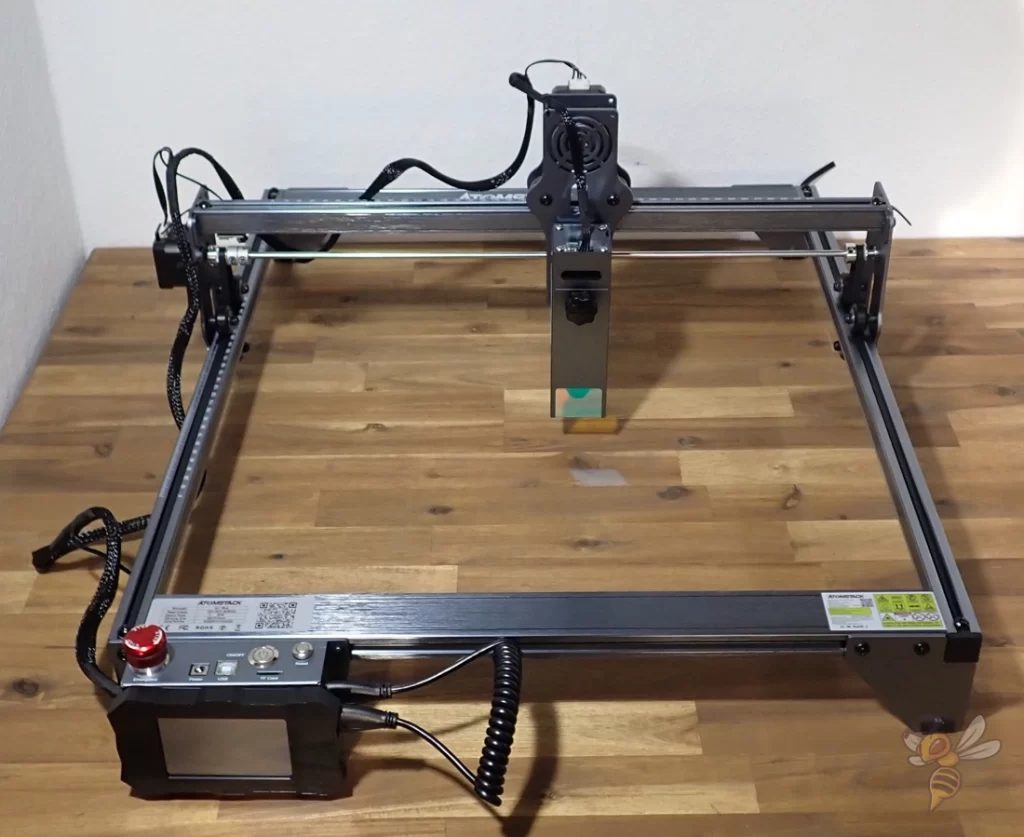
Features & Design
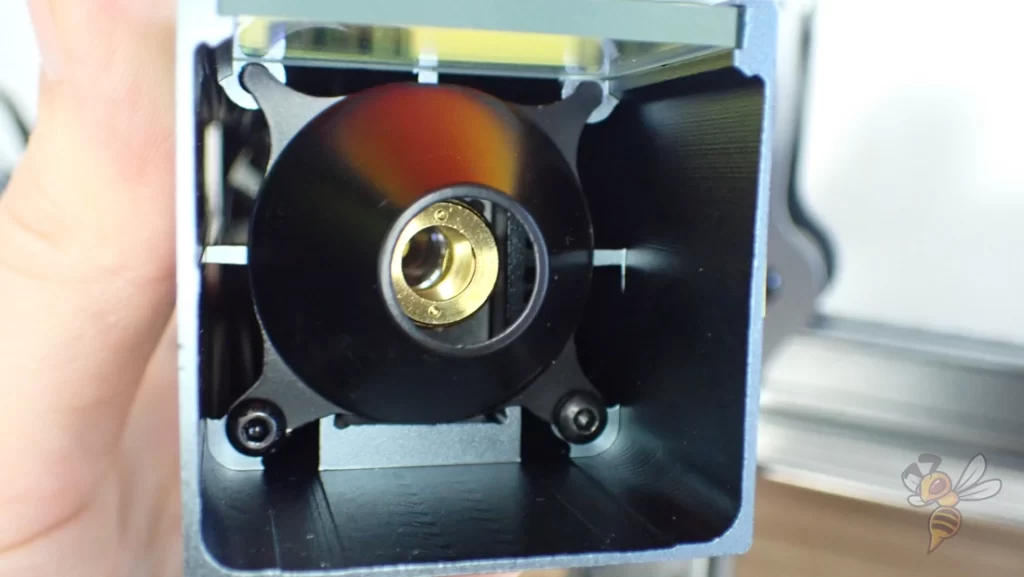
Powerful 10W Laser Module

With the Atomstack X7 Pro’s 10-watt laser module, you can cut many materials quickly and deeply. The small focus of 0.06 × 0.06 mm also gives you a very high accuracy.
Even if you don’t necessarily want to cut extremely deep, the high power is still worth it because you can cut and engrave thin materials much faster with it.
Here are a few examples of what you can work on with the Atomstack X7 Pro’s 10 watt laser:
- Cutting & engraving:
- 20 mm thick wood
- 15 mm thick black plexiglass
- Cardboard
- Leather
- Engraving:
- Metal
- Ceramics
- Glass
I already had a little experience with 5 watt laser devices and was very surprised how much the double power really accelerates the process. Especially when setting the speeds, I thought every time that the speed is too high and the material is not cut all the way through. Most of the time I was wrong!
Warning: Laser Class 4!
The big downside of the powerful laser is that it can be dangerous to your eyes and skin. Due to the high power, even deflected rays are harmful.
Therefore, when using a laser of this power, extreme caution must always be exercised to prevent long-term damage.
One safety measure is already built into the Atomstack X7 Pro. The laser module is shielded up to just above the material to be processed and has a filter glass at the front. This renders the majority of the deflected beams harmless.
Nevertheless, rays escape in the small slit between the material and the radiation shield. If you are in the same room as the laser, I strongly recommend that you use laser safety goggles.
Another way to protect yourself from the harmful rays would be to use a suitable enclosure or otherwise shield the device.
Touchscreen
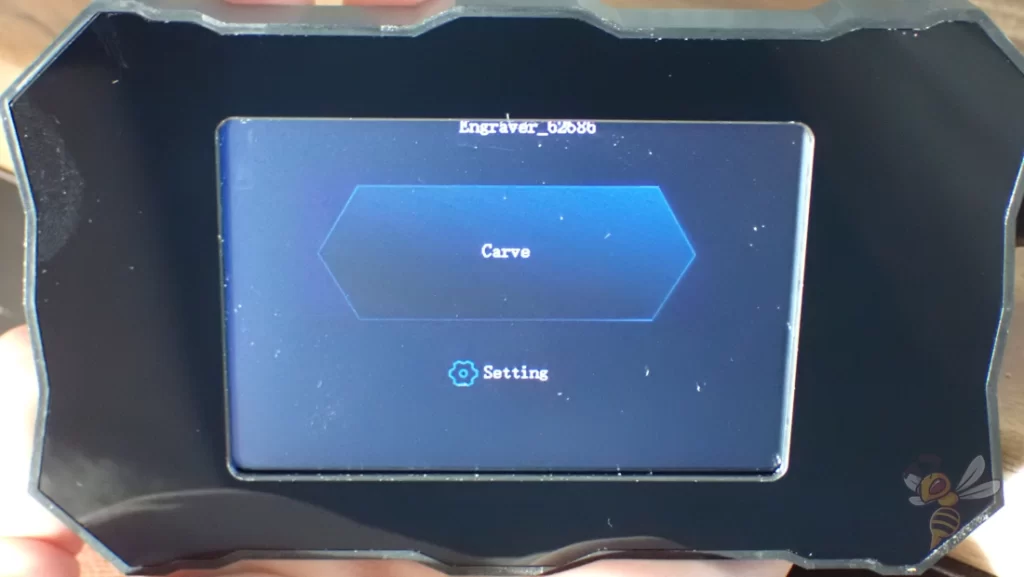
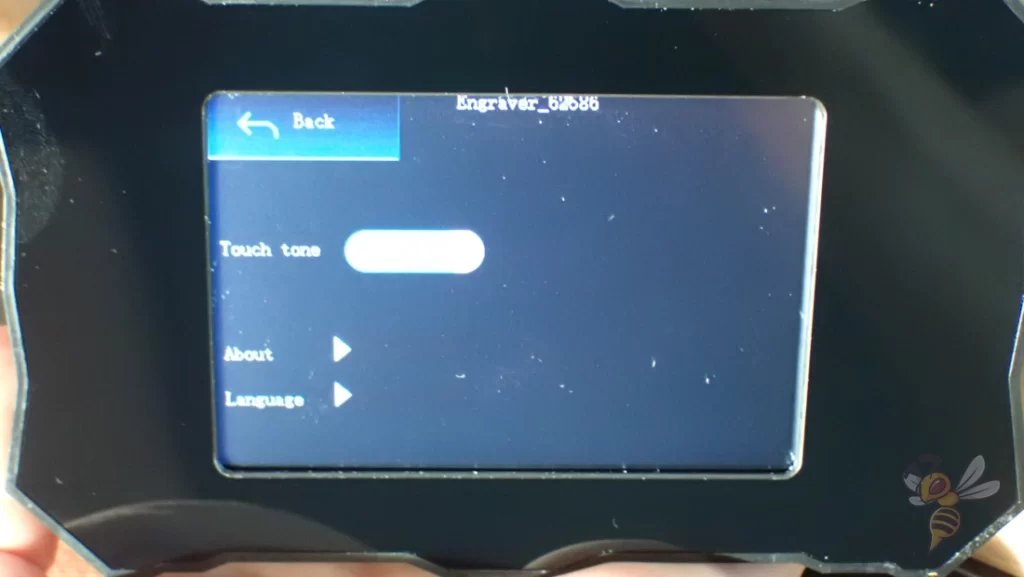
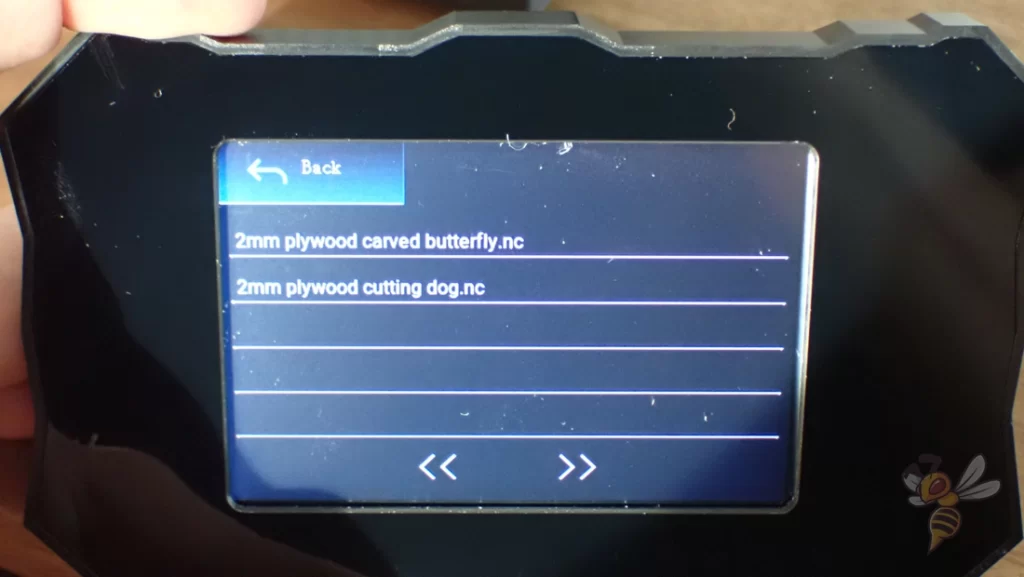
The touch screen is a very useful feature if you want to save multiple files on the MicroSD card and use them one after the other.
On many other devices, there’s only a single button as the user interface that lets you start the single file.
Not only can you select and start the file via the touch screen, you can also display where the motif will be lasered to align the material. You can also adjust the settings and much more.
By being able to prepare the files on your computer and transport them to the laser via the microSD card, you don’t need a physical cable connection between the device and a computer. I’m a big fan of this offline operation, as it’s not always practical to carry your laptop to the device or place the device within range of your laptop or computer.
Unfortunately, with my copy, the touchscreen did not respond well to my inputs. I had to press a little harder with my finger and fingernail with each click so that it registered the click. Of course, we are pretty spoiled by today’s smartphones, as far as touchscreens are concerned, but I would have expected a little more here.
But as I said, it could also be that just my copy is a bit more sluggish, as it looks much easier to make inputs via the touchscreen in Atomstack’s video (see above).
Stable Construction
Without high accuracy, projects with fine details are not feasible. This accuracy is not only defined by the low focus point of the laser, the positioning accuracy across the axes is also essential.
The positioning accuracy depends on the stepper motors on the one hand and on a stable construction on the other hand. The construction of the Atomstack X7 Pro is based on aluminum profiles that are firmly connected to each other. The running wheels run over them and are driven by toothed belts with the stepper motors.
The anodized aluminum surface of the frame looks very classy and is not susceptible to scratches.
Emergency Stop

The Atomstack X7 Pro has two emergency stop systems. Directly in front of the control panel is a large red emergency stop button. This immediately turns off the device and prevents possible damage.
The other emergency stop system is a built-in gyroscope that immediately shuts down the device if it senses that the device is tipping or falling over.
Since the Atomstack X7 Pro does not have an enclosure, these safety measures make sense. On the one hand, if the stepper motors collide with objects in the work area, the movement could cause damage to the device or the object. On the other hand, tilting the device could cause the laser beams to shoot across the room. Both would not be advisable for your health either …
Large Working Area
The advantage of laser devices without an enclosure is that the working area can be kept quite large. A larger aluminum profile is by far not as expensive to expand as a closed housing.
The workspace of the Atomstack X7 Pro is 410 × 400 millimeters. This allows you to work on medium and large objects in one piece. If that’s not enough space for you, there are several upgrades that can increase the workspace (more on that later in this article).
Measuring Scale
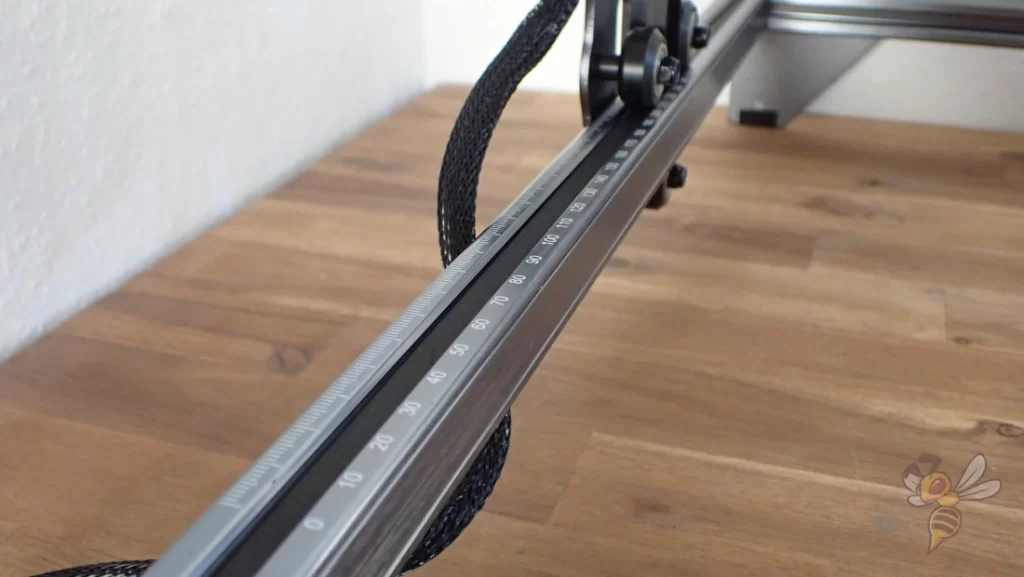
On one side of the work area, there is a measuring scale on the aluminum profile. Theoretically, you can use this to align the material correctly, but I prefer to use the border function via the touchscreen.
With this function, the laser scans the rectangular outline of the motif at low power. This way you know exactly how much space the motif requires and can align the material accordingly. This actually makes the scale pointless.
Connections
To operate the Atomstack X7 Pro, you can either connect a computer or laptop directly with a USB cable, or use a MicroSD card and the touchscreen offline.
Check Price at:
Software & Operation
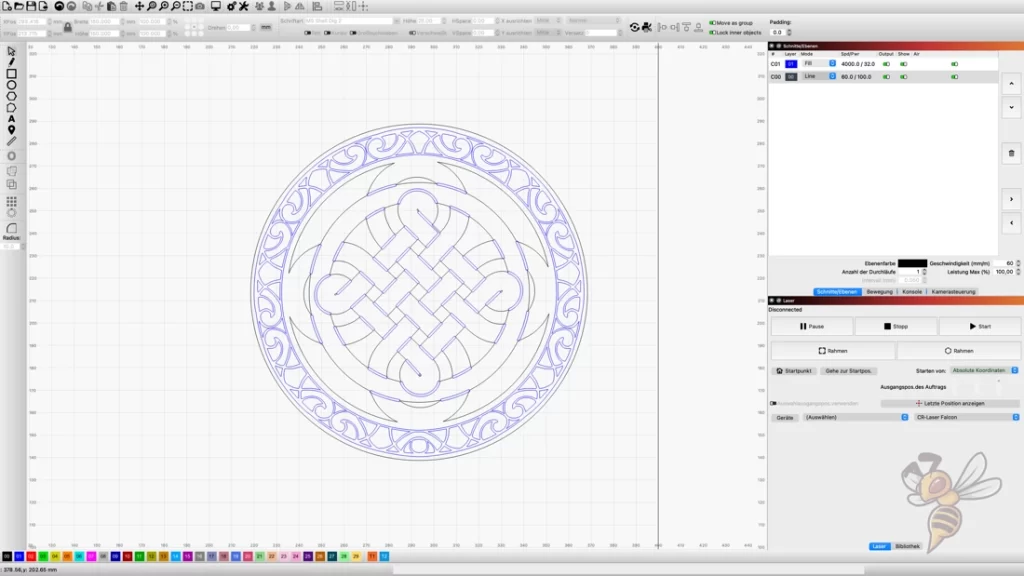
You can supply the Atomstack X7 Pro with G-Code files, either with LaserGRBL or Lightburn. I have experience with both programs, but I chose Lightburn for the Atomstack X7 Pro. LaserGRBL is the free version for Windows and Lightburn is available for Windows and Mac OS after a one-time purchase.
What I find so handy about Lightburn is that you can choose many types of lines and distinguish them by color. You can also determine the order in which the lines are cut or engraved.
At first glance, the user interface seems a bit crowded and complicated. In principle, however, you need very little of it if you want to laser ready-made files. Besides the easy setting of the laser parameters, the preview feature is also very handy to get the best out of the laser.
As for the laser settings, you need to specify the power in percent, the speed in millimeters per minute and the number of passes. For starters, this can be relatively confusing and too much. Fortunately, however, the microSD card contains a clear table with the correct settings for various materials.
If you are using a material that is not in this table, simply choose the one that is most similar and try the given settings. It is best to calibrate the settings with small samples that are quickly lasered. That way, you can find the perfect settings for cutting and engraving.
Results
Dinosaur Puzzle with 3D Printing
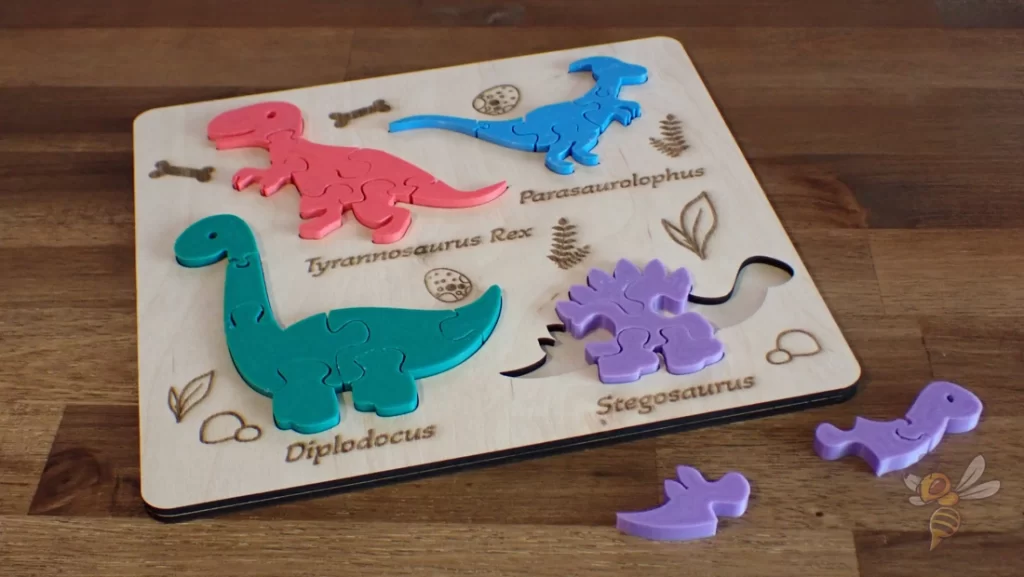
The first project was directly a complete DIY project. I have gathered various designs on the Internet and created my own dinosaur puzzle for children.
It is a combination of laser cutting, laser engraving and 3D printing. The colorful plastic parts are from a 3D printer (FLSUN Super Racer).
I find the result of the wooden parts very successful, partly there are a few burn marks around the engraved parts. But this is not too bad in my eyes and can be removed with a little alcohol afterwards for the most part.
Solar System Wooden Puzzle

The next project was also a puzzle for children. With this object, I wanted to try out how all three functions of the laser work together. The individual planets were cut out, the writing was engraved and the orbits and asteroids were done only by a line of the laser.
I glued the planets with the decoration lines on the cut-out parts from the upper part of the puzzle. So, they are easy to touch and place.
Coaster
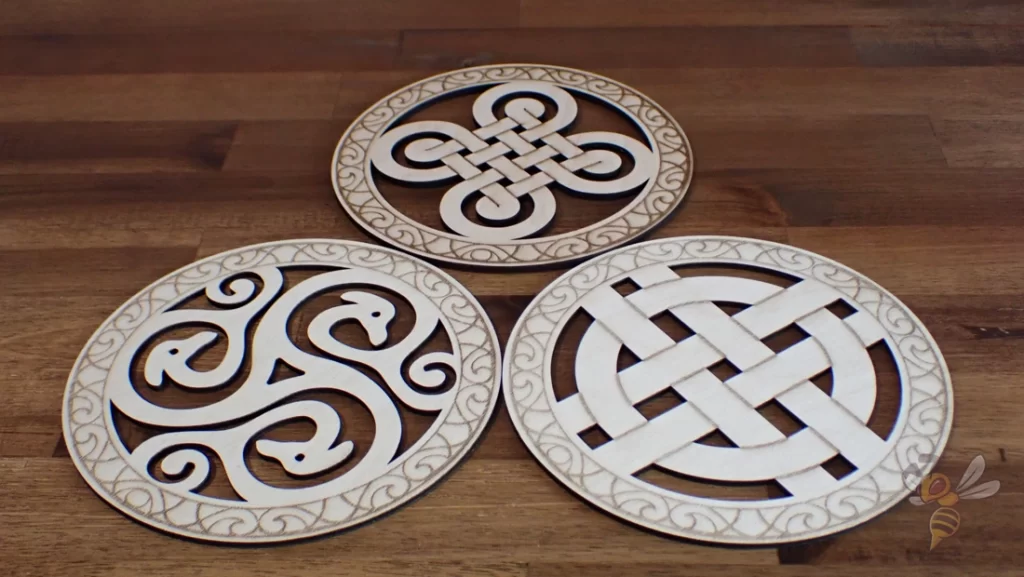
The last project were coasters with Viking motifs. Despite the fine details, there are hardly any burn marks here and even the smallest holes were cut out precisely.
Upgrades
There are a few upgrades for the Atomstack X7 Pro that improve the quality and give you even more possibilities to laser different objects.
Rotary Roller*: With this upgrade, you can also work on round objects. This device rotates the object evenly around its axis. The smallest diameter you can work with is 4 mm. With this upgrade, you can also mark cans, round pieces of wood, glasses or cups. On top of the two towers is a ball that is mounted particularly smoothly. Together with the Rotary Roller, you can also work on very large objects. The Rotary Roller gradually pushes the object over these towers.
Honeycomb panel*: If you cut wood with the laser and use only a piece of sheet metal as a base, you will get severe burn marks on the bottom. With this honeycomb plate, you can avoid this because the laser shoots after cutting through a few millimeters of air and then on a sheet of metal. This disperses its light and prevents it from burning the underside.
Extension Kit*: If the working area is not sufficient for you and you do not prefer the solution via the Rotary Roller and the Extension Towers, you can also extend the working area with larger profiles. This extends the working area to 850 × 410 mm.
Is the Atomstack X7 Pro Worth It?
The Atomstack X7 Pro* is definitely worthwhile for anyone who needs a powerful laser for cutting and engraving. It doesn’t have an enclosed housing like the xTool M1 for example, but it’s usually more than half the price.
I had a lot of fun with this test and was pleasantly surprised at how easy it is to create great projects. The only thing that is not perfect about the device is the touchscreen. It only responds with a little more pressure than you’re used to, which means every second click has to be done twice because the first one didn’t register. However, this drawback is minimal and hardly hinders the fun.
What you need in any case is a pair of laser safety goggles*. Although the laser module has a good protection built in, but also deflected rays can be harmful to you.
Check Price at:
Disclosure: This website is the property of Martin Lütkemeyer and is operated by Martin Lütkemeyer. Martin Lütkemeyer is a member of the Amazon Services LLC and other Affiliate Programs. These are affiliate advertising programs designed to enable websites to earn advertising revenue through advertising and linking to Amazon.com and others. Links marked with * are affiliate links.
