
- Wet Filament: Prevention, Symptoms & Drying - July 18, 2024
- Sovol SV08 – Best PrusaSlicer Settings & Profile - June 26, 2024
- Sovol SV08 – Best Orca Slicer Settings & Profile - June 26, 2024
Disclosure: Links marked with * are Affiliate Links. I earn from qualifying purchases if you decide to make a purchase through these links – at no additional cost for you!
Setting the correct print speed for the Anycubic Mega S* is not quite as easy as the included instructions suggest.
Even though the Anycubic Mega S is one of the cheaper models, excellent results can be achieved with the right settings.
With a faster print speed than approx. 60 mm/s, the print quality of the Anycubic Mega S decreases considerably. The slower the print speed, the better the result. A good compromise between print speed and quality is 40 mm/s.
How the results look in reality with different print speeds is shown in the experiment further down in the text.
Table of Contents:
Why Print Speed Affects Quality
Fast movements generate vibrations. The faster the print head of the 3D printer moves, the more vibrations are generated.
These vibrations are reflected 1:1 in the print image. It is therefore quite logical why the print quality decreases with increasing print speed.
And this is where you can see the difference between cheap and expensive devices. In order to offer a 3D printer at a low price, it has to consist of lightweight components. The art is to build a stable frame even from such light components.
This has been achieved quite well with the Anycubic Mega S*. Nevertheless, you can see big differences to more expensive models in the print quality at comparable print speeds. In the recent past, the Ender 6 comes directly to mind – this printer can print really fast!
Setting the Print Speed in the Printer Menu or in the Slicer?
With the Anycubic Mega S, you have two options for setting the print speed:
- In the menu of the printer
- In the slicer
In the menu of the printer itself, you can set the print speed via the Print Rate. This value is set to 100% by default and can be reduced.
However, this type of setting is quite imprecise and is mainly suitable for making quick adjustments when a change in the slicer would take too long.
The better option is to set the print speed in the slicer itself.
There you can enter the print speed as a numerical value and thus have comparable values.
In addition, you not only have the choice of the print speed in general, but you can also set many different settings that affect the print time (Travel Speed, Layer Height, Inner Walls, etc.).
Experiment – Mega S Print Speed
I did an experiment with the Anycubic Mega S. I wanted to know which print speed setting is the best compromise between speed and quality.
The results are quite clear: the quality decreases very quickly with speed!
For this experiment, I used the typical test owl and printed it 7 times at different print speeds. The differences in print time and quality were astonishing.
Print Speed vs. Print Duration
To make it possible to compare the different printing times, I enlarged the model extremely in the slicer and sliced each at the different printing speeds.
| Print Speed | Print Duration |
|---|---|
| 10 mm/s | 17:53 |
| 20 mm/s | 09:15 |
| 40 mm/s | 05:09 |
| 60 mm/s | 03:57 |
| 80 mm/s | 03:26 |
| 100 mm/s | 03:11 |
| 120 mm/s | 03:03 |

Since I find the influence of print speed on print duration so important, this comparison is before the actual quality comparison.
The fact that the printing time is not really shortened when you go faster than 60 mm/s has a very big influence on which speed you actually choose.
It seems that something changes at 40 mm/s. From this speed on, the print duration does not change significantly and after 60 mm per second, it almost does not change at all.
For this reason alone, I will no longer print faster than 50 mm/s with my Anycubic Mega S in the future. And the quality comparison only underpins this even more.
Print Speed vs. Quality
The comparison between print speed and quality also shows that high speeds are not worthwhile.
Especially after 60 mm/s, there are strong deficits on the surface. In general, however, you can say that the quality gets better and better as you print more slowly.
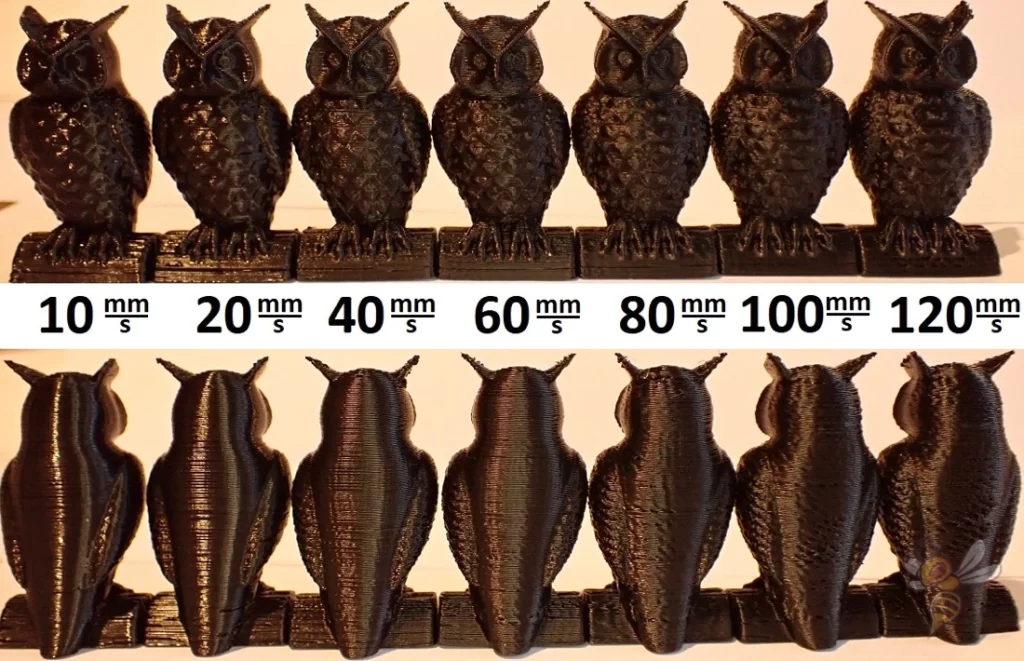
Especially the back of the respective owls clearly shows how the quality deteriorates the higher the printing speed becomes.
As a result of the comparison between quality and print speed, you can remember that it is never worth printing above 60 mm/s and that it can be a good investment to reduce the speed for objects that really need to be aesthetically perfect.
Related Questions
Is the print speed dependent on the filament?
The best print speed depends on the filament used (not related to the Mega S, but in general):
- PLA: 30-90 mm/s
- ABS: 40-80 mm/s
- PETG: 40-90 mm/s
- Nylon: 40-60 mm/s
- ASA: 20-50 mm/s
- HIPS: 25-55 mm/s
Is the printing speed dependent on the 3D printer?
How fast a certain quality can be printed depends strongly on the 3D printer used. With the Anycubic Mega S, the optimal print speed for PLA is between 20-60 mm/s.
But there are also 3D printers that can print the same quality 3 times as fast (e.g. the Ender 6 from Creality).
How can I reduce the print time without increasing the print speed?
In order to minimize the total printing time during 3D printing, the following parameters can be changed in addition to the printing speed itself:
- Infill: the less infill the object has, the shorter the print time
- Layer Height: The thicker the layers, the fewer layers need to be printed. Layer Height can save a lot of time.
- Extrusion Width: A larger extrusion width will extrude more material per second, just like Layer Height – only in the x/y plane and not in the z plane.
How can I print multiple objects in Cura, each with different print options?
You can print multiple models with different print settings at once in Cura. Here are the steps with the example of the print speed:
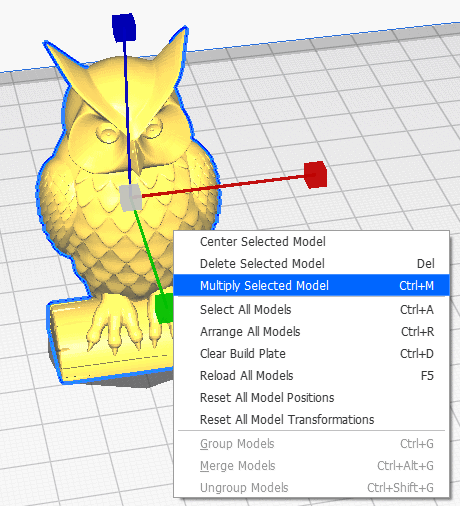
- Multiply object: If you want to print the same object multiple times but with different print options, you must first multiply it. Cura arranges the object so that the print head has to travel as little distance as possible to save time.
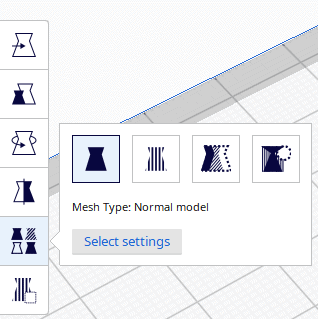
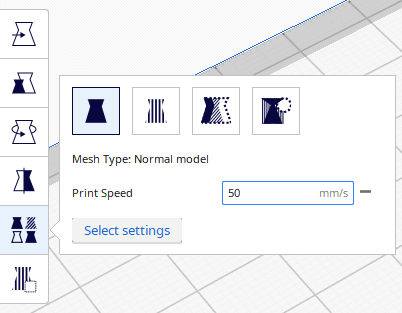
- Select object and choose options at Mesh Type: Here you can select the print options you would like to vary between objects.
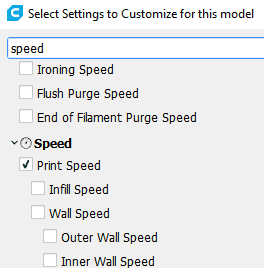
- Customize printing options: Once you have completed the previous step for all models, you can now customize the print options. To do this, simply click on the respective model. Make sure you remember which object had which settings before you remove it from the print bed.
Disclosure: This website is the property of Martin Lütkemeyer and is operated by Martin Lütkemeyer. Martin Lütkemeyer is a member of the Amazon Services LLC and other Affiliate Programs. These are affiliate advertising programs designed to enable websites to earn advertising revenue through advertising and linking to Amazon.com and others. Links marked with * are affiliate links.
