
- Wet Filament: Prevention, Symptoms & Drying - July 18, 2024
- Sovol SV08 – Best PrusaSlicer Settings & Profile - June 26, 2024
- Sovol SV08 – Best Orca Slicer Settings & Profile - June 26, 2024
Disclosure: Links marked with * are Affiliate Links. I earn from qualifying purchases if you decide to make a purchase through these links – at no additional cost for you!
A Resin 3D Printer delivers much more precise results than regular 3D Printers and is a lot of fun to work with. In addition, the prices are getting lower and lower.
Some time ago you couldn’t get a 3D printer that could print with synthetic resins for less than 1000 dollars. Now there are more and more resin 3D printers on the market, even below 500 dollar (for example the Elegoo Mars 3 or Anycubic Photon M3).
In order to achieve good printing results with a synthetic resin, some settings are necessary. But you don’t have to be a professional for this. Resin 3D printers are also suitable for beginners.
It is important that you take care of your own protection because the resin is very harmful to the skin and the respiratory tract. Always wear a breathing mask and rubber gloves and ventilate the room well.
Here you can find a comprehensive Google spreadsheet from Elegoo for the best settings of different Elegoo resin types for the most popular Elegoo 3D printers: Link to the spreadsheet
If you don’t own an Elegoo 3D printer, you can still use the data. Just compare the exposure output from your 3D printer with the listed 3D printers from Elegoo.
The table above is missing a few important settings that you need to achieve good results with Elegoo Resin. This article will tell you what they are and how to find the best settings for your resin 3D printer.
Table of Contents:
- 1 How Does Resin Printing Work?
- 2 Why is Elegoo Resin So Good?
- 3 Advantages and Disadvantages of Elegoo Resin
- 4 What Are The Best Settings For Printing With Elegoo Resin?
- 5 How to Calibrate Elegoo Resin Settings
- 6 Water Washable Resin By Elegoo
- 7 What to do When the Elegoo Resin Does Not Stick When Printed?
- 8 How to Filter Resin Correctly?
- 9 What do I do When Resin is on the Printer Display?
How Does Resin Printing Work?
In resin printing, UV rays cure the synthetic resin. The process is called SLA. In the SLA and DLP processes, the resin is cured by targeted radiation.
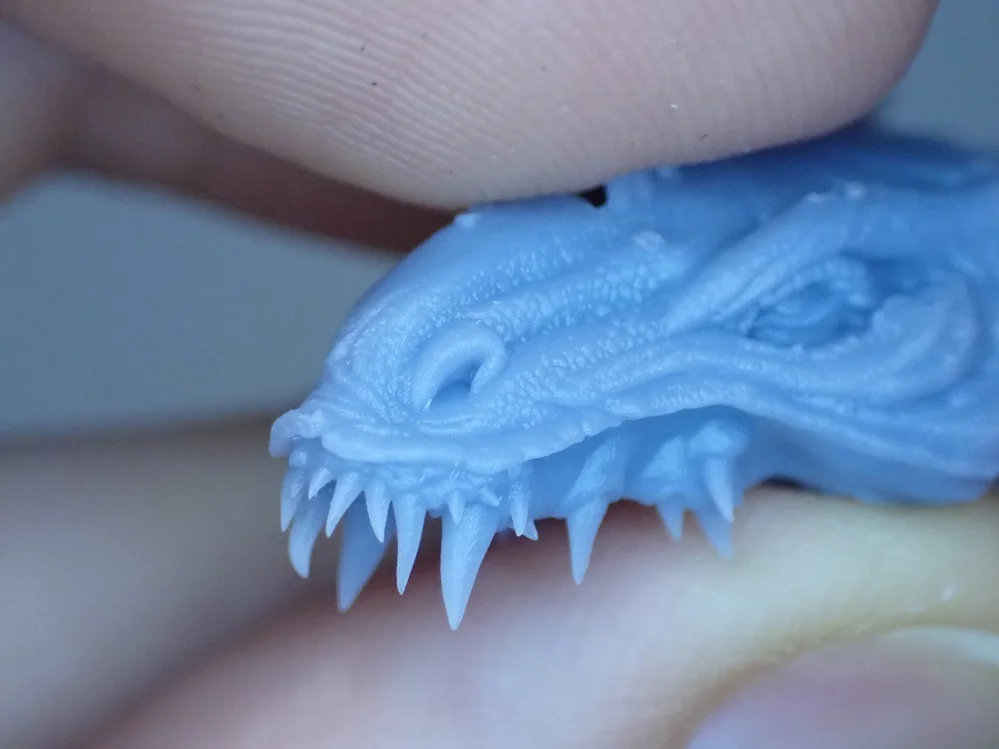
Resin is a liquid plastic. By curing with the help of these two processes, much finer structures are created than with an FDM 3D printer. The object appears more filigree and detailed. Resin offers many advantages for printing. There is now a wide range of resin choices on the market. One, which is very popular, is the Elegoo resin.
Why is Elegoo Resin So Good?
Elegoo resin offers a few special advantages. It has a very reliable layer adhesion and only minimal warping.
A very big advantage is that there are less poisonous vapors from itself. It still remains very harmful and you should continue to protect yourself. But still, it is very mild compared to other synthetic resins.
Properties of Elegoo Resin
- Wavelength: 405 nm
- Hardness: 79 D
- Shrinkage: 7.1 %.
- Liquid density: 1100 g/cm3
- Viscosity at 25 °: 552 MPa
- Exposure time: 6-10 s
- Elongation at break: 14.2 %.
- Tensile strength: 23.4 Mpa
- Shelf life: 1 year
- Colors: Grey, white, black, transparent, red, yellow, blue and green
- Size: 500 ml or 1000 ml
Advantages and Disadvantages of Elegoo Resin
Pro
- VOC-free (toxic vapors)
- little smell (or stench) when printing
- enhanced adhesion
- uniform surface structure after printing
- compatible with all Resin 3D printers
- inexpensive
- high-resolution detail accuracy
- precise layers
- smooth surfaces
- available in many colors
- Colors are very bright
Con
- liquid state requires high curing temperature
- high curing temperature requires longer cooling time
- you can create a mess with resin with ease
- supplied filter is badly processed
- relatively high shrinkage rate
- Resin 3D printers are small, therefore only small objects are possible
- not suitable for UV radiation, high wear
What Are The Best Settings For Printing With Elegoo Resin?
One of the most popular slicers for resin 3D printers is ChiTuBox*. I use this software for all my resin 3D printers.
The only setting that is highly dependent on the resin used in resin 3D printers is the exposure time. However, there are a few other settings that are slightly dependent on the resin used. The performance of each resin can be different and allow for different resolutions.
If you do not use a 3D printer from Elegoo, you can still use the values given in this article for yourself. You can compare the exposure power of your 3D printer with the given models from Elegoo. If your value lies between two models, you can try an average value.
Normal Exposure Time
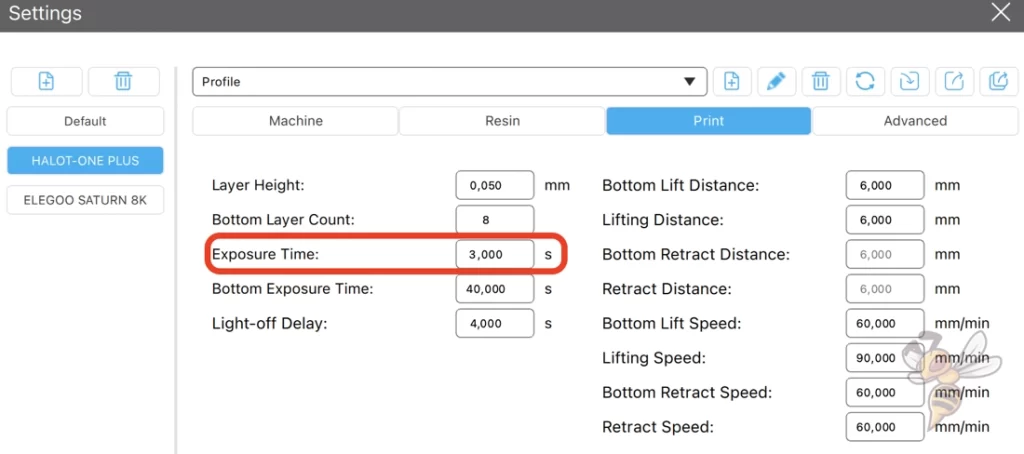
The exposure time of Elegoo Resin is 8 to 9 seconds on older 3D printers like the Mars or Mars Pro. On newer models, such as the Mars 2, Mars 3, Saturn and Jupiter models, it is only 2.5 to 3 seconds.
How long the Elegoo Resin needs to be exposed depends on how powerful the LCD screen of your 3D printer is. The more powerful it is, the shorter the exposure times will be.
With the advent of monochrome screens, the exposure time could be reduced several times. Models that used to take a whole day are now ready within a few hours.
The UV light transfers the necessary energy into the resin to harden it. As with normal light, the absorption depends on the color of the material. Therefore, the exposure times for dark and translucent resins are different from other colors.
These are the best exposure times for the listed Elegoo Resin 3D printers (at a layer height of 0.05 mm):
| Model | Normal resin | Dark resin | Transparent resin |
|---|---|---|---|
| Mars | 8 s | 14-15 s | 12 s |
| Mars Pro | 7 s | 11 s | 10 s |
| Mars 2 | 2.5 s | 3 s | 6 s |
| Mars 2 Pro | 2.5 s | 3 s | 6 s |
| Saturn | 2.5 s | 3.5 s | 7 s |
| Saturn S | 2.5 s | 3.5 s | 7 s |
| Mars 3 | 2.5 s | 3 s | 6 s |
| Mars 3 Pro | 2.5 s | 3 s | 6 s |
| Saturn 2 | 2.5 s | 3.5 s | 7 s |
| Saturn 2 8K | 2.5 s | 3.5 s | 7 s |
| Jupiter | 2.5 s | 3.5 s | 7 s |
For the very high-resolution resin 3D printers, such as the Saturn 2 8K*, there is now also 8K resin. These materials need about one second longer for exposure.
Exposure Time of the Bottom Layers
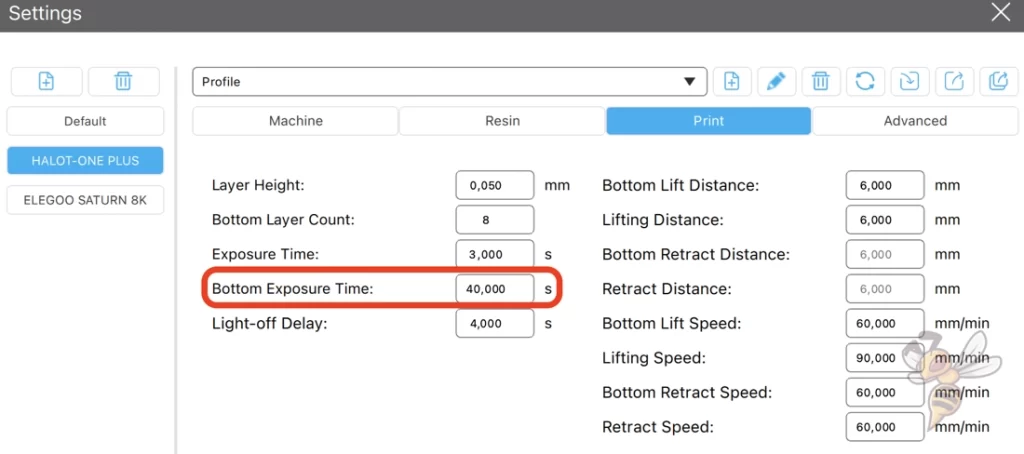
In addition to the normal exposure time, the exposure time of the first layers of the model is also important. If it is too short, the print bed adhesion might not be sufficient to hold the model upside down on the print bed.
There are also differences in the exposure time of the first layers between the different models. As with the normal exposure time, the higher the power, the shorter it becomes.
However, the exposure time of the first layers must not be set too high, otherwise the layers will become extremely brittle and widen outwards.
Here is an overview table for the exposure times of the first layers for different Elegoo Resin 3D printers (at a layer height of 0.05 mm):
| Model | Normal resin | Dark resin | Transparent resin |
|---|---|---|---|
| Mars | 60 s | 70-75 s | 70 s |
| Mars Pro | 45-50 s | 45-50 s | 50-60 s |
| Mars 2 | 35-40 s | 40-45 s | 40-45 s |
| Mars 2 Pro | 35-40 s | 40-45 s | 40-45 s |
| Saturn | 30-35 s | 35-40 s | 35-40 s |
| Saturn S | 30-35 s | 35-40 s | 35-40 s |
| Mars 3 | 35 s | 40-45 s | 40-45 s |
| Mars 3 Pro | 35 s | 40-45 s | 40-45 s |
| Saturn 2 | 30-35 s | 35-40 s | 35-40 s |
| Saturn 2 8K | 30-35 s | 35-40 s | 35-40 s |
| Jupiter | 30-35 s | 35-40 s | 35-40 s |
Layer Height
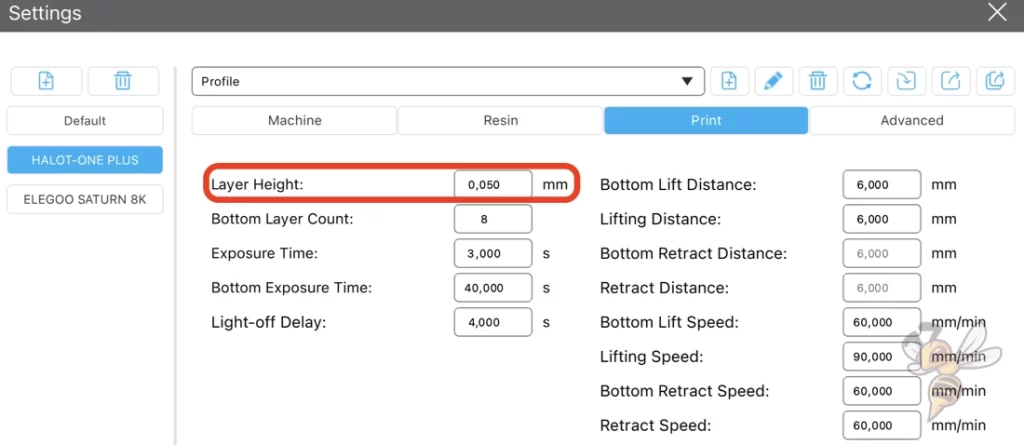
The layer height determines the resolution in z-direction. Smaller layer heights produce finer results, coarser layers are printed faster.
How small you can set the layer height depends on your 3D printer. The standard that every resin 3D printer can realize is 0.05 mm. But there are also 3D printers that can do 0.01 mm.
If your layer height differs greatly from the standard (0.05 mm), your exposure times will also need to be adjusted. Thinner layers need less time to cure.
This compensates somewhat for the fact that you generally have longer printing times with smaller layer heights. With a layer height of 0.025 mm, the printing takes not quite twice as long as with 0.05 mm.
Since your 3D printer has a fixed XY resolution (the pixel size), you do not change the accuracy of the entire object with the layer height. So with the layer height, you only change the resolution in the Z-direction. However, together with optimized edge smoothing, you can produce objects that resemble injection molded parts even with relatively inexpensive resin 3D printers by using smaller layer heights.
Any time you make a big change to your settings that affect exposure time, you should do a test print to see if the changes were effective or cause print errors. I’ll show you how to do this later in this article.
Number of Bottom Layers
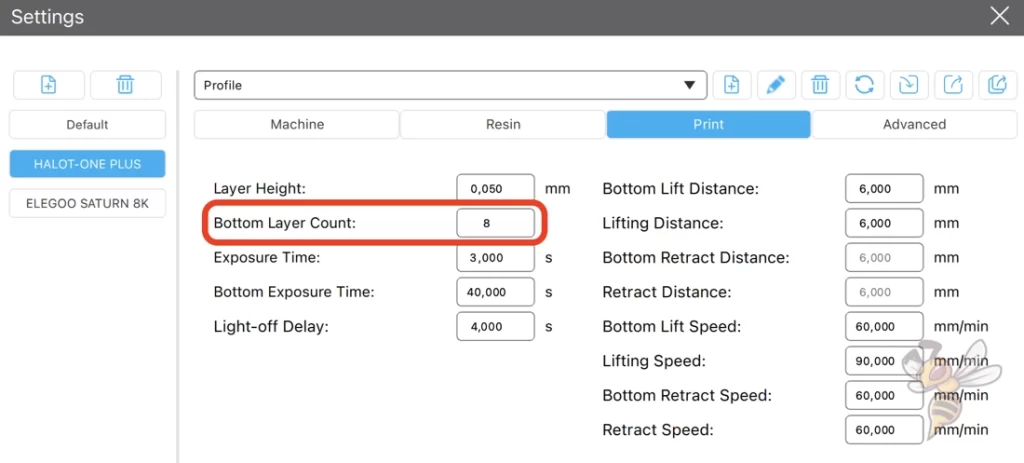
The more base layers are exposed for a longer time in a resin print, the better the object adheres to the print bed. Standard values here are between 5 and 10.
Print bed adhesion for resin prints is influenced by the nature of the print bed, the exposure time of the first few layers and the number of longer exposed bottom layers.
If an object comes off the print bed during printing, it means the print can be stopped immediately. Not only is it a shame for the wasted resin and time, it can also require a very long cleaning of the printer to remove the splatter and filter the resin.
Therefore, it is important to expose a few of the first layers of a resin object longer. But you must not expose them too long. Otherwise, you will cause an elephant foot (the first layers of the object are too wide).
Values between 5 and 10 have proven to be a good guideline. If you have problems with print bed adhesion, you can increase the exposure time of the first layers as well as their number.
Lifting Speed & Distance
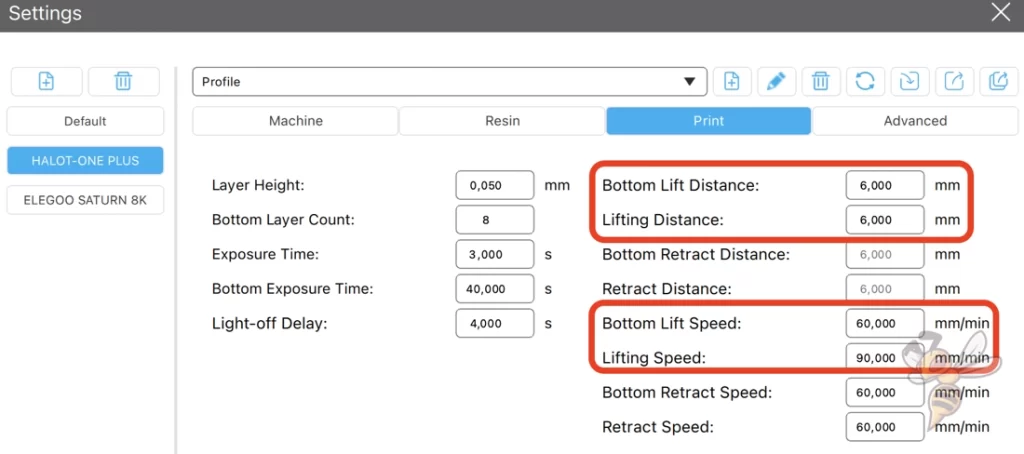
The speed at which the print bed is lifted by the FEP film after exposure is called the lifting speed. It should be set slower for the bottom layers than for the rest of the model.
The slower the print bed is raised, the less likely the object is to come off the print bed. The disadvantage, however, is that it increases the print time. Therefore, you can adjust the setting separately for the first layers and the rest of the model.
For the first layers, lifting speeds of 40 to 60 mm/min have proven to be good. These values are also independent of which 3D printer you use. For the rest of the model, you can use values between 80 and 100 mm/min.
Some 3D printers get quite loud at higher speeds. So, you always have to find the balance between speed, noise and risk for the print bed adhesion.
The lifting distance indicates how far the print bed, or more precisely the previously printed layer, should be lifted from the FEP film before it is lowered back onto the LCD screen. Higher values increase the printing time, but lead to a good wetting with new resin.
If the distance is too small, air bubbles could form in the worst case or the FEP film still sticks completely to the last printed layer and no new resin is added at all.
Anti-Aliasing
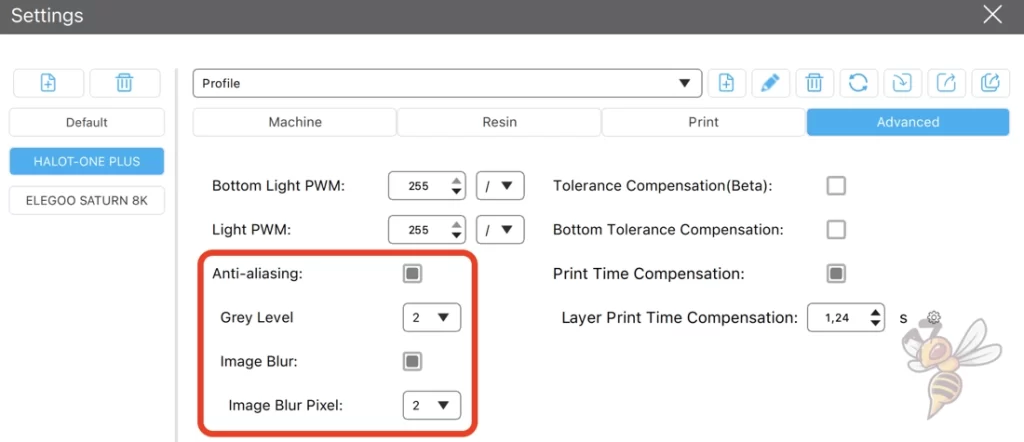
Sharp edges can be rounded by anti-aliasing. The typical steps that occur in resin 3D printing can thus be smoothed. However, too much anti-aliasing leads to a loss of fine details.
Edge smoothing is where the differences between cheap and expensive resin 3D printers become apparent. Although you can use edge smoothing to create objects that have no edges or steps even with a cheap resin 3D printer, you will lose the finest details.
With a 3D printer with a better resolution, you can set the edge smoothing smaller and get more details with still a smooth surface.
With edge smoothing completely disabled, you will see steps in your model. A 3D printer with extremely good resolution, these steps are small, but still visible.
As with most other settings, it’s important to find the right balance between too much and too little. Too much and you lose detail, too little and you see steps on the surface.
Therefore, it may take you several tries to find the right value for your 3D printer. Also, the value depends on the object you are printing. The less fine detail the object has, the more edge smoothing you can use.
How to Calibrate Elegoo Resin Settings
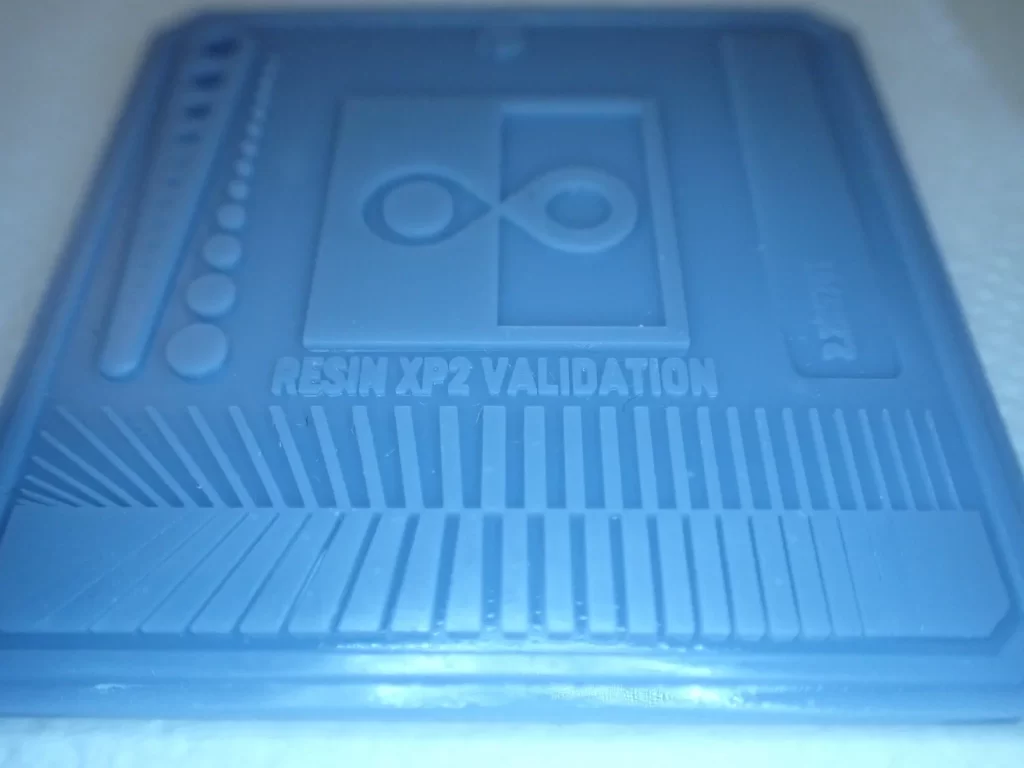
The settings for Elegoo Resin can be optimized with suitable calibration objects. These objects can be printed quickly and reveal weaknesses in the print settings.
While the values given in this article are good guidelines, they probably won’t give you the best results. You should especially calibrate the exposure time to get the highest possible resolution.
My favorite for calibrating resin 3D printers is this resin test matrix*. Depending on whether you set the exposure time too high or too low, you will see different details more or less pronounced.
For example, if the exposure time is set high, the squares at the bottom of the test matrix will overlap. The test matrix is also printed within a few minutes, allowing you to calibrate the values relatively quickly.
Water Washable Resin By Elegoo
Elegoo has launched another resin on the market. A water washable resin*.
The safety precautions also apply here. Resin remains hazardous to health. But with the right measures, you can still take advantage of its benefits.
The water-washable resin is particularly thin. It also requires a longer curing time. It can also warp a little more. However, you can simply wash it off with water and you do not need 99% alcohol from Elegoo to clean it.
However, you must not simply dispose of the water in the drain after cleaning. This would pollute or attack the environment and also your pipes too much. So you have to collect it and dispose of it like paint residues or similar.
The print quality of the resin is incredible. It is a pleasure to work with this water washable resin. It is easy to spread and gives great results.
What to do When the Elegoo Resin Does Not Stick When Printed?
Sometimes it happens that the resin does not adhere properly to the printing bed. This is annoying and it is important to find out what could be the cause.
When you have checked your calibration, realigned your printing plate and it is free of grease, it should work again. If this is not the reason, there are other possibilities.
The resin itself can also be a possible trigger for not adhering to the printing bed. The resin must always be shaken well before use.
If it is not mixed well, it cannot give good results. Just pour it back into the bottle and start again.
You should shake the resin vigorously for about two minutes. Always use a sieve when pouring it back, especially after printing. Small particles will contaminate your next print.
Also, too short exposure time can lead to poor adhesion. To change this you have to go into the slicing software and adjust the settings. The appropriate exposure time varies depending on the resin color and type of Elegoo.
In any case, let the first layers cure longer than the rest of the object. Then you will get good adhesion on the printing bed.
Another possibility is room temperature. For good curing your object needs a room temperature of at least 20 °C.
How to Filter Resin Correctly?
There are disposable filters* and there are reusable filters* for 3D resin printers. It doesn’t matter which one you use. But the resin must always be filtered, otherwise, the impurities will produce negative print results.
You should always filter the resin if one of the following things applies:
- a print has failed
- a print has failed partially
- parts of the cured resin stick to the bottom of the tank
- if you use a new tank
- particles floating in the tank
In order to filter the resin properly and protect yourself, you will need a few utensils to make your work easier:
- a lacquer sieve or a fine oil filter
- gloves
- a ringstand
- an opaque container of plastic material
- a plastic spatula with rounded corners
And this is the easiest way to filter the resin:
- Put your gloves on
- Hang the filter in the ring stand
- Now remove the wiper from the tank
- Place the wiper on a protected surface
- Hold the tank diagonally over the filter without touching the window
- The beak of the tank must be directly above the filter when pouring
- Pour the resin completely through the filter into the bottle
- Use the spatula to help scrape out the tank
What do I do When Resin is on the Printer Display?
It is best to let the resin cure first when it has reached your printer display. Then you can remove it with a kitchen scraper very easily.
Position the scraper very carefully so as not to cause scratches. Water-washable Elegoo resin* can of course be washed off easily.
Disclosure: This website is the property of Martin Lütkemeyer and is operated by Martin Lütkemeyer. Martin Lütkemeyer is a member of the Amazon Services LLC and other Affiliate Programs. These are affiliate advertising programs designed to enable websites to earn advertising revenue through advertising and linking to Amazon.com and others. Links marked with * are affiliate links.
