
- Wet Filament: Prevention, Symptoms & Drying - July 18, 2024
- Sovol SV08 – Best PrusaSlicer Settings & Profile - June 26, 2024
- Sovol SV08 – Best Orca Slicer Settings & Profile - June 26, 2024
Disclosure: Links marked with * are Affiliate Links. I earn from qualifying purchases if you decide to make a purchase through these links – at no additional cost for you!
The Creality Ender 3 (original*, V2* and Pro*) is one of the most popular 3D printers. It has been on this market for quite some time. This is certainly due to its good price-performance ratio. It is also very easy to use, making it the perfect tool for beginners.
However, the specification of the print volume and the size of the print bed can be somewhat confusing.
The size of the print bed is 235 × 235 mm for the original Ender 3, the Ender 3 V2 and the Ender 3 Pro, and the print volume is 220 × 220 × 250 mm. In the XY direction, the volume at the edges is 7.5 mm smaller than the print bed to allow for the clamps on a glass print bed.
Why different measurements are given for the print volume and the printing bed and all further details are summarized in this post.
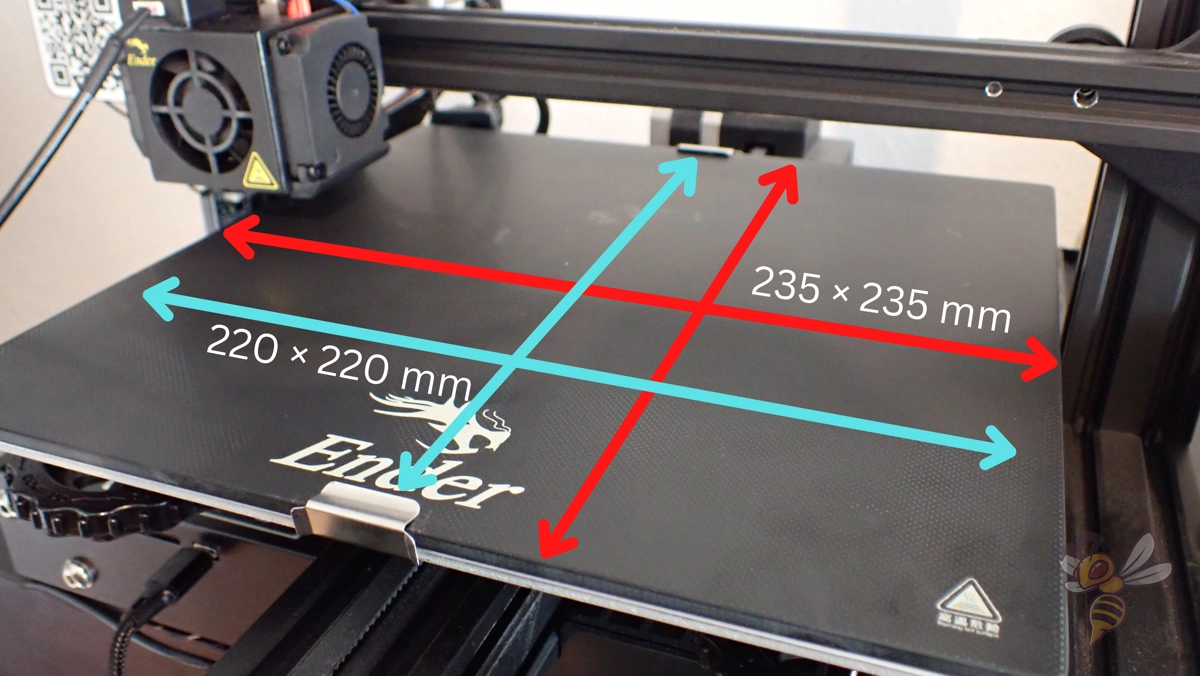
Red: Actual size of the print bed.
Table of Contents:
What is a Printing Bed?
The printing bed is one of the most important components of a 3D printer. Your 3D object is created on the printing bed. There it is applied layer by layer. There are printing beds that stand still and some that move up and down or back and forth.
It is important that the printing bed is of high enough quality to hold the filament firmly in place. If the filament slips when hitting the printing bed, the 3D print will fail or it will warp and look unattractive.
At the same time, the printing bed has to be constructed in such a way that the 3D print can be removed from the bed after completion. You will achieve particularly good results with a heatable printing bed.
Luckily, most printing beds are interchangeable and you can use a better one in your 3D printer if you are having trouble with yours. The Creality Ender 3 has a good printing bed, though. The included printing bed is made of glass and works quite well for the start.
What Do the Measurements Mean?
With all the 3D printers available on the market, it is a bit complicated to read and understand all the size and dimensional information. The 3D printer Creality Ender 3 is built extra compact.
Nevertheless, the manufacturers also wanted to offer a satisfactory printing surface. This should satisfy more customers. Because some only want to print small models, others also want to print large ones.
There are rather few 3D printers on the market that are really designed for large prints. However, there are some tricks that can help you to print a larger object even with a small print volume.
The construction volume of the Creality Ender 3 is (just) 220 × 220 × 250 mm. With this size it will certainly not win any price. Nevertheless, it is optimally designed for small 3D prints.
With its small overall size of 440 × 410 × 465 mm, which should never be confused with the building volume when reading the measurements, it fits anywhere on your desk and you don’t need to make a lot of room for the 3D printer.
The area of the printing bed is 235 × 235 mm. This makes you wonder why only a construction volume of 220 × 220 × 250 mm is given, doesn’t it? Are 15 mm misappropriated by the manufacturer or how does this figure come about? We will explain it to you below. Now let’s summarize again briefly:
Creality Ender 3 Dimensions
- Printing volume: 220 × 220 × 250 mm
- Printing bed size: 235 × 235 mm
- Size of the device: 440 × 410 × 465 mm
Why is 14% of the Bed Size Misappropriated?
In total, Creality thus states 14 % less print volume than the size of the printing bed could provide. The Ender 3 is guided by mechanical joints.
These do not always work 100% accurately.
Therefore, tolerances must be included when calculating the print volume. In order to achieve perfect prints, a certain number of tolerances are calculated and specified depending on the manufacturer.
In addition, it always depends on the printing bed itself. The supplied printing bed is fixed with binder clips. These require a large amount of play. Binder clips are not the best way to achieve a perfect 3D print.
But even there, there are ways to make the printing process easier and more efficient with a few small steps.
Can I Exceed the Printing Volume?
The truth is that you can easily exceed the size of your specified printing volume. There is no reason at all why you should not!
There are some 3D printing experts who have even pushed the print volume to 235 × 235 × 250. However, we would not recommend this to you as a beginner. The manufacturer Creality has decided that 220 × 220 × 250 mm is exactly the right print size for the Ender 3 3D printer.
3D printers require a tolerance margin, as the prints can always deviate slightly. The printing bed can also be shifted by a few millimeters, for example after cleaning. The manufacturer has taken this into account in its specifications in order to guarantee the best possible printing result.
But that doesn’t mean you can’t print bigger. A margin of 5 mm on each side should be perfectly adequate. You do not need 15 mm. So you gain 10 mm and get an area of 230 × 230 × 250 mm – after all.
If you like to experiment a little bit with your 3D printer and don’t mind possibly producing a few failed prints and cleaning your 3D printer several times, then you can of course go even closer to the 235 × 235 × 250 mm.
Surely it can also be a lot of fun to deal with, research and play with your new device in this way.
What Can I Change to Increase the Printing Volume?
Surely it annoys you, like most other users, that you cannot use so much of your installation space. But there are a few simple solutions for this:
- Replace the clips
- Replace the printing bed
- Modify the firmware
Instead of using the supplied binder clips on the Creality Ender 3, you can simply replace them. Don’t even bother with them, just replace them directly.
For this you exchange the binder clips for those with a smaller profile. Best are those that you can also find behind picture frames.
These springs are the perfect mount for your Ender 3, they lock much better and are guaranteed to hold their position. It will certainly be a relief for you when the bulky binder clips are gone.
Here* you can watch such clips on Amazon.
But you can also replace the printing bed. From Creality there is a magnetic printing bed*. This fits perfectly on the surface of the Ender 3 because it was specially designed by the manufacturer.
This also makes it much easier to remove your printed object from the printing bed. But keep in mind that magnetic printing beds wear out very strongly from 60 °C. They are therefore not suitable for ABS* filament.
Now you have to reprogram your 3D printer. Because its software is programmed to the manufacturer’s specified dimensions. For this purpose, you update the firmware of the mainboard. There you simply set the new dimensions.
Upgrading the Creality Ender 3
There are a lot of variants to upgrade the Ender 3. Many different printing bed variants are now available on the market.
This includes, for example, a printing bed made of polypropylene*. Filaments such as ABS* and PLA* adhere better to it during printing. Once the printing bed has cooled down, the objects can be removed from the printing bed very easily.
Polypropylene also has the advantage that it is easier to clean. You can fix the printing bed with clamps or simply with adhesive tape.
Another possibility to exchange the printing bed is a printing bed made of hardened glass*. It is fixed with clamps.
Thanks to a silicone and carbon coating, the prints on this bed will hold perfectly. No slipping and therefore no distortion. The printing bed is especially suitable if you want to print with ABS. This printing bed is extremely heat-resistant and therefore suitable for all common types of filament.
We have already mentioned the magnetic, removable printing bed* above. It can be easily bent after printing, so you can easily remove the object from the printing bed. However, the prints will hold better on the glass or polypropylene bed.
Many other components can be exchanged and upgraded at Ender 3. This includes the hotend, for example. But you can also add components.
A nice special is the laser engraver*. With it, you can really enhance your 3D prints. Don’t you want to engrave your name on the objects? Or create a very personal gift with your printer?
If you want to better protect your device, you can purchase a case for the Creality Ender 3*. This protects it from dirt and dust.
It has a viewing window in the front area so that you can still easily observe your printer. Your printer is well protected while you still have full control over your 3D printing.
According to the manufacturer, the housing is even fireproof and does not allow fire to penetrate to the outside. Let’s hope you never need this feature.
Of course, the mainboard can also be exchanged* or extended. Creality also sells new updates on a regular basis to enhance your 3D printer. The installation is very easy and can be used by everyone. You don’t need to know much about it.
So you can see that with a Creality Ender 3 you have all possibilities. There are many more small upgrades that you will surely get to know bit by bit through the platforms once you have bought an Ender 3. It is worthwhile to check these platforms, again and again, to not miss important and practical upgrades:
Perfect Use of Space
The Creality Ender 3 offers a nice print volume compared to other 3D printers for its small dimensions of 440 × 410 × 465 mm. The 3D printer fits perfectly on every desk.
Compared to other devices, it is lightweight and therefore easier to transport. So if you want to move it a bit, it is not a big deal. Of course, it is always a personal question if you like the look of the Creality Ender 3.
The obvious spool holder is not for everyone. However, the Ender 3 offers a lot of advantages, which may make you forget the optics.
Fortunately, you can also replace the spool holder if it bothers you. If the attached spool holder at ender 3 is too steep for you, you can replace it with an external spool holder. However, this will make your 3D printer bigger, as the external spool holder is attached to the side.
Compared to the Ender 3, it still has the advantage that it is somewhat more robustly built than its brother.
Disclosure: This website is the property of Martin Lütkemeyer and is operated by Martin Lütkemeyer. Martin Lütkemeyer is a member of the Amazon Services LLC and other Affiliate Programs. These are affiliate advertising programs designed to enable websites to earn advertising revenue through advertising and linking to Amazon.com and others. Links marked with * are affiliate links.
