
- Wet Filament: Prevention, Symptoms & Drying - July 18, 2024
- Sovol SV08 – Best PrusaSlicer Settings & Profile - June 26, 2024
- Sovol SV08 – Best Orca Slicer Settings & Profile - June 26, 2024
Disclosure: Links marked with * are Affiliate Links. I earn from qualifying purchases if you decide to make a purchase through these links – at no additional cost for you!
Cura Ironing improves 3D print surfaces by smoothing the top layer, reducing visible lines and gaps. This article guides you through activating the feature and fine-tuning its settings to get smoother top surfaces.
Table of Contents:
What is Cura Ironing?

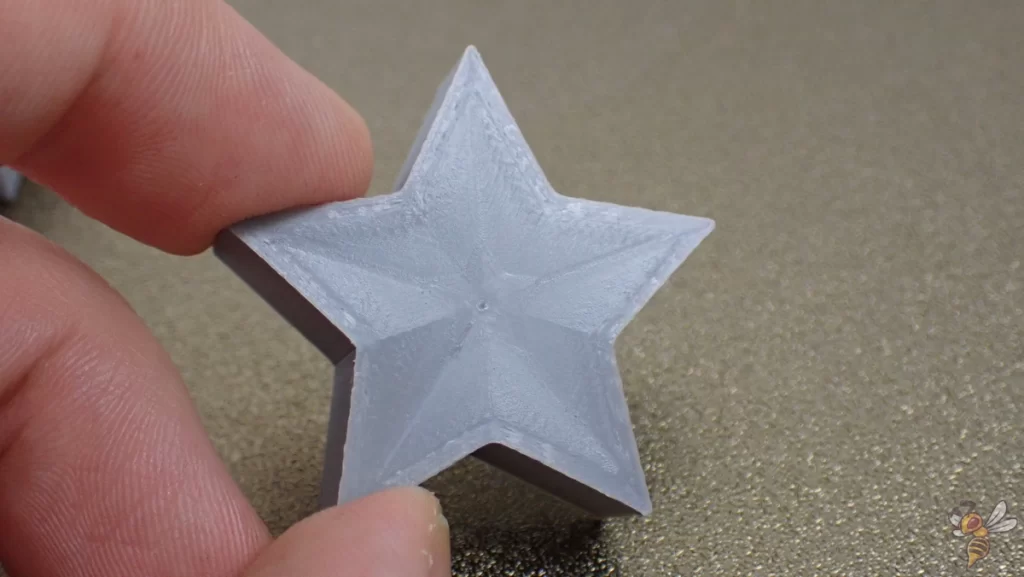
With ironing enabled in Cura the heated nozzle makes an extra pass over the top surface without printing another layer.
This process mimics ironing a piece of clothing, hence the name. The hot nozzle melts the surface again, moving slowly to heat it up sufficiently. The flat part of the nozzle then smooths it out.
Benefits of Ironing:
- Flat Top Surfaces: By reheating and pressing down the top layer, ironing effectively reduces visible layer lines, offering a much smoother finish.
- Filling Gaps: Ironing also fills in any small gaps on the top surface by pushing out a minimal amount of material into these areas, ensuring a more uniform appearance.
Drawbacks:
- Increased Print Time: The extra pass adds time to your overall printing process.
- Potential for Visible Lines: Interruptions in the ironing pattern can leave visible lines, especially if the printer has to move between different sections of the top layer. Switching the Ironing Pattern to something like Concentric might mitigate this.
- Topography on Detailed Surfaces: If you’re printing a model with a lot of details on the top surface or curved surfaces, ironing can accentuate the layer borders, creating a more pronounced topography effect. This can be avoided by selecting the “Iron Only Highest Layer” option.
(By the way: The opposite of ironing in Cura is Cura’s Fuzzy Skin feature.)
How to Enable Ironing in Cura
Activating ironing in Cura is straightforward. Follow these steps to get started:
- Go to the “Top/Bottom” settings in Cura.
- If you don’t see the ironing options, change your settings visibility to “All”. Then, enable the ironing feature.
- After enabling ironing, several new settings will appear. These include ironing pattern, ironing speed, and ironing flow, among others.
Next, we’ll break down these new settings to help you optimize ironing for the best results.
Cura Ironing Settings
If you activate ironing, new settings will appear. With these settings, you can optimize the effect for your specific 3D printing project.
Iron Only Highest Layer
With the “Iron Only Highest Layer” setting in Cura, the nozzle will smooth only the very top layer of your print.
- Focused Ironing: Activating this setting directs the ironing effort exclusively to the very top layer of your print. It’s the smart move when your model has multiple top surfaces but demands a smooth finish only on the topmost layer.
- Time-Saving: By ironing just the highest layer, the printing time drops considerably.
- Universal Application: Whether your project involves multiple objects or employs multi-extrusion printing, this setting ensures that the highest layer of every object receives that perfect ironed finish.
Ironing Pattern
The “Ironing Pattern” setting in Cura is crucial for how the nozzle moves over the flat surface during the ironing process. There are two primary patterns you can choose from: Zigzag and Concentric.
- Zigzag: The Zigzag pattern directs the nozzle in a back-and-forth motion over the surface. This approach is effective for most types of surfaces, providing a reliable finish. However, it tends to produce more visible borders between passes than might be desirable.
- Concentric: On the other hand, the Concentric pattern involves the nozzle drawing circles from the inside out. This method is especially suited for long and thin surfaces, as it minimizes borders. A potential downside is that, with very small concentric circles, the material can degrade due to the nozzle lingering too long in the same spot, resulting in a visible mark on the surface.
Selecting between Zigzag and Concentric depends on the specific needs of your print’s top surface. Zigzag offers a straightforward, generally effective approach, while Concentric provides a solution for reducing border visibility on certain shapes.
Monotonic Ironing Order
The “Monotonic Ironing Order” setting in Cura tweaks how ironing lines are printed, impacting your final print’s surface quality. Here’s a straightforward breakdown:
- Standard Ironing: By default, Cura arranges ironing lines to minimize travel distance. This efficiency, however, can lead to varying overlaps between lines, affecting how light reflects off the surface and, consequently, its appearance.
- Monotonic Order: This setting prints adjacent ironing lines in the same direction, ensuring consistent overlap. This uniformity gives the whole surface a consistent shine and a smoother look.
- Impact on Shine: While the monotonic order promises a smoother surface by making the overlap uniform, its effectiveness can be limited. The inherently low flow rate of ironing means starting a new line can still create noticeable borders, which this setting doesn’t eliminate.
- Travel Moves: Choosing a monotonic order slightly increases travel move length, but this increase is minimal and generally not a concern.
- Real-World Application: For those chasing the smoothest possible surface, the monotonic order offers a step in the right direction for printing visually appealing models. However, its benefits may be subtle unless paired with precise flow rate control. To further enhance smoothness, consider combining this setting with Z Hops.
Ironing Line Spacing
The “Ironing Line Spacing” setting in Cura plays a critical role in determining the quality of your print’s top surface and the overall printing time.
This setting adjusts the gap between each ironing pass. Unlike regular printing lines, ironing lines are typically much closer together. This closeness is key to ironing’s effectiveness, contributing significantly to achieving a smoother surface.
- Increase Spacing: Doing so will decrease the printing time. It’s a practical choice if you’re looking to save time and the top surface quality is not your primary concern.
- Decrease Spacing: This enhances the top surface’s smoothness by covering more area with the ironing process. If your goal is to achieve the highest quality finish, narrowing the line spacing is the way to go.
Ironing Flow
Ironing Flow directly influences the effectiveness of the Cura ironing feature, crucial for achieving that flawless top layer. This setting adjusts how much material is extruded during the ironing pass, playing a pivotal role in filling any gaps on the surface.
- Why It Matters: Ironing essentially overextrudes on purpose, laying down additional lines on the surface. The flow must be high enough to maintain pressure in the nozzle, crucial for filling in those tiny, yet visible, surface gaps.
- Adjusting for Surface Quality: If your print’s top layer is rough, perhaps due to quick printing speeds or pillowing effects, increasing the Ironing Flow setting can help. More material flow means better gap filling, leading to a smoother finish.
- In Practice: Finding the right balance is key. Too little flow, and you won’t fill the gaps properly, leaving a less-than-ideal surface. Too much, and you risk overdoing it, possibly causing unwanted bulges or affecting the detail of your print’s top layer.
- Pro Tip: Start with Cura’s default setting and adjust based on the specific needs of your print. If you notice your top layer still shows imperfections, a slight increase in ironing flow might be just what you need. Remember, every filament and print scenario is unique, so what works for one project may need tweaking for another.
Ironing Inset
Ironing Inset is a crucial setting in Cura for controlling how close the ironing process gets to the edges of your print. Here’s what you need to know:
- Purpose: It prevents the ironing pass from smoothing all the way to the outer edges. If it did, the pressure inside the nozzle chamber could push material over the edge, creating unwanted ripples.
- Preventing Overflow: It ensures material doesn’t spill over the edges, keeping finishes neat.
- Selective Ironing: Useful for excluding thin areas from ironing, like shallow slopes, where not every layer step needs smoothing. Adjusting this setting can help avoid ironing these thin strips, though it may also stop larger areas from being fully ironed to the edge.
Application Tips: Adjust the Ironing Inset based on your print’s design and the finish you’re aiming for. A smaller inset allows closer ironing to the edges, ideal for smooth, flat surfaces. Increase the inset for intricate designs or to prevent ironing on narrow sections.
Ironing Speed
Ironing Speed in Cura adjusts the nozzle’s movement speed during the ironing process.
- Slower for Better Fusion: The ironing speed is typically much slower than the speed for printing the rest of the layer. This slow movement is crucial for allowing the top surface lines to melt together, creating a seamlessly smooth finish.
- Impact on Printing Time: It’s important to note that a slower ironing speed, while beneficial for surface quality, will increase your total printing time. This is especially true when the line width for ironing is set to be very narrow.
Material Considerations: Since different materials react differently to heat and speed, having the ability to adjust the ironing speed is vital. For materials that need more heat to fuse properly, a slower speed ensures the nozzle has enough time to effectively smooth the surface.
Finding the Right Speed: Starting with Cura’s default setting and adjusting based on your material’s response can lead to optimal results. If you find the surface isn’t as smooth as you’d like, consider reducing the speed. However, be mindful of the increased print time.
Ironing Acceleration
As with the Ironing Speed, the Ironing Acceleration setting in Cura plays a crucial role in achieving a smooth top layer on your prints. This setting allows you to control how quickly the printer accelerates when ironing.
- Slower for Smoothness: Ironing Acceleration is typically set slower than the general print acceleration. This slower acceleration is vital for ensuring that the ironing process can thoroughly smooth out the top layer without introducing any sudden movements that could affect the finish.
- Fine-tuning the Process: Adjusting the acceleration can help fine-tune how the nozzle handles the top layer, especially when dealing with materials that respond differently to the ironing process. A slower acceleration ensures that the nozzle has ample time to apply heat and pressure evenly across the surface, filling in any gaps and smoothing out imperfections.
In practice, starting with the standard acceleration and adjusting based on your print’s needs and the material’s characteristics can lead to the best results. Remember, the goal is to enhance the surface quality without compromising the overall print time significantly.
Disclosure: This website is the property of Martin Lütkemeyer and is operated by Martin Lütkemeyer. Martin Lütkemeyer is a member of the Amazon Services LLC and other Affiliate Programs. These are affiliate advertising programs designed to enable websites to earn advertising revenue through advertising and linking to Amazon.com and others. Links marked with * are affiliate links.
