
- Wet Filament: Prevention, Symptoms & Drying - July 18, 2024
- Sovol SV08 – Best PrusaSlicer Settings & Profile - June 26, 2024
- Sovol SV08 – Best Orca Slicer Settings & Profile - June 26, 2024
Disclosure: Links marked with * are Affiliate Links. I earn from qualifying purchases if you decide to make a purchase through these links – at no additional cost for you!
Replacing the fans on the Anycubic Mega S is one of the most popular upgrades for this 3D printer. With the right fans, the printer becomes very quiet.
On the Anycubic Mega S, you can swap out 3 fans to reduce the noise level by up to 30 dB:
- Hot-end fan: NF-A4x10 FLX* (just replace it)
- Power supply fan: NF-A9x14 PWM* (+ self-printed part)
- Mainboard fan: NF-A9x14 PWM* (+ self-printed part)
How this is done in detail is shown in this step-by-step guide.
Table of Contents:
Why Replacing the Fans?
Before you change all the fans in your Anycubic Mega S, there is first the question of the motivation behind this.
In order to offer a 3D printer for its lowest price, sacrifices have to be made here and there in terms of quality. Quiet fans are unfortunately one of them in the Anycubic Mega S.
If quiet fans had been installed from the start, the device would have been more expensive. However, only a few people are interested in the printer’s noise level when they buy it. Only afterwards do many people want to make their printer quieter.
But fortunately, there are many talented hobbyists who have already found solutions for these problems!
Hot-End Fan
With the hot-end fan, you can really make big improvements. Replacing it is also easier than with the other fans. You just have to replace the existing one and not print any other parts.
The extremely quiet NF-A4x10 FLX* fan is perfect for this. When I installed and tested the fan, I had to first visually convince myself that it runs because you can no longer hear it at all!
Mounting
As I said, the assembly is quite simple. The only thing that might present you with a challenge is that you will have to adjust the connector. You’ll have to do some soldering for that.
Unfortunately, the adapter from 3 to 2 pins included with the NF-A4x10 FLX* does not fit the connector in the Mega S.
If you don’t own a soldering iron yet, it’s about time! In such technical hobbies as 3D printing, you will sooner or later have to solder. But don’t worry – soldering is not difficult and soldering irons* are not expensive.
Step 1: Unplug the power cord
Before you start doing anything, be sure to unplug the power cord. Even if you are sure what you are doing, this is a protective measure that will cost you less than a few seconds and can prevent a lot of damage to you and the device.
Electrical shocks are only funny in cartoons!
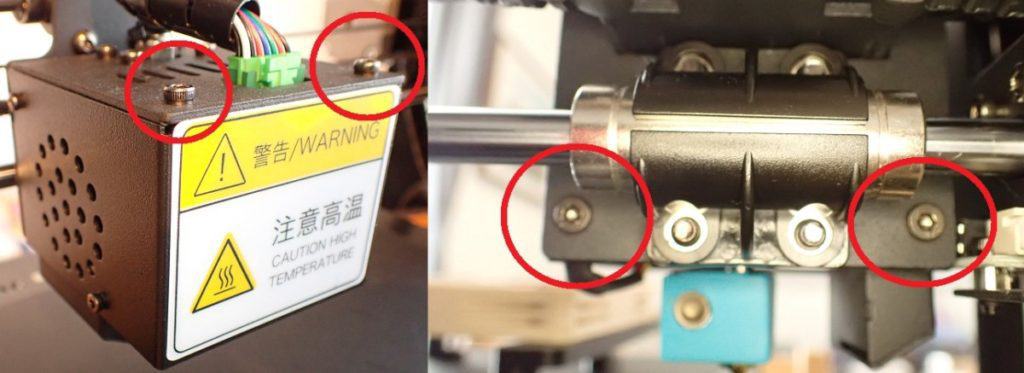
Step 2: Remove case from hot end
Now you can unscrew the housing from the hot end. There are plenty of screws on this case, but you only need the two screws at the top and the two screws at the bottom of the backside.
For this purpose, you can use the supplied hexagonal wrenches.
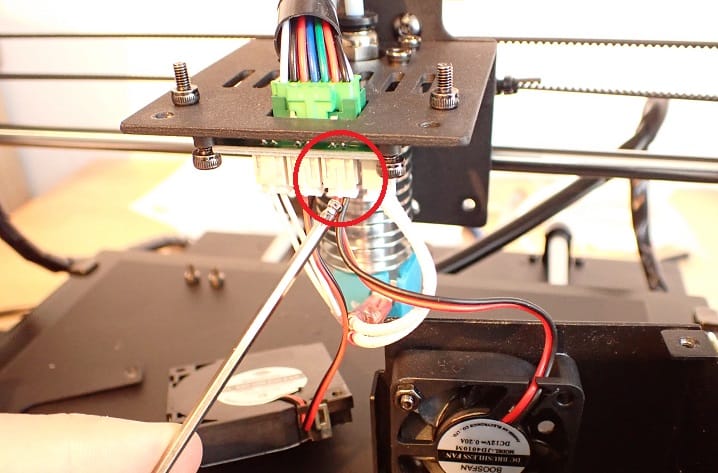
Step 3: Disconnect cable from fan
Before you unscrew the fan, you should unplug its cable. Simply unplugging it is sufficient here.
Note that there are two fans in the hot-end case, and we are only replacing one. On the left side is the component fan. We can’t easily replace this fan because it has a downward opening and doesn’t have the standard design of commercially available fans. However, that’s not a big deal since this fan doesn’t get loud during printing.
Step 4: Remove the fan
Now you can loosen the four screws from the fan and remove them. The washers that will probably fall down now are not needed for the new fan.
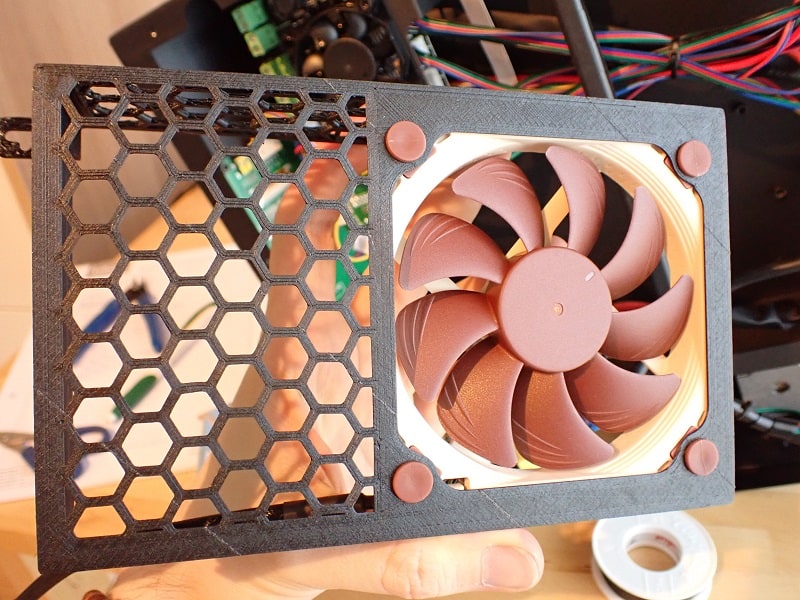
All new fans we install in this guide have a built-in rubber surface to minimize vibration.
Step 5: Adjust / solder cable
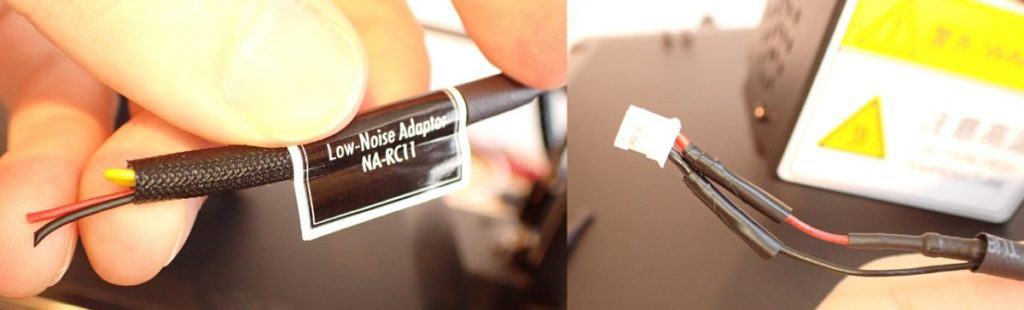
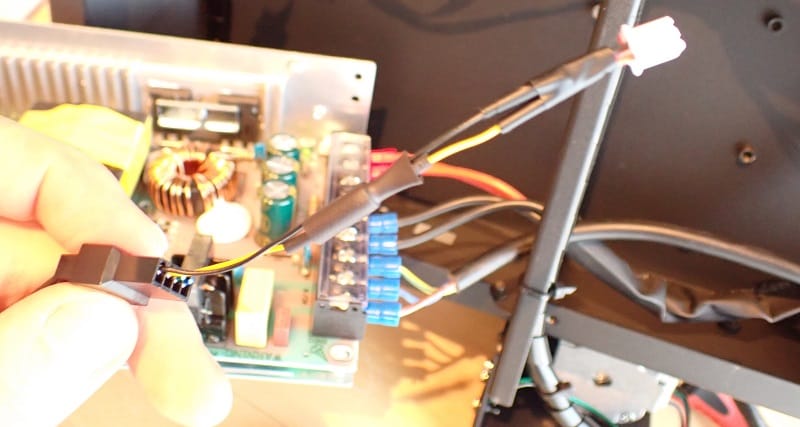
The new NF-A4x10 FLX* fan comes with a low-noise adapter. You will definitely want to use this, as it will make the fan a bit quieter.
And exactly this adapter you use to solder the old plug of the original fan to it.
To do this, you need to follow these steps:
- cut off the old plug with some distance
- cut the low noise adapter behind the resistor
- strip the resulting 4 cable ends
- solder black and red cable ends together
- Insulate solder joints (with electrical tape* or ideally with heat shrink tubing*)
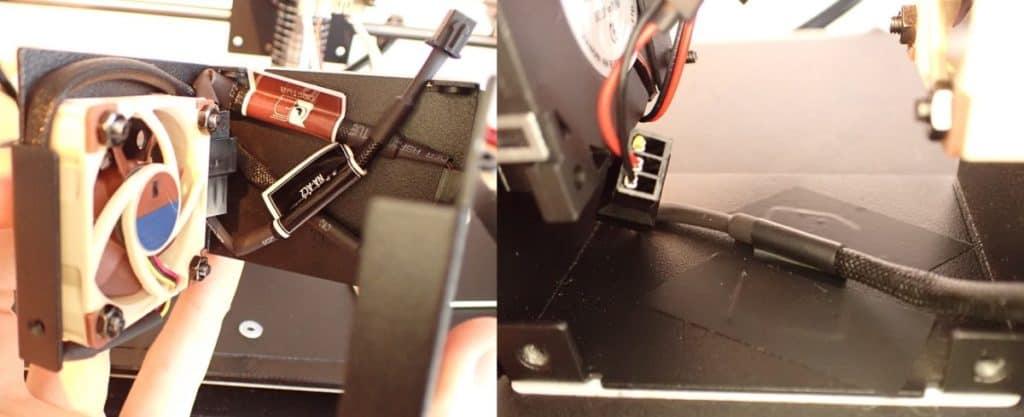
Step 6: Reassemble everything
Now that the plug from the new fan is fitted, you can put everything back together.
You will probably notice that the cable from the new fan is quite long. But that’s not a big deal, since you have plenty of room for it inside the case. The best thing to do is to run the cable around the fan once and then tape it to the front of the case. Then the cables are not in the way. If you want it perfect, you can also shorten it and solder it back together.
So to reassemble everything you now have to do the following steps:
- Mount the fan with the 4 original screws.
(Pay attention to the correct orientation – the air should be blown from the outside to the hot end. The fan has markings on the side in which direction the airflow flows). - Lay fan cable
- Plug in fan cable
- Screw on housing
Step 7: Test the fan
You have done it! Now you can test if it worked.
Plug the power cord back in, start the 3D printer and heat the nozzle up to 200 °C.
Normally, a noise similar to an airplane taking off should occur now… But with the new fan, you will not notice if it is working or not!
So to check if it is working at all, you need to see if the blades of the fan are spinning.
Power Supply Fan
Replacing the power supply fan is a bit more complicated. Here we need a self-printed part!
The NF-A9x14 PWM* is ideal as a fan. It is also barely or not at all audible and offers enough power to cool the PSU sufficiently.
Print power supply cover
Before you can mount or replace anything at all, you need to print the right cover for the PSU case.
Since you first have to see which variant you have to print, you will have to disassemble and reassemble the 3D printer at least twice before everything is done.
Step 1: Check power supply version
On Thingiverse there is a detailed guide on which cover fits for which power supply version.
To check this, you need to open your 3D printer to access the power supply:
- Pull out the mains plug!
- Lay the printer on its side. Make sure that it is not lying on the stepper motors.
- Unscrew the base plate. In addition to the 8 screws of the base plate, you must also unscrew at least two feet.
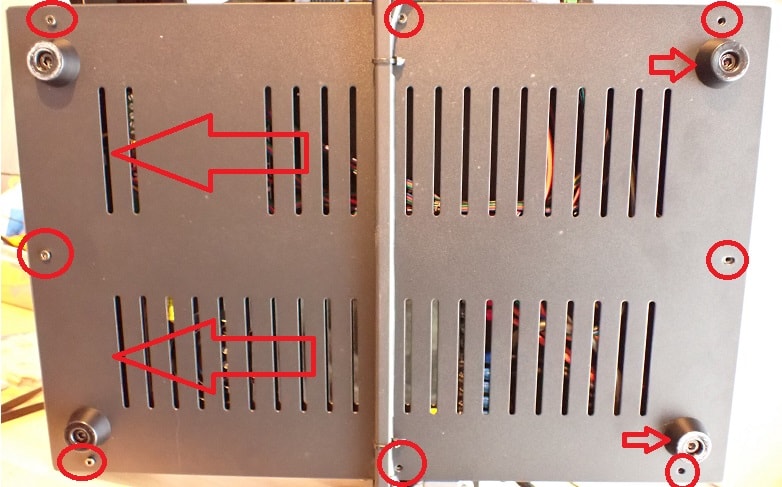
- Unscrew the power supply unit. To do this, you need to unscrew four screws on the top of the 3D printer. These are partially located under the print bed – depending on where it is currently located. However, there are several screws on the top of the printer. To know which screws are the right ones, you have to look at the position of the power supply on the bottom side.
- You don’t need to unscrew the many cables on the right side of the power supply. You can just pull the power supply out partially.
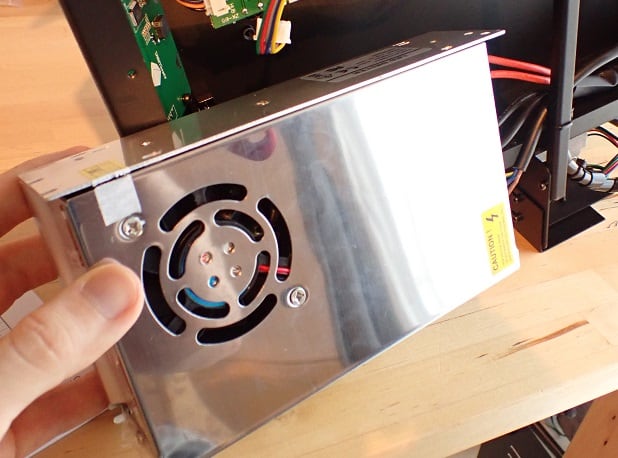
- Open the power supply housing (2 screws and slide mechanism).
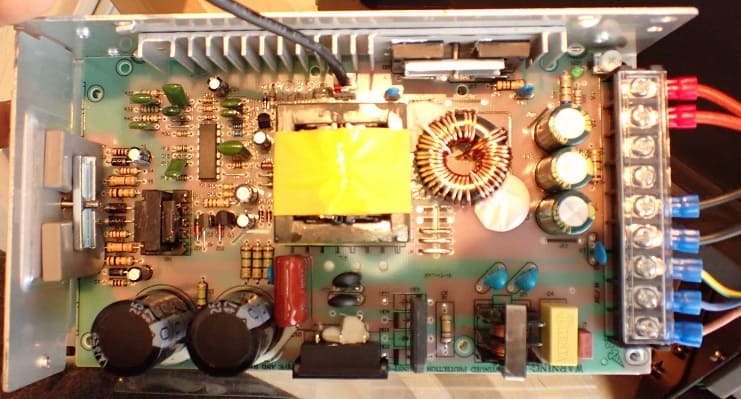
- Compare the power supply with the different versions in the Thingiverse Guide.
- Reassemble everything.
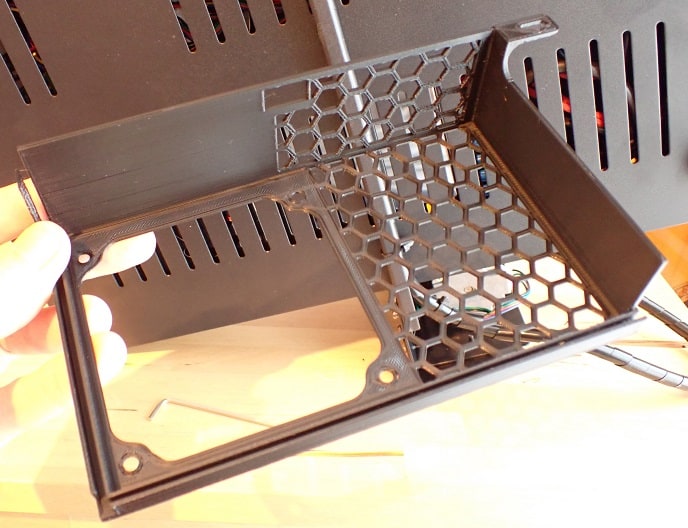
Step 2: Print matching housing
Once you know which version you need to print, download the appropriate file and print the part.
You can use normal PLA filament* for this.
Make sure that you do not change the size of the object. It can happen with some Mega S profiles in Cura that Cura says that the print bed is too small for it. But this is not the case. Then you can simply add a few millimeters to the print bed in the 3D printer settings and it fits!
Mounting
Now we have everything together and can begin the actual assembly.
Step 1: Open 3D printer and power supply
You already know how to open the 3D printer and the power supply (don’t forget to unplug the power!).
Step 2: Mount new fan on the printed cover
You can mount the new fan on the printed part with the included elastic mounting aids.
For me, the printed openings were extremely narrow and it would not work at the first go. But you can help a little with a screwdriver from one side and pull from the other side – the parts are very robust!
Again, pay attention to the direction of the airflow. If you want to combine it with the mainboard fan, you can either blow the air in or out. I have decided to blow in.
Step 3: Adapt / solder connector
Again, the supplied plug from the new fan, unfortunately, does not fit directly into the power supply. You can use the plug from the old fan again and solder it to the low-noise adapter. Again, it is important that you insulate everything from each other to avoid short circuits.
Step 4: Connect and test fan
Connect the new fan and test it. To do this, you need to plug the power plug back in and turn on the device. You can leave the 3D printer as it is for this. You can’t do much wrong and it should work.
Then pull out the mains plug again!
Step 5: Reassemble everything
Now you can reassemble everything or continue directly with the mainboard fan if you already have the parts for it.
Mainboard Fan
The mainboard fan also has great potential for reducing noise. And here, too, you have to print a part yourself.
As a fan we can also use the NF-A9x14 PWM*.
Before you disassemble the 3D printer, you need to print the fan mount. This is available on Thingiverse to fit the Mega S.
Mounting
Once you have printed the part, the assembly can begin.
Step 1: Unplug the power cord
As always, this step is self-evident but important!
Step 2: Open 3D printer
If the 3D printer is not still open from the power supply fan upgrade, you will need to unscrew the bottom panel.
To do this, you need to lay the 3D printer on its side (not on the stepper motors) and unscrew the screws on the bottom for the base plate and for at least two of the feet. Then you can slide off the base plate.
Step 3: Remove old fan
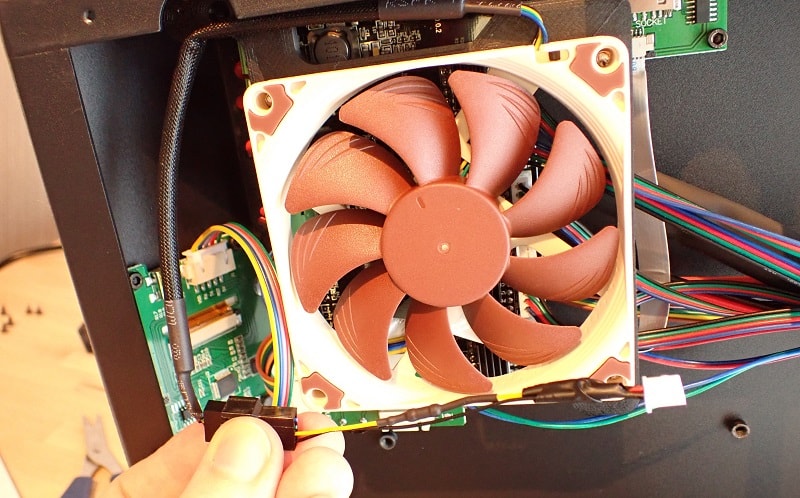
To remove the old fan you just have to unscrew it (the brackets as well) and pull the connector out of the mainboard.
Step 4: Adjust / solder cable
Unfortunately, the adapters supplied with the new fan do not fit the connections of the 3D printer. So you have to cut off the old connector again and solder it to the right end of the low-noise adapter.
Step 5: Mount and connect the new fan
The installation of the new fan is quite simple. You just have to attach it to the three corners of the new component with the included screws and then screw the whole thing onto the motherboard.
Plug the cable in exactly where the old fan was connected.
Step 6: Test the fan
To test the fan, you can plug the power cord back in and turn on the 3D printer. The fan should run. When it does, you can turn it off and reassemble everything.
Noise Level Before and After
The difference in loudness before and after installing the new fans is truly amazing!
To compare this, I measured the decibels before and after the 3 upgrades with the new fans.
| Standby mode | Nozzle at 200 °C | |
|---|---|---|
| Noise level before | 45 dB | 75 dB |
| Noise level after | 25 dB | 35 dB |
For comparison:
- 30 = whisper
- 40 = refrigerator, soft radio music
- 50 = silent conversation
- 60 = normal conversation
- 70 = loud conversation, car, lawnmower at 7 m distance
- 80 = loud radio music, heavy road traffic
As you can see, the noise level has improved dramatically. Before, I always had to close the door when the 3D printer was running and I could still hear it. Now it’s barely audible even with the door open.
Disclosure: This website is the property of Martin Lütkemeyer and is operated by Martin Lütkemeyer. Martin Lütkemeyer is a member of the Amazon Services LLC and other Affiliate Programs. These are affiliate advertising programs designed to enable websites to earn advertising revenue through advertising and linking to Amazon.com and others. Links marked with * are affiliate links.
